文章目录
ansible playbook使用
playbook与ansible命令行执行命令的区别就是将要执行的操作定义到配置文件中,直接执行配置文件即可
创建playbook配置文件:
[root@linux01 ~]# vim /etc/ansible/test.yml
配置文件内容:
---
- hosts: 192.168.234.130
  user: root
  tasks:
    - name: test_playbook
      shell: touch /tmp/test_playbook
说明: 第一行需要有三个杠,hosts参数指定了对哪些主机进行操作,如果是多台机器可以用逗号作为分隔,也可以使用主机组,在/etc/ansible/hosts里定义;user参数指定了使用什么用户登录远程主机操作;tasks指定了一个任务,其下面的name参数同样是对任务的描述,在执行过程中会打印出来,shell是ansible模块名字,该配置文件需要执行的操作就是在指定的192.168.234.130机器/tmp目录下创建test_playbook文件
执行playbook配置文件:
[root@linux01 ~]# ansible-playbook /etc/ansible/test.yml

PLAY [192.168.234.130] **************************************************************************************************************************************

TASK [Gathering Facts] **************************************************************************************************************************************
ok: [192.168.234.130]

TASK [test_playbook] ****************************************************************************************************************************************
 [WARNING]: Consider using file module with state=touch rather than running touch

changed: [192.168.234.130]

PLAY RECAP **************************************************************************************************************************************************
192.168.234.130            : ok=2    changed=1    unreachable=0    failed=0
在192.168.234.130机器上查看文件是否被创建:
[root@linux02 ~]# ll /tmp/test_playbook
-rw-r--r-- 1 root root 0 1月   2 16:39 /tmp/test_playbook
playbook变量的用法
创建playbook配置文件:
[root@linux01 ~]# vim /etc/ansible/create_test.yml
配置文件内容:
---
- name: create_test
  hosts: 192.168.234.130
  user: root
  gather_facts: false
  vars:
    - c: "pb_user"
  tasks:
    - name: create test
      user: name="{{ c }}"
说明:gather_facts: false表示不收集系统信息(ip地址、系统版本等等),当机器过多,不关闭gather_facts会比较影响性能,获取gather_facts收集的信息使用命令:ansible 192.168.234.130 -m setup;c是变量,变量值pb_user,tasks中user模块表示创建用户,用户名pb_user
执行配置文件:
[root@linux01 ~]# ansible-playbook /etc/ansible/create_test.yml

PLAY [create_test] ******************************************************************************************************************************************

TASK [create test] ******************************************************************************************************************************************
changed: [192.168.234.130]

PLAY RECAP **************************************************************************************************************************************************
192.168.234.130            : ok=1    changed=1    unreachable=0    failed=0
#如果指定的机器该用户已存在,changed的值会是0
在192.168.234.130机器查看新创建的用户:
[root@linux02 ~]# tail -1 /etc/passwd
pb_user:x:1003:1003::/home/pb_user:/bin/bash
playbook循环的用法
当前客户机有3个文件,权限644:
[root@linux02 ~]# ls -l /tmp/111.log /tmp/222.log /tmp/333.log
-rw-r--r-- 1 root root 0 1月   2 18:47 /tmp/111.log
-rw-r--r-- 1 root root 0 1月   2 18:47 /tmp/222.log
-rw-r--r-- 1 root root 0 1月   2 18:47 /tmp/333.log
#需要通过ansible playbook将3个文件权限变更为600
创建配置文件:
[root@linux01 ~]# vim /etc/ansible/while.yml
配置文件内容:
---
- hosts: 192.168.234.130
  user: root
  tasks:
    - name: change mode for files
      file: path=/tmp/{{ item }} mode=600
      with_items:
        - 111.log
        - 222.log
        - 333.log
#循环更改客户机3个文件的权限为600
执行配置文件:
[root@linux01 ~]# ansible-playbook /etc/ansible/while.yml

PLAY [192.168.234.130] **************************************************************************************************************************************

TASK [Gathering Facts] **************************************************************************************************************************************
ok: [192.168.234.130]

TASK [change mode for files] ********************************************************************************************************************************
changed: [192.168.234.130] => (item=111.log)
changed: [192.168.234.130] => (item=222.log)
changed: [192.168.234.130] => (item=333.log)

PLAY RECAP **************************************************************************************************************************************************
192.168.234.130            : ok=2    changed=1    unreachable=0    failed=0
在客户机查看权限变更结果:
[root@linux02 ~]# ls -l /tmp/111.log /tmp/222.log /tmp/333.log
-rw------- 1 root root 0 1月   2 18:47 /tmp/111.log
-rw------- 1 root root 0 1月   2 18:47 /tmp/222.log
-rw------- 1 root root 0 1月   2 18:47 /tmp/333.log
playbook条件判断的用法
playbook中条件判断使用when模块,创建配置文件:
[root@linux01 ~]# vim /etc/ansible/when.yml
配置文件内容:
---
- hosts: web
  user: root
  tasks:
    - name: use when
      shell: touch /tmp/when.txt
      when: ansible_ens33.ipv4.address == "192.168.234.130"
说明:针对web主机组中的所有机器,对ip为192.168.234.130的机器创建文件when.txt,gather_facts不能关闭,ansible_ens33.ipv4.address以及ip是从gather_facts中获取
执行配置文件:
[root@linux01 ~]# ansible-playbook /etc/ansible/when.yml

PLAY [web] **************************************************************************************************************************************************

TASK [Gathering Facts] **************************************************************************************************************************************
ok: [192.168.234.130]
ok: [127.0.0.1]

TASK [use when] *********************************************************************************************************************************************
skipping: [127.0.0.1]
 [WARNING]: Consider using file module with state=touch rather than running touch

changed: [192.168.234.130]

PLAY RECAP **************************************************************************************************************************************************
127.0.0.1                  : ok=1    changed=0    unreachable=0    failed=0
192.168.234.130            : ok=2    changed=1    unreachable=0    failed=0
在192.168.234.130客户机查看文件是否创建:
[root@linux02 ~]# ls -l /tmp/when.txt
-rw-r--r-- 1 root root 0 1月   2 19:49 /tmp/when.txt
playbook handlers用法
handlers的作用与shell中的&&用法相同,表示前一个命令执行成功,再执行后面的命令
创建配置文件:
[root@linux01 ~]# vim /etc/ansible/handlers.yml
配置文件内容:
---
- name: handlers_test
  hosts: 192.168.234.130
  user: root
  tasks:
    - name: copy file
      copy: src=/etc/passwd dest=/tmp/aaa.sh
      notify: test handlers
  handlers:
    - name: test handlers
      shell: echo "111111" >> /tmp/aaa.sh
#当tasks中的内容执行成功时,才执行notify指定的handlers,通过handlers中name定义的名称指定,可以定义多个handlers,notify也可以指定多个handlers
执行配置文件:
[root@linux01 ~]# ansible-playbook /etc/ansible/handlers.yml

PLAY [handlers_test] ****************************************************************************************************************************************

TASK [Gathering Facts] **************************************************************************************************************************************
ok: [192.168.234.130]

TASK [copy file] ********************************************************************************************************************************************
changed: [192.168.234.130]

RUNNING HANDLER [test handlers] *****************************************************************************************************************************
changed: [192.168.234.130]

PLAY RECAP **************************************************************************************************************************************************
192.168.234.130            : ok=3    changed=2    unreachable=0    failed=0
在客户机查看handlers中的内容是否被写入文件:
[root@linux02 ~]# tail -1 /tmp/aaa.sh
111111
playbook安装nginx
当nginx被编译安装增加了配置模块的时候,其他客户机yum安装的就会就差异,接下来即可使用ansible playbook批量安装服务端已编译安装好的nginx
nginx编译安装目录:/usr/local/nginx/
nginx配置文件目录:/usr/local/nginx/conf/nginx.conf
nginx启动脚本目录:/usr/local/nginx/sbin/nginx
创建配置文件目录:
[root@linux01 ~]# mkdir /etc/ansible/nginx_install
创建角色目录(子配置文件目录):
[root@linux01 ~]# cd /etc/ansible/nginx_install/
[root@linux01 nginx_install]# mkdir -p roles/{common,install}/{handlers,files,meta,tasks,templates,vars}
目录结构:
[root@linux01 nginx_install]# tree roles/
roles/
├── common
│   ├── files
│   ├── handlers
│   ├── meta
│   ├── tasks
│   ├── templates
│   └── vars
└── install
    ├── files
    ├── handlers
    ├── meta
    ├── tasks
    ├── templates
    └── vars
说明:roles目录下有两个角色,common为一些准备操作,install为安装nginx的操作;每个角色下面又有几个目录,handlers下面是当发生改变时要执行的操作,通常用在配置文件发生改变,重启服务;files为安装时用到的一些文件,meta为说明信息,说明角色依赖等信息,tasks里面是核心的配置文件,templates通常存一些配置文件以及启动脚本等模板文件,vars下为定义的变量
打包nginx安装目录到/roles/install/files:
[root@linux01 nginx_install]# cd /usr/local/
[root@linux01 local]# tar zcvf nginx.tar.gz nginx/
[root@linux01 local]# mv nginx.tar.gz /etc/ansible/nginx_install/roles/install/files/
在common的tasks下创建配置文件,用于安装nginx的依赖包:
[root@linux01 roles]# vim common/tasks/main.yml
配置文件内容:
- name: Install initializtion require software
  yum: name="zlib-devel,pcre-devel" state=installed
在install的vars下创建配置文件,用于定义变量:
[root@linux01 roles]# vim install/vars/main.yml
配置文件内容:
nginx_user: www
nginx_port: 80
nginx_basedir: /usr/local/nginx
在install的tasks下创建配置文件,用于拷贝nginx安装目录到目标机器:
[root@linux01 roles]# vim install/tasks/copy.yml
配置文件内容:
- name: Copy Nginx Software
  copy: src=nginx.tar.gz dest=/tmp/nginx.tar.gz owner=root group=root
- name: Uncompression Nginx Software
  shell: tar zxf /tmp/nginx.tar.gz -C /usr/local/
继续在install的tasks下创建配置文件,用于在客户机创建用户,启动nginx服务,删除压缩包:
[root@linux01 roles]# vim install/tasks/install.yml
配置文件内容:
- name: Create Nginx User
  user: name={{ nginx_user }} state=present createhome=no shell=/sbin/nologin
- name: Start Nginx Service
  shell: /usr/local/nginx/sbin/nginx
- name: Delete Nginx compression files
  shell: rm -rf /tmp/nginx.tar.gz
再次在install的tasks下创建配置文件,用于引用install.yml和copy.yml配置文件:
[root@linux01 roles]# vim install/tasks/main.yml
配置文件内容:
- include: copy.yml
- include: install.yml
到此两个roles:common和install就定义完成了,接下来要定义一个入口配置文件:
[root@linux01 nginx_install]# vim install.yml
配置文件内容:
---
- hosts: 192.168.234.130
  remote_user: root
  gather_facts: True
  roles:
    - common
    - install
#指定客户机为192.168.234.130,当需要在多台机器操作时,可以定义主机组
执行配置文件:
[root@linux01 nginx_install]# ansible-playbook install.yml
[DEPRECATION WARNING]: The use of 'include' for tasks has been deprecated. Use 'import_tasks' for static inclusions or 'include_tasks' for dynamic
inclusions. This feature will be removed in a future release. Deprecation warnings can be disabled by setting deprecation_warnings=False in ansible.cfg.
[DEPRECATION WARNING]: include is kept for backwards compatibility but usage is discouraged. The module documentation details page may explain more about
this rationale.. This feature will be removed in a future release. Deprecation warnings can be disabled by setting deprecation_warnings=False in
ansible.cfg.

PLAY [192.168.234.130] **************************************************************************************************************************************

TASK [Gathering Facts] **************************************************************************************************************************************
ok: [192.168.234.130]

TASK [common : Install initializtion require software] ******************************************************************************************************
ok: [192.168.234.130]

TASK [install : Copy Nginx Software] ************************************************************************************************************************
ok: [192.168.234.130]

TASK [install : Uncompression Nginx Software] ***************************************************************************************************************
 [WARNING]: Consider using unarchive module rather than running tar

changed: [192.168.234.130]

TASK [install : Create Nginx User] **************************************************************************************************************************
ok: [192.168.234.130]

TASK [install : Start Nginx Service] ************************************************************************************************************************
changed: [192.168.234.130]

TASK [install : Delete Nginx compression files] *************************************************************************************************************
 [WARNING]: Consider using file module with state=absent rather than running rm

changed: [192.168.234.130]

PLAY RECAP **************************************************************************************************************************************************
192.168.234.130            : ok=7    changed=3    unreachable=0    failed=0
在客户机查看nginx服务已启动:
[root@linux02 ~]# ps aux|grep nginx
root     43798  0.0  0.1  45856  1128 ?        Ss   22:09   0:00 nginx: master process /usr/local/nginx/sbin/nginx
nobody   43799  0.0  0.1  46312  1892 ?        S    22:09   0:00 nginx: worker process
root     43860  0.0  0.0 112728   972 pts/0    S+   22:10   0:00 grep --color=auto nginx
命令执行流程图:
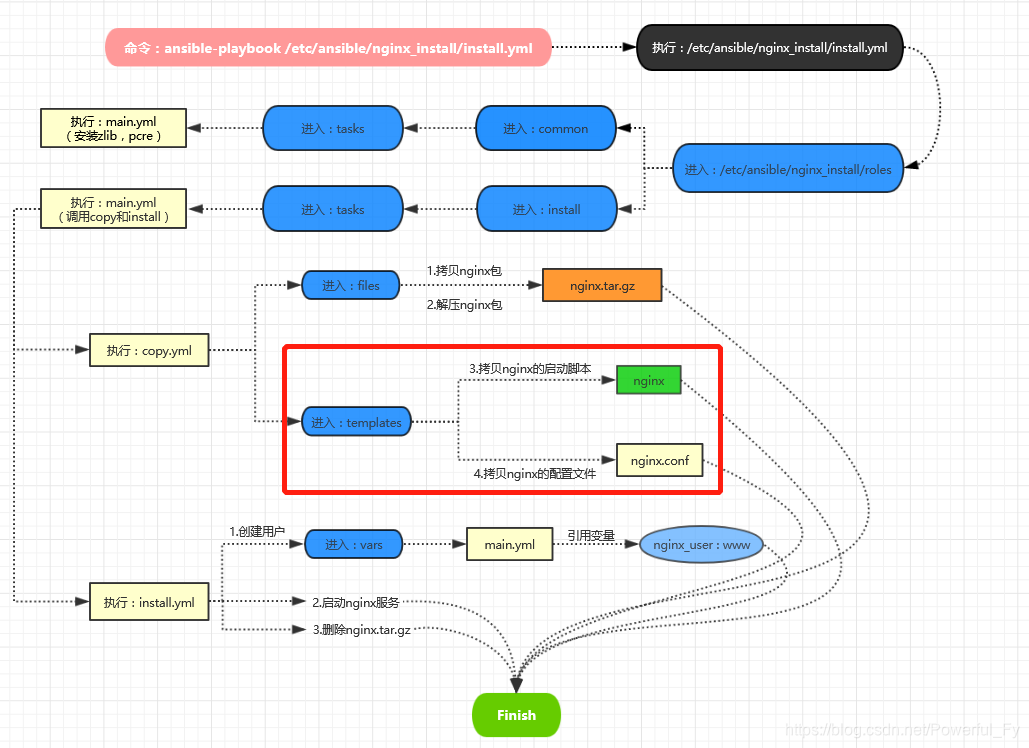
#红框部分已忽略,因为编译安装的nginx,nginx.conf配置文件和启动脚本都在nginx安装目录中,拷贝nginx安装目录时,已经包含了启动脚本与nginx.conf配置文件
playbook更新/回滚配置文件
更新
创建目录:
[root@linux01 ~]# mkdir -p /etc/ansible/nginx_config/roles/{new,old}/{files,handlers,vars,tasks}
说明:其中new为更新时用到的,old为回滚时用到的,files下面为更新文件存放目录,handlers为重启nginx服务的命令
将需要更新的配置文件或目录拷贝到roles/new/files下:
[root@linux01 ~]# cd /usr/local/nginx/conf/
[root@linux01 conf]# cp -r nginx.conf vhost/  /etc/ansible/nginx_config/roles/new/files/
在roles/new/vars下创建配置文件,用于定义变量:
[root@linux01 conf]# cd /etc/ansible/nginx_config/
[root@linux01 nginx_config]# vim roles/new/vars/main.yml
配置文件内容:
nginx_basedir: /usr/local/nginx
在roles/new/handlers下创建配置文件,用于更新配置文件后重装nginx:
[root@linux01 nginx_config]# vim roles/new/handlers/main.yml
配置文件内容:
- name: restart nginx
  shell: /usr/local/nginx/sbin/nginx -s reload
在roles/new/tasks下创建配置文件,用于更新配置文件:
[root@linux01 nginx_config]# vim roles/new/tasks/main.yml
配置文件内容:
- name: copy conf file
  copy: src={{ item.src }} dest={{ nginx_basedir }}/{{ item.dest }} backup=yes owner=root group=root mode=0644
  with_items:
    - { src: nginx.conf, dest: conf/nginx.conf }
    - { src: vhost, dest: conf/ }
  notify: restart nginx
定义入口配置文件:
[root@linux01 nginx_config]# vim update.yml
配置文件内容:
---
- hosts: 192.168.234.130
  user: root
  roles:
  - new
执行配置文件即可更新指定主机:
[root@linux01 nginx_config]# ansible-playbook update.yml

PLAY [192.168.234.130] **************************************************************************************************************************************

TASK [Gathering Facts] **************************************************************************************************************************************
ok: [192.168.234.130]

TASK [new : copy conf file] *********************************************************************************************************************************
changed: [192.168.234.130] => (item={u'dest': u'conf/nginx.conf', u'src': u'nginx.conf'})
changed: [192.168.234.130] => (item={u'dest': u'conf/', u'src': u'vhost'})

RUNNING HANDLER [new : restart nginx] ***********************************************************************************************************************
changed: [192.168.234.130]

PLAY RECAP **************************************************************************************************************************************************
192.168.234.130            : ok=3    changed=2    unreachable=0    failed=0
回滚
创建回滚配置文件:
[root@linux01 nginx_config]# vim backup.yml
配置文件内容:
---
- hosts: 192.168.234.130
  user: root
  roles:
  - old
同步new目录下的文件到old目录:
[root@linux01 nginx_config]# rsync -av roles/new/ roles/old/
在每次变更new/files目录下的文件时,先将当前使用的配置文件同步到old/files:rsync -av roles/new/files/ roles/old/files
当更新的配置文件有问题需要回滚时,执行回滚配置文件即可:ansible-playbook backup.yml
