目录
4.5.2、选择“Rescue a CentOS system”... 13
1、背景说明
目前不少客户都要求有虚机的备份需求,由于像vmware或者ZTE的tecs自带的虚机快照功能在使用上都有一些各自的限制,所以有些特殊情况无法进行虚机的备份恢复,所有有些客户会要求提供额外的虚机备份恢复方案。本文提供的方案不依赖于任何第三方的备份恢复工具,使用上也没有任何限制。在vmware6.5下面测试虚机的备份恢复是没有问题的。在zte的tecs上测试也进行过测试,对于备份恢复本身是没有问题的,但是zte的tecs平台在虚机的启动引导上有些问题,会导致虽然系统盘恢复是成功的,但是通过tecs平台的重启虚机是起不来。而在对tecs平台的虚机进行了手工挂载cdrom(目前tecs版本均不支持虚机挂载cdrom的功能)的情况下,通过手动选择从本地vda的系统盘引导启动,是可以正常进入虚机的。
2、搭建nfs服务器
2.1、nfs服务端安装包
root@chilitest-dbep-mw03[/root]# yum install -y nfs-utils
root@chilitest-dbep-mw03[/root]# yum install -y rpcbind
启动服务rpcbind和nfs-server服务
root@chilitest-dbep-mw03[/root]# systemctl start rpcbind
root@chilitest-dbep-mw03[/root]# systemctl enable rpcbind
root@chilitest-dbep-mw03[/root]# systemctl start nfs-server
root@chilitest-dbep-mw03[/root]# systemctl enable nfs-server
2.2、关闭防火墙
systemctl stop firewalld
systemctl disable firewalld
或配置防火墙放行nfs
root@chilitest-dbep-mw03[/root]# firewall-cmd --permanent --add-service=nfs
root@chilitest-dbep-mw03[/root]# firewall-cmd --reload
关闭selinux
vi /etc/selinux/config
SELINUX=disabled
重启机器。
2.3、创建共享目录
root@chilitest-dbep-mw03[/root]# mkdir -p /nfs/public
2.4、挂载数据盘
新加一个磁盘作为nfs的数据盘
2.4.1、磁盘分区
root@chilitest-dbep-mw03[/root]# fdisk /dev/sdc
2.4.2、创建pv
root@chilitest-dbep-mw03[/root]# pvcreate /dev/sdc1
2.4.3、创建vg
root@chilitest-dbep-mw03[/root]# vgcreate vgnfs /dev/sdc1
2.4.4、创建lv
root@chilitest-dbep-mw03[/root]# lvcreate -l +76799 -n lvnfs vgnfs
2.4.5、格式化lv
root@chilitest-dbep-mw03[/root]# lvscan
root@chilitest-dbep-mw03[/root]# mkfs.xfs /dev/vgnfs/lvnfs
2.4.6、挂载lv
root@chilitest-dbep-mw03[/root]# mount /dev/vgnfs/lvnfs /nfs/public
2.4.7、修改fstab启动文件
root@chilitest-dbep-mw03[/root]# vi /etc/fstab
新增
/dev/mapper/vgnfs-lvnfs /nfs/public xfs defaults 0 0
保存退出。
root@chilitest-dbep-mw03[/root]# mount -a
2.4.8、查看挂载
root@chilitest-dbep-mw03[/root]# df -Th
Filesystem Type Size Used Avail Use% Mounted on
…
/dev/mapper/vgnfs-lvnfs xfs 300G 33M 300G 1% /nfs/public
2.5、修改nfs目录权限
root@chilitest-dbep-mw03[/nfs/backup]# chown -R nfsnobody.nfsnobody /nfs/public
2.6、配置nfs权限
root@chilitest-dbep-mw03[/root]# vi /etc/exports
/nfs/public 10.xxx.xxx.0/22(rw,sync,no_all_squash)
2.7、重新加载nfs服务
root@chilitest-dbep-mw03[/root]# systemctl reload nfs
2.8、检查服务端nfs资源
root@chilitest-dbep-mw03[/root]# showmount -e 10.xxx.xxx.xxx
Export list for 10.xxx.xxx.xxx:
/nfs/public 10.xxx.xxx.0/22
至此nfs服务端完毕
2.9、客户端测试挂载
2.9.1、创建客户端挂载目录
我们这里客户端仍然使用服务端测试
root@chilitest-dbep-mw03[/root]# mkdir -p /nfs/backup/
2.9.2、挂载nfs客户端
root@chilitest-dbep-mw03[/root]# mount 10.xxx.xxx.xxx:/nfs/public /nfs/backup/
2.9.3、检查客户端挂载
root@chilitest-dbep-mw03[/root]# df -Th
Filesystem Type Size Used Avail Use% Mounted on
…
10.xxx.xxx.xxx:/nfs/public nfs4 300G 33M 300G 1% /nfs/backup
2.9.4、修改fstab开机挂载
root@chilitest-dbep-mw03[/root]# vi /etc/fstab
新增:
10.xxx.xxx.xxx:/nfs/public /nfs/backup nfs4 defaults 0 0
保存退出。
root@chilitest-dbep-mw03[/root]# mount -a
2.9.5、测试客户端创建文件
root@chilitest-dbep-mw03[/nfs/backup]# echo test>wufan.log
root@chilitest-dbep-mw03[/nfs/backup]# ls
wufan.log
root@chilitest-dbep-mw03[/nfs/backup]# cat wufan.log
test
测试正常。
3、虚机备份恢复测试
我们以10.xxx.xxx.45这台虚机为例,来进行备份恢复。
3.1、挂载nfs客户端
在10.xxx.xxx.45上创建nfs挂载点然后挂载,作为虚机备份文件的存储。
3.1.1、创建挂载点
[email protected][/root]# mkdir -p /backup
3.1.2、安装nfs-utils包
客户端需要安装nfs-util包
[email protected][/etc/yum.repos.d]# yum install -y nfs-utils
3.1.3、挂载nfs文件系统
[email protected][/etc/yum.repos.d]# mount -t nfs 10.xxx.xxx.xxx:/nfs/public /backup
3.1.4、查看挂载
[email protected][/etc/yum.repos.d]# df -Th
Filesystem Type Size Used Avail Use% Mounted on
…
10.xxx.xxx.xxx:/nfs/public nfs4 300G 33M 300G 1% /backup
3.2、执行虚机备份
这里我们备份的时候使用gzip进行了压缩,可以有效减小备份文件的大小,压缩率蛮高的,一般都能到10%左右,我这边60g的sda盘,备份压缩后大小7g多一点。注意,这里一定要备份整个sda,不能是只备份sda1和sda2等,因为sda包括了前面2048个扇区的MBR分区表信息,这部分信息不在sda1等任何子分区里面。
[email protected][/root]# dd if=/dev/sda | gzip > /backup/10.xxx.xxx.45_sda_image.gz
3.3、模拟虚机故障
破坏该虚机的sda盘信息,模拟虚机故障无法启动。这里直接把sda盘的前面1000个512字节块信息破坏掉,这样sda就无法起来了。
[email protected][/backup]# dd if=/dev/zero of=/dev/sda bs=512 count=1000
3.4、重启虚机
[email protected][/backup]# reboot
3.5、检查重启结果
重启后进入vsphere控制台查看虚机,发现无法起来了

3.6、尝试使用控制台重启虚机
我们在尝试使用vsphere的控制台重启虚机
3.6.1、关闭电源


选择是
3.6.2、启动虚机

3.6.3、控制台查看


他会一直在这个界面等待,无法启动。
4、虚机恢复
此时需要进入到rescue模式进行恢复,而进入rescue模式需要有虚机安装镜像,所以我们先上传虚机安装镜像到虚机所在的物理机存储。此处我们虚机是centos7.4操作系统,所以我们上传centos7.4对应的镜像。
4.1、上传镜像
上传一个安装该操作系统的iso镜像文件到虚机所在的盘


我这边创建了一个iso_files目录,然后把centos7.4的镜像传到了这个目录。
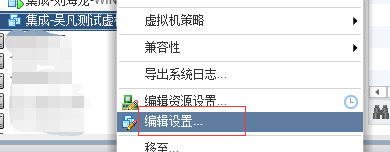
4.2、关闭虚机
使用vsphere控制台直接关闭虚机
过程截图上面有,此处略。
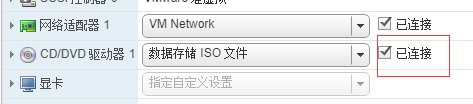
4.3、挂载镜像到虚机


cd/dvd驱动器选择“数据存储ISO文件”,在弹出的窗口中选择刚刚上传的虚机镜像iso文件。

然后选中“已连接”
4.4、开启虚机
使用控制台打开虚机电源
该步骤截图上面也有,此处略。
4.5、进入rescue模式
4.5.1、选择Troubleshooting

4.5.2、选择“Rescue a CentOS system”

4.5.3、按“Enter”键

4.5.4、选择“1) Continue”
输入数字1,然后回车

4.5.5、回车
输入回车,进入shell界面


我们就可以在这个shell界面输入命令进行虚机的恢复了。
4.6、恢复虚机
4.6.1、设置虚机网络
4.6.1.1、查看rescue模式下的网卡

4.6.1.2、设置网络ip并且添加出口网关

这里原虚机宕机前是什么ip和什么网关,这里就设置成什么,跟原来一样即可,主要是保证rescue模式下有个ip能跟内网通以便挂载nfs文件系统。
4.6.1.3、再次查看网卡

4.6.1.4、测试连通

发现通了。
4.6.2、挂载nfs
4.6.2.1、创建挂载点并挂载nfs文件系统

隐掉的ip是nfs服务器的ip。
4.6.2.2、查看挂载

4.6.3、检查备份文件

发现备份文件是正常的。
4.6.4、执行恢复
gzip -dc /backup/10.xxx.xxx.45_sda_image.gz | dd of=/dev/sda
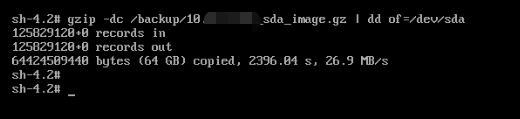
此时恢复已经成功,下面我们尝试重启虚机。
5、恢复后检查
5.1、关闭虚机


5.2、去除cdrom

5.3、打开虚机电源

5.4、进入控制台检查


5.5、虚机正常启动

