最近有人私信我说,我写的博客有些肤浅,没有深究,在此我统一回复一下,这些博客大多都是概念性东西,是用通俗的例子让你理解这个技术或者知识到底是怎么一样原理。
所以我在后面都加着适合新人,我们都是从新人走过来的,知道初学者的那种迷茫,只会代码,不懂原理和含义,就比如,注解,你不去学习理解,初学者根本就不知道那是个什么东西,为什么要使用注解。
如果是资深大牛,那就不要看了,还是那句话,适合新人。
————————————————
1,Spring是什么?
Spring其实就是一个容器;
Spring就是把每个bean(实体类)与bean的关系全部交给第三方容器进行管理,这个容器就是Spring,管理整个对象的生命周期;
2,Spring的好处;
-
轻量级框架
Spring是轻量级框架,基本的版本大约2M
-
控制反转
Spring通过控制反转实现松散耦合,对象们给它们的依赖,而不是创建或者查找依赖的对象们;方便解耦,简化开发
-
面相切面的编程 AOP
Spring支持面相切面的编程,并且把应用业务逻辑和系统分开
-
容器
Spring 包含并管理应用中对象的生命周期和配置
-
MVC框架
Spring的WEB框架是个精心设计的框架,是WEB框架的一个很好的替代品
-
事务管理
Spring 提供一个持续的事务管理接口,可以扩展到上至本地事务下至全局事务(JTA)
-
异常处理
Spring 提供方便的API把具体技术的相关异常(比如由JDBC Hibernate or JDO 抛出的) 转化为一致的 unchecked异常
在我看来,Spring还有一个更大的好处,就是可以集合很多种框架;
3,Spring的核心
- ioc 控制反转(也就是创建对象)
- di 依赖注入 (可以说di与ioc是成对出现的,一个负责创建,一个负责注入)
- aop 面向切面编程
4, Spring的简单应用
> 1. 创建一个maven项目,要知道在公司,没有说是单独创建java或者web项目的;
> 2. 引入依赖,也就是加入jar包;
> 3. 创建一个实体类;
> 4. 创建Spring的Xml文件,并且创建一个bean
> 5. 创建测试类,
>            并且在main方法里面,
>         5.1 先加载Spring.xml,
>         5.2 然后根据bean的id,查找对象,
>         5.3 这个时候,对象就被创建出来了;
这是一个简单得思路;下面就是代码;
- 创建一个maven项目
- 引入依赖,也就是加入jar包;
- 创建一个实体类;
前两个就不写了,太简单了,直接第三步
package entity;
public class UserEntity {
	private String name;
	private int age;
	//无参构造函数
	public UserEntity(){
		System.out.println("这是一个无参构造函数!");
	}
	public String getName() {
		return name;
	}
	public void setName(String name) {
		this.name = name;
	}
	public int getAge() {
		return age;
	}
	public void setAge(int age) {
		this.age = age;
	}
}
- 创建Spring的Xml文件,并且创建一个bean
<?xml version="1.0" encoding="UTF-8"?>

<beans xmlns="http://www.springframework.org/schema/beans"
		xmlns:xsi="http://www.w3.org/2001/XMLSchema-instance"
		xmlns:aop="http://www.springframework.org/schema/aop" xmlns:context="http://www.springframework.org/schema/context"
       xsi:schemaLocation="
        http://www.springframework.org/schema/beans
        http://www.springframework.org/schema/beans/spring-beans-3.1.xsd
        http://www.springframework.org/schema/aop
        http://www.springframework.org/schema/aop/spring-aop-3.1.xsd
        http://www.springframework.org/schema/context
        http://www.springframework.org/schema/context/spring-context-3.1.xsd">
        <!-- 创建了一个bean -->
        <bean id="userEntity" class="entity.UserEntity"></bean>
</beans>
- 创建测试类
import org.springframework.context.support.ClassPathXmlApplicationContext;

import entity.UserEntity;

/**
 *
* 项目名称:Spring
* 类描述:(Spring学习)
* 创建人:莫参商
* 创建时间:2020-1-19 下午2:43:44
* 修改人:acer
* @version
*
 */
public class SpringTest {
		public static void main(String[] args) {
			//1.先加载Spring容器
			ClassPathXmlApplicationContext Context = new ClassPathXmlApplicationContext("Spring002.xml");
			//根据bean的id,查找对象
			UserEntity bean = (UserEntity) Context.getBean("userEntity");
			//这个时候,就可以用了
			System.out.println(bean);
		}
}
结果:

5,Spring默认是单例
怎么证明是不是单例呢?
只要构造多次调用,但是构造函数之运行一次,就是单例,这是最好得证明;
那我们现在就证明一下,Spring默认是单例的;
更新上面的测试类代码:
import org.springframework.context.support.ClassPathXmlApplicationContext;

import entity.UserEntity;

/**
 *
* 项目名称:Spring
* 类描述:(Spring学习)
* 创建人:莫参商
* 创建时间:2020-1-19 下午2:43:44
* 修改人:acer
* @version
*
 */
public class SpringTest {
		public static void main(String[] args) {
			//1.先加载Spring容器
			ClassPathXmlApplicationContext Context = new ClassPathXmlApplicationContext("Spring002.xml");
			System.out.println("---------------------------------");
			//根据bean的id,查找对象;这里创建两个对象
			UserEntity bean1 = (UserEntity) Context.getBean("userEntity");
			UserEntity bean2 = (UserEntity) Context.getBean("userEntity");
			System.out.println(bean1);
			System.out.println(bean2);
			//这个时候,就可以用了,测试一下两个对象的内存路径是否相同
			System.out.println(bean1==bean2);
		}
}
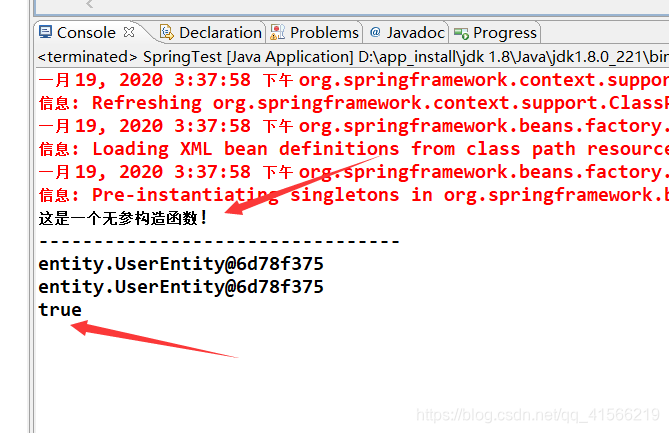
看结果就知道,这个实体类被new创建了两次,但是构造方法只调用了一次,并且两个对象的引用是相同的;可以说明,Spring默认是单例;
6,Spring怎么改成多例的呢?
单例有单例的好处,多例有多例的好处;
想要将单例改成多例其实很简单。
在Spring.xml文件加入一行代码;
<?xml version="1.0" encoding="UTF-8"?>

<beans xmlns="http://www.springframework.org/schema/beans"
		xmlns:xsi="http://www.w3.org/2001/XMLSchema-instance"
		xmlns:aop="http://www.springframework.org/schema/aop" xmlns:context="http://www.springframework.org/schema/context"
       xsi:schemaLocation="
        http://www.springframework.org/schema/beans
        http://www.springframework.org/schema/beans/spring-beans-3.1.xsd
        http://www.springframework.org/schema/aop
        http://www.springframework.org/schema/aop/spring-aop-3.1.xsd
        http://www.springframework.org/schema/context
        http://www.springframework.org/schema/context/spring-context-3.1.xsd">

        <bean id="userEntity" class="entity.UserEntity" scope="prototype"></bean>
</beans>
然后测试一下
import org.springframework.context.support.ClassPathXmlApplicationContext;

import entity.UserEntity;

/**
 *
* 项目名称:Spring
* 类描述:(Spring学习)
* 创建人:莫参商
* 创建时间:2020-1-19 下午2:43:44
* 修改人:acer
* @version
*
 */
public class SpringTest {
		public static void main(String[] args) {
			//1.先加载Spring容器
			ClassPathXmlApplicationContext Context = new ClassPathXmlApplicationContext("Spring002.xml");
			System.out.println("---------------------------------");
			//根据bean的id,查找对象
			UserEntity bean1 = (UserEntity) Context.getBean("userEntity");
			System.out.println(bean1);
			UserEntity bean2 = (UserEntity) Context.getBean("userEntity");
			System.out.println(bean2);
			//这个时候,就可以用了
			System.out.println(bean1==bean2);
		}
}
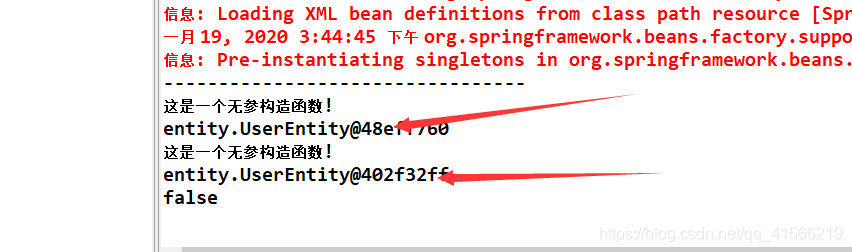
这个时候,就变成了多例。
7,Spring简单的生命周期介绍;
- singleton 单例;
- singleton prototype 多例;
- singleton request web项目种会遇到,不常用;
- singleton session web项目会用到,不常用;
