目录
一、集群安装Solr + Key-Value Store Indexer
3.创建 collection实例并将配置文件上传到 zookeeper
6.注册 Lily HBase Indexer Configuration 和 Lily HBase Indexer Service
7.重启 Key-Value Store Indexer 服务
一、集群安装Solr + Key-Value Store Indexer
先安装Solr ,再安装Key-Value Store Indexer ,安装节点和hbase,hdfs在相同节点。
二、创建Hbase二级索引
1.更改表结构,允许复制
已存在的表
disable 'tableName'
alter 'tableName',{NAME =>'fn', REPLICATION_SCOPE =>1}
enable 'tableName'
不存在的表
create ‘table‘,{NAME =>‘cf‘, REPLICATION_SCOPE =>1}
#其中1表示开启replication功能,0表示不开启,默认为0
2.创建相应的SolrCloud集合
这里得路径和用户名都可以自己定义
# 生成实体配置文件:
 solrctl instancedir --generate /opt/hbase-indexer/index1
进入 ~/hbase-indexer/user_index 目录下的conf目录,将managed-schema 文件复制为 schema.xml
cp managed-schema schema.xml在schema.xml文件中加入
<field name="HBase_Indexer_Test_cf1_name" type="string" indexed="true" stored="true"/>
属性解析:
name:这里的name是自定义,但是后面要使用到,要和后面的Morphline.conf文件中的outputField属性对应。
type:字段类型
indexed:是否建立索引
stored:是否存储
注意:这里name字段它对应了我们后续需要修改Morphline.conf文件中的outputField属性。因此可以看成是hbase中需要创建索引的值。因此我们建议将其与表名和列族结合,格式建议如下:
HBase_Indexer_ZDTable_fn_name
Hbase_indexer_表名_列簇_列名
再修改solrconfig.xml,找到下面的配置将false改为true,这个是硬提交,会影响性能
    <autoCommit>
       <maxTime>${solr.autoCommit.maxTime:60000}</maxTime>
       <openSearcher>true</openSearcher>
     </autoCommit>
创建
solrctl instancedir --create index1 /home/jast/opt/hbase-indexer/index13.创建 collection实例并将配置文件上传到 zookeeper
solrctl collection --create index1

如果希望将数据分散到各个节点进行存储和检索,则需要创建多个shard,需要使用如下命令


solrctl collection --create index1 -s 7 -r 3 -m 21

其中-s表示设置Shard数为7,-r表示设置的replica数为3,-m表示最大shards数目(7*3)
4.创建 Lily HBase Indexer 配置
创建文件 morphline-hbase-mapper.xml
[root@test119 index1]# cat morphline-hbase-mapper.xml
<?xml version="1.0"?>
<!-- table:需要索引的HBase表名称-->
<!-- mapper:用来实现和读取指定的Morphline配置文件类,固定为MorphlineResultToSolrMapper-->
<indexer table="hbase_tableName" mapper="com.ngdata.hbaseindexer.morphline.MorphlineResultToSolrMapper" read-row="never" >
<!--param中的name参数用来指定当前配置为morphlineFile文件 -->
<!--value用来指定morphlines.conf文件的路径,绝对或者相对路径用来指定本地路径,如果是使用Cloudera Manager来管理morphlines.conf就直接写入值morphlines.conf"-->
    <param name="morphlineFile" value="morphlines.conf"/>
<!--value="ZDTableMap",这里test3Map是自定义,接下来要使用。其他的mapper,param name等属性默认即可-->
    <param name="morphlineId" value="JastTableMap"/>
</indexer>
5.配置Morphline文件
进入CM管理界面中 Key-Value Store Indexer,修改 Morphline文件
SOLR_LOCATOR : {
  # Name of solr collection
  collection : hbaseindexer

  # ZooKeeper ensemble
  zkHost : "$ZK_HOST"
}


morphlines : [
{
id : JastTableMap
importCommands : ["org.kitesdk.**", "com.ngdata.**"]

commands : [
  {
    extractHBaseCells {
      mappings : [
        {
          inputColumn : "fn:name"
          outputField : "hbase_indexer_vt_fn_name"
          type : string
          source : value
        },{
          inputColumn : "fn:comments_count"
          outputField : "hbase_indexer_vt_fn_comments_count"
          type : string
          source : value
        },{
          inputColumn : "fn:text"
          outputField : "hbase_indexer_vt_fn_text"
          type : string
          source : value
        }
      ]
    }
  }


  { logDebug { format : "output record: {}", args : ["@{}"] } }
]
}
]
上面设置类型都是string(根据数据会自动转换),如果需要设置int类型可以参考:
注:
id:表示当前morphlines的名称,与上一步的value="JastTableMap"要一致

importCommands:需要引入的命令包地址

extractHBaseCells:该命令用来读取HBase列数据并写入到SolrInputDocument对象中,该命令必须包含零个或者多个mappings命令对象。

mappings:用来指定HBase列限定符的字段映射。

inputColumn:需要写入到solr中的HBase列字段。值包含列族和列限定符,并用‘ : ’分开。其中列限定符也可以使用通配符*来表示,譬如可以使用c1:*表示读取只要列族为data的所有hbase列数据,也可以通过c1:na*来表示读取列族为c1列限定符已na开头的字段值.

outputField:用来表示morphline读取的记录需要输出的数据字段名称,该名称必须和solr中的schema.xml文件的field节点自定义的name名称保持一致,否则写入不正确

type:用来定义读取HBase数据的数据类型,HBase中的数据都是以byte[]的形式保存,但是所有的内容在Solr中索引为text形式,所以需要一个方法来把byte[]类型转换为实际的数据类型。type参数的值就是用来做这件事情的。现在支持的数据类型有:byte,int,long,string,boolean,float,double,short和bigdecimal。当然你也可以指定自定的数据类型,只需要实现com.ngdata.hbaseindexer.parse.ByteArrayValueMapper接口即可

实现接口可参考: https://datamining.blog.csdn.net/article/details/103566964

source:用来指定HBase的KeyValue那一部分作为索引输入数据,可选的有‘value’和'qualifier',当为value的时候表示使用HBase的列值作为索引输入,当为qualifier的时候表示使用HBase的列限定符作为索引输入
6.注册 Lily HBase Indexer Configuration 和 Lily HBase Indexer Service
hbase-indexer add-indexer \
--name ZDindexer \
--indexer-conf /opt/hbase-indexer/index1/morphline-hbase-mapper.xml --connection-param solr.zk=test110:2181,test115:2181,test119:2181/solr \
--connection-param solr.collection=index1 \
--zookeeper test110:2181,test115:2181,test119:2181
注:这里的name可以随便起,solr.collection 要与上面的相同
7.重启 Key-Value Store Indexer 服务
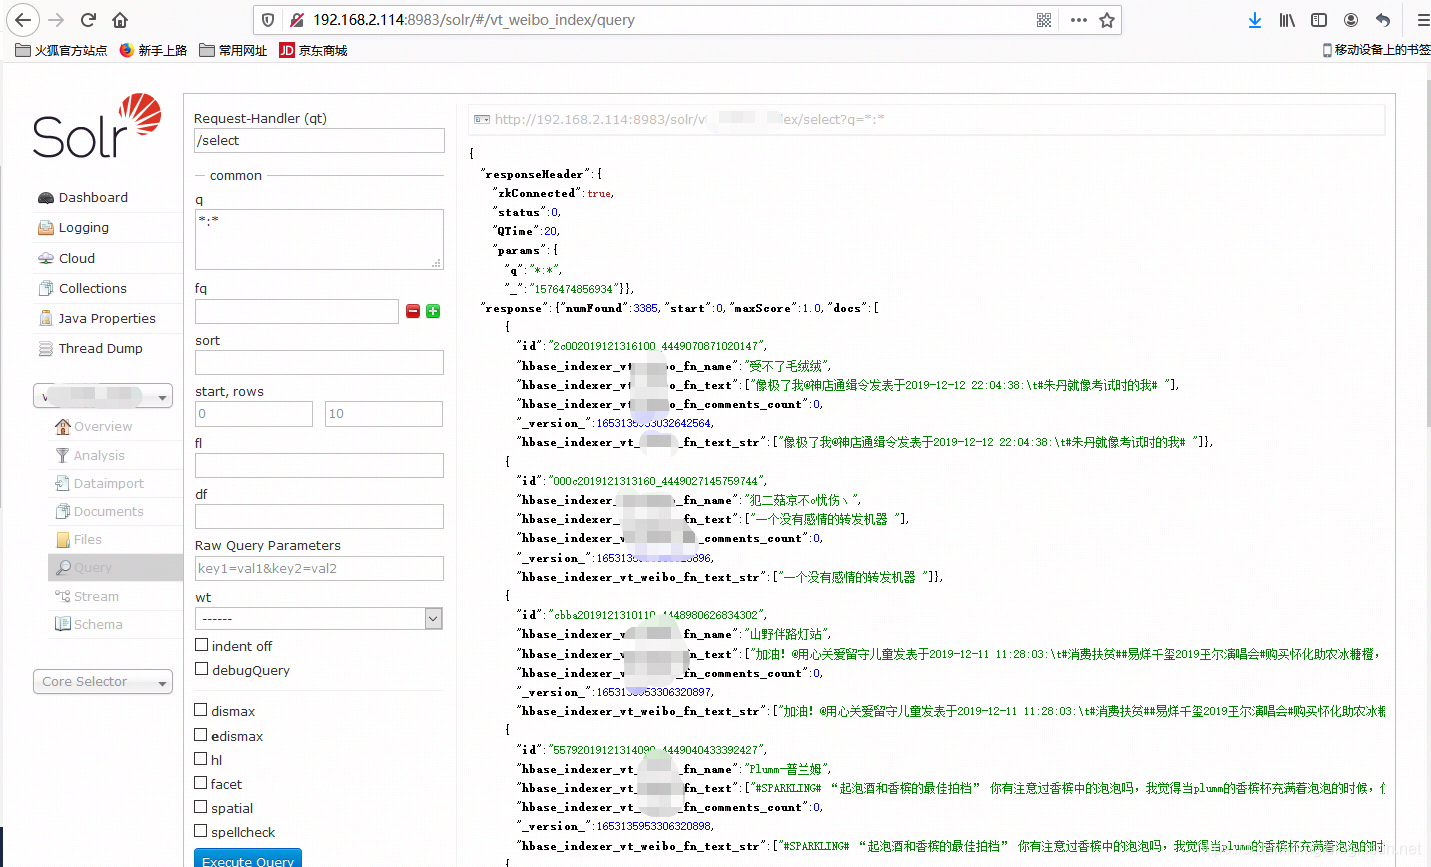
此时往hbase中插入数据,可以自动同步至 Solr 中,Solr Collection 为上面创建的 index1
solr查看页面:http://ip:8983
三、命令汇总
1.列出所有 Hbase indexer
hbase-indexer list-indexers --zookeeper hostname:21812.删除 Hbase indexer
hbase-indexer delete-indexer --name TESTindexer --zookeeper hostname1:2181,hostname2:2181,hostname3:21813.列出 Solr 所有 collection
solrctl collection --list4.清空 Solr collection 中所有数据
solrctl collection --deletedocs vt_index5.删除 Solr collection
solrctl collection --delete vt_index6.列出 Solr 所有 instancedir
solrctl instancedir --list 7.删除 Solr instancedir
solrctl instancedir --delete vt_index8.初始化生成 instancedir 配置文件
solrctl instancedir --generate /home/jast/opt/hbase-indexer/index19.创建 instancedir
solrctl instancedir --create index1 /home/jast/opt/hbase-indexer/index110. 创建 Solr collection
solrctl collection --create index1 -s 3 -r 1 -m 311. 创建 Hbase Indexer
hbase-indexer add-indexer \
--name TESTindexer \
--indexer-conf ~/opt/hbase-indexer/morphline-hbase-mapper.xml --connection-param solr.zk=hostname1:2181,hostname2:2181,hostname3:2181/solr \
--connection-param solr.collection=index1\
--zookeeper hostname1:2181,hostname2:2181,hostname3:2181
12.更新 Solr instancedir 配置
solrctl instancedir --update index1/home/jast/opt/hbase-indexer/index113.更新 Solr collection配置
solrctl collection --reload index114.更新 Hbase Indexer
hbase-indexer update-indexer -n index1常见问题
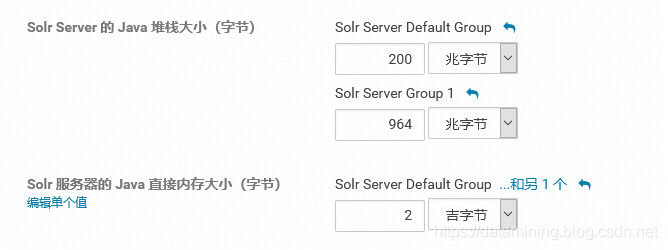
问题1:服务异常退出,查看日志发现没报错
从服务器查看日志没有异常,通过CDH查看日志发现内存不足,在搭建集群时候,Key-Value Store Indexer 与 Solr 都要给够相关内存,具体大小根据实际情况来测试
Key-Value Store Indexer 的配置参数:
Lily HBase Indexer 的 Java 堆栈大小(字节)

Solr 的配置参数