1、如何创建bean(ioc控制反转)
1)对象方式
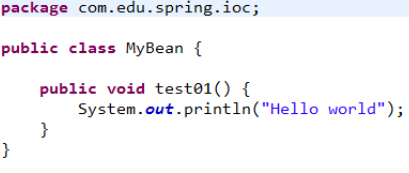
定义一个mybean(我的女朋友 )输出一段helloworld
 定义一个配置类,获取到mybean
 通过.class反射获取以及根据配置类的方法名来获取到bean
2)继承工厂方式


3)自定义工厂方式
 第一种为配置了一个bean工厂,返回一个工厂bean,第二种通过工厂方法创建bean

4)直接使用注解方式,context中需要加入class参数
 创建了一个User的容器
 以上为创建bean的4种方式
2、使用注解实现依赖注入(将值注入到属性中)

3、bean的生命周期
1、bean的初始化
 1、首先资源定位,扫描bean所在的包
2、找到所在bean后会进行bean的定义,然后将bean的定义保存到BeanDefinition的实例中
注:什么是BeanDefinition?
Spring容器启动的过程中,会将Bean解析成Spring内部的BeanDefinition结构
将Bean的定义信息存储到这个BeanDefinition相应的属性中,后面对Bean的操作就直接对BeanDefinition进行,例如拿到这个BeanDefinition后,可以根据里面的类名、构造函数、构造函数参数,使用反射进行对象创建。
3、发布bean得定义,使用ioc容器装载bean,当我们想使用时容器会自动向我们提供我们所需要的bean
4、创建bean的实例对象
5、最终实现bean的依赖注入
简单来说就是定义bean-实例bean-使用bean
2、bean的生命周期
 1、Bean实现了BeanNameAware接口,工厂调用Bean的setBeanName()方法传递Bean的ID
2、Bean实现了BeanFactoryAware接口,工厂调用setBeanFactory()方法传入工厂自身
3、ApplicationContextAware接口让Bean拥有了访问容器的能力,
4、将Bean实例传递给Bean的前置处理器的postProcessBeforeInitialization(Object bean, String beanname)方法
5、调用Bean的初始化方法
6、用spring的 InitializingBean 的 afterPropertiesSet 来初始化
7、将Bean实例传递给Bean的后置处理器的postProcessAfterInitialization(Object bean, String beanname)方法
8、正在使用Bean
9、容器关闭之前,调用Bean的销毁方法
实现一个简单实例
学生类
package com.student;

import org.springframework.beans.factory.BeanNameAware;

/**
 * @Description:一个学生类(Bean),能体现其生命周期的Bean
 */
public class Student implements BeanNameAware {
	private String name;

	//无参构造方法
	public Student() {
		super();
	}

	/** 设置对象属性
	 * @param name the name to set
	 */
	public void setName(String name) {
		System.out.println("设置对象属性setName()..");
		this.name = name;
	}

	//Bean的初始化方法
	public void initStudent() {
		System.out.println("Student这个Bean:初始化");
	}

	//Bean的销毁方法
	public void destroyStudent() {
		System.out.println("Student这个Bean:销毁");
	}

	//Bean的使用
	public void play() {
		System.out.println("Student这个Bean:使用");
	}

	/* 重写toString
	 * @see java.lang.Object#toString()
	 */
	@Override
	public String toString() {
		return "Student [name = " + name + "]";
	}

	//调用BeanNameAware的setBeanName()
	//传递Bean的ID。
	@Override
	public void setBeanName(String name) {
		System.out.println("调用BeanNameAware的setBeanName()..." );
	}

}
测试类
package com.linjie.cycle;

import org.junit.Test;
import org.springframework.context.ApplicationContext;
import org.springframework.context.support.AbstractApplicationContext;
import org.springframework.context.support.ClassPathXmlApplicationContext;

/**
 * 测试类
 *
 */
public class CycleTest {
    @Test
 	public void test() {
		ApplicationContext context = new ClassPathXmlApplicationContext("applicationContext.xml");
		Student student = (Student) context.getBean("student");
		//Bean的使用
		student.play();
		System.out.println(student);
		//关闭容器
		((AbstractApplicationContext) context).close();
	}
}
applicationContext.xml
<?xml version="1.0" encoding="UTF-8"?>
<beans xmlns="http://www.springframework.org/schema/beans"
    xmlns:xsi="http://www.w3.org/2001/XMLSchema-instance"
    xsi:schemaLocation="
        http://www.springframework.org/schema/beans http://www.springframework.org/schema/beans/spring-beans.xsd">

   <!-- init-method:指定初始化的方法
        destroy-method:指定销毁的方法 -->
		<bean id="student" class="com.linjie.cycle.Student" init-method="initStudent" destroy-method="destroyStudent">
		<property name="name" value="LINJIE"></property>
		</bean>
</beans>
执行结果

在此十分感谢大佬
4、bean的作用域
 基本上就是这些,若有错误我会及时纠正,见谅
