前言
本篇包含:异常处理及程序调试、文件及目录操作、操作数据库
八、异常处理及程序调试
1、异常处理语句
1.try…except语句
try:
    语句块1
except [ExceptionName [as alias]]:
    语句块2
#ExceptionName指定要捕获的异常;不指定,处理所有异常
#出现异常,执行语块2
#处理多个异常:except (异常1,异常2) as alias:
def chufa(): #除法
    a = int(input("请输入被除数:"))
    b = int(input("请输入除数:"))
    print(a,"除以",b,"的结果为:",a/b)
if __name__ == '__main__':
    try:
        chufa()
    except ZeroDivisionError:
        print("\n被除数不能为0!!!")

2.try…except…else语句
try:
    语句块1
except [ExceptionName [as alias]]:
    语句块2
else:
    语句块3
#没有出现异常,执行语块3;出现异常不执行语块3
3.try…except…finally语句
try:
    语句块1
except [ExceptionName [as alias]]:
    语句块2
finally:
    语句块3
#无论是否出现异常,都执行语块3

4.使用raise语句抛出异常
某个方法或函数可能会产生异常,不想在当前的方法或函数处理异常,可以使用raise语句在方法或函数中抛出异常。
raise [ExceptionName[(reason)]]
#reason异常信息描述
#省略[ExceptionName[(reason)]]会把异常原样抛出
#省略[(reason)],异常不带描述信息
def chufa(): #除法
    a = int(input("请输入被除数:"))
    b = int(input("请输入除数:"))
    if a < b:
        raise ValueError("这里被除数要大于除数!")
    print(a,"除以",b,"的结果为:",a/b)
if __name__ == '__main__':
    chufa()

2、程序调试
1.使用自带的IDLE进行程序调试
IDLE->Debug->Debugger
添加断点:在要添加断点的行->右键->Set Breakpoint
使用 python IDLE 自带的 debuger 进行调试
2.使用assert语句调试程序
assert expression [,reason]
#expression 表达式为真时,什么都不做,表达式为假时,抛出AssertionError异常;
#reason可选参数,用于对判断条件进行描述,为了以后更好的知道哪里出现了问题。
assert语句只在调试阶段有效.所以我们平时测试用的debug版本才会有断言挂起,release版本没有断言
apple=int(input("请输入苹果数量:"))
children=int(input("请输入小朋友的数量:"))
assert apple>children,"苹果不够分"
#结果
请输入苹果数量:10
请输入小朋友的数量:20

Traceback (most recent call last):
  File "C:\Python27\main.py", line 9, in <module>
    assert apple>children,"苹果不够分"
AssertionError: 苹果不够分
注:
(1)断言只能作为辅助调试手段使用,在表达式为False时抛出异常终止程序执行,不能在程序中代替条件判断语句,因为程序以优化方式运行时不会执行断言语句。
(2)添加-O参数程序运行在优化模式,不会输出断言:python -O 文件名.py
九、文件及目录操作
1、基本文件操作
打开文件->写入内容->关闭文件
打开文件->读取内容->(关闭文件,也可以不关闭)
1.创建和打开文件
file = open(filename[,mode[,buffering]])
#mode文件打开模式:r只读、w只写、a追加
#buffering指定读写的缓存模式:0不缓存、1缓存、大于1缓冲区大小

file = open('qwzf.txt','w') #创建文件
file = open('qwzf.txt','r') #打开gbk文件
file = open('qwzf.txt','r',encoding = "utf-8") #打开utf-8文件
file = open('qwzf.jpg','rb')#以二进制形式打开文件
2.关闭文件
file.close()
判断文件是否关闭:print(file.closed)
3.打开文件时使用with语句
使用with语句打开文件,可以自动关闭文件
with expression as target:
    with-body
#expression可以指定要打开文件的open函数
#as target指定变量,target保存表达式的结果
#with-body语句体
with open('qwzf.txt','r',encoding = "utf-8") as file: #打开文件
    pass
4.写入文件内容
file.write(string)
file = open('qwzf.txt','w',encoding = "utf-8") #打开文件
file.write("我学Python") #写入内容
file.close() #关闭文件
如果不想关闭并把内容写入文件,可以使用file.flush() 把缓冲区内容写入文件
将列表内容写入文件
list1 = ["qwzf","lemon","chumen007"]
with open("qwzf.txt","w") as file:
    file.writelines([line + "\n" for line in list1])

5.读取文件
文件打开模式只能是r(只读)或r+(读写)
(1)读取指定字符:file.read([size])
file.seek()将文件指针移到要截取的位置
with open("qwzf.txt","r") as file: #打开文件
    print("文件内容:",file.read())
    file.seek(10) #定位到第10个字节
    string = file.read(2) #读取两个字符
    print(string)

(2)读取一行:file.readline()
with open("qwzf.txt","r") as file: #打开文件
    num = 0 #记录行号
    while True:
        num += 1
        line = file.readline() #读取一行
        if line == "":
            break
        print(num,line,end="\n") #输出一行

(3)读取全部行:file.readlines(),返回字符串列表
2、目录操作
1.os和os.path模块
os模块是Python内置的与操作系统功能和文件系统相关的模块。该模块的语句的执行结果通常与操作系统有关。
os.path模块是os模块的子模块
python之OS模块详解
python之os模块
Python必学的OS模块详解
2.路径
os.getcwd()获取文件当前工作目录
os.path.abspath(path)获取文件绝对路径
os.path.join(path1[,path2[,...]])拼接路径
path:路径
import os
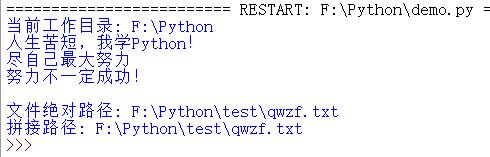
print("当前工作目录:",os.getcwd())
with open("test/qwzf.txt","r") as file: #通过相对路径打开文件
print(file.read())
print("文件绝对路径:",os.path.abspath("test/qwzf.txt"))
print("拼接路径:",os.path.join(r"F:\Python",r"test\qwzf.txt"))
#拼接路径不会检查目录是否存在
3.判断目录是否存在
os.path.exists(path)判断目录(文件)是否存在,不区分大小写
4.创建目录
os.mkdir(path,mode=0o777) mode指定数值模式,可省略
import os
if not os.path.exists(r"D:\demo"):
    os.mkdir(r"D:\demo")
else:
    print("该目录已存在")
创建多级目录
(1)递归调用os.mkdir()
import os
def mkdir(path): #创建一个递归函数用于创建目录
    if not os.path.isdir(path): #判断是否为路径
        mkdir(os.path.split(path)[0])
    else:
        return
    os.mkdir(path) #创建目录
mkdir(r"D:\demo\qwzf1\qwzf2")
(2)os.makedirs(name,mode=0o777)创建多级目录
import os
os.makedirs(r"D:\demo\qwzf\qwzf2020") #创建多级目录
5.删除目录
删除空目录:os.rmdir(path)
删除非空目录:shutil.rmtree(path)
import shutil
shutil.rmtree(r"D:\demo") #删除非空目录
6.遍历目录
os.walk(top[,topdown][,onerror][,followlinks])
#top 指定要遍历内容的根目录
#topdown 可选,为 True,则优先遍历top目录,否则优先遍历 top 的子目录(默认为开启)。
#onerror 可选,指定错误处理方式
#followlinks 可选,如果为 True,访问软链接指向的目录,默认开启
'''
返回值:元组生成器对象
(dirpath,dirnames,filenames)
dirpath 字符串 当前正在遍历的路径
dirnames 列表 当前路径下包含的子目录
filenames 列表 当前路径下包含的文件
'''
import os
path = r"F:\Python\test"
print("未整理前的遍历结果:")
for p in os.walk(path):
    print(p,"\n")
print("整理后的遍历结果:")
print("【",path,"】目录下包含的文件和目录:")
for root,dirs,files in os.walk(path): #遍历指定目录
    for dirname in dirs:
        print(os.path.join(root,dirname)) #输出遍历到的目录
    for filename in files:
        print("\t",os.path.join(root,filename)) #输出遍历到的目录

3、高级文件操作
1.删除文件os.remove(path)
2.重命名文件和目录
os.rename(src,dst)
#src要进行重命名的目录或文件路径
#dst重命名之后的目录或文件路径
3.获取文件基本信息os.stat(path)
os.stat() 方法
python获取文件信息
import os
def formatTime(longtime):
'''格式化时间的函数'''
import time
return time.strftime("%Y-%m-%d %H:%M:%S",time.localtime(longtime))
def formatByte(number):
'''格式化文件大小的函数'''
for(scale,label) in [(1024*1024*1024,"GB"),(1024*1024,"MB"),(1024,"KB")]:
if number>=scale:
return "%.2f %s" %(number*1.0/scale,lable)
elif number ==1:
return "1字节"
else: #小于1字节
byte = "%.2f" % (number or 0)
return (byte[:-3] if byte.endswith(".00") else byte) + "字节"
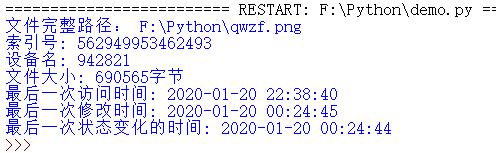
fileinfo = os.stat("qwzf.png") #获取文件的基本信息
print("文件完整路径:",os.path.abspath("qwzf.png")) #获取文件的完整路径
#输出文件的基本信息
print("索引号:",fileinfo.st_ino)
print("设备名:",fileinfo.st_dev)
print("文件大小:",formatByte(fileinfo.st_size))
print("最后一次访问时间:",formatTime(fileinfo.st_atime))
print("最后一次修改时间:",formatTime(fileinfo.st_mtime))
print("最后一次状态变化的时间:",formatTime(fileinfo.st_ctime))
十、操作数据库
1、数据库编程接口
Python操作数据库的规范:DB_API
参考:数据库__DB-API、Python DB-API
1.连接对象
connect()函数->Connection对象
Connection()的常用参数列表:
dsn:数据源名称.给出该参数表示数据库依赖
user: 数据库登陆名.默认是当前用户
password: 数据库登陆的秘密.默认为空
host: 数据库主机名.默认是用本地主机
database(db): 要使用的数据库名.没有默认值
port: MySQL服务使用的TCP端口.默认是3306
charset: 数据库编码. utf-8
Connection对象常用方法:
cursor() :使用该连接创建并返回游标(获取游标对象,操作数据库。)
commit():提交当前事务
rollback():回滚当前事务
close():关闭数据库连接
2.游标对象
Connection对象->cursor()->Cursor对象
Cursor对象常用方法:
callproc(procname,[,parameters]):调用存储过程,需要数据库支持
close():关闭当前游标对象
excute(sql[, args]):执行一个数据库查询或命令
excutemany(sql, args):执行多个数据库查询或命令
fetchone():获取查询结果集的下一条记录
fetchmany([size = cursor.arraysize]):获取指定数量的记录
fetchall():获取结果集的所有记录
nextset():跳至下一个可用结果集

#获取Connection对象
conn = pymysql.connect(host='localhost',
                       user='user',
                       password='passwd',
                       db='test',
                       charset='utf-8'
                       cursorclass=pymysql.cursors.DictCursor)
#生成Cursor对象
cur = conn.cursor()
#执行SQL语句
cur.excute("insert into users(id,name) values(1,'qwzf')")
#关闭Cursor对象
cur.close()
#提交当前事务
conn.commit()
#关闭Connection对象
conn.close()
2、使用SQLite
Python内置SQLite模块:sqlite3
连接数据库->执行SQL语句->关闭连接
1.创建数据库文件
实现步骤:
导入sqlite3模块->创建Connection对象->创建Cursor对象->执行SQL语句->关闭游标->关闭连接
#导入模块
import sqlite3
#创建连接对象
conn = sqlite3.connect('qwzf.db')
#创建游标对象
cursor = conn.cursor()
#执行SQL语句
cursor.execute('create table user(id int(10) primary key,name varchar(20))')
#关闭游标
cursor.close()
#关闭连接
conn.close()
2.操作SQLite数据库
即增删改查,参考:python 操作SQLite3数据库的方法
3、使用PyMySQL
PyMySQL 是在 Python3.x 版本中用于连接 MySQL 服务器的一个库
1.下载安装MySQL
可以直接使用内置MySQL的集成软件,如:phpstudy
2.安装PyMySQL
pip install PyMySQL
测试是否安装成功
>>> import pymysql
3.连接数据库
#导入PyMySQL模块
import pymysql
#调用connect()函数产生Connection连接对象
db = pymysql.connect('localhost','root','root','testpy','utf8')
#db = pymysql.connect(host = 'localhost',user = 'root',password = 'root',database = 'testpy',charset = 'utf8')
#调用cursor()方法,创建Cursor对象
cursor = db.cursor()
#执行SQL语句
cursor.execute('select version()')
data = cursor.fetchone()
print(data)
#关闭游标和连接
cursor.close()
db.close()

4.操作MySQL数据库
即增删改查,参考:使用pymysql操作数据库、pymysql数据库之建库建表、增删改查
后记
到现在为止Python基础知识已经基本学完了(这里表示还没学Python的面向对象程序设计和GUI界面编程)。在这些Python的基础知识上,可以开始愉快的开启Python进阶之旅了@_@!!!
