1、了解缓存
缓存是为了提高运行性能:调用在缓存中已有的数据从而减少对数据库的操作。
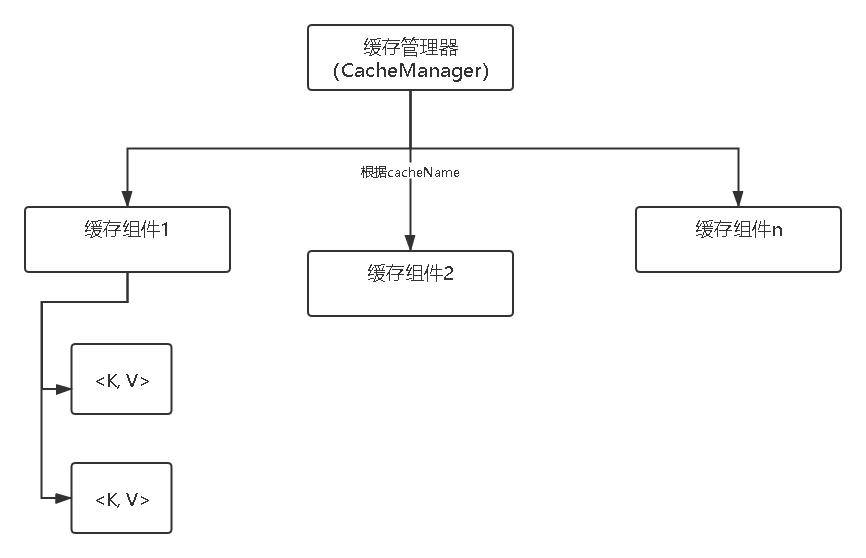
一个缓存管理器管理着多个缓存组件, 每个缓存组件有多个key, value键值对。
举一个例子:
一个公司(缓存管理器)有多个部门(缓存组件)它们都有自己的部门名称(cacheName),每个部门也有多个职员(key, value键值对)。
其中键值对的储存方式是:
key默认是方法参数的值的字符串, value是方法的返回值。
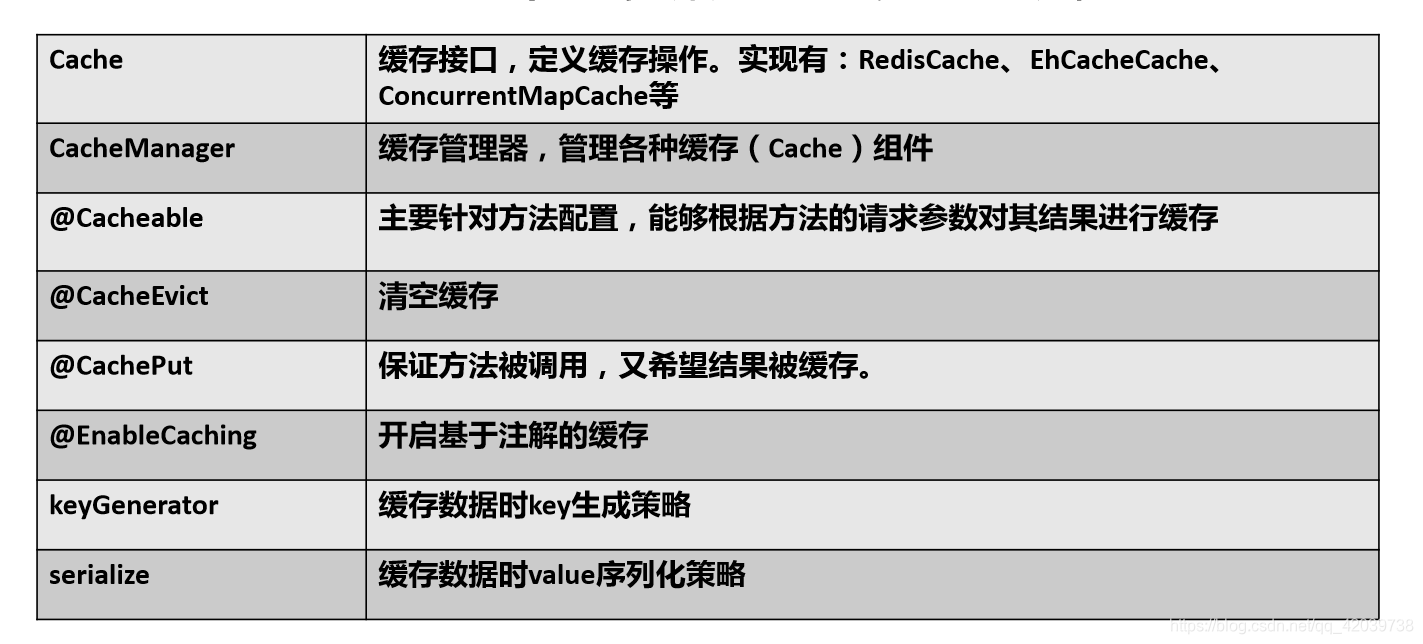
2、使用缓存
1)、主程序添加缓存注解 @EnableCaching, 开启缓存
package com.example;

import org.mybatis.spring.annotation.MapperScan;
import org.mybatis.spring.annotation.MapperScans;
import org.springframework.boot.SpringApplication;
import org.springframework.boot.autoconfigure.SpringBootApplication;
import org.springframework.cache.annotation.EnableCaching;


@MapperScan(value="com.example.mapper")
@SpringBootApplication
@EnableCaching
public class CacheApplication {

	public static void main(String[] args) {
		SpringApplication.run(CacheApplication.class, args);
	}

}
2)、测试使用(我这里的缓存注解是标注在Service业务层的)
package com.example.service;

import org.springframework.beans.factory.annotation.Autowired;
import org.springframework.cache.annotation.CacheConfig;
import org.springframework.cache.annotation.CacheEvict;
import org.springframework.cache.annotation.CachePut;
import org.springframework.cache.annotation.Cacheable;
import org.springframework.cache.annotation.Caching;
import org.springframework.stereotype.Service;

import com.example.bean.Employee;
import com.example.mapper.EmployeeMapper;

@CacheConfig(cacheNames="emp")
@Service
public class EmployeeService {
	@Autowired
	EmployeeMapper employeeMapper;

	@Cacheable(cacheNames = {"emp"}, key="#id"/*, keyGenerator="cacheKey", condition = "#id>1 and #root.methodName eq 'getEmp' ", unless = "#id==2"*/)
	public Employee getEmp(int id){
		System.out.println("查询...");
		return employeeMapper.get(id);
	}

	@CachePut(value="emp", key="#employee.id")
	public Employee update(Employee employee){
		System.out.println("update:" + employee);
		employeeMapper.update(employee);
		return employee;
	}

	@CacheEvict(value="emp", key="#id")
	public int delete(int id){
		System.out.println("delete:" + id);
		return id;
	}

	@Caching(
			cacheable = {
					@Cacheable(value="emp", key = "#lastName")
			},
			put = {
					@CachePut(value="emp", key="#result.id"),
					@CachePut(value="emp", key="#result.email")
			}
	)
	public Employee getByName(String lastName){
		return employeeMapper.getByName(lastName);
	}


}
@CacheConfig(cacheNames=“emp”)
表示这个类的 cacheName/value 都赋值为 “emp”,表示这些缓存都是同一类的。所以这个注解是配置以下众多标注有缓存注解方法的共有属性!
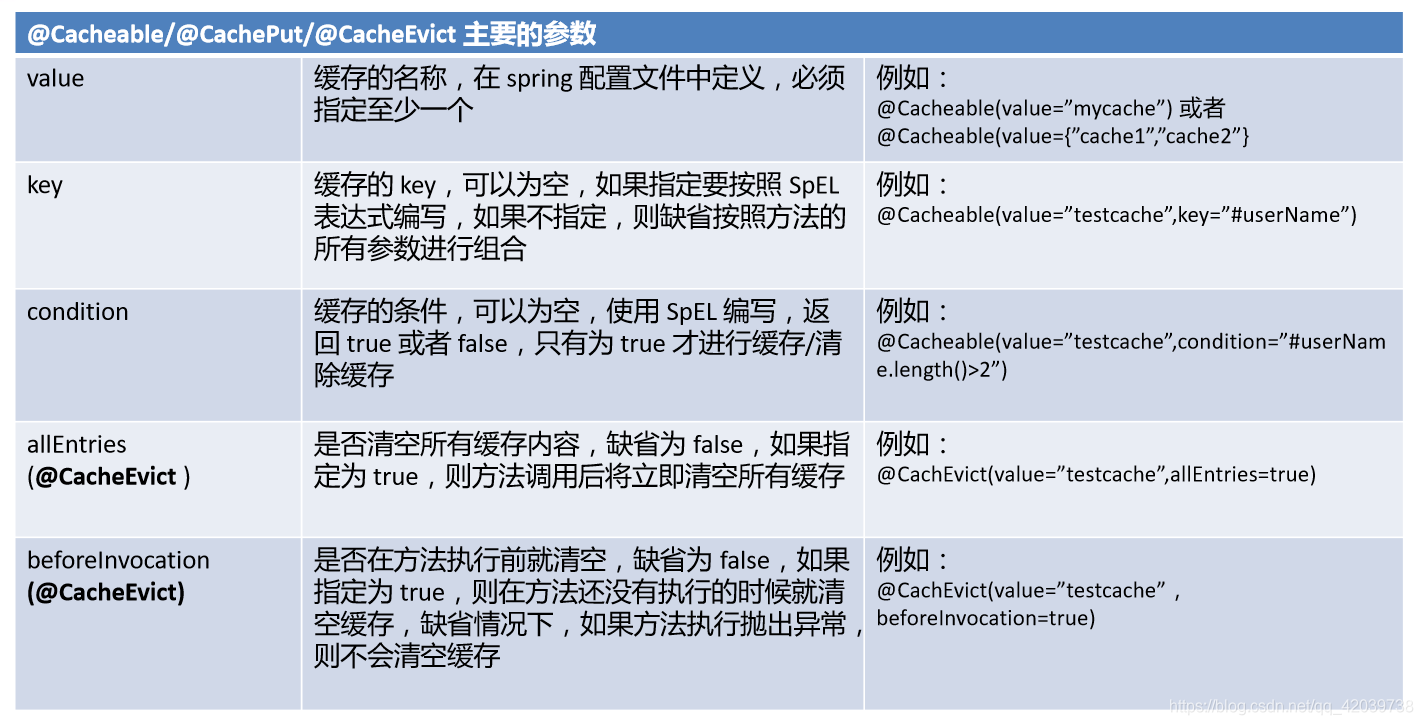
@Cacheable(cacheNames = {“emp”}, key="#id"/, keyGenerator=“cacheKey”, condition = "#id>1 and #root.methodName eq ‘getEmp’ ", unless = “#id==2”/)
cacheNames:表示这个缓存的分类名称, 你可以只写一个, 也可以写多个, 多个要用{ }花括号哦。
key:表示缓存的键名称,相当于<key, 缓存的值>
keyGenerator: key生成策略, 自定义key的名称(和key两个二选一)
condition:表示缓存启用的条件
unless:表示如果表达式为true就不执行缓存
@CachePut
表示每次调用数据库并且更新缓存 , 弥补了@Cacheable数据更新后还是拿旧数据的缺陷, 两者可以互相配合
@Cacheable(cacheNames = {"emp"}, key="#id"/*, keyGenerator="cacheKey", condition = "#id>1 and #root.methodName eq 'getEmp' ", unless = "#id==2"*/)
	public Employee getEmp(int id){
		System.out.println("查询...");
		return employeeMapper.get(id);
	}

	@CachePut(value="emp", key="#employee.id")
	public Employee update(Employee employee){
		System.out.println("update:" + employee);
		employeeMapper.update(employee);
		return employee;
	}
更新时,会将分类名为 id 值的缓存更新, 所以第二次提取雇员信息的时候虽然仍是拿缓存的数据, 但此时缓存数据已经更新了。
@CacheEvict
表示清除缓存
@Caching
表示专门配置复杂的缓存条件, 用数组形式装载不同种类的注解与属性
