普通Web项目架构渐进式实现
- SpringMVC、Mybatis独立架构实现
- Spring MVC做Restful API
- 使用C3P0数据库连接池
- 集成Ehcache
- Spring集成各组件
当下微服务大行其道,以SpringBoot为核心的软件架构逐渐成为各类型后台架构的主体,但是这不意味着SSH、SSM式的架构马上就要被淘汰。相反,我认为微服务架构和传统Web架构应用场景很多并不冲突,在现在可见的几年后SSM这式架构依然会大行其道。趁着我现在有参入到SSM的项目,正好把之前的记录梳理一遍。这篇文章是渐进式的。首先我会给出一个SpringMVC、Mybatis的Demo,然后我会逐渐加入各类组件进去,数据库连接池,二级缓存,Spring代理SqlSession事务、Thymeleaf模板引擎等。最后时间允许的话就加入POI整合成一个报表程序。
SpringMVC、Mybatis独立架构实现
工具:
- JDK1.8
- Idea
- Maven
更新日志
- logback
- jwt
- 动态数据源
- quartz
- …
项目目录

SpringMVC
依赖库引入和资源文件加入生成路径
<?xml version="1.0" encoding="UTF-8"?>
<project xmlns="http://maven.apache.org/POM/4.0.0"
         xmlns:xsi="http://www.w3.org/2001/XMLSchema-instance"
         xsi:schemaLocation="http://maven.apache.org/POM/4.0.0 http://maven.apache.org/xsd/maven-4.0.0.xsd">
    <modelVersion>4.0.0</modelVersion>
    <groupId>cn.example</groupId>
    <artifactId>newWebApp</artifactId>
    <version>1.0-SNAPSHOT</version>
    <build>
        <sourceDirectory>java</sourceDirectory>
        <!--    resource设置把非java文件的其它文件在生成项目时添加到目标路径中(如:mybatis的mapper.xml文件等) -->
        <resources>
            <resource>
                <directory>java</directory>
                <excludes>
                    <exclude>**/*.java</exclude>
                </excludes>
            </resource>
        </resources>
        <plugins>
            <plugin>
                <groupId>org.apache.maven.plugins</groupId>
                <artifactId>maven-compiler-plugin</artifactId>
                <configuration>
                    <source>8</source>
                    <target>8</target>
                </configuration>
            </plugin>
        </plugins>
    </build>
<!--    war知名此项目是web项目 -->
    <packaging>war</packaging>
<!-- spring-web、spring-mvc依赖库 -->
    <dependencies>
        <!-- https://mvnrepository.com/artifact/org.springframework/spring-web -->
        <dependency>
            <groupId>org.springframework</groupId>
            <artifactId>spring-web</artifactId>
            <version>5.1.8.RELEASE</version>
        </dependency>
        <!-- https://mvnrepository.com/artifact/org.springframework/spring-webmvc -->
        <dependency>
            <groupId>org.springframework</groupId>
            <artifactId>spring-webmvc</artifactId>
            <version>5.1.8.RELEASE</version>
        </dependency>
<!--        阿里巴巴的fastJson库,用起来比jdk的Json库好用  -->
        <dependency>
            <groupId>com.alibaba</groupId>
            <artifactId>fastjson</artifactId>
            <version>1.2.47</version>
        </dependency>
<!-- mybatis依赖库和mysql链接库-->
        <!-- https://mvnrepository.com/artifact/org.mybatis/mybatis -->
        <dependency>
            <groupId>org.mybatis</groupId>
            <artifactId>mybatis</artifactId>
            <version>3.5.2</version>
        </dependency>
        <!-- https://mvnrepository.com/artifact/mysql/mysql-connector-java -->
        <dependency>
            <groupId>mysql</groupId>
            <artifactId>mysql-connector-java</artifactId>
            <version>5.1.47</version>
        </dependency>
<!--        junit单元测试框架-->
        <dependency>
            <groupId>org.junit.jupiter</groupId>
            <artifactId>junit-jupiter-api</artifactId>
            <version>RELEASE</version>
            <scope>test</scope>
        </dependency>
    </dependencies>
</project>
web.xml配置
    <servlet>
        <servlet-name>spring-web-mvc</servlet-name>
        <servlet-class>org.springframework.web.servlet.DispatcherServlet</servlet-class>
        <init-param>
            <param-name>contextConfigLocation</param-name>
            <param-value>classpath:applicationContext-MVC.xml</param-value>
        </init-param>
    </servlet>
    <servlet-mapping>
        <servlet-name>spring-web-mvc</servlet-name>
        <url-pattern>/</url-pattern>
    </servlet-mapping>
        <!--  Spring上下文载入监听器,如果不配置就只能手工获取Bean,也就是说不能用@Autowired,@Resource自动装载Bean  -->
    <context-param>
        <param-name>contextConfigLocation</param-name>
        <param-value>classpath:applicationContext.xml</param-value>
    </context-param>
    <listener>
        <listener-class>org.springframework.web.context.ContextLoaderListener</listener-class>
    </listener>
SpringMVC上下文配置文件
<beans xmlns="http://www.springframework.org/schema/beans"
       xmlns:context="http://www.springframework.org/schema/context"
       xmlns:mvc="http://www.springframework.org/schema/mvc" xmlns:xsi="http://www.w3.org/2001/XMLSchema-instance"
       xmlns:aop="http://www.springframework.org/schema/aop"
       xsi:schemaLocation="
        http://www.springframework.org/schema/beans
        http://www.springframework.org/schema/beans/spring-beans-3.0.xsd
        http://www.springframework.org/schema/context
        http://www.springframework.org/schema/context/spring-context-3.0.xsd
        http://www.springframework.org/schema/mvc
        http://www.springframework.org/schema/mvc/spring-mvc-3.0.xsd
        http://www.springframework.org/schema/aop
      	http://www.springframework.org/schema/aop/spring-aop.xsd">
<!--    jsp视图解析器 -->
    <bean class="org.springframework.web.servlet.view.InternalResourceViewResolver">
        <property name="prefix" value="/Views/"></property>
        <property name="suffix" value=".jsp"></property>
    </bean>
<!--    包扫描路径(应用注解)  -->
    <context:component-scan base-package="cn.Controller" />
    </beans>
Controller类
@Controller
public class IndexController {
//	返回视图和Model
    @RequestMapping(value = "/"  , method = RequestMethod.GET)
    public ModelAndView proc1(){
        ModelAndView modelAndView = new ModelAndView("home");
        return modelAndView;
    }
    //	Restful API
    @ResponseBody
    @RequestMapping("/hello")
    public String proc2(){
        return "good eveing";
    }

    @ResponseBody
    @RequestMapping(value = "/oneParam")
    public String oneParamProc( String smsVerifyCode ){
        JSONObject result = new JSONObject();
        result.put("status", "Param : " + smsVerifyCode);
        return result.toJSONString();
    }

    @ResponseBody
    @RequestMapping(value = "/register")
    public String registerProc( String smsVerifyCode , HttpServletRequest request){
        JSONObject result = new JSONObject();
        result.put("state", "success");
        result.put("info", smsVerifyCode );
        return result.toJSONString();
    }
}
视图页面
Views/home.jsp
<%@ page contentType="text/html;charset=UTF-8" language="java" %>
<html>
<head>
    <title>首頁</title>
</head>
<body>
<h1>一個普通的是視圖葉!</h1>
<p>Hello everyone</p>
<hr>
<a href="hello">say hello</a>
<hr>
<a href="oneParam?smsVerifyCode=012345">帶一個參數的請求Action</a>
<hr>
<a href="register?smsVerifyCode=123456">也是帶一個參數的Action?</a>
</body>
</html>
测试

Mybatis基础、实现CRUD
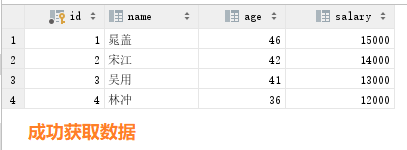
demo使用的数据库名:exampledb,表:employee
+--------+-------------+------+-----+---------+----------------+
| Field  | Type        | Null | Key | Default | Extra          |
+--------+-------------+------+-----+---------+----------------+
| id     | int(11)     | NO   | PRI | NULL    | auto_increment |
| name   | varchar(16) | YES  |     | NULL    |                |
| age    | int(11)     | YES  |     | NULL    |                |
| salary | float       | YES  |     | NULL    |                |
+--------+-------------+------+-----+---------+----------------+
mybatis配置文件
mybatis-config.xml
<?xml version="1.0" encoding="UTF-8"?>
<!DOCTYPE configuration PUBLIC "-//mybatis.org//DTD Config 3.0//EN" "http://mybatis.org/dtd/mybatis-3-config.dtd">
<configuration>
    <properties resource="database.properties"></properties>
    <environments default="development">
        <environment id="development">
            <transactionManager type="JDBC"></transactionManager>
            <dataSource type="POOLED">
                <property name="driver" value="${jdbc.driver}"/>
                <property name="url" value="${jdbc.url}"/>
                <property name="username" value="${jdbc.username}"/>
                <property name="password" value="${jdbc.password}"/>
            </dataSource>
        </environment>
    </environments>

<mappers>
    <mapper class="cn.Dao.EmployeeDao"></mapper>
</mappers>

</configuration>
数据源配置文件
database.properties
#mysql database setting
jdbc.driver=com.mysql.jdbc.Driver
jdbc.url=jdbc:mysql://127.0.0.1:3306/exampledb
jdbc.username=root
jdbc.password=123456
Entity类
public class Employee implements Serializable {
    private Integer id;
    private String name;
    private Integer age;
    private Float salary;

    @Override
    public String toString() {
        return "Employee{" +
                "id=" + id +
                ", name='" + name + '\'' +
                ", age=" + age +
                ", salary=" + salary +
                '}';
    }

    public Integer getId() {
        return id;
    }

    public void setId(Integer id) {
        this.id = id;
    }

    public String getName() {
        return name;
    }

    public void setName(String name) {
        this.name = name;
    }

    public Integer getAge() {
        return age;
    }

    public void setAge(Integer age) {
        this.age = age;
    }

    public Float getSalary() {
        return salary;
    }

    public void setSalary(Float salary) {
        this.salary = salary;
    }

    public Employee(Integer id, String name, Integer age, Float salary) {
        this.id = id;
        this.name = name;
        this.age = age;
        this.salary = salary;
    }

    public Employee() {
    }
}
mapper配置文件

<?xml version="1.0" encoding="UTF-8" ?>
<!DOCTYPE mapper PUBLIC "-//mybatis.org//DTD Mapper 3.0//EN" "http://mybatis.org/dtd/mybatis-3-mapper.dtd" >
<!-- 映射的DAO接口 -->
<mapper namespace="cn.Dao.EmployeeDao">
<!-- 按id查询一条记录 -->
<select id="selectOne"
resultType="cn.Entity.Employee">
select id,name,age,salary from employee where id = #{id}
</select>
<!-- 查询所有记录-按name字段降序排序 -->
<select id="findAll"
resultType="cn.Entity.Employee">
select id,name,age,salary
from employee
order by name desc
</select>
<!-- 插入一条记录 -->
<insert id="addOne" parameterType="cn.Entity.Employee">
insert into employee(name,age,salary) values(#{name},#{age},#{salary})
</insert>
<!-- 更新一条记录 -->
<update id="updateOneSalary">
update employee set salary = #{salary} where id = #{id}
</update>
<!-- 删除一条记录 -->
<delete id="deleteOne" parameterType="int">
delete from employee where id = #{id}
</delete>
<!-- 动态SQL - 查询工资低于5000,如果给出年龄条件 就是:工资低于5000同时年龄大于给定年龄的职工 -->
<select id="listSalaryLessThanFiveThousandAndAgeLargeThenAge" resultType="cn.Entity.Employee">
select id,name,age,salary
from employee
where salary < 5000
<if test="null != #{age} ">
and age > #{age}
</if>
</select>
</mapper>
Dao接口定义
接口中的方法签名要与mapper文件中定义的一致,注意观察。
public interface EmployeeDao{

    public Employee selectOne(Integer id);
    public List<Employee> findAll();

    public void addOne(Employee employee);

    public void updateOneSalary(@Param("salary") Float salary, @Param("id") Integer id);

    public void deleteOne(Integer id);

    public List<Employee> listSalaryLessThanFiveThousandAndAgeLargeThenAge(Integer age);
}
测试
    @Test
    public void testProc() throws IOException {

        InputStream inputStream = Resources.getResourceAsStream("mybatis-config.xml");
        SqlSessionFactoryBuilder sqlSessionFactoryBuilder = new SqlSessionFactoryBuilder();
        SqlSessionFactory sessionFactory = sqlSessionFactoryBuilder.build(inputStream);

        SqlSession sqlSession = sessionFactory.openSession();
        EmployeeDao employeeDao = sqlSession.getMapper(EmployeeDao.class);

        System.out.println("=========================================");
        employeeDao.findAll().forEach(i->{
            System.out.println(i.toString());
        });
        employeeDao.addOne(new Employee(null,"張三",46, 4500F));
        employeeDao.addOne(new Employee(null,"李四",55, 8000F));
        sqlSession.commit();
        System.out.println("=========================================");
        employeeDao.findAll().forEach(i->{
            System.out.println(i.toString());
        });

        System.out.println("=========================================");
        System.out.println("Identiry is : 1");
        Employee employee = employeeDao.selectOne(1);
        System.out.println(employee.toString());
        employeeDao.updateOneSalary(7500F,1);
        employeeDao.deleteOne(3);
        sqlSession.commit();

        System.out.println("=========================================");
        employeeDao.findAll().forEach(i->{
            System.out.println(i.toString());
        });

        System.out.println("=========================================");
        employeeDao.listSalaryLessThanFiveThousandAndAgeLargeThenAge(45).forEach(i->{
            System.out.println(i.toString());
        });

        sqlSession.commit();
        sqlSession.close();
        inputStream.close();
    }
}

Spring MVC做Restful API
SpringMVC返回JSON或者其它类对象需要做些配置。
加入依赖:
        <!-- https://mvnrepository.com/artifact/com.fasterxml.jackson.core/jackson-databind -->
        <dependency>
            <groupId>com.fasterxml.jackson.core</groupId>
            <artifactId>jackson-databind</artifactId>
            <version>2.9.9.2</version>
        </dependency>
修改SpringMVC的上下文配置文件:
<!--    开启Spring MVC的注解驱动   -->
    <mvc:annotation-driven></mvc:annotation-driven>
这样就可以正常转换对象返回输出了。
使用C3P0数据库连接池
加入依赖:
<!--    c3p0连接池  依赖库-->
        <!-- https://mvnrepository.com/artifact/com.mchange/c3p0 -->
        <dependency>
            <groupId>com.mchange</groupId>
            <artifactId>c3p0</artifactId>
            <version>0.9.5.4</version>
        </dependency>
需要写一个数据源工厂类的子类:
public class MybatisC3p0DatabaseSourcesFactory extends UnpooledDataSourceFactory {
    public MybatisC3p0DatabaseSourcesFactory(){
        this.dataSource = new ComboPooledDataSource();
    }
}
如果是Mybatis使用配置文件几个参数需要修改:
    <properties resource="database.properties"></properties>
    <environments default="development">
        <environment id="development">
            <transactionManager type="JDBC"></transactionManager>
            <dataSource type="cn.CommonUtils.MybatisC3p0DatabaseSourcesFactory">
                <property name="driverClass" value="${jdbc.driver}"/>
                <property name="jdbcUrl" value="${jdbc.url}"/>
                <property name="user" value="${jdbc.username}"/>
                <property name="password" value="${jdbc.password}"/>
                <property name="initialPoolSize" value="8"/>
                <property name="minPoolSize" value="8"/>
                <property name="maxPoolSize" value="32"/>
                <property name="acquireIncrement" value="8"/>
            </dataSource>
        </environment>
    </environments>
单独的C3P0使用
单独的C3P0测试
        MybatisC3p0DatabaseSourcesFactory mybatisC3p0DatabaseSourcesFactory = new MybatisC3p0DatabaseSourcesFactory();
        Properties properties = new Properties();
        properties.setProperty("jdbcUrl", "jdbc:mysql://127.0.0.1:3306/exampledb");
        properties.setProperty("driverClass", "com.mysql.jdbc.Driver");
        properties.setProperty("initialPoolSize", "8");
        properties.setProperty("minPoolSize", "8");
        properties.setProperty("maxPoolSize", "32");
        properties.setProperty("user", "root");
        properties.setProperty("password", "123456");
        mybatisC3p0DatabaseSourcesFactory.setProperties(properties);
        DataSource dataSource = mybatisC3p0DatabaseSourcesFactory.getDataSource();
        try(Connection connection = dataSource.getConnection()){
            String nativeSql = connection.nativeSQL("insert into employee(name,age,salary) values('麦克T',34,1500)");
            System.out.println(nativeSql);
            Statement statement = connection.createStatement();
            PreparedStatement preparedStatement = connection.prepareStatement("insert into employee(name,age,salary) values(?,?,?)");
            for (int i = 0; i < 15000; i++) {
//                statement.execute("insert into employee(name,age,salary) values('麦克',i%60,i*3500%8000)");
                preparedStatement.setString(1,"麦克"+i);
                preparedStatement.setInt(2,i%60);
                preparedStatement.setFloat(3,i*3500%8000);
                preparedStatement.execute();
            }
//            connection.commit();
        }
在mybatis-config.xml配置文件将DataSource改为c3p0之后
此时mybatis的数据源已经是由c3p0管理了。可以在启动时看到相关日志。
其实mybatis本身也有连接池。
集成Ehcache
EhCache 是一个纯Java的进程内缓存框架,具有快速、精干等特点,是Hibernate中默认的CacheProvider。Ehcache是一种广泛使用的开源Java分布式缓存。主要面向通用缓存,Java EE和轻量级容器。它具有内存和磁盘存储,缓存加载器,缓存扩展,缓存异常处理程序,一个gzip缓存servlet过滤器,支持REST和SOAP api等特点。Ehcache最初是由Greg Luck于2003年开始开发。2009年,该项目被Terracotta购买。软件仍然是开源,但一些新的主要功能(例如,快速可重启性之间的一致性的)只能在商业产品中使用,例如Enterprise EHCache and BigMemory。维基媒体Foundationannounced目前使用的就是Ehcache技术。主要的特性有:1. 快速 2. 简单 3. 多种缓存策略 4. 缓存数据有两级/三级:内存(堆、堆外)和磁盘,因此无需担心容量问题 5. 缓存数据会在虚拟机重启的过程中写入磁盘 6. 可以通过RMI、可插入API等方式进行分布式缓存 7. 具有缓存和缓存管理器的侦听接口 8. 支持多缓存管理器实例,以及一个实例的多个缓存区域 9. 提供Hibernate的缓存实现

加入依赖库
ehcache需要slf4j-api的库。
        <!-- https://mvnrepository.com/artifact/org.ehcache/ehcache -->
        <dependency>
            <groupId>org.ehcache</groupId>
            <artifactId>ehcache</artifactId>
            <version>3.8.0</version>
        </dependency>
        <!-- https://mvnrepository.com/artifact/org.mybatis.caches/mybatis-ehcache -->
        <dependency>
            <groupId>org.mybatis.caches</groupId>
            <artifactId>mybatis-ehcache</artifactId>
            <version>1.1.0</version>
        </dependency>
        <!-- https://mvnrepository.com/artifact/org.slf4j/slf4j-api -->
        <dependency>
            <groupId>org.slf4j</groupId>
            <artifactId>slf4j-api</artifactId>
            <version>1.7.26</version>
        </dependency>
ehcache配置文件
ehcache可以使用配置文件创建缓存,也可以摆脱xml配置文件使用代码创建。
ehcache.xml
<config
        xmlns:xsi='http://www.w3.org/2001/XMLSchema-instance'
        xmlns='http://www.ehcache.org/v3'
        xsi:schemaLocation="http://www.ehcache.org/v3 http://www.ehcache.org/schema/ehcache-core.xsd">
<!--    指定持久化位置-->
    <persistence directory="D:\tmp"/>

    <cache alias="employeeCache">
        <key-type>java.lang.Integer</key-type>
        <value-type>cn.Entity.Employee</value-type>
<!--        缓存超时时间-->
        <expiry>
            <ttl unit="minutes" >35</ttl>
        </expiry>
        <resources>
<!--            缓存堆的大小  -->
            <heap unit="entries">64</heap>
<!--            堆占用内存大小-->
            <offheap unit="MB">1</offheap>
<!--            持久化到硬盘-->
            <disk persistent="true" unit="MB">2</disk>
        </resources>
    </cache>

    <cache alias="myCache1">
        <key-type>java.lang.String</key-type>
        <value-type>java.lang.String</value-type>
        <resources>
            <heap unit="entries">20</heap>
            <offheap unit="MB">10</offheap>
        </resources>
    </cache>

<!--    缓存模板    -->
    <cache-template name="myDefaults">
        <key-type>java.lang.Long</key-type>
        <value-type>java.lang.String</value-type>
        <heap unit="entries">200</heap>
    </cache-template>
<!--    使用模板    -->
    <cache alias="bar" uses-template="myDefaults">
        <key-type>java.lang.Number</key-type>
    </cache>

    <cache alias="simpleCache" uses-template="myDefaults" />

</config>
搭配配置文件使用
        Configuration configuration = new XmlConfiguration(getClass().getResource("ehcache.xml"));
        CacheManager cacheManager = CacheManagerBuilder.newCacheManager(configuration);
        cacheManager.init();

        Cache<String, String> cache = cacheManager.getCache("myCache1",  String.class, String.class);
        cache.put("001","zhangsan");
        cache.put("002","lisi");
        cache.put("003","wanger");
//        cache.clear();
        cacheManager.close();
无配置文件使用缓存
        CacheManager cacheManager = CacheManagerBuilder.newCacheManagerBuilder()
                .withCache("preConfigured",
                        CacheConfigurationBuilder.newCacheConfigurationBuilder(Long.class, String.class, ResourcePoolsBuilder.heap(10)))
                .build();

        cacheManager.init();

        Cache<Long, String> preConfigured =
                cacheManager.getCache("preConfigured", Long.class, String.class);

        Cache<Long, String> myCache = cacheManager.createCache("myCache",
                CacheConfigurationBuilder.newCacheConfigurationBuilder(Long.class, String.class, ResourcePoolsBuilder.heap(10)));

        myCache.put(1L, "da one!");
        String value = myCache.get(1L);

//        cacheManager.removeCache("preConfigured");

        cacheManager.close();
    }
Ehcache工具类
使用Ehcache一般写个单例工具类方便后期使用。
//  双锁单例ehcache工厂
public class EhcacheFactory {

    private static volatile CacheManager cacheManager;
    private EhcacheFactory(){}

    public static synchronized CacheManager getCacheManager(){
        if(cacheManager!=null){
            return cacheManager;
        }else{
            ProtectedInstance protectedInstance = new ProtectedInstance();
            cacheManager = protectedInstance.getCachaManager();
        }
        return cacheManager;
    }

    public static synchronized CacheManager getCacheManager(boolean hasAvailable){
        if(hasAvailable){
        CacheManager cm = getCacheManager();
            if (cm != null && cm.getStatus() != Status.AVAILABLE) {
                cm.init();
            }
        }
        return cacheManager;
    }
}

class ProtectedInstance{
    public CacheManager getCachaManager(){
        Configuration configuration = new XmlConfiguration(this.getClass().getResource("/ehcache.xml"));
        CacheManager cacheManager = CacheManagerBuilder.newCacheManager(configuration);
        return cacheManager;
    }

    public ProtectedInstance() {
    }
}
Ehcache使用示例
一般缓存查询数据都是放到一个过程里:请求数据,到缓存查,没找到再到数据库里查,在数据库查找的同时放到缓存里,之后都在缓存里了。
为了表述清晰我把这个步骤拆成了两个,方便新手理解。
不要忘记配置SpringMVC的Json转换器哦,不然返回对象时会报类型转换错误的。
查询数据放入缓存
    @ResponseBody
    @RequestMapping("/listAllEmployee")
    public List<Employee> listAllEmployeeProc() throws IOException {
        List<Employee> result = new LinkedList<>();

        InputStream inputStream = Resources.getResourceAsStream("mybatis-config.xml");
        SqlSessionFactoryBuilder sqlSessionFactoryBuilder = new SqlSessionFactoryBuilder();
        SqlSessionFactory sessionFactory = sqlSessionFactoryBuilder.build(inputStream);

        try(SqlSession sqlSession = sessionFactory.openSession()){
            EmployeeDao employeeDao = sqlSession.getMapper(EmployeeDao.class);
            result = employeeDao.findAll();

            CacheManager cacheManager = EhcacheFactory.getCacheManager();
            if(cacheManager.getStatus()!=Status.AVAILABLE){
                cacheManager.init();
            }

            Cache<Integer, Employee> cache = cacheManager.getCache("employeeCache", Integer.class, Employee.class);

            result.forEach(i->{
                System.out.println(i.toString());
                if(cache!=null)
                    cache.put(i.getId(),i);
            });
        }
      return result;
    }
在缓存里调取数据
    @ResponseBody
    @RequestMapping("/listAllInCache")
    public List getem(){
        List<Employee> result = new LinkedList<>();
        CacheManager cacheManager = EhcacheFactory.getCacheManager();
        if(cacheManager.getStatus()!=Status.AVAILABLE){
            cacheManager.init();
        }

        Cache<Integer, Employee> cache = cacheManager.getCache("employeeCache", Integer.class, Employee.class);
        if(cache!=null)
        cache.forEach(i->{
            result.add(i.getValue());
        });
//        cache.clear();
        return result;
    }
Okay , 到现在项目的各个框架都搭建完毕。
Spring
SpringMVC
Mybatis
C3P0
Ehcache
下面可以开始将各个组件集成Spring,另外做些拓展。
Spring集成各组件
Spring集成Mybatis
单独使用mybatis是有很多限制的(比如无法实现跨越多个session的事务),而且很多业务系统本来就是使用spring来管理的事务,因此mybatis最好与spring集成起来使用。
Spring集成SqlSessionFactory
首先是加入相关依赖
<!--        Spring集成mybatis所需依赖-->
        <!-- https://mvnrepository.com/artifact/org.mybatis/mybatis-spring -->
        <dependency>
            <groupId>org.mybatis</groupId>
            <artifactId>mybatis-spring</artifactId>
            <version>2.0.2</version>
        </dependency>
        <!-- https://mvnrepository.com/artifact/org.springframework/spring-jdbc -->
        <dependency>
            <groupId>org.springframework</groupId>
            <artifactId>spring-jdbc</artifactId>
            <version>5.1.9.RELEASE</version>
        </dependency>
清空mybatis-config.xml配置
<?xml version="1.0" encoding="UTF-8"?>
<!DOCTYPE configuration PUBLIC "-//mybatis.org//DTD Config 3.0//EN" "http://mybatis.org/dtd/mybatis-3-config.dtd">

<configuration>
</configuration>
application-context.xml配置
    <!--自动扫描DAO包-->
    <context:component-scan base-package="cn.Dao"/>
    <!--1 引入属性文件,在配置中占位使用 -->
    <context:property-placeholder location="classpath:database.properties" />

    <!--2 配置C3P0数据源 -->
    <bean id="datasource" class="com.mchange.v2.c3p0.ComboPooledDataSource" destroy-method="close">
<!--    <bean id="datasource" class="cn.CommonUtils.MybatisC3p0DatabaseSourcesFactory" destroy-method="close">-->
        <!--驱动类名 -->
        <property name="driverClass" value="${jdbc.driver}" />
        <!-- url -->
        <property name="jdbcUrl" value="${jdbc.url}" />
        <!-- 用户名 -->
        <property name="user" value="${jdbc.username}" />
        <!-- 密码 -->
        <property name="password" value="${jdbc.password}" />
        <!-- 当连接池中的连接耗尽的时候c3p0一次同时获取的连接数  -->
        <property name="acquireIncrement" value="8"></property>
        <!-- 初始连接池大小 -->
        <property name="initialPoolSize" value="8"></property>
        <!-- 连接池中连接最小个数 -->
        <property name="minPoolSize" value="8"></property>
        <!-- 连接池中连接最大个数 -->
        <property name="maxPoolSize" value="32"></property>
    </bean>

    <!--3 会话工厂bean sqlSessionFactoryBean -->
    <bean id="sqlSessionFactory" class="org.mybatis.spring.SqlSessionFactoryBean">
        <!-- 数据源 -->
        <property name="dataSource" ref="datasource"></property>
        <!-- 别名 -->
<!--        <property name="typeAliasesPackage" value="cn.Dao **"></property>-->
        <!-- sql映射文件路径 -->
        <property name="mapperLocations" value="classpath*:cn/Dao/*Dao.xml"></property>
        <!--    mybatis配置文件 -->
        <property name="configLocation" value="classpath:mybatis-config.xml"></property>
    </bean>
   <!-- 4 自动扫描对象关系映射 -->
    <bean id="mapperScannerConfigurer" class="org.mybatis.spring.mapper.MapperScannerConfigurer">
        <property name="basePackage" value="cn.Dao"></property>
    </bean>
测试托管后的SqlSessionFactory
这一步用来测试SqlSessionFactory是否被正确托管
        ApplicationContext applicationContext = new ClassPathXmlApplicationContext("applicationContext.xml");
        SqlSessionFactory sessionFactory = (SqlSessionFactory) applicationContext.getBean("sqlSessionFactory");

        EmployeeDao employeeDaoTx = sessionFactory.openSession().getMapper(EmployeeDao.class);

        Employee employee = employeeDaoTx.selectOne(1500);
        System.out.println(employee.toString());
如下正确查到数据就是已经OK了。

Spring代理Mybatis事务
声明式事务管理
application-context.xml配置
		<!-- 增加事务管理命名空间 -->
       xmlns:tx="http://www.springframework.org/schema/tx"
       <!-- 增加事务管理schema路径 -->
       http://www.springframework.org/schema/tx
       http://www.springframework.org/schema/tx/spring-tx.xsd

    <!--5 声明式事务管理 -->
    <!--定义事物管理器,由spring管理事务 -->
    <bean id="transactionManager" class="org.springframework.jdbc.datasource.DataSourceTransactionManager">
        <property name="dataSource" ref="datasource"></property>
    </bean>
    <!--支持注解驱动的事务管理,指定事务管理器 -->
    <tx:annotation-driven transaction-manager="transactionManager" proxy-target-class="true"/>

    <context:annotation-config></context:annotation-config>

    <!--  应用了事务注解的类要定义成spring bean ,不然事务不起作用  -->
    <bean id="employeeService" class="cn.Service.EmployeeService"></bean>
应用了事务的业务类
public class EmployeeService {
    private EmployeeDao employeeDao;

    public EmployeeService(EmployeeDao ed){
        this.employeeDao = ed;
    }
    public EmployeeService(){}

    public void setEmployeeDao(EmployeeDao ed){
        this.employeeDao = ed;
    }

    @Transactional
    public void batchDeleteEmployee(int begin , int end){
        for (int i = begin; i < end; i++) {
            Employee temp = this.employeeDao.selectOne(i);
            if(temp==null){
                throw new IllegalStateException("没有此员工!");
            }
            this.employeeDao.deleteOne(i);
        }
    }

    public Employee getOne(Integer id){
        return this.employeeDao.selectOne(id);
    }
}
测试
    @ResponseBody
    @RequestMapping("/testTx2")
    public void testTxProc(Integer begin , Integer end){
        ApplicationContext applicationContext = new ClassPathXmlApplicationContext("applicationContext.xml");
        SqlSessionFactory sessionFactory = (SqlSessionFactory) applicationContext.getBean("sqlSessionFactory");
        EmployeeService employeeService = (EmployeeService) applicationContext.getBean("employeeService");

        EmployeeDao employeeDaoTx = sessionFactory.openSession().getMapper(EmployeeDao.class);
        employeeService.setEmployeeDao(employeeDaoTx);
        try {
            employeeService.batchDeleteEmployee(begin, end);
        }catch (IllegalStateException e){
            System.out.println(e.getMessage());
        }finally {
            System.out.println("finally");
        }
    }

删除51–52

删除53–60

因为表里没有第55条记录,抛出了IllegalStateException异常,事务回滚。
事务生效,测试成功。
到现在为止,我们已经用Spring代理了由C3P0做连接池的数据源、SqlSessionFactory,还加了声明事事务管理。但是整体来看只有声明式的事务管理给我们以后的开发减少了代码量,反观获得数据库会话这块并没有给我带来明显的方便,那么我们现在要开始着手做SqlSession的完全代理了。
Spring代理Mybatis全注解开发
一个组件被Spring代理,简要来说分为三个步骤:
将组件放入Spring容器,定义Bean
装载Bean
使用Bean
这个步骤有两种实现:1、在上下文配置文件手写Bean定义。2、使用注解。
我们在上面用的就是手写Bean定义,这种方式太繁琐,而且这个定义Bean的各个步骤又是重复的,如此一来,随着项目业务增多,代码、配置会搞成一团乱麻。注解就是简化这个流程的解决方案,你只需要在你要放入Spring容器的类、接口加上指定的注解就行了。
这是Spring托管Bean的四类注解。
@Controller
@Repository
@Service
@Component
下面我们将项目Mybatis这块改造为注解模式。
Dao接口
@Repository
public interface EmployeeDao
Service实现类
@Service
public class EmployeeServiceImpl implements IEmployeeService
application-Context.xml配置文件
<!--    开启注解 -->
    <context:annotation-config />
<!--    添加包扫描路径  -->
    <context:component-scan base-package="cn.Dao"></context:component-scan>
    <context:component-scan base-package="cn.Service"></context:component-scan>
Controller类载入Service的Bean
不用手动装载Bean了。
    @Autowired
    private IEmployeeService employeeService;

    @ResponseBody
    @RequestMapping("/testTx3")
    public List<Employee> listSomeEmployee3(Integer begin , Integer count){
        Employee employee = employeeService.getOne(begin);
        List<Employee> employees = new LinkedList<>();
        employees.add(employee);
        return employees;
    }

好了,至此我们已经完成了Mybatis的完全代理。
Spring Cache代理Ehcache3
关于Spring Cache - Ehcache3的一些说明
Ehcache3使用还是比较简单的,通过自己写的缓存工具类使用起来也很方便,但是在很多场景下,业务代码交叉很多缓存代码会使得代码的可读性变差和整体复杂度增高,为了使我们的代码更简洁,我们来使用Spring Cache来代理Ehcache3实现注解使用缓存。
这篇文章没有Mybatis集成Ehcache,可能有人会觉得这是个纰漏,实际上Spring Cache可以在任何类和方法上使用缓存机制,而不仅仅是在MyBatis上使用,所以就没必要单独讲Mybatis集成Ehcache,做重复劳动了。
首先是对Spring Cache的缓存机制做个说明;Spring Cache的注解缓存是声明在函数和类上的(此函数的类必须是Spring容器里的Bean)通过AOP机制,对传入的参数和结果做记录,就是说如果你第一次使用这个函数的时候传入的参数是“001”,运行函数内代码、查询数据库、返回结果是“abc”。第二次你再传入"001"实参,不再运行此函数,直接从缓存中返回“abc”。这就是它的基本机制,挺简单的。
有几点需要大家关注下:
Spring暂时还没有直接兼容Ehcache3,只有通过JCache来代理Ehcache3。
内部调用,非public方法上使用注解,会导致缓存无效。由于SpringCache是基于Spring AOP的动态代理实现,由于代理本身的问题,当同一个类中调用另一个方法,会导致另一个方法的缓存不能使用,这个在编码上需要注意,避免在同一个类中这样调用。如果非要这样做,可以通过再次代理调用,如((Category)AopContext.currentProxy()).get(category)这样避免缓存无效
不能支持多级缓存设置,如默认到本地缓存取数据,本地缓存没有则去远端缓存取数据,然后远程缓存取回来数据再存到本地缓存。
缓存的同步 sync:
在多线程环境下,某些操作可能使用相同参数同步调用。默认情况下,缓存不锁定任何资源,可能导致多次计算,而违反了缓存的目的。对于这些特定的情况,属性 sync 可以指示底层将缓存锁住,使只有一个线程可以进入计算,而其他线程堵塞,直到返回结果更新到缓存中。
例:
@Cacheable(cacheNames="foos", sync="true")
public Foo executeExpensiveOperation(String id) {...}
常用注解
@Cacheable 应用到读取数据的方法上,即可缓存的方法,如查找方法,先从缓存中读取,如果没有再调用相应方法获取数据,然后把数据添加到缓存中。
@CacheConfig 主要用于配置该类中会用到的一些共用的缓存配置。
@CachePut 应用到写数据的方法上,如新增/修改方法,调用方法时会自动把相应的数据放入缓存。
@CacheEvict 应用到移除数据的方法上,如删除方法,调用方法时会从缓存中移除相应的数据。
@Caching 组合多个Cache注解使用。
缓存策略
如果缓存满了,从缓存中移除数据的策略,常见的有FIFO, LRU 、LFU
FIFO (First in First Out) 先进先出策略,即先放入缓存的数据先被移除
LRU (Least Recently Used) 最久未使用策略, 即使用时间距离现在最久的那个数据被移除
LFU (Least Frequently Used) 最少使用策略,即一定时间内使用次数(频率)最少的那个数据被移除
TTL(Time To Live)存活期,即从缓存中创建时间点开始至到期的一个时间段(不管在这个时间段内有没被访问过都将过期)
TTI (Time To Idle)空闲期,即一个数据多久没有被访问就从缓存中移除的时间。
先加入依赖:
<!--        JCache依赖 -->
        <!-- https://mvnrepository.com/artifact/javax.cache/cache-api -->
        <dependency>
            <groupId>javax.cache</groupId>
            <artifactId>cache-api</artifactId>
            <version>1.1.1</version>
        </dependency>

<!--        Spring测试框架 搭配junit4使用-->
        <dependency>
            <groupId>org.springframework</groupId>
            <artifactId>spring-test</artifactId>
            <version>5.1.5.RELEASE</version>
            <scope>test</scope>
        </dependency>
<!--        单元测试框架 junit4 -->
        <dependency>
            <groupId>junit</groupId>
            <artifactId>junit</artifactId>
            <version>4.13-beta-3</version>
            <scope>test</scope>
        </dependency>
Ehcache3的配置文件还维持之前的不改动。
Spring-Ehcache3缓存配置文件
<?xml version="1.0" encoding="UTF-8"?>
<beans xmlns="http://www.springframework.org/schema/beans"
       xmlns:xsi="http://www.w3.org/2001/XMLSchema-instance"
       xmlns:cache="http://www.springframework.org/schema/cache"
       xsi:schemaLocation="http://www.springframework.org/schema/beans
       http://www.springframework.org/schema/beans/spring-beans.xsd
       http://www.springframework.org/schema/cache
       http://www.springframework.org/schema/cache/spring-cache.xsd">

    <description>Ehcache缓存配置文件</description>

    <!-- jcache缓存 -->
    <bean id="jCacheManager" class="org.springframework.cache.jcache.JCacheManagerFactoryBean">
        <property name="cacheManagerUri" value="classpath:ehcache.xml" /> <!--改成配置文件对应的路径-->
    </bean>
    <bean id="cacheManager" class="org.springframework.cache.jcache.JCacheCacheManager">
        <property name="cacheManager" ref="jCacheManager" />
    </bean>
<!--    开启缓存注解-->
    <cache:annotation-driven cache-manager="cacheManager"></cache:annotation-driven>

</beans>
不要忘了在applicationContext.xml里倒入cache上下文配置文件
<import resource="applicationContext-Cache.xml"></import>
码代码
找一个方法加上缓存
    @Override
    @Cacheable(value = "employeeCache" , key = "#id")
    public Employee getOne(Integer id){
        System.out.println("Access Database ... : employeeId:"+id);
        return this.employeeDao.selectOne(id);
    }
缓存测试
@RunWith(SpringJUnit4ClassRunner.class)
@ContextConfiguration(locations = {"/applicationContext.xml","/applicationContext-MVC.xml","/applicationContext-Cache.xml"})
public class TestClass2 {
    @Autowired
    private IEmployeeService employeeService;
    @Test
    public void testProc() throws InterruptedException {

       Employee employee = employeeService.getOne(3522);
        System.out.println(employee.toString());
        Thread.sleep(500);
        employee = employeeService.getOne(3522);
        System.out.println(employee.toString());
    }
}
结果
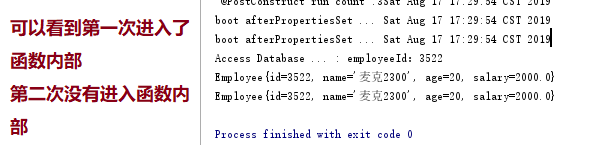
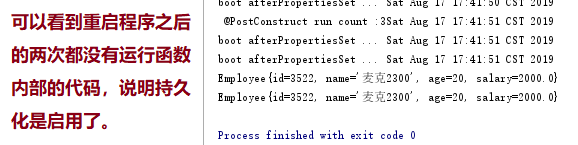
现在再运行一次测试,看看缓存的持久化机制启用了没。
Apache POI的使用
Apache POI 是创建和维护操作各种符合Office Open XML(OOXML)标准和微软的OLE 2复合文档格式(OLE2)的Java API。用它可以使用Java读取和创建,修改MS Excel文件.而且,还可以使用Java读取和创建MS Word和MSPowerPoint文件。Apache POI 提供Java操作Excel解决方案
依赖引入
<!--        操作Office格式API   -->
        <!-- https://mvnrepository.com/artifact/org.apache.poi/poi-ooxml -->
        <dependency>
            <groupId>org.apache.poi</groupId>
            <artifactId>poi-ooxml</artifactId>
            <version>4.1.0</version>
        </dependency>

<!--        SpringMVC上传文件的依赖-->
        <!-- https://mvnrepository.com/artifact/commons-fileupload/commons-fileupload -->
        <dependency>
            <groupId>commons-fileupload</groupId>
            <artifactId>commons-fileupload</artifactId>
            <version>1.4</version>
        </dependency>
码代码:读写Excel
    /**
     * 写xls文件
     * @throws IOException
     */
    @Test
    public void testProc2() throws IOException {
        HSSFWorkbook workbook = new HSSFWorkbook();
        HSSFSheet sheet = workbook.createSheet("Sheet1");
        HSSFRow row = sheet.createRow(0);
        HSSFCell cell = row.createCell(0);
        HSSFCell cell2 = row.createCell(1);
        cell.setCellValue("今天是:");
        cell2.setCellValue(new Date().toLocaleString());

        FileOutputStream fileOutputStream = new FileOutputStream("D:/tmp/newTable.xls");

        workbook.write(fileOutputStream);
        fileOutputStream.flush();
        fileOutputStream.close();
        workbook.close();
    }

    /**
     * 写xlsx文件
     * @throws IOException
     */
    @Test
    public void testProc3() throws IOException {
        XSSFWorkbook workbook = new XSSFWorkbook();
        XSSFSheet sheet = workbook.createSheet("Sheet1");
        XSSFRow row = sheet.createRow(0);
        XSSFCell cell = row.createCell(0);
        XSSFCell cell2 = row.createCell(1);
        cell.setCellValue("Hello");
        cell2.setCellValue("Apache POI");

        FileOutputStream fileOutputStream = new FileOutputStream("D:/tmp/newTable2007.xlsx");

        workbook.write(fileOutputStream);
        fileOutputStream.flush();
        fileOutputStream.close();
        workbook.close();
    }

    /**
     * 读xlsx文件
     * @throws IOException
     */
    @Test
    public void testProc4() throws IOException {
        FileInputStream fileInputStream = new FileInputStream("D:/tmp/newTable2007.xlsx");

        XSSFWorkbook xssfWorkbook = new XSSFWorkbook(fileInputStream);
        XSSFSheet sheet = xssfWorkbook.getSheetAt(0);
        System.out.println("读取Excel文件:"+"newTable2007.xlsx");
        System.out.println("读物Sheet:"+sheet.getSheetName());

        sheet.forEach(i->{
            i.forEach(ii->{
                System.out.print(ii.getStringCellValue()+" ");
            });
            System.out.println();
        });

        xssfWorkbook.close();
        fileInputStream.close();
    }
Excel的上传及下载
为了让大家更好的了解Spring Cache和POI的作用,我把它俩整到一块做个例子。
配置Spring MVC的上传文件解析器
Spring MVC上下文配置文件:
    <!-- Spring文件上传注解 -->
    <bean id="multipartResolver" class="org.springframework.web.multipart.commons.CommonsMultipartResolver">
        <property name="maxUploadSize">
            <value>1024000</value>
        </property>
        <property name="defaultEncoding" value="UTF-8"></property>
    </bean>
Service代码
要注意@Cacheable注解应用到无参函数上的key设置
spEL的#root对象。
    @Override
    @Cacheable(value = "allEmployee" , key = "#root.methodName")
    public List<Employee> findAll() {
        System.out.println("Access Database ..." + new Date().toString());
        return this.employeeDao.findAll();
    }
Cache设置
    <cache alias="allEmployee">
        <key-type>java.lang.String</key-type>
        <value-type>java.util.List</value-type>
        <!--        缓存超时时间-->
        <expiry>
            <ttl unit="minutes">35</ttl>
        </expiry>
        <resources>
            <!--            缓存堆的大小  -->
            <heap unit="entries">64</heap>
            <!--            堆占用内存大小-->
            <offheap unit="MB">1</offheap>
            <!--            持久化到硬盘-->
            <disk persistent="true" unit="MB">2</disk>
        </resources>
    </cache>
Controller代码
@Controller
public class PoiController {
    @Autowired
    private IEmployeeService employeeService;

    Integer rowIndex = 0;

    @ResponseBody
    @PostMapping("/uploadExcelFile")
    public JSONObject uploadExcelFile( MultipartFile excelFile) throws IOException {
        JSONObject result = new JSONObject();
        result.put("PathVariable" ,excelFile.getName());
//      读取上传的文件
        XSSFWorkbook xssfWorkbook = new XSSFWorkbook(excelFile.getInputStream());
        XSSFSheet sheet = xssfWorkbook.getSheetAt(0);
        System.out.println("读取Excel文件:"+excelFile);
        System.out.println("读物Sheet:"+sheet.getSheetName());

        sheet.forEach(i->{
            System.out.println(i.getCell(0).getStringCellValue());
            System.out.println(i.getCell(1).getNumericCellValue());
            System.out.println(i.getCell(2).getNumericCellValue());
            Employee employee = new Employee();
            employee.setName(i.getCell(0).getStringCellValue());
            employee.setAge( (int)i.getCell(1).getNumericCellValue());
            employee.setSalary((float) i.getCell(2).getNumericCellValue());
//          将Excel里的数据遍历出来放入DB
            employeeService.saveEmployee(employee);
        });

        xssfWorkbook.close();
        return result;
    }

    /**
     * 下载Excel
     * @param request
     * @param response
     * @throws IOException
     */
    @GetMapping("/listAllEmployeeOfExcel")
    public void listAllEmployeeOfExcel(HttpServletRequest request , HttpServletResponse response) throws IOException {
        XSSFWorkbook workbook = new XSSFWorkbook();
        XSSFSheet sheet = workbook.createSheet("Sheet1");
//      读取employee、放入Excel
        employeeService.findAll().forEach(i->{
        XSSFRow row = sheet.createRow(rowIndex++);
        XSSFCell cell = row.createCell(0);
        XSSFCell cell2 = row.createCell(1);
        XSSFCell cell3 = row.createCell(2);
        cell.setCellValue(i.getName());
        cell2.setCellValue(i.getAge());
        cell3.setCellValue(i.getSalary());

        });
//      response输出流设置
        response.reset();
        response.setHeader("Content-disposition","attachment; filename=Employee.xlsx");
        response.setContentType("application/vnd.openxmlformats-officedocument.spreadsheetml.sheet");

        workbook.write(response.getOutputStream());
        workbook.close();

    }
}
视图页
<%@ page contentType="text/html;charset=UTF-8" language="java" %>
<html>
<head>
    <title>首頁</title>
</head>
<body>
<h1>一個普通的是視圖葉!</h1>
<p>Hello everyone</p>
<hr>
<a href="hello">say hello</a>
<hr>
<a href="oneParam?smsVerifyCode=012345">帶一個參數的請求Action</a>
<hr>
<a href="register?smsVerifyCode=123456">也是帶一個參數的Action?</a>
<hr>
<a href="testTx">测试Repository</a>

<form action="uploadExcelFile" method="post" enctype="multipart/form-data">
    <input type="file" value="上传Excel文件" name="excelFile">
    <input type="submit" value="提交">
</form>

<hr>
<a href="listAllEmployeeOfExcel">下载Excel文件</a>
</body>
</html>
测试


上传成功。
开始测试导出数据到Excel并下载。


