紧接着上篇文章
爬取京东商品的评论进行情感分析
1.导入相关库
# 导入requests库(请求和页面抓取)
import requests
# 导入time库(设置抓取Sleep时间)
import time
#  导入random库(生成乱序随机数)
import random
# 导入正则库(从页面代码中提取信息)
import re
import os
import csv
# 导入情感分析库
from snownlp import SnowNLP
# 导入数值计算库(常规计算)
import numpy as np
# 导入科学计算库(拼表及各种分析汇总)
import pandas as pd
# 导入绘制图表库(数据可视化)
import matplotlib.pyplot as plt
# 导入结巴分词(关键词提取)
import jieba.analyse
2.爬取京东商品评论
# 设置请求中头文件的信息
headers = {'User-Agent': 'Mozilla/5.0 (Windows NT 10.0; WOW64) AppleWebKit/537.36 (KHTML, like Gecko) Chrome/70.0.3538.25 Safari/537.36 Core/1.70.3732.400 QQBrowser/10.5.3819.400',
            'Accept': '*/*',
            'Accept-Charset': 'ISO-8859-1,utf-8;q=0.7,*;q=0.3',
            'Connection': 'close',
            'Referer': 'https://item.jd.com/'
            }

# 设置Cookie的内容
cookie = {
    'unpl': 'V2_ZzNtbRUAQxIgChFQchtVUmJRRVxKVhATJ1tHV3scXAViA0FbclRCFX0URlRnGVoUZwcZXkJcRxVFCEdkeBBVAWMDE1VGZxBFLV0CFSNGF1wjU00zQwBBQHcJFF0uSgwDYgcaDhFTQEJ2XBVQL0oMDDdRFAhyZ0AVRQhHZHgbVARnAhVVQ2dzEkU4dlF%2bGV0EZjMTbUNnAUEpAUBTfx9fSGQBGlxCVkQddDhHZHg%3d',
    '__jdv': '76161171|baidu-pinzhuan|t_288551095_baidupinzhuan|cpc|0f3d30c8dba7459bb52f2eb5eba8ac7d_0_ff16d3f5838f4cf090b7cb02141141b7|1573975311990',
    '__jdu': '239010690',
    'areaId': '6',
    'ipLoc-djd': '6-303-36781-0',
    'PCSYCityID': 'CN_140000_140100_140106',
    'shshshfpb': 'jqH3At%2FfU9SrlFcfQjnfgMw%3D%3D',
    'shshshfpa': 'jqH3At%2FfU9SrlFcfQjnfgMw%3D%3D',
    '__jda': '122270672.239010690.1573975311.1573975311.1573975312.1',
    '__jdc': '122270672',
    '3AB9D23F7A4B3C9B': 'WVUDLUVYFRMFVKWZOXHTGBDYUMV5HMLY2VYDBX3UYJL672OAJ7LWVIW6GONDLMS7TCDWMSZKMYEAZRERTJXKDOILGU',
    'shshshfp': 'd36a43b250efcf39d0b6add590016f0d',
    '__jdb': '122270672.5.239010690|1.1573975312',
    'shshshsID': '26d62b30ea6b57e4d6469f7de971d0bd_5_1573975729111',
    'JSESSIONID': '63E9CE05E36AD715BF1AEEFF241759B5.s1'

}

productIds = [100003150357, 10265477083, 100004751037, 34664250889, 100003052761, 100004917490]
# 设置URL的第一部分
url1 = 'https://sclub.jd.com/comment/productPageComments.action?callback=callback=fetchJSON_comment98vv2511&productId='
# 设置URL的第二部分
url2 = '&score=0&sortType=5&page='
# 设置URL的第三部分
url3 = '&pageSize=10&isShadowSku=0&rid=0&fold=1'
# 乱序输出0-100的唯一随机数
# 随机选取50页评论进行抓取
ran_num = random.sample(range(100), 50)


def jie_xi(url1, productId, url2, ran_num, url3):
    # 拼接URL并乱序循环抓取页面
    for i in ran_num:
        i = str(i)
        url = (url1+productId+url2+i+url3)
        r = requests.get(url=url, headers=headers, cookies=cookie)
        html = r.content   # .content返回的是bytes型也就是二进制的数据
        print("当前抓取页面:", url, "状态:", r)
        html = str(html, encoding="GBK")  # 对抓取的页面进行编码
        # file = open("page.txt", "w")  # 将编码后的页面输出为txt文本存储
        # file.writelines(html)
        # 使用正则提取userClient字段信息
        user_comment = re.findall(r',.*?"content":(.*?),', html)
        # usera = re.findall(r',.*?"creationTime":(.*?),', html)
        # userd = re.findall(r',.*?"referenceName":(.*?),', html)
        write_to_csv(user_comment, productId)
        # write_to_txt(user_comment, productId)
        print(user_comment)
        time.sleep(3)


def write_to_csv(content, id):
    file = 'D:/数据/评论' + id + '.csv'
    # newline=''确保没有空行
    f = open(file, 'a', encoding='utf-8', newline='')
    writer = csv.writer(f)
    for i in range(len(content)):
        writer.writerow([content[i]])


# 存入txt
def write_to_txt(content, id):
    file = 'D:/数据/评论' + id + '.txt'
    # newline=''确保没有空行
    f = open(file, 'a', encoding='utf-8', newline='')
    for i in range(len(content)):
        f.write(content[i])


def run():
    for productId in productIds:
        time.sleep(3)
        productId = str(productId)
        jie_xi(url1, productId, url2, ran_num, url3)
run()
对于京东商品的评论,解析页面信息我们是获取不到的,必须审查元素

点击network后刷新页面

找到了商品的评论信息

我们便能设置请求头信息了
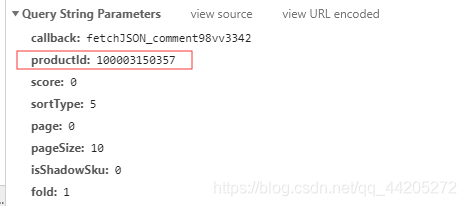
这里是重点,每个商品的id都不同,所以需要将url分为几个部分
3.情感分析
# 导入数据
data = pd.read_csv('D:/数据/评论100004917490.csv')
# 数据相关处理
len = data.shape[0]
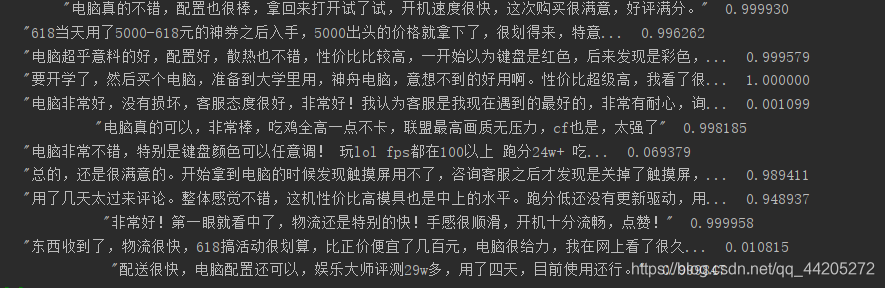
# 情感分析
def emotion(comemnt):
s = SnowNLP(comemnt)
return s.sentiments
data["emotion"] = data.comment.apply(emotion)
# 情感分析得分区间
def process():
sum_sentiment = 0
good_count = 0
just_so_so_count = 0
bad_count = 0
for i in range(len):
if data.emotion.values[i] >= 0.8:
good_count += 1
elif data.emotion.values[i] >= 0.4 and data.emotion.values[i] < 0.8:
just_so_so_count += 1
else:
bad_count += 1
sum_sentiment += data.emotion.values[i]
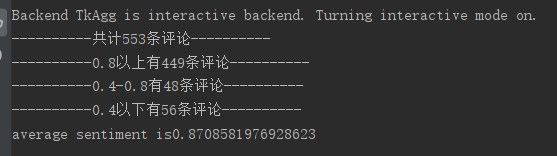
print("----------共计" + str(len) + "条评论----------")
print("----------0.8以上有" + str(good_count) + "条评论----------")
print("----------0.4-0.8有" + str(just_so_so_count) + "条评论----------")
print("----------0.4以下有" + str(bad_count) + "条评论----------")
print("average sentiment is {}".format(sum_sentiment/len))
process()
4.制作词云
我的其他文章已经讲过这部分内容
from os import path
from PIL import Image
from wordcloud import WordCloud, ImageColorGenerator
import matplotlib.pyplot as plt
import numpy as np
import  jieba


def GetWordCloud():
   path_txt = 'D:/数据/评论100004917490.txt'
   path_img = "test.jpg"
   f = open(path_txt, 'r', encoding='utf-8').read()
   background_image = np.array(Image.open(path_img))
   # join() 方法用于将序列中的元素以指定的字符连接生成一个新的字符串
   cut_text = " ".join(jieba.cut(f))
   # mask参数=图片背景,必须要写上,另外有mask参数再设定宽高是无效的
   wordcloud = WordCloud(font_path="simhei.ttf", background_color="white", mask=background_image).generate(cut_text)
   # 生成颜色值
   image_colors = ImageColorGenerator(background_image)
   # 下面代码表示显示图片
   plt.imshow(wordcloud.recolor(color_func=image_colors), interpolation="bilinear")
   # 获得模块所在的路径的
   d = path.dirname(__file__)
   # os.path.join():  将多个路径组合后返回
   wordcloud.to_file(path.join(d, "圣女的救济1.png"))
   plt.axis("off")
   plt.show()

GetWordCloud()

5.计算准确率,召回率,F值
def calculation():
# 计算准确率,召回率,F值
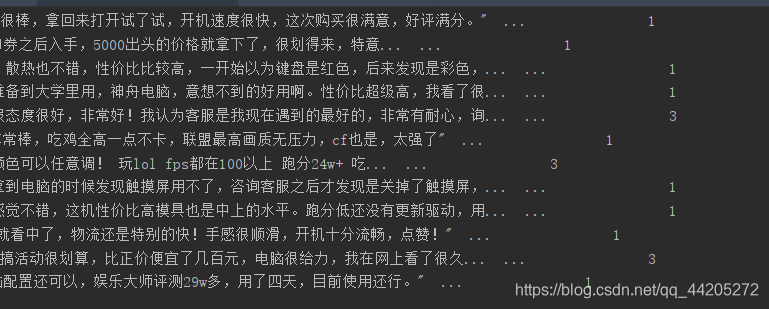
# 对情感及进行标签分类(分为1,2,3)
def emotion_classification(comemnt):
s = SnowNLP(comemnt)
if s.sentiments >= 0.8:
return 1
elif s.sentiments >= 0.4 and s.sentiments <0.8:
return 2
else:
return 3
data["classification"] = data.comment.apply(emotion_classification)
# 划分测试集和训练集
from sklearn.model_selection import train_test_split
# 正确率 = 正确识别的个体总数 / 识别出的个体总数
# 召回率 = 正确识别的个体总数 / 测试集中存在的个体总数
# F值 = 正确率 * 召回率 * 2 / (正确率 + 召回率)
data_class = data['classification']
train, test = train_test_split(data_class, test_size=0.2)
x = train.values
y = test.values
# 我们统计一下1,2,3出现的次数
count = pd.value_counts(data_class)
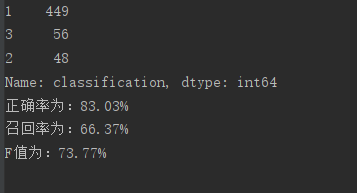
print(count)
'''
1 449
3 56
2 48
Name: classification, dtype: int64
'''
# 过抽取的数据来进行计算
count_sui_ji = pd.value_counts(x)
accuracy_rate = count_sui_ji.values[0] / count_sui_ji.sum()
recall = count_sui_ji.values[0] / data_class.shape[0]
F = (accuracy_rate * recall * 2) / (accuracy_rate + recall)
print("正确率为:{:.2f}%".format(accuracy_rate * 100))
print("召回率为:{:.2f}%".format(recall * 100))
print("F值为:{:.2f}%".format(F * 100))
calculation()
6.可视化
def plot():
    yun_xing_sum = 0
    jia_ge_sum = 0
    nei_cun_sum = 0
    xing_neng_sum = 0
    for i in range(data.shape[0]):
        if '运行' in data.comment.values[i]:
            yun_xing_sum += 1
        if '价格' in data.comment.values[i]:
            jia_ge_sum += 1
        if '内存' in data.comment.values[i]:
            nei_cun_sum += 1
        if '性能' in data.comment.values[i]:
            xing_neng_sum += 1
    print(yun_xing_sum, jia_ge_sum, nei_cun_sum, xing_neng_sum)

    yun_xing_z = 0
    jia_ge_z = 0
    nei_cun_z = 0
    xing_neng_z = 0
    for i in range(data.shape[0]):
        if "运行" in data.comment.values[i] and "快" in data.comment.values[i]:
            yun_xing_z += 1
        elif "价格" in data.comment.values[i] and "满意" in data.comment.values[i]:
            jia_ge_z += 1
        elif "内存" in data.comment.values[i] and "不错" in data.comment.values[i]:
            nei_cun_z += 1
        elif "性能" in data.comment.values[i] and "不错" in data.comment.values[i]:
            xing_neng_z += 1
    print(yun_xing_z, jia_ge_z, nei_cun_z, xing_neng_z)

    yun_xing_f = yun_xing_sum - yun_xing_z
    jia_ge_f = jia_ge_sum - jia_ge_z
    nei_cun_f = nei_cun_sum - nei_cun_z
    xing_neng_f = xing_neng_sum - xing_neng_z

    # 画图
    import numpy as np
    import matplotlib.pyplot as plt
    plt.style.use('ggplot')    # 使用自带的样式进行美化
    # print(plt.style.available)   # 打印出所有的样式
    # 下面两行代码用于显示中文
    plt.rcParams['font.sans-serif'] = ['SimHei']
    plt.rcParams['axes.unicode_minus'] = False

    plt.subplot(111)
    x = np.array([1, 2, 3, 4])
    y1 = np.array([yun_xing_z, jia_ge_z, nei_cun_z, xing_neng_z])
    y2 = np.array([yun_xing_f, jia_ge_f, nei_cun_f, xing_neng_f])

    plt.bar(x, y1, width=0.3, label="正面", color='r')
    plt.bar(x+0.3, y2, width=0.3, label="负面", color='b')
    plt.title("电脑性能评价结果分析", color='k')
    for a, b in zip(x, y1):
        plt.text(a, b, b, ha='center', va='bottom', fontsize=11, color='k')
    for a, b in zip(x+0.3, y2):
        plt.text(a, b, b, ha='center', va='bottom', fontsize=11, color='k')
    plt.xlabel('评价属性')
    plt.ylabel('评价数量')
    plt.xticks(x + 0.15, ["运行", "价格", "内存", "性能"])
    plt.grid(False)
    plt.legend(ncol=2, loc='upper center')
plot()

