在使用 Flutter 开发的过程中,我们可能需要进行数据的页面之间的传递、共享或者全局的一个事件、状态管理和监听。那么这节博客我们将介绍 Flutter 中实现数据共享与传递的方法,并配合实例进行详细讲解。
1.InheritedWidget 实现数据共享与传递
在 Android 中可以通过静态常量、全局对象来存储和共享数据,也就是全局变量概念。Flutter 中则是以另外一种方式来实现全局的数据共享与传递的。InheritedWidget 就可以实现类似全局变量的功能。如果是页面之间的传递也可以通过路由来传递数据。当然我们也可以用另一种方式来全局共享和传递数据。那么首先我们使用官方提供的 InheritedWidget 来实现数据共享与传递。
其实 Flutter 的很多地方也都用到了 InheritedWidget 的组件方式来实现数据共享的,如获取全局主题属性的设计就类似于 InheritedWidget 的方式:
Theme.of(context).primaryColor;
... ...
@override
Widget build(BuildContext context) {
  return Text(
    'Example',
    style: Theme.of(context).textTheme.title,
  );
}
通过 Theme.of(context) 获取一个对象,然后获取它的属性或方法。
还有一个使用例子就是 MediaQuery。我们可以使用 MediaQuery 来获取相关信息:
MediaQuery.of(context).size.width;
MediaQuery 继承自 InheritedWidget,就是用 InheritedWidget 来实现数据共享和传递。
我们看一个官方的例子:
class FrogColor extends InheritedWidget {
  const FrogColor({
    Key key,
    @required this.color,
    @required Widget child,
  }) : assert(color != null),
       assert(child != null),
       super(key: key, child: child);

  final Color color;

  static FrogColor of(BuildContext context) {
    return context.inheritFromWidgetOfExactType(FrogColor) as FrogColor;
  }

  @override
  bool updateShouldNotify(FrogColor old) => color != old.color;
}

// 使用的时候
... ...
@override
  Widget build(BuildContext context) {
    return Scaffold(
        appBar: AppBar(title: Text('File Samples'), primary: true),
        // 设置颜色值
        body: FrogColor(
          color: Colors.teal,
          child: Text("文件操作"),
        )); //Text("文件操作")
  }

// 使用获取颜色值的时候类似MediaQuery
FrogColor.of(context).color.value;
我们需要先通过 of(context) 来实例化获取我们的对象。获取就是通过:context.inheritFromWidgetOfExactType(Type) 来获取,我们可以返回对象也可以直接返回值。
updateShouldNotify 这个方法就是看是否需要更新数据,当新的值和原有的值不一样的时候就需要更新。
这种默认的 InheritedWidget 方式初始化之后,由于里面的变量是 final 类型的,所以只能获取值,不能修改值,这也是它的一个缺点。想要修改值的话,需要我们进行扩充修改定制才可以,大家可以尝试下。
2.ScopedModel实现数据共享与传递
由于 InheritedWidget 方式有其自身的限制,所以我们采用另外一种方式来更方便的实现全局数据共享、监听、传递。通过 ScopedModel 插件库来实现:https://pub.dev/packages/scoped_model。
它的作用就是状态管理、数据管理。如我们进入详情页之后,进行了评论、点赞、更改某些状态值之后,再返回前一个页面。它对应的数据也应该得到更新等类似的情况下,我们可以使用 ScopedModel 来实现。ScopedModel 使用了观察者模式来实现数据状态管理,内部也是使用了 InheritedWidget 进行数据共享传递的。
接下来我们就看下 ScopedModel 的具体使用方法吧:
dependencies:
  scoped_model: ^1.0.1
在使用的地方导入包:
import 'package:scoped_model/scoped_model.dart';
那么我们来实现一个第二个页面点击增加数字,返回第一个页面后也同步更新数字值的一个小例子。
首先定义 Model,用来定义数据:
import 'package:flutter/widgets.dart';
import 'package:scoped_model/scoped_model.dart';

// 继承自Model来实现自己的Model来存储数据
class CounterModel extends Model {
  // 定义属性
  int _counter = 0;

  // 获取值的方法
  int get counter => _counter;

  // 定义改变值的方法
  void increment() {
    _counter++;
    // 调用通知刷新数据
    notifyListeners();
  }
  // 也可以通过这种方式获取对象,调用里面的属性和方法
  static CounterModel of(BuildContext context) {
    return ScopedModel.of<CounterModel>(context);
  }
}
// 想实现数据监听的父页面最外层用ScopedModel包裹,定义Model
// 我们可以在入口出全局添加
void main() {
  return runApp(
      ScopedModel<CounterModel>(model: CounterModel(), child: ShowApp()));
}
子页面:

```kotlin
// 子页面使用
import 'package:flutter/material.dart';
import 'package:flutter/widgets.dart';
import 'package:scoped_model/scoped_model.dart';

import 'countermodel.dart';
import 'scoped_detail_samples.dart';

class ScopedSamples extends StatefulWidget {
  @override
  State<StatefulWidget> createState() {
    return ScopedSamplesState();
  }
}

class ScopedSamplesState extends State<ScopedSamples> {
  @override
  void initState() {
    super.initState();
  }

  @override
  Widget build(BuildContext context) {
    // 可以通过这种方式实例化获取值
    final _model = CounterModel.of(context).counter;
    return Scaffold(
      appBar: AppBar(title: Text('Scoped Samples'), primary: true),
      body: Column(
        children: <Widget>[
          // 方式一:ScopedModelDescendant来获取绑定属性值
          ScopedModelDescendant<CounterModel>(builder: (context, child, model) {
            return Text('${model.counter}');
          }),
          // 方式二:CounterModel.of,本质是:ScopedModel.of<CounterModel>(context);
          Text('$_model')
        ],
      ),
      floatingActionButton: FloatingActionButton(
        onPressed: () {
          Navigator.push(context, MaterialPageRoute(builder: (context) {
            return ScopedDetailSamples();
          }));
        },
      ),
    );
  }
}
第二个页面:
import 'package:flutter/material.dart';
import 'package:flutter/widgets.dart';
import 'package:scoped_model/scoped_model.dart';

import 'countermodel.dart';

class ScopedDetailSamples extends StatefulWidget {
  @override
  State<StatefulWidget> createState() {
    return ScopedDetailSamplesState();
  }
}

class ScopedDetailSamplesState extends State<ScopedDetailSamples> {
  @override
  void initState() {
    super.initState();
  }

  @override
  Widget build(BuildContext context) {
    return Scaffold(
      appBar: AppBar(title: Text('Scoped Samples'), primary: true),
      body:
          ScopedModelDescendant<CounterModel>(builder: (context, child, model) {
            // 当然也可以直接使用CounterModel.of(context).counter
        return Text('${model.counter}');
      }),
      floatingActionButton: FloatingActionButton(
        onPressed: CounterModel.of(context).increment,
        tooltip: 'Increment',
        child: Icon(Icons.add),
      ),
    );
  }
}
效果图如下:

数值两个页面同步更新。
3.Redux 实现数据共享与传递
Redux 的作者同 ScopedModel 是同一个作者,Redux 使用起来相对于 ScopedModel 麻烦一些。
主要由 State、Action、Reduxer、Store、StoreConnector 几部分组成。
State 相当于 ScopedModel 里的 Model,用于定于对象和属性;
Action 相当于定义操作 State 的方法;
Reduxer 用于将 Action 匹配操作 State 的一个中间件;
Store 相当于 ScopedModel 里的最顶层的 ScopedModel 里的 Model;
StoreConnector 相当于 ScopedModel 里的 ScopedModelDescendant,用于绑定、更新数据。
我们依然是使用官方的增加数字的例子来进行讲解演示,Redux的插件库主页地址:https://pub.dev/packages/flutter_redux。
引用库:
dependencies:
  flutter_redux: ^0.5.3
使用的地方导入类:
import 'package:flutter_redux/flutter_redux.dart';
首先定义一个 State 实体类:
// 定义存储数据的属性和构造对象赋值方法
class AppState {
  int counter;

  AppState(this.counter);
}
这个 AppState 类我们可以单独写在一个文件里,也可以写在一个单独的类里面。
接下来定义这个 State 类的 Actions,也就是方法集合:
// Actions,也就是方法,可以定义多个方法在里面
enum Actions { Increment, Decrement }
然后定义一个Reduxer,用于关联 Actions 和 AppState:
// reducer,用于匹配Action,操作AppState里的数据
AppState reducer(AppState state, action) {
  if (action == Actions.Increment) {
    return new AppState(state.counter + 1);
  } else if (action == Actions.Decrement) {
    return new AppState(state.counter - 1);
  }
  return state;
}
有了这几个类之后,我们就可以构建我们的 Store了。
// Store需要一个reducer和initialState(初始化实体对象,并赋初值)
final store = Store(reducer, initialState: AppState(0));
为了方便,我们把这几个部分写在一个单独的 dart 文件里:

// dart文件名这里随便起一个,叫做:redux_app.dart

// 定义实体State对象,内含属性和构造方法
class AppState {
  int counter;
  AppState(this.counter);
}

// Actions,也就是方法,可以定义多个方法在里面
enum Actions { Increment, Decrement }

// reducer,用于匹配Action,操作AppState里的数据
AppState reducer(AppState state, action) {
  if (action == Actions.Increment) {
    return new AppState(state.counter + 1);
  } else if (action == Actions.Decrement) {
    return new AppState(state.counter - 1);
  }
  return state;
}

// Store需要一个reducer和initialState(初始化实体对象,并赋初值)
final store = Store(reducer, initialState: AppState(0));
接下来我们需要在入口类里包裹一个 StoreProvider,将我们的 store 绑定上去,全局监听、共享数据。
void main() => runApp(ShowApp());

class ShowApp extends StatelessWidget {
  @override
  Widget build(BuildContext context) {
    return StoreProvider<AppState>(
      // 这个store是从刚才创建的redux_app.dart文件导入的
      store: store,
      child: MaterialApp(
        title: 'Flutter Demo',
        theme: ThemeData(
          primarySwatch: Colors.teal,
        ),
        home: ShowAppPage(),
        routes: <String, WidgetBuilder>{
          '/buttonpage': (BuildContext context) => ButtonSamples(),
          '/routepage': (BuildContext context) => RouteSamples(),
        },
      ),
    );
  }
}
这个用法和 ScopedModel 很像,可以对比着进行使用。
这样我们就可以在子页面里使用 StoreConnector 进行包裹组件,实现数据的监听、共享了。
StoreConnector 的作用和 ScopedModel 里的 ScopedModelDescendant 的作用基本一致,大家可以对比着进行学习使用。
// 组件绑定数据可以有两种方式

// 第一种方式,StoreProvider.of<AppState>(context).state来获取属性值
int counter = StoreProvider.of<AppState>(context).state.counter;
... ...
body: Text(
        '$counter',
        style: TextStyle(fontSize: 20),
      ),

//第二种方式,用StoreConnector包裹组件
@override
  Widget build(BuildContext context) {
    return Scaffold(
      appBar: AppBar(title: Text('Redux Samples'), primary: true),
      // StoreConnector包裹组件,绑定数值
      body: StoreConnector<AppState, String>(
        // 定义数据转换方式,将store数据转换为哪种类型进行使用,也可以直接返回store
        converter: (store) => store.state.counter.toString(),
        // 定义组件布局,绑定数据,第二个参数对应converter返回的数据
        builder: (context, counter) {
          return Text(
            counter,
            style: TextStyle(fontSize: 20),
          );
        },
      ),
      floatingActionButton: StoreConnector<AppState, VoidCallback>(
        converter: (store) {
          return () {
            //store.dispatch用于执行Actions里的方法
            return store.dispatch(reduxApp.Actions.Increment);
          };

        },
        // 简化为lambda表达式就是:converter: (store) => () => store.dispatch(Actions.Decrement),
        builder: (context, callback) {
          return FloatingActionButton(
            // 这里点击就会执行converter返回的操作或数值
            onPressed: callback,
            child: Icon(Icons.add),
          );
        },
      ),
    );
  }
}
这样就实现了 Redux 数据的更新与监听,是不是和 ScopedModel 用法很像,不过比 ScopedModel 更麻烦。
4.EventBus 实现数据共享与传递
最后我们看下 EventBus 实现数据监听、通信与共享传递的用法,EventBus 对于 Android 平台开发者来说非常熟悉,EventBus 在 Android 平台也是一个事件总线、通信、数据共享、监听的三方库。Flutter 中也有人实现了 EventBus 在 Flutter 平台的插件库:https://pub.dev/packages/event_bus。
EventBus是一个解耦应用程序的简单事件总线,基于发布/订阅模式,有发布者、订阅者两个角色。
当我们在 MVC 或 MVP 模式中有一个 MVC 或 MVP 的关系时可能很好进行数据通信:
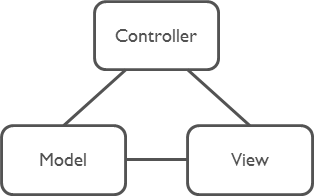
但是当有多组 MVC 或 MVP 关系时,多组控制器之间进行通信管理就非常的麻烦和复杂、耦合度高:

通过 EventBus 这种事件总线的管理,耦合度大大降低:

(图片来自于 EventBus 插件库官方)
接下来我们看下 EventBus 的用法,EventBus 相对于其他两个插件库更加的容易理解和使用一些。
添加依赖库:
dependencies:
  event_bus: ^1.1.0
使用的地方导入库:
import 'package:event_bus/event_bus.dart';
使用的基本步骤和用法如下。
首先创建一个事件总线:
import 'package:event_bus/event_bus.dart';
// 实例化EventBus,创建一个事件总线
EventBus eventBus = EventBus();
接下来定义 Event 事件(实体类):
// 定义Event事件:即要传递和共享的实体类
class UserEvent {
  String name;

  UserEvent(this.name);
}

// 可以定义多个实体类
class BookEvent {
  String bookName;

  BookEvent(this.bookName);
}
接下来注册事件观察者:
eventBus.on<UserEvent>().listen((event) {
  // 所有类型为UserEvent或其子类的事件、数据都可以被监听到
  print(event.name);
});


eventBus.on().listen((event) {
  // 监听所有事件
  print(event.runtimeType);
});
发送事件:
User myUser = User('Mickey');
eventBus.fire(UserEvent(myUser));
取消订阅事件:
StreamSubscription userSubscription = eventBus.on<UserEvent>().listen((event) {
  print(event.name);
});

userSubscription.cancel();
接下来我们就通过一个实例来看下 EventBus 的具体用法。
我们新建一个类,这里命名为 event_bus.dart:
import 'package:event_bus/event_bus.dart';

// 实例化EventBus,创建一个事件总线
EventBus eventBus = EventBus();

// 定义Event事件:即要传递和共享的实体类
class UserEvent {
  String name;

  UserEvent(this.name);
}

// 可以定义多个实体类
class BookEvent {
  String bookName;

  BookEvent(this.bookName);
}
我们依然写两个页面,第一个页面用于接收事件、数据;第二个页面用来发送事件、数据。
在第一个页面我们注册和监听接收事件、数据:
class EventBusSamplesState extends State<EventBusSamples> {
  var name = '初始数据';

  @override
  void initState() {
    super.initState();
    // 注册和监听t发送来的UserEven类型事件、数据
    eventBus.on<UserEvent>().listen((UserEvent event) {
      setState(() {
        name = event.name;
      });
    });
  }

  @override
  Widget build(BuildContext context) {
    return Scaffold(
      appBar: AppBar(title: Text('EventBus Samples'), primary: true),
      // 绑定数据
      body: Text(
        '$name',
        style: TextStyle(fontSize: 20),
      ),
      floatingActionButton: FloatingActionButton(
        onPressed: () {
          Navigator.push(context, MaterialPageRoute(builder: (context) {
            return EventBusDetailSamples();
          }));
        },
        tooltip: '跳转',
        child: Icon(Icons.add),
      ),
    );
  }
}
怎么样?是不是很简单。
EventBus 是通过 Dart Streams 来实现的,那么我们可以通过对 Dart Stream 的控制,来实现对 EventBus 的控制。我们也可以取消注册监听。
StreamSubscription subscription = eventBus.on<UserEvent>().listen((event) {
  print(event.name);
});

subscription.resume(); // 开始/恢复监听
subscription.pause(); // 暂停监听
subscription.cancel(); // 取消注册监听
接下来我们看第二个页面,用来发送事件、数据:
class EventBusDetailSamplesState extends State<EventBusDetailSamples> {
  var name = '初始数据'
  @override
  void initState() {
    super.initState();
    // 注册和监听t发送来的UserEven类型事件、数据,这里我们为了时时显示我们发送的内容,在这里也监听一下
    eventBus.on<UserEvent>().listen((UserEvent event) {
      setState(() {
        name = event.name;
      });
    });
  }

  @override
  Widget build(BuildContext context) {
    return Scaffold(
      appBar: AppBar(title: Text('EventBus Samples'), primary: true),
      body: Text(
        '$name',
        style: TextStyle(fontSize: 20),
      ),
      floatingActionButton: FloatingActionButton(
        onPressed: () {
          // 发送事件、数据
          eventBus.fire(UserEvent('Tom'));
        },
        child: Icon(Icons.add),
      ),
    );
  }
}
我们接下来看下运行效果:

EventBus 适用于全局的数据通信,不适合保持数据和状态,可以搭配ScopedModel进行使用。
