前言
现在flutter的Widget还是满足不了复杂项目的需求,小编拿到项目的需求,找了三天,网上对这块还是空白的,所以就只能自己造轮子了,现在写这篇博客,和大家分享一下
准备工具
这套课程是采用VScode进行开发的。当前在此之前请准备好Flutter开发环境,我这里就不进行讲解了。
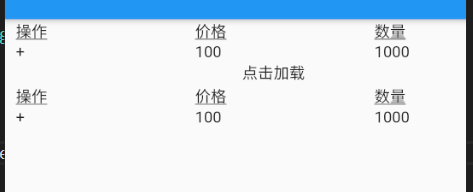
轮子实现结果
点击+号,则灰色是列表就会出现,形成一个新的表格

涉及到的插件
provide: ^1.0.2 状态管理插件
小实例流程
首先编写provide文件
设置一个变量来控制开关的闭合,一个函数来改变变量的值
import 'package:flutter/material.dart';

class isOpenProvide with ChangeNotifier{
  bool isopen=false;

  open(){
    isopen=!isopen;
    print(isopen);
    notifyListeners();
  }

}
写+号的动作
 Widget _operation(String title,BuildContext context){
    return Container(
      width: 150,
      margin: EdgeInsets.only(left: 10.0),
      child: InkWell(
        onTap: ()async{
         await Provide.value<isOpenProvide>(context).open();
         _addTable(context);
        },
        child: Text(
          title,
        ),
      )
    );
  }
增加行
Widget _addTable(BuildContext context){

    if (Provide.value<isOpenProvide>(context).isopen) {
      return _newList(context);
    } else{
      return Text('点击加载');
    }
  }
  //新增加行的颜色和数据
Widget _newList(BuildContext context){
    return Row(
      children: <Widget>[
        Container(
          color: Colors.grey,
          child: Column(
            children: <Widget>[
              Row(
                children: <Widget>[
                  _titleContext('操作'),
                  _titleContext('价格'),
                  _titleContext('数量'),
                ],
              ),
              Row(
                children: <Widget>[
                  _operation('+',context),
                  _context('100'),
                  _context('1000'),
                ],
              ),
            ],
          ),
        )
      ],
    );
  }
具体的布局
这里的数据都是死数据,之后接入项目的时候,就可以使用后端接口传过来的数据了
/**
 * 垂直listView
 */
class MyApp extends StatelessWidget {

  bool isOpen=false;

  @override
  Widget build(BuildContext context) {
    final title = 'list';
    return new MaterialApp(
      title: title,
      home: Provide<isOpenProvide>(
        builder: (context,child,val){
          return new Scaffold(
            appBar: new AppBar(
              title: new Text(title),
            ),
            body: new Center(
              child: new ListView(
                //控制方向 默认是垂直的
              scrollDirection: Axis.horizontal,
                children: <Widget>[
                  Column(
                    children: <Widget>[
                      Row(
                        children: <Widget>[
                          _titleContext('操作'),
                          _titleContext('价格'),
                          _titleContext('数量'),
                        ],
                      ),
                      Row(
                        children: <Widget>[
                          _operation('+',context),
                          _context('100'),
                          _context('1000'),
                        ],
                      ),
                      _addTable(context),
                      Row(
                        children: <Widget>[
                          _titleContext('操作'),
                          _titleContext('价格'),
                          _titleContext('数量'),
                        ],
                      ),
                      Row(
                        children: <Widget>[
                          _operation('+',context),
                          _context('100'),
                          _context('1000'),
                        ],
                      ),
                    ],
                  )
                ],
              ),
            ),
          );
        },
      ),
    );
  }
这个例子十分的简单,大家可以到我的github的table下载源码,直接看,希望可以帮助到大家,有帮助的话,请给我一个赞和一个star,编写不易。
