写在前面:
本文章旨在总结备份、方便以后查询,由于是个人总结,如有不对,欢迎指正;另外,内容大部分来自网络、书籍、和各类手册,如若侵权请告知,马上删帖致歉。
目录
一、GPIO模式
STM32的 GPIO模式有以下几种:
- GPIO_Mode_AIN -- 模拟输入
- GPIO_Mode_IN_FLOATING -- 输入浮空
- GPIO_Mode_IPD -- 输入下拉
- GPIO_Mode_IPU -- 输入上拉
- GPIO_Mode_Out_OD -- 开漏输出
- GPIO_Mode_Out_PP -- 推挽式输出
- GPIO_Mode_AF_OD -- 开漏复用功能
- GPIO_Mode_AF_PP -- 推挽式复用功能
typedef enum
{
  GPIO_Mode_AIN = 0x0,
  GPIO_Mode_IN_FLOATING = 0x04,
  GPIO_Mode_IPD = 0x28,
  GPIO_Mode_IPU = 0x48,
  GPIO_Mode_Out_OD = 0x14,
  GPIO_Mode_Out_PP = 0x10,
  GPIO_Mode_AF_OD = 0x1C,
  GPIO_Mode_AF_PP = 0x18
}GPIOMode_TypeDef;
为了后面的代码参考,顺便在上面贴上 GPIO的模式结构体,也可以在 stm32f10x_gpio.h 文件中查看
根据上面的几种模式,可以大致分为 4种模式:输入、输出、复用、模拟
先来了解一下 I/O口总的功能结构,然后再细分

1、输入

2、输出

3、复用

4、模拟

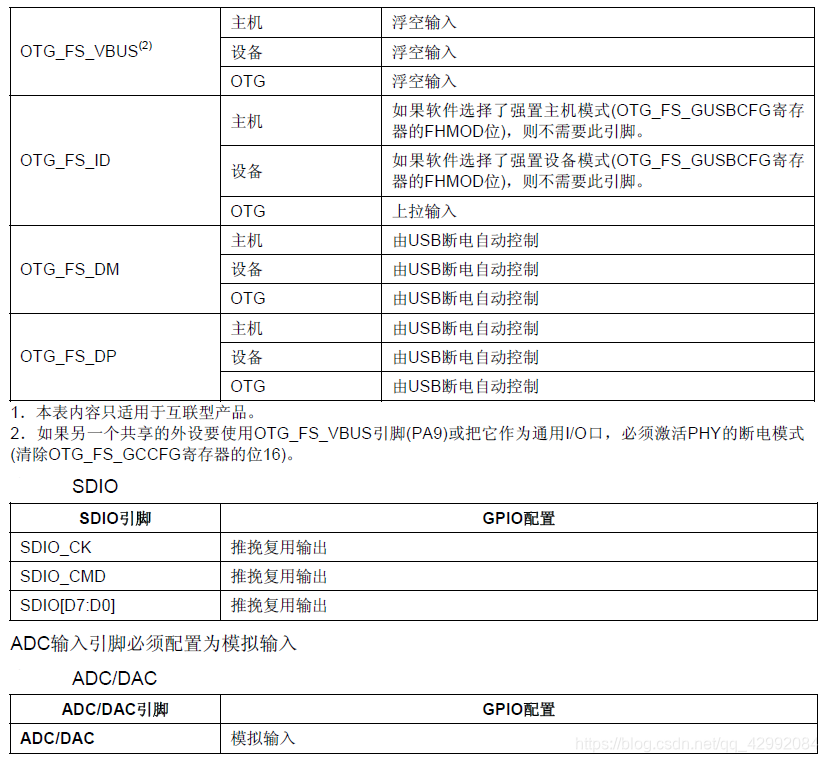
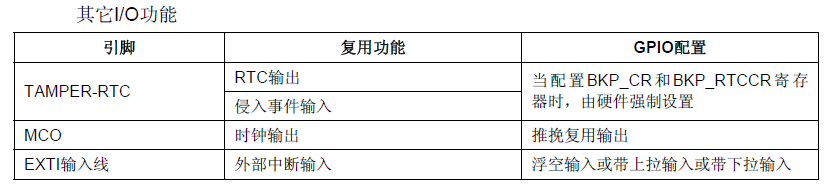
二、外设 I/O配置模式选择


三、GPIO配置代码实现
本次只演示输入、输出的例子;另外的,后面也会一一应用
1、输出之推挽输出
/************************************************
函数名称 : LED_Config
功    能 : LED配置
参    数 : 无
返 回 值 : 无
*************************************************/
void LED_Config(void)
{
	GPIO_InitTypeDef GPIO_InitStructure;

	RCC_APB2PeriphClockCmd(RCC_APB2Periph_GPIOB, ENABLE);

	/* Configure PB.14 pin as output push pull */
	GPIO_InitStructure.GPIO_Pin = LED_GPIO_PIN;
	GPIO_InitStructure.GPIO_Mode = GPIO_Mode_Out_PP;
	GPIO_InitStructure.GPIO_Speed = GPIO_Speed_10MHz;
	GPIO_Init(LED_GPIO_PORT, &GPIO_InitStructure);
}
2、输入之上拉输入
/************************************************
函数名称 : Key_Config
功    能 : 按键配置
参    数 : 无
返 回 值 : 无
*************************************************/
void Key_Config(void)
{
	EXTI_InitTypeDef EXTI_InitStructure;
	GPIO_InitTypeDef GPIO_InitStructure;
	NVIC_InitTypeDef NVIC_InitStructure;

	/* Enable GPIOB clock */
	RCC_APB2PeriphClockCmd(RCC_APB2Periph_GPIOB, ENABLE);

	/* Enable AFIO clock */
	RCC_APB2PeriphClockCmd(RCC_APB2Periph_AFIO, ENABLE);

	/* Configure PB.01 pin as input pull up */
	GPIO_InitStructure.GPIO_Pin = KEY_GPIO_PIN;
	GPIO_InitStructure.GPIO_Mode = GPIO_Mode_IPU;
	GPIO_Init(KEY_GPIO_PORT, &GPIO_InitStructure);

	/* Connect EXTI1 Line to PB.01 pin */
	GPIO_EXTILineConfig(GPIO_PortSourceGPIOB, GPIO_PinSource1);

	/* Configure EXTI1 line */
	EXTI_InitStructure.EXTI_Line = EXTI_Line1;
	EXTI_InitStructure.EXTI_Mode = EXTI_Mode_Interrupt;
	EXTI_InitStructure.EXTI_Trigger = EXTI_Trigger_Falling;
	EXTI_InitStructure.EXTI_LineCmd = ENABLE;
	EXTI_Init(&EXTI_InitStructure);

	/* Enable the EXTI1 Interrupt */
	NVIC_InitStructure.NVIC_IRQChannel = EXTI1_IRQn;
	NVIC_InitStructure.NVIC_IRQChannelPreemptionPriority = 2;
	NVIC_InitStructure.NVIC_IRQChannelSubPriority = 1;
	NVIC_InitStructure.NVIC_IRQChannelCmd = ENABLE;
	NVIC_Init(&NVIC_InitStructure);

	/* Generate software interrupt: simulate a falling edge applied on EXTI1 line */
	EXTI_GenerateSWInterrupt(EXTI_Line1);
}
以上便是常用的一些 I/O配置;在输入中,用到了 EXIT和 NVIC这两个陌生的配置,现在你不需要弄懂他们,后面会详细说
四、总工程实现
bsp_gpio.c 源文件
#include "bsp_gpio.h"


/************************************************
函数名称 : LED_Config
功    能 : LED配置
参    数 : 无
返 回 值 : 无
*************************************************/
void LED_Config(void)
{
	GPIO_InitTypeDef GPIO_InitStructure;

	RCC_APB2PeriphClockCmd(RCC_APB2Periph_GPIOB, ENABLE);

	/* Configure PB.14 pin as output push pull */
	GPIO_InitStructure.GPIO_Pin = LED_GPIO_PIN;
	GPIO_InitStructure.GPIO_Mode = GPIO_Mode_Out_PP;
	GPIO_InitStructure.GPIO_Speed = GPIO_Speed_10MHz;
	GPIO_Init(LED_GPIO_PORT, &GPIO_InitStructure);

	LED_OFF;
}

/************************************************
函数名称 : Key_Config
功    能 : 按键配置
参    数 : 无
返 回 值 : 无
*************************************************/
void Key_Config(void)
{
	EXTI_InitTypeDef EXTI_InitStructure;
	GPIO_InitTypeDef GPIO_InitStructure;
	NVIC_InitTypeDef NVIC_InitStructure;

	/* Enable GPIOB clock */
	RCC_APB2PeriphClockCmd(RCC_APB2Periph_GPIOB, ENABLE);

	/* Enable AFIO clock */
	RCC_APB2PeriphClockCmd(RCC_APB2Periph_AFIO, ENABLE);

	/* Configure PB.01 pin as input pull up */
	GPIO_InitStructure.GPIO_Pin = KEY_GPIO_PIN;
	GPIO_InitStructure.GPIO_Mode = GPIO_Mode_IPU;
	GPIO_Init(KEY_GPIO_PORT, &GPIO_InitStructure);

	/* Connect EXTI1 Line to PB.01 pin */
	GPIO_EXTILineConfig(GPIO_PortSourceGPIOB, GPIO_PinSource1);

	/* Configure EXTI1 line */
	EXTI_InitStructure.EXTI_Line = EXTI_Line1;
	EXTI_InitStructure.EXTI_Mode = EXTI_Mode_Interrupt;
	EXTI_InitStructure.EXTI_Trigger = EXTI_Trigger_Falling;
	EXTI_InitStructure.EXTI_LineCmd = ENABLE;
	EXTI_Init(&EXTI_InitStructure);

	/* Enable the EXTI1 Interrupt */
	NVIC_InitStructure.NVIC_IRQChannel = EXTI1_IRQn;
	NVIC_InitStructure.NVIC_IRQChannelPreemptionPriority = 2;
	NVIC_InitStructure.NVIC_IRQChannelSubPriority = 1;
	NVIC_InitStructure.NVIC_IRQChannelCmd = ENABLE;
	NVIC_Init(&NVIC_InitStructure);

	/* Generate software interrupt: simulate a falling edge applied on EXTI1 line */
	EXTI_GenerateSWInterrupt(EXTI_Line1);
}


/*---------------------------- END OF FILE ----------------------------*/
bsp_gpio.h 头文件
#ifndef __BSP_GPIO_H
#define __BSP_GPIO_H


#include "stm32f10x.h"

#define LED_GPIO_PORT			GPIOB
#define LED_GPIO_PIN			GPIO_Pin_14

#define LED_ON				GPIO_ResetBits(GPIOB, GPIO_Pin_14)
#define LED_OFF				GPIO_SetBits(GPIOB, GPIO_Pin_14)

#define KEY_GPIO_PORT			GPIOB
#define KEY_GPIO_PIN			GPIO_Pin_1

void LED_Config(void);
void Key_Config(void);


#endif	/* __BSP_GPIO_H */


/*---------------------------- END OF FILE ----------------------------*/
stm32f10x_it.c 源文件
/* Includes ------------------------------------------------------------------*/
#include "stm32f10x_it.h"
#include "bsp_gpio.h"


/******************************************************************************/
/*            STM32F10x Peripherals Interrupt Handlers                        */
/******************************************************************************/

/**
  * @brief  This function handles External line 1 interrupt request.
  * @param  None
  * @retval None
  */
void EXTI1_IRQHandler(void)
{
	if(EXTI_GetITStatus(EXTI_Line1) != RESET)
	{
		if(GPIO_ReadInputDataBit(KEY_GPIO_PORT, KEY_GPIO_PIN) == RESET)
		{
			LED_OFF;
		}

		/* Clear the  EXTI line 1 pending bit */
		EXTI_ClearITPendingBit(EXTI_Line1);
	}
}
main.c 主函数
/* Includes ------------------------------------------------------------------*/
#include "stm32f10x.h"
#include <stdio.h>


/************************************************
函数名称 : main
功    能 : 主函数入口
参    数 : 无
返 回 值 : 无
*************************************************/
int main(void)
{
	/* Initial Configuration */
	SystemInit();

	/* -------- End -------- */

	LED_ON;

	/* Infinite loop */
	while (1)
	{

	}
}
