package com.dn_alan.myapplication;


import android.content.Context;
import android.util.AttributeSet;
import android.util.Log;
import android.view.View;
import android.view.ViewGroup;


import java.util.ArrayList;
import java.util.List;

/**
 *      思路,我们知道绘制流程最终会调用到我门的OnMesure  和   onLayout,
 *     而不同的布局,他们自己的实现不一样,所以才有了我们使用的这些基本布局组件
 *     那么我们现在自己来开发一个瀑布式的流式布局
 */
public class WaterfallFlowLayout extends ViewGroup {
    private static final String TAG = "WaterfallFlowLayout";
    /**
     * 用来保存行高的列表
     */
    private List<Integer> lstLineHegiht = new ArrayList<>();
    /**
     * 用来保存每行views的列表
     */
    private List<List<View>> lstLineView = new ArrayList<>();

    private boolean isFlag;

    public WaterfallFlowLayout(Context context) {
        super(context);
    }

    public WaterfallFlowLayout(Context context, AttributeSet attrs) {
        super(context, attrs);
    }

    public WaterfallFlowLayout(Context context, AttributeSet attrs, int defStyleAttr) {
        super(context, attrs, defStyleAttr);
    }

    @Override
    public LayoutParams generateLayoutParams(AttributeSet attrs) {
        return new MarginLayoutParams(getContext(),attrs);
    }

    /**
     * @param widthMeasureSpec
     * @param heightMeasureSpec MeasureSpec是父控件提供给子View的一个参数,作为设定自身大小参考,只是个参考,要多大,还是View自己说了算。
     */
    @Override
    protected void onMeasure(int widthMeasureSpec, int heightMeasureSpec) {
        super.onMeasure(widthMeasureSpec, heightMeasureSpec);
        Log.d(TAG, "onMeasure");
        //测量的方法会走两次,如果不添加这个flag,布局会向下移动
        if(isFlag){
            return;
        }
        isFlag = true;

        //1.先完成自己的宽高测量
        //需要得到mode进行判断我的显示模式是怎样的
        //获取父容器建议的宽和高
        int widthSize = MeasureSpec.getSize(widthMeasureSpec);
        int heightSize = MeasureSpec.getSize(heightMeasureSpec);
        //获取父容器模式
        int widthMode = MeasureSpec.getMode(widthMeasureSpec);
        int heightMode = MeasureSpec.getMode(heightMeasureSpec);

        //当前控件宽高(自己)
        int measureWidth = 0;
        int measureHeight = 0;

        //当前行宽,行高,因为存在多行,下一行数据要放到下方,行高需要保存
        int iCurLineW = 0;
        int iCurLineH = 0;


        //1.确认自己当前空间的宽高,这里因为会有两次OnMeasure,进行二级测量优化,所以采用IF_ELSE结构
        //二级优化原理在源码具体Draw时,第一次不会直接进行performDraw的调用反而是在下面重新进行了一次scheduleTraversals
        //在ViewRootImpl源码2349-2372之中我门会看到  scheduleTraversals在我们的2363
        //对View遍历之前我们要判断不同的模式,判断父容器的模式
        //MeasureSpec.EXACTLY是matchParent或者具体的固定值
        if(widthMode == MeasureSpec.EXACTLY && heightMode == MeasureSpec.EXACTLY){
            measureWidth = widthSize;
            measureHeight = heightSize;
        }else{
            //当前VIEW宽高
            int iChildWidth = 0;
            int iChildHeight = 0;
            //获取子VIEW数量用于迭代
            int childCount = getChildCount();


            //单行信息容器
            //当前行存放多少个View
            List<View> viewList = new ArrayList<>();
            for (int i = 0;i < childCount;i++){
                View childAt = getChildAt(i) ;
                //1.测量自己
                //测量子View的宽和高
                measureChild(childAt,widthMeasureSpec,heightMeasureSpec);
                //2.获取getLayoutParams 即XML资源
                //获取偏移量,即布局中margin属性的值
                MarginLayoutParams layoutParams = (MarginLayoutParams) childAt.getLayoutParams();


                //3.获得实际宽度和高度(MARGIN+WIDTH)
                iChildWidth = childAt.getMeasuredWidth() + layoutParams.leftMargin + layoutParams.rightMargin;
                iChildHeight = childAt.getMeasuredHeight() + layoutParams.topMargin + layoutParams.bottomMargin;

                //4.是否需要换行
                //判断当前剩余的宽度是否需要下一个控件的绘制。判断是否需要换行
                if(iCurLineW + iChildWidth > widthSize){
                    //4.1.纪录当前行信息
                    //4.1.1.纪录当前行最大宽度,高度累加
                    measureWidth = Math.max(measureWidth,iCurLineW);
                    measureHeight += iCurLineH;
                    //4.1.2.保存这一行数据,及行高
                    lstLineHegiht.add(iCurLineH);
                    lstLineView.add(viewList);

                    //4.2.纪录新的行信息
                    //4.2.1.赋予新行新的宽高
                    iCurLineW = iChildWidth;
                    iCurLineH = iChildHeight;

                    //4.2.2添加新行纪录
                    viewList = new ArrayList<View>();
                    viewList.add(childAt);

                }else{
                    //5.1.不换行情况
                    //5.1.1.记录某行内的消息行内宽度的叠加、高度比较
                    iCurLineW += iChildWidth;
                    iCurLineH = Math.max(iCurLineH, iChildHeight);

                    //5.1.2.添加至当前行的viewList中
                    viewList.add(childAt);
                }

                //6.如果正好是最后一行需要换行
                if(i == childCount - 1){
                    //6.1.记录当前行的最大宽度,高度累加
                    measureWidth = Math.max(measureWidth,iCurLineW);
                    measureHeight += iCurLineH;


                    //6.2.将当前行的viewList添加至总的mViewsList,将行高添加至总的行高List
                    lstLineView.add(viewList);
                    lstLineHegiht.add(iCurLineH);

                }


            }
        }
    }

    @Override
    protected void onLayout(boolean changed, int l, int t, int r, int b) {
        //开始布局
        //1.取得所有视图信息
        //与之当前组件上下左右四个边距
        int left,top,right,bottom;
        //当前顶部高度和左部高度
        int curTop = 0;
        int curLeft = 0;
        //开始迭代
        int lineCount = lstLineView.size();
        for(int i = 0 ; i < lineCount ; i++) {
            List<View> viewList = lstLineView.get(i);
            int lineViewSize = viewList.size();
            for(int j = 0; j < lineViewSize; j++){
                View childView = viewList.get(j);
                MarginLayoutParams layoutParams = (MarginLayoutParams) childView.getLayoutParams();


                left = curLeft + layoutParams.leftMargin;
                top = curTop + layoutParams.topMargin;
                right = left + childView.getMeasuredWidth();
                bottom = top + childView.getMeasuredHeight();
                //同理,通过调用自身的layout进行布局
                childView.layout(left,top,right,bottom);
                //左边部分累加
                curLeft += childView.getMeasuredWidth() + layoutParams.leftMargin + layoutParams.rightMargin;
            }
            //进入下一行
            curLeft = 0;
            curTop += lstLineHegiht.get(i);
        }
        lstLineView.clear();
        lstLineHegiht.clear();
    }
}
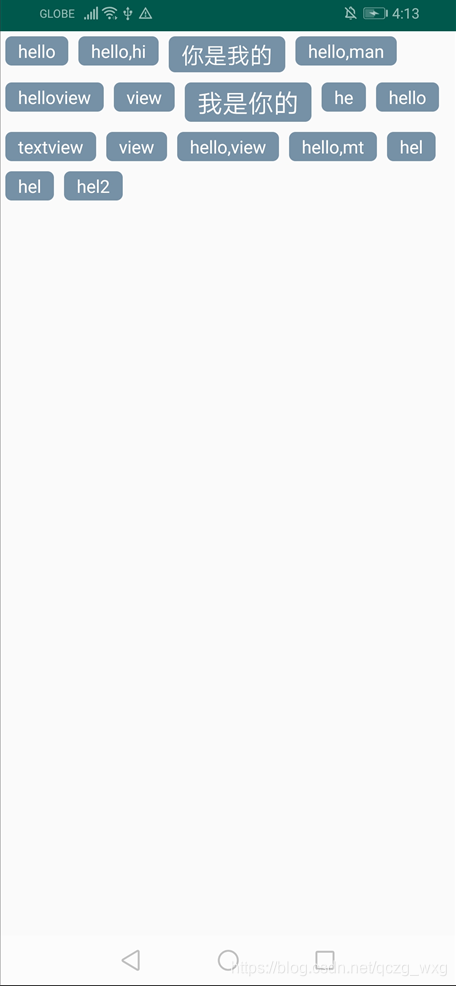
<?xml version="1.0" encoding="utf-8"?>
<LinearLayout
    xmlns:android="http://schemas.android.com/apk/res/android"
    android:layout_width="match_parent"
    android:layout_height="match_parent"
    android:orientation="vertical">

    <com.dn_alan.myapplication.WaterfallFlowLayout
        android:layout_width="match_parent"
        android:layout_height="wrap_content">

        <TextView
            style="@style/text_flag_01"
            android:text="hello" />

        <TextView
            style="@style/text_flag_01"
            android:text="hello,hi" />

        <TextView
            style="@style/text_flag_01"
            android:text="你是我的"
            android:textSize="18sp" />

        <TextView
            style="@style/text_flag_01"
            android:text="hello,man" />

        <TextView
            style="@style/text_flag_01"
            android:text="helloview" />

        <TextView
            style="@style/text_flag_01"
            android:text="view" />

        <TextView
            style="@style/text_flag_01"
            android:text="我是你的"
            android:textSize="20sp" />

        <TextView
            style="@style/text_flag_01"
            android:text="he" />

        <TextView
            style="@style/text_flag_01"
            android:text="hello" />

        <TextView
            style="@style/text_flag_01"
            android:text="textview" />

        <TextView
            style="@style/text_flag_01"
            android:text="view" />

        <TextView
            style="@style/text_flag_01"
            android:text="hello,view" />

        <TextView
            style="@style/text_flag_01"
            android:text="hello,mt" />

        <TextView
            style="@style/text_flag_01"
            android:text="hel" />

        <TextView
            style="@style/text_flag_01"
            android:text="hel" />

        <TextView
            style="@style/text_flag_01"
            android:text="hel2" />

    </com.dn_alan.myapplication.WaterfallFlowLayout>


</LinearLayout>
 <style name="text_flag_01">
        <item name="android:layout_width">wrap_content</item>
        <item name="android:layout_height">wrap_content</item>
        <item name="android:layout_margin">4dp</item>
        <item name="android:background">@drawable/flag_01</item>
        <item name="android:textColor">#ffffff</item>
    </style>
看下效果