0401-Flume
第一章 概述
1.1 Flume定义
Flume是Cloudera提供的一个高可用的,高可靠的,分布式的
海量日志采集、聚合和传输的系统。Flume基于流式架构,灵活简单。

1.2 Flume的优点
- 可以和任意存储进程集成。
- 输入的的数据速率大于写入目的存储的速率,flume会进行缓冲,减小hdfs的压力。
- flume中的
事务基于channel,使用了两个事务模型(sender + receiver),确保消息被可靠发送。
Flume使用两个独立的事务分别负责从soucrce到channel,以及从channel到sink的事件传递。一旦事务中所有的数据全部成功提交到channel,那么source才认为该数据读取完成。同理,只有成功被sink写出去的数据,才会从channel中移除。
1.3 Flume的组成


1.3.1 Agent
Agent是一个JVM进程,它
以事件Event的形式将数据从源头送至目的。
Agent主要有3个部分组成,Source、Channel、Sink。
1.3.2 Source
Source是负责接收数据到Flume Agent的组件。Source组件可以处理各种类型、各种格式的日志数据,包括avro、thrift、exec、jms、spooling directory、netcat、sequence generator、syslog、http、legacy。
1.3.3 Channel
Channel是位于Source和Sink之间的
缓冲区。因此,Channel允许Source和Sink运作在不同的速率上。Channel是线程安全的,可以同时处理几个Source的写入操作和几个Sink的读取操作。
Flume自带两种Channel:Memory Channel和File Channel。
Memory Channel是内存中的队列。Memory Channel在不需要关心数据丢失的情景下适用。如果需要关心数据丢失,那么Memory Channel就不应该使用,因为程序死亡、机器宕机或者重启都会导致数据丢失。
File Channel将所有事件写到磁盘。因此在程序关闭或机器宕机的情况下不会丢失数据。
1.3.4 Sink
Sink不断地轮询Channel中的事件且批量地移除它们,并将这些事件批量写入到存储或索引系统、或者被发送到另一个Flume Agent。
Sink是完全事务性的。在从Channel批量删除数据之前,每个Sink用Channel启动一个事务。批量事件一旦成功写出到存储系统或下一个Flume Agent,Sink就利用Channel提交事务。事务一旦被提交,该Channel从自己的内部缓冲区删除事件。
Sink组件目的地包括hdfs、logger、avro、thrift、ipc、file、null、HBase、solr、自定义。
1.3.5 Event
传输单元,Flume数据传输的基本单元,以事件的形式将数据从源头送至目的地。 Event由可选的header和载有数据的一个bytearray 构成。Header是容纳了key-value字符串对的HashMap。
1.4 Flume的拓扑结构
1.4.1 多flume串联
这种模式是将多个flume给顺序连接起来了,从最初的source开始到最终sink传送的目的存储系统。此模式不建议桥接过多的flume数量, flume数量过多不仅会影响传输速率,而且一旦传输过程中某个节点flume宕机,会影响整个传输系统。
1.4.2 单source,多channel、sink

Flume支持将事件流向一个或者多个目的地。这种模式将数据源复制到多个channel中,每个channel都有相同的数据,sink可以选择传送的不同的目的地。
1.4.3 Flume负载均衡

Flume支持使用将多个sink逻辑上分到一个sink组,flume将数据发送到不同的sink,主要解决负载均衡和故障转移问题。
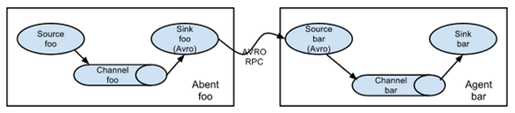
1.4.4 Flume Agent聚合

这种模式是我们最常见的,也非常实用,日常web应用通常分布在上百个服务器,大者甚至上千个、上万个服务器。产生的日志,处理起来也非常麻烦。用flume的这种组合方式能很好的解决这一问题,
每台服务器部署一个flume采集日志,传送到一个集中收集日志的flume,再由此flume上传到hdfs、hive、hbase、jms等,进行日志分析。
1.5 Flume Agent的内部原理

第二章 Flume安装部署
- 将apache-flume-1.7.0-bin.tar.gz上传到linux的/opt/software目录下
- 解压apache-flume-1.7.0-bin.tar.gz到/opt/module/目录下
[yanlzh'@node11 software]$ tar -zxf apache-flume-1.7.0-bin.tar.gz -C /opt/module/
- 修改apache-flume-1.7.0-bin的名称为flume
[yanlzh@node11 module]$ mv apache-flume-1.7.0-bin flume
- 将flume/conf下的flume-env.sh.template文件修改为flume-env.sh,并配置flume-env.sh文件
[yanlzh@node11 conf]$ mv flume-env.sh.template flume-env.sh
[yanlzh@node11 conf]$ vi flume-env.sh
export JAVA_HOME=/opt/module/jdk1.8.0_144
第三章 Flume案例
3.1 监控端口数据官方案例
- 案例需求
首先启动Flume任务,监控本机44444端口,服务端;
然后通过netcat工具向本机44444端口发送消息,客户端;
最后Flume将监听的数据实时显示在控制台。
- 实现步骤
- 安装netcat工具
[yanlzh@node11 software]$ sudo yum install -y nc
- 判断44444端口是否被占用
netstat命令是一个监控TCP/IP网络的非常有用的工具,它可以显示路由表、实际的网络连接以及每一个网络接口设备的状态信息。
选项参数:
-t或–tcp:显示TCP传输协议的连线状况;
-u或–udp:显示UDP传输协议的连线状况;
-n或–numeric:直接使用ip地址,而不通过域名服务器;
-l或–listening:显示监控中的服务器的Socket;
-p或–programs:显示正在使用Socket的程序识别码(PID)和程序名称;
[yanlzh@node11 flume-telnet]$ sudo netstat -tunlp | grep 44444
- 创建配置文件flume-netcat-logger.conf
[yanlzh@node11 flume]$ mkdir job
[yanlzh@node11 flume]$ cd job/
[yanlzh@node11 job]$ touch flume-netcat-logger.conf
[yanlzh@node11 job]$ vim flume-netcat-logger.conf
添加如下内容:
# Name the components on this agent
a1.sources = r1
a1.sinks = k1
a1.channels = c1

# Describe/configure the source
a1.sources.r1.type = netcat
a1.sources.r1.bind = localhost
a1.sources.r1.port = 44444

# Describe the sink
a1.sinks.k1.type = logger

# Use a channel which buffers events in memory
a1.channels.c1.type = memory
a1.channels.c1.capacity = 1000
a1.channels.c1.transactionCapacity = 100

# Bind the source and sink to the channel
a1.sources.r1.channels = c1
a1.sinks.k1.channel = c1
- 开启flume监听端口
[yanlzh@node11 flume]$ bin/flume-ng agent
					  -c conf/
					  -n a1
					  -f job/flume-netcat-logger.conf
					  -Dflume.root.logger=INFO,console
- 使用netcat工具向本机的44444端口发送内容
[yanlzh@node11 ~]$ nc localhost 44444
hello
world
3.2 实时读取本地文件到HDFS案例
- 案例需求
实时监控Hive日志(单个文件),并上传到HDFS中
- 需求分析
- 创建符合条件的flume配置文件
Source: Exec
Channel: Memory
Sink: HDFS- 执行配置文件, 开启监控
- 开启hive,生成日志
/opt/module/hive/logs/hive.log- 查看HDFS上的数据
- 实现步骤
- Flume要想将数据输出到HDFS, 必须持有Hadoop相关jar包
将commons-configuration-1.6.jar、
hadoop-auth-2.7.2.jar、
hadoop-common-2.7.2.jar、
hadoop-hdfs-2.7.2.jar、
commons-io-2.4.jar、
htrace-core-3.1.0-incubating.jar
拷贝到/opt/module/flume/lib文件夹下。- 创建
flume-file-hdfs.conf文件
[yanlzh@node11 job]$ touch flume-file-hdfs.conf
[yanlzh@node11 job]$ vim flume-file-hdfs.conf
添加如下内容
# Name the components on this agent
a2.sources = r2
a2.sinks = k2
a2.channels = c2

# Describe/configure the source
a2.sources.r2.type = exec
a2.sources.r2.command = tail -F /tmp/yanlzh/hive.log
a2.sources.r2.shell = /bin/bash -c

# Describe the sink
a2.sinks.k2.type = hdfs
a2.sinks.k2.hdfs.path = hdfs://node11:9000/flume/%Y%m%d/%H
#上传文件的前缀
a2.sinks.k2.hdfs.filePrefix = logs-
#是否按照时间滚动文件夹
a2.sinks.k2.hdfs.round = true
#多少时间单位创建一个新的文件夹
a2.sinks.k2.hdfs.roundValue = 1
#重新定义时间单位
a2.sinks.k2.hdfs.roundUnit = hour
#是否使用本地时间戳
a2.sinks.k2.hdfs.useLocalTimeStamp = true
#积攒多少个Event才flush到HDFS一次
a2.sinks.k2.hdfs.batchSize = 1000
#设置文件类型,可支持压缩
a2.sinks.k2.hdfs.fileType = DataStream
#多久生成一个新的文件
a2.sinks.k2.hdfs.rollInterval = 60
#设置每个文件的滚动大小
a2.sinks.k2.hdfs.rollSize = 134217700
#文件的滚动与Event数量无关
a2.sinks.k2.hdfs.rollCount = 0

# Use a channel which buffers events in memory
a2.channels.c2.type = memory
a2.channels.c2.capacity = 1000
a2.channels.c2.transactionCapacity = 100

# Bind the source and sink to the channel
a2.sources.r2.channels = c2
a2.sinks.k2.channel = c2
- 执行监控配置
[yanlzh@node11 flume]$ bin/flume-ng agent
					  -c conf/
 					  -f job/flume-file-hdfs.conf
					  -n a2
					  -Dflume.root.logger=INFO,console
- 开启Hadoop和hive并操作hive产生日志
- 在HDFS上查看文件

3.3 实时读取目录文件到HDFS案例
- 案例需求
使用Flume监听
整个目录的文件
- 需求分析
- 创建符合条件的flume配置文件
Source: Spooldir
Channel: Memory
Sink: HDFS- 执行配置文件, 开启监控
- 向upload目录文件中添加文件
/opt/module/flume/upload- 查看HDFS上的数据
- 查看
/opt/module/flume/upload目录上传的文件是否已经标记为.COMPLETED结尾; .tmp后缀结尾的文件没有上传
- 实现步骤
- 创建配置文件flume-dir-hdfs.conf
[yanlzh@node11 job]$ touch flume-dir-hdfs.conf
[yanlzh@node11 job]$ vim flume-dir-hdfs.conf
添加如下内容
a3.sources = r3
a3.sinks = k3
a3.channels = c3

# Describe/configure the source
a3.sources.r3.type = spooldir
a3.sources.r3.spoolDir = /opt/module/flume/upload
a3.sources.r3.fileSuffix = .COMPLETED
a3.sources.r3.fileHeader = true
#忽略所有以.tmp结尾的文件,不上传
a3.sources.r3.ignorePattern = ([^ ]*\.tmp)

# Describe the sink
a3.sinks.k3.type = hdfs
a3.sinks.k3.hdfs.path = hdfs://node11:9000/flume/upload/%Y%m%d/%H
#上传文件的前缀
a3.sinks.k3.hdfs.filePrefix = upload-
#是否按照时间滚动文件夹
a3.sinks.k3.hdfs.round = true
#多少时间单位创建一个新的文件夹
a3.sinks.k3.hdfs.roundValue = 1
#重新定义时间单位
a3.sinks.k3.hdfs.roundUnit = hour
#是否使用本地时间戳
a3.sinks.k3.hdfs.useLocalTimeStamp = true
#积攒多少个Event才flush到HDFS一次
a3.sinks.k3.hdfs.batchSize = 100
#设置文件类型,可支持压缩
a3.sinks.k3.hdfs.fileType = DataStream
#多久生成一个新的文件
a3.sinks.k3.hdfs.rollInterval = 60
#设置每个文件的滚动大小大概是128M
a3.sinks.k3.hdfs.rollSize = 134217700
#文件的滚动与Event数量无关
a3.sinks.k3.hdfs.rollCount = 0

# Use a channel which buffers events in memory
a3.channels.c3.type = memory
a3.channels.c3.capacity = 1000
a3.channels.c3.transactionCapacity = 100

# Bind the source and sink to the channel
a3.sources.r3.channels = c3
a3.sinks.k3.channel = c3
- 启动监控文件夹命令
说明: 在使用Spooling Directory Source时
(1) 不要在监控目录中创建并持续修改文件
(2) 上传完成的文件会以.COMPLETED结尾
(3) 被监控文件夹每500毫秒扫描一次文件变动
[yanlzh@node11 flume]$ bin/flume-ng agent
					  -c conf/
					  -n a3
					  -f job/flume-dir-hdfs.conf
					  -Dflume.root.logger=INFO,console
- 向upload文件夹中添加文件
[yanlzh@node11 upload]$ touch yanlzh.txt
[yanlzh@node11 upload]$ touch yanlzh.tmp
[yanlzh@node11 upload]$ touch yanlzh.log
- 查看HDFS上的数据

- 查看upload文件夹
[yanlzh@node11 upload]$ ll
total 0
-rw-rw-r--. 1 yanlzh yanlzh 0 Dec  7 22:25 yanlzh.log.COMPLETED
-rw-rw-r--. 1 yanlzh yanlzh 0 Dec  7 22:25 yanlzh.tmp
-rw-rw-r--. 1 yanlzh yanlzh 0 Dec  7 22:24 yanlzh.txt.COMPLETED
3.4 单数据源多出口案例(选择器)
3.5 单数据源多出口案例(Sink组)
3.6 多数据源汇总案例
第四章 Flume监控之 Ganglia
4.1 Ganglia的安装与部署
- 安装httpd服务与php
[yanlzh@node11 flume]$ sudo yum -y install httpd php
- 安装其他依赖
[yanlzh@node11 flume]$ sudo yum -y install rrdtool perl-rrdtool rrdtool-devel
[yanlzh@node11 flume]$ sudo yum -y install apr-devel
- 安装ganglia
[yanlzh@node11 flume]$ sudo rpm -Uvh http://dl.fedoraproject.org/pub/epel/6/x86_64/epel-release-6-8.noarch.rpm
[yanlzh@node11 flume]$ sudo yum -y install ganglia-gmetad
[yanlzh@node11 flume]$ sudo yum -y install ganglia-web
[yanlzh@node11 flume]$ sudo yum install -y ganglia-gmond
- 修改配置文件
/etc/httpd/conf.d/ganglia.conf
[yanlzh@node11 flume]$ sudo vim /etc/httpd/conf.d/ganglia.conf
修改
#
# Ganglia monitoring system php web frontend
#

Alias /ganglia /usr/share/ganglia

<Location /ganglia>
  Order deny,allow
  Allow from all
#  Deny from all
#  Allow from 127.0.0.1
#  Allow from ::1
  # Allow from .example.com
</Location>
- 修改配置文件
/etc/ganglia/gmetad.conf
[yanlzh@node11 flume]$ sudo vim /etc/ganglia/gmetad.conf
修改
data_source "node11" 192.168.40.111
- 修改配置文件
/etc/ganglia/gmond.conf
[yanlzh@node11 flume]$ sudo vim /etc/ganglia/gmond.conf

cluster {
  name = "node11"
  owner = "unspecified"
  latlong = "unspecified"
  url = "unspecified"
}
udp_send_channel {
  #bind_hostname = yes # Highly recommended, soon to be default.
                       # This option tells gmond to use a source address
                       # that resolves to the machine's hostname.  Without
                       # this, the metrics may appear to come from any
                       # interface and the DNS names associated with
                       # those IPs will be used to create the RRDs.
  # mcast_join = 239.2.11.71
  host = 192.168.40.111
  port = 8649
  ttl = 1
}
udp_recv_channel {
  # mcast_join = 239.2.11.71
  port = 8649
  bind = 192.168.40.111
  retry_bind = true
  # Size of the UDP buffer. If you are handling lots of metrics you really
  # should bump it up to e.g. 10MB or even higher.
  # buffer = 10485760
}
- 修改配置文件
/etc/selinux/config
[yanlzh@node11 flume]$ sudo vim /etc/selinux/config

SELINUX=disabled
注意:
selinux本次生效关闭必须重启,如果此时不想重启,可以临时生效之
[yanlzh@node11 flume]$ sudo setenforce 0
- 启动ganglia
[yanlzh@node11 flume]$ sudo service httpd start
[yanlzh@node11 flume]$ sudo service gmetad start
[yanlzh@node11 flume]$ sudo service gmond start
- 打开网页浏览ganglia页面
http://node11/ganglia/
尖叫提示:如果完成以上操作依然出现权限不足错误,请修改/var/lib/ganglia目录的权限:
sudo chmod -R 777 /var/lib/ganglia
4.2 操作Flume测试监控
- 修改/opt/module/flume/conf目录下的
flume-env.sh配置:
export JAVA_OPTS="-Dflume.monitoring.type=ganglia
-Dflume.monitoring.hosts=node11:8649
-Xms100m
-Xmx200m"
- 启动Flume任务
[yanlzh@node11 flume]$ bin/flume-ng agent \
--conf conf/ \
--name a1 \
--conf-file job/flume-netcat-logger.conf \
-Dflume.root.logger==INFO,console \
-Dflume.monitoring.type=ganglia \
-Dflume.monitoring.hosts=node11:8649
- 发送数据观察ganglia监测图
[yanlzh@node11 flume]$ nc localhost 44444


第五章 自定义Source
5.1 介绍
官方提供的source类型已经很多,但是有时候并不能满足实际开发当中的需求,此时我们就需要根据实际需求自定义某些source。
据官方说明自定义MySource需要继承AbstractSource类并实现Configurable和PollableSource接口。
实现相应方法:
- getBackOffSleepIncrement()//暂不用
- getMaxBackOffSleepInterval()//暂不用
configure(Context context)//初始化context(读取配置文件内容)process()//获取数据封装成event并写入channel,这个方法将被循环调用。
使用场景:读取MySQL数据或者其他文件系统。
5.2 代码实现
package com.lz.flume;

import org.apache.flume.Context;
import org.apache.flume.EventDeliveryException;
import org.apache.flume.PollableSource;
import org.apache.flume.conf.Configurable;
import org.apache.flume.event.SimpleEvent;
import org.apache.flume.source.AbstractSource;

import java.util.HashMap;

/**
 * @ClassName MySource
 * @Description: TODO
 * @Author MAlone
 * @Date 2019/12/8
 * @Version V1.0
 **/
public class MySource extends AbstractSource implements Configurable, PollableSource {

    // 第一配置文件中将来要读取的字段
    private Long delay;
    private String field;

    // 初始化配置信息
    public void configure(Context context) {
        delay = context.getLong("delay", 2000L);
        field = context.getString("field", "YYY");
    }

    public Status process() throws EventDeliveryException {
        try {
            // 创建Event头信息
            HashMap<String, String> header = new HashMap<String, String>();
            // 创建Event
            SimpleEvent event = new SimpleEvent();
            // 循环封装事件
            for (int i = 0; i < 6; i++) {
                // 给事件设置头信息
                event.setHeaders(header);
                // 给事件设置内容
                event.setBody((field + i).getBytes());
                // 将事件写入Channel
                getChannelProcessor().processEvent(event);
                Thread.sleep(delay);
            }
        } catch (Exception e) {
            e.printStackTrace();
            return Status.BACKOFF;
        }
        return Status.READY;
    }

    public long getBackOffSleepIncrement() {
        return 0;
    }

    public long getMaxBackOffSleepInterval() {
        return 0;
    }

}
5.3 测试
- 打包
将写好的代码打包,并放到flume的lib目录(/opt/module/flume/lib)下。- 编写配置文件
# Name the components on this agent
a1.sources = r1
a1.sinks = k1
a1.channels = c1

# Describe/configure the source
a1.sources.r1.type = com.lz.flume.MySource
a1.sources.r1.delay = 1000
a1.sources.r1.field = yyk

# Describe the sink
a1.sinks.k1.type = logger

# Use a channel which buffers events in memory
a1.channels.c1.type = memory
a1.channels.c1.capacity = 1000
a1.channels.c1.transactionCapacity = 100

# Bind the source and sink to the channel
a1.sources.r1.channels = c1
a1.sinks.k1.channel = c1
- 开启任务
[yanlzh@node11 flume]$ bin/flume-ng agent -c conf/ -f job/flume-mysource.conf -n a1 -Dflume.root.logger=INFO,console
- 结果展示

5.4 自定义MySQL Source
第六章 自定义Sink
6.1 介绍
Sink不断地轮询Channel中的事件且批量地移除它们,并将这些事件批量写入到存储或索引系统、或者被发送到另一个Flume Agent。
Sink是完全事务性的。在从Channel批量删除数据之前,每个Sink用Channel启动一个事务。批量事件一旦成功写出到存储系统或下一个Flume Agent,Sink就利用Channel提交事务。事务一旦被提交,该Channel从自己的内部缓冲区删除事件。
Sink组件目的地包括hdfs、logger、avro、thrift、ipc、file、null、HBase、solr、自定义。官方提供的Sink类型已经很多,但是有时候并不能满足实际开发当中的需求,此时我们就需要根据实际需求自定义某些Sink。根据官方说明自定义MySink需要
继承AbstractSink类并实现Configurable接口。
实现相应方法:
configure(Context context)//初始化context(读取配置文件内容)
process()//从Channel读取获取数据(event),这个方法将被循环调用。
使用场景:读取Channel数据写入MySQL或者其他文件系统。
6.2 代码实现
package com.lz.flume;

import org.apache.flume.*;
import org.apache.flume.conf.Configurable;
import org.apache.flume.sink.AbstractSink;
import org.slf4j.Logger;
import org.slf4j.LoggerFactory;

/**
 * @ClassName MySink
 * @Description: TODO
 * @Author MAlone
 * @Date 2019/12/8
 * @Version V1.0
 **/
public class MySink extends AbstractSink implements Configurable {

    //创建Logger对象
    private static final Logger LOG = LoggerFactory.getLogger(AbstractSink.class);

    private String prefix;
    private String suffix;

    public Status process() throws EventDeliveryException {
        //声明返回值状态信息
        Status status;
        //获取当前Sink绑定的Channel
        Channel ch = getChannel();
        //获取事务
        Transaction txn = ch.getTransaction();
        //声明事件
        Event event;
        //开启事务
        txn.begin();
        //读取Channel中的事件,直到读取到事件结束循环
        while (true) {
            event = ch.take();
            if (event != null) {
                break;
            }
        }
        try {
            //处理事件(打印)
            LOG.info(prefix + new String(event.getBody()) + suffix);
            //事务提交
            txn.commit();
            status = Status.READY;
        } catch (Exception e) {
            //遇到异常,事务回滚
            txn.rollback();
            status = Status.BACKOFF;
        } finally {
            //关闭事务
            txn.close();
        }
        return status;
    }

    public void configure(Context context) {
        //读取配置文件内容,有默认值
        prefix = context.getString("prefix", "hello:");
        //读取配置文件内容,无默认值
        suffix = context.getString("suffix");
    }
}
6.3 测试
- 打包
将写好的代码打包,并放到flume的lib目录(/opt/module/flume/lib)下。- 编写配置文件
# Name the components on this agent
a1.sources = r1
a1.sinks = k1
a1.channels = c1

# Describe/configure the source
a1.sources.r1.type = netcat
a1.sources.r1.bind = localhost
a1.sources.r1.port = 44444

# Describe the sink
a1.sinks.k1.type = com.lz.flume.MySink
#a1.sinks.k1.prefix = lz:
a1.sinks.k1.suffix = :lz

# Use a channel which buffers events in memory
a1.channels.c1.type = memory
a1.channels.c1.capacity = 1000
a1.channels.c1.transactionCapacity = 100

# Bind the source and sink to the channel
a1.sources.r1.channels = c1
a1.sinks.k1.channel = c1
第七章 Flume面试题
7.1 你是如何实现Flume数据传输的监控的
使用第三方框架Ganglia实时监控Flume。
7.2 Flume的Source,Sink,Channel的作用?你们Source是什么类型?
1、作用
(1)Source组件是专门用来收集数据的,可以处理各种类型、各种格式的日志数据,包括avro、thrift、exec、jms、spooling directory、netcat、sequence generator、syslog、http、legacy
(2)Channel组件对采集到的数据进行缓存,可以存放在Memory或File中。
(3)Sink组件是用于把数据发送到目的地的组件,目的地包括Hdfs、Logger、avro、thrift、ipc、file、Hbase、solr、自定义。
2、我公司采用的Source类型为:
(1)监控后台日志:exec,spooldir
(2)监控后台产生日志的端口:netcat
7.3 Flume的Channel Selectors
Channel Selectors, 可以让不同的项目的日志通过不同的channel到不同的Sink中去,
Channel Selectors有两类型
RelicatingChannel Selector(default) :会将source过来的events发往所有的channelMultiplexingChannel Selector: 可以选择发往那些Channel
7.4 Flume参数调优
- Source
增加Source个数(使用Tair Dir Source时可增加FileGroups个数)可以增大Source的读取数据的能力。例如:当某一个目录产生的文件过多时需要将这个文件目录拆分成多个文件目录,同时配置好多个Source 以保证Source有足够的能力获取到新产生的数据。
batchSize参数决定Source一次批量运输到Channel的event条数,适当调大这个参数可以提高Source搬运Event到Channel时的性能。- Channel
type 选择memory时Channel的性能最好,但是如果Flume进程意外挂掉可能会丢失数据。type选择file时Channel的容错性更好,但是性能上会比memory channel差。
使用file Channel时dataDirs配置多个不同盘下的目录可以提高性能。
Capacity 参数决定Channel可容纳最大的event条数。transactionCapacity 参数决定每次Source往channel里面写的最大event条数和每次Sink从channel里面读的最大event条数。transactionCapacity需要大于Source和Sink的batchSize参数。- Sink
增加Sink的个数可以增加Sink消费event的能力。Sink也不是越多越好够用就行,过多的Sink会占用系统资源,造成系统资源不必要的浪费。
batchSize参数决定Sink一次批量从Channel读取的event条数,适当调大这个参数可以提高Sink从Channel搬出event的性能。
7.5 Flume的事务机制
Flume的事务机制(类似数据库的事务机制):Flume使用
两个独立的事务分别负责从Soucrce到Channel,以及从Channel到Sink的事件传递。比如spooling directory source 为文件的每一行创建一个事件,一旦事务中所有的事件全部传递到Channel且提交成功,那么Soucrce就将该文件标记为完成。同理,事务以类似的方式处理从Channel到Sink的传递过程,如果因为某种原因使得事件无法记录,那么事务将会回滚。且所有的事件都会保持到Channel中,等待重新传递。
7.6 Flume采集数据会丢失吗
不会,Channel存储可以存储在File中,数据传输自身有事务。
