SSM实战之商品信息管理系统《三》
1.前言
本系统属于SSM的常用功能整合使用练习。
涉及到SSM框架整合+前端框Bootstrap+Ajax校验+登录拦截器+图片文件上传+日期类型转换器+json格式传参等常用功能的使用。
上一篇点这里 完成了ssm的登录功能,从login.jsp登录成功跳转到showItems.jsp。
下面开始完善showItems.jsp的商品展示功能。
2.SSM实战之商品展示模块
- 展示原理 :我们输入正确的账号密码以后,就应该跳转到内容展示的页面。
内容展示页面,是需要展示所有的商品信息,那么第一需要获取全部的商品信息,第二需要做分页处理。
获取全部信息,那么就需要先把商品信息保存到数据库中,然后再去select All Data 。
照样是需要跟数据库打交道,我们就需要从底往上写。
不懂的可以参考:SSM框架下web项目运行流程
实现商品展示模块:
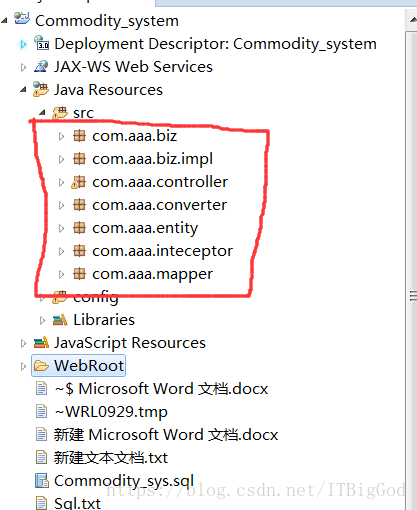
首先要保证你的项目结构跟我的一样:
缺少的话,你就自己创建对应的包名.
其次,你的数据库里面需要有一张items表。

准备好这些就开始了。
一. 在entity包下新建一个Items.java实体类:
代码如下:
package com.aaa.entity;

import java.util.Date;

/**
 *@class_name:Items
 *@param: 1.items
 *@return: 商品实体类
 *@author:Zoutao
 *@createtime:2018年3月22日
 */
public class Items {

    private int id;                 //商品id
    private String name;            //商品名
    private float price;            //商品价格
    private String detail;          //商品描述
    private String pic;             //商品图片
    private Date createtime;        //创建日期


    public String getPic() {
        return pic;
    }
    public void setPic(String pic) {
        this.pic = pic;
    }
    public int getId() {
        return id;
    }
    public void setId(int id) {
        this.id = id;
    }
    public String getName() {
        return name;
    }
    public void setName(String name) {
        this.name = name;
    }
    public float getPrice() {
        return price;
    }
    public void setPrice(float price) {
        this.price = price;
    }
    public String getDetail() {
        return detail;
    }
    public void setDetail(String detail) {
        this.detail = detail;
    }

    public Date getCreatetime() {
        return createtime;
    }
    public void setCreatetime(Date createtime) {
        this.createtime = createtime;
    }

    //重写构造方法-这样不会出现数据初始化异常
    public Items(int id, String name, float price, String detail, String pic,
            Date createtime) {
        super();
        this.id = id;
        this.name = name;
        this.price = price;
        this.detail = detail;
        this.pic = pic;
        this.createtime = createtime;
    }
    public Items() {
        super();
        // TODO Auto-generated constructor stub
    }

    @Override
    public String toString() {
        return "Items [id=" + id + ", name=" + name + ", price=" + price
                + ", detail=" + detail + ", pic=" + pic + ", createtime="
                + createtime + "]";
    }
}
二. Dao层接口:
在mapper包下新建一个ItemsDaoMapper.java接口类:
代码如下:
package com.aaa.mapper;

import java.util.List;

import com.aaa.entity.Items;

/**
 *@class_name:ItemsDaoMapper
 *@param: 2.ItemsDao
 *@return: 商品Dao接口类
 *@author:Zoutao
 *@createtime:2018年3月22日
 */
public interface ItemsDaoMapper {

    //1.查询所有商品
    public List<Items> findAll();
}
三. 在mapper包下新建一个ItemsDaoMapper.xml:
代码如下:
<?xml version="1.0" encoding="UTF-8"?>
<!DOCTYPE mapper PUBLIC "-//mybatis.org//DTD Mapper 3.0//EN"
"http://mybatis.org/dtd/mybatis-3-mapper.dtd">

<!-- 指定映射到dao层 -->
<mapper namespace="com.aaa.mapper.ItemsDaoMapper">
    <!-- 查询所有数据id降序 -->
    <select id="findAll" resultType="items">
        select * from items order by id
        desc
    </select>
</mapper>
四. 在biz包下新建一个ItemsBiz.java接口类:
代码如下:
package com.aaa.biz;

import java.util.List;

import com.aaa.entity.Items;

/**
 *@class_name:ItemsBiz
 *@param: 4.ItemsService层
 *@return: 商品service接口类
 *@author:Zoutao
 *@createtime:2018年3月22日
 */
public interface ItemsBiz {
        //2.查询所有商品
        public List<Items> findAll();
}
五. 在com.aaa.biz.impl包下新建一个ItemsBizImpl.java实现类类:
代码如下:
package com.aaa.biz.impl;

import java.util.List;

import org.springframework.beans.factory.annotation.Autowired;
import org.springframework.stereotype.Service;

import com.aaa.biz.ItemsBiz;
import com.aaa.entity.Items;
import com.aaa.mapper.ItemsDaoMapper;

/**
 * @class_name:ItemsBizImpl
 * @param: 5.ItemsImpl层
 * @return: 商品service实现类
 * @author:Zoutao
 * @createtime:2018年3月22日
 */

@Service
public class ItemsBizImpl implements ItemsBiz {

    @Autowired
    private ItemsDaoMapper itemsDaoMapper;

    @Override
    public List<Items> findAll() {
        // TODO Auto-generated method stub
        return itemsDaoMapper.findAll();
    }
}
六.在controller包下新建一个ItemsController.java控制类:
代码如下:
package com.aaa.controller;

import java.util.List;

import org.springframework.beans.factory.annotation.Autowired;
import org.springframework.stereotype.Controller;
import org.springframework.ui.Model;
import org.springframework.web.bind.annotation.RequestMapping;
import org.springframework.web.bind.annotation.RequestParam;

import com.aaa.biz.ItemsBiz;
import com.aaa.entity.Items;
import com.github.pagehelper.PageHelper;
import com.github.pagehelper.PageInfo;

/**
 *@class_name:ItemsController
 *@param: 6.controller控制层
 *@return: 实现业务逻辑控制
 *@author:Zoutao
 *@createtime:2018年3月22日
 */
@Controller
@RequestMapping("/items")
public class ItemsController {

    @Autowired
    private ItemsBiz itemsBiz;

    @RequestMapping("/queryItems")
    public String queryItems(@RequestParam(value="pn",defaultValue="1")Integer pn,Model model){
        //1.引入分页插件,pn是第几页,5是每页显示多少行
        PageHelper.startPage(pn,5);
        //2.紧跟的查询就是一个分页查询
        List<Items>list =itemsBiz.findAll();
        //3.使用PageInfo包装查询后的结果,5是连续显示的条数
        PageInfo<Items> pageInfo =new PageInfo<Items>(list,5);
        //4.使用model设置到前端
        model.addAttribute("pageInfo",pageInfo);
        //5.最后设置返回的jsp
        return "showItems";

    }
}
七.在WebRoot文件夹下的showItems.jsp中添加商品显示功能。
代码如下:
<%@ page language="java" import="java.util.*" pageEncoding="UTF-8"%>
<%@ taglib uri="http://java.sun.com/jsp/jstl/core" prefix="c"%>
<%@ taglib uri="http://java.sun.com/jsp/jstl/fmt" prefix="fmt"%>
<%
String path = request.getContextPath();
String basePath = request.getScheme() + "://" + request.getServerName() + ":" + request.getServerPort()
+ path + "/";
%>
<!DOCTYPE HTML PUBLIC "-//W3C//DTD HTML 4.01 Transitional//EN">
<html>
<head>
<base href="<%=basePath%>">
<title>商品详情页-qxb</title>
<meta http-equiv="pragma" content="no-cache">
<meta http-equiv="cache-control" content="no-cache">
<meta http-equiv="expires" content="0">
<meta http-equiv="keywords" content="keyword1,keyword2,keyword3">
<meta http-equiv="description" content="This is my page">
<link rel="stylesheet" href="css/bootstrap.min.css" />
<link rel="stylesheet" href="css/bootstrap-datetimepicker.min.css" />
<script type="text/javascript" src="js/jquery-3.2.1.min.js"></script>
<script type="text/javascript" src="js/bootstrap.min.js"></script>
<script type="text/javascript" src="js/bootstrap-datetimepicker.min.js"></script>
<script type="text/javascript"
src="js/bootstrap-datetimepicker.zh-CN.js"></script>
</head>
<script type="text/javascript">
$("#myModal").modal({
keyboard : false,
backdrop : true
});
$(function() {
$(".form_datetime").datetimepicker({
format : "yyyy-mm-dd hh:ii",
autoclose : true,
todayBtn : true,
todayHighlight : true,
showMeridian : true,
pickerPosition : "bottom-left",
language : 'zh-CN',//中文,需要引用zh-CN.js包
startView : 2,//月视图
minView : 2
//日期时间选择器所能够提供的最精确的时间选择视图
});
});
</script>
<body>
<div class="container">
<!-- 标题 -->
<div class="row">
<div class="col-md-7">
<h2>SSM的CRUD+分页+拦截器+日期转换+Ajax</h2>
<span>柒晓白-2018/3/22</span>
</div>
<div class="col-md-offset-10">
<h4>
欢迎您: <span class="glyphicon glyphicon-user"></span>
<strong>${user1.username }</strong><small>
<a href="#">注销</a></small>
</h4>
</div>
</div>
<!-- 按钮-->
<div class="row">
<div class="col-md-6 col-md-offset-10">
<button type="button" class="btn btn-primary btn-lg"
data-toggle="modal" data-target="#myModal">
<span class="glyphicon glyphicon-plus"></span>添加商品
</button>
</div>
</div>
<!-- 表格 -->
<div class="row">
<div class="col-md-12">
<form
action="${pageContext.request.contextPath }/items/addCar.action"
method="post">
<table class="table table-bordered table-hover">
<tr class="success" align="center">
<th>商品名称</th>
<th>商品价格</th>
<th>商品图片</th>
<th>商品介绍</th>
<th>生产日期</th>
<th colspan="3">操作</th>
</tr>
<c:forEach items="${pageInfo.list}" var="item">
<tr align="center">
<td>${item.name }</td>
<td>${item.price }</td>
<!-- 照片显示 -->
<td><img title="${item.detail }"
style="width: 60px; height: 60px"
src="#"></td>
<td>${item.detail }</td>
<!-- jstl标签返回日期格式 -->
<td><fmt:formatDate value="${item.createtime}"
pattern="yyyy-MM-dd" /></td>
<!-- 删除操作 -->
<td><a
href="#"><button
type="button" class="btn btn-success btn-lg"
onclick="return confirm('确定要删除信息吗?') ">
<span class="glyphicon glyphicon-trash"></span> 删除
</button></a></td>
<!-- 修改操作 -->
<td><a
href="#"><button
type="button" class="btn btn-success btn-lg">
<span class="glyphicon glyphicon-edit"></span> 修改
</button></a></td>
</tr>
</c:forEach>
</table>
</form>
</div>
</div>
<!-- 分页 -->
<div class="row">
<!-- 分页信息 -->
<div class="col-md-6">
<h4>当前第${pageInfo.pageNum }页,共${pageInfo.pages }页,共${pageInfo.total }条记录数</h4>
</div>
<!-- 分页条 -->
<div class="col-md-6">
<ul class="pagination pagination-lg">
<li><a
href="${pageContext.request.contextPath }/items/queryItems.action?pn=1">首页</a></li>
<c:if test="${pageInfo.hasPreviousPage }">
<li><a
href="${pageContext.request.contextPath }/items/queryItems.action?pn=${pageInfo.pageNum-1}"
aria-label="Previous"> <span aria-hidden="true">«</span>
</a></li>
</c:if>
<c:forEach items="${pageInfo.navigatepageNums }" var="nav">
<c:if test="${nav==pageInfo.pageNum }">
<li class="active"><a
href="${pageContext.request.contextPath }/items/queryItems.action?pn=${nav}">${nav }</a></li>
</c:if>
<c:if test="${nav!=pageInfo.pageNum }">
<li><a
href="${pageContext.request.contextPath }/items/queryItems.action?pn=${nav}">${nav }</a></li>
</c:if>
</c:forEach>
<c:if test="${pageInfo.hasNextPage}">
<li><a
href="${pageContext.request.contextPath }/items/queryItems.action?pn=${pageInfo.pageNum+1}"
aria-label="Previous"> <span aria-hidden="true">»</span>
</a></li>
</c:if>
<li><a
href="${pageContext.request.contextPath }/items/queryItems.action?pn=${pageInfo.pages}">末页</a></li>
</ul>
</div>
</div>
</div>
</body>
</html>值得注意的是,上一篇只是为了演示登录成功。我们把页面跳转设置到/user/showitems.action下。
现在我们需要改回来,改成正常的url:/items/showitems.action
第一:将login.jsp页面下的ajax语句最后一条:

修改:

第二:将UserController.java文件下的语句注释掉。
/*
     * @RequestMapping("/queryItems") public String queryItems(Model model) {
     * System.out.println("欢迎登录!"); return "showItems"; }
     */
到了这里,我们的商品显示模块的流程就完成了,如果登录账户正确以后,跳转到:showItems.jsp来展示数据库里面的商品信息了。
运行如图:

图片没有显示那是因为我清空了tomcat服务器的缓存。
没关系,下一篇会说这个问题。运行报错的话,请评论贴出错误信息。
到这里我们只是完成了整个数据的分页展示和查询。
下一篇将完善展示页面的增删查改操作。
You got a dream, you gotta protect it.
如果你有梦想的话,就要去捍卫它 。 ——《当幸福来敲门》