上一篇介绍了使用spring-data-jpa来实现数据的持久化及展示,现在使用比较流行的Mybatis来整合springboot,这里通过一个完整的例子来展示。实现数据的录入,展示以及按条件查询,同样,在上一篇的基础上进行,springboot基础的配置搭建不做介绍。
首先引入Mybatis的依赖包
<dependency>
    		<groupId>org.mybatis.spring.boot</groupId>
   	 		<artifactId>mybatis-spring-boot-starter</artifactId>
    		<version>1.0.0</version>
		</dependency>
接着在application.properties中(多用更简洁的yml,大家随意)配置mapper及映射路径等信息
mybatis.typeAliasesPackage=org.amuxia.entity
mybatis.mapperLocations=classpath:mapper/*.xml
配置之后定义实体类,基本前几篇的无异,把为spring-data-jpa写的注解信息去掉即可,这里不做展示。
接下来定义接口,代码如下:
public interface ItemsDAO{

	public List<Items> findList();
	public void save(Items items);
	public List<Items> findItemByName(@Param("name") String name);
}
Mybatis是基于接口编程的,我们写好接口,对应编写映射文件中的sql语句即可,非常灵活。我们在resources文件夹下新建一个mapper文件,存放XML映射文件,这里做简单的例子学习使用,mapper文件不按功能具体细分,实际应该把映射文件归类的,映射文件代码如下:
扫描二维码关注公众号,回复:
910437 查看本文章

<?xml version="1.0" encoding="UTF-8" ?>
<!DOCTYPE mapper PUBLIC "-//mybatis.org//DTD Mapper 3.0//EN" "http://mybatis.org/dtd/mybatis-3-mapper.dtd" >
<mapper namespace="org.amuxia.dao.ItemsDAO">
	<resultMap id="BaseResultMap" type="org.amuxia.entity.Items">
		<result column="id" property="id" />
		<result column="title" property="title" />
		<result column="name" property="name" />
		<result column="detail" property="detail" />
	</resultMap>

	<parameterMap id="Items" type="org.amuxia.entity.Items"/>

	<sql id="Base_Column_List">
		id, title,name,detail
	</sql>

	<select id="findList" resultMap="BaseResultMap">
		select
		<include refid="Base_Column_List" />
		from items
	</select>

	<select id="findItemByName" resultMap="BaseResultMap" parameterType="java.lang.String">
		select
		<include refid="Base_Column_List" />
		from items
		where name = #{name}
	</select>

	<insert id="save" parameterType="Items">
		insert into items
		(title,name,detail)
		values
		(#{title},#{name},#{detail})
	</insert>

</mapper>
控制器类调用接口,即可对数据进行操作,但是我们一般很少直接多DAO类进行直接调用,通常包一层Service类,代码如下:
package org.amuxia.service;

import java.util.List;

import org.amuxia.dao.ItemsDAO;
import org.amuxia.entity.Items;
import org.springframework.beans.factory.annotation.Autowired;
import org.springframework.stereotype.Service;

@Service
public class ItemsService implements ItemsDAO{

	@Autowired
	private ItemsDAO dao;

	@Override
	public List<Items> findList() {
		// TODO Auto-generated method stub
		return dao.findList();
	}

	@Override
	public void save(Items items) {
		// TODO Auto-generated method stub
		dao.save(items);
	}

	@Override
	public List<Items> findItemByName(String name) {
		// TODO Auto-generated method stub
		return dao.findItemByName(name);
	}
}
接着定义Controller,实现具体的业务功能:
package org.amuxia.controller;

import java.util.List;

import org.amuxia.entity.Items;
import org.amuxia.service.ItemsService;
import org.springframework.beans.factory.annotation.Autowired;
import org.springframework.context.annotation.ComponentScan;
import org.springframework.web.bind.annotation.RequestMapping;
import org.springframework.web.bind.annotation.RequestParam;
import org.springframework.web.bind.annotation.ResponseBody;
import org.springframework.web.bind.annotation.RestController;
import org.springframework.web.servlet.ModelAndView;

@ComponentScan
@RestController
@RequestMapping("/items1")
public class ItemsController1 {

	@Autowired
	private ItemsService service;

	/**
	 * @return
	 * 查询全部信息
	 */
	@RequestMapping("/list")
	public ModelAndView  itemsList() {
		List<Items> list = service.findList();
		ModelAndView mav = new ModelAndView("items");
		mav.addObject("list", list);
		return mav;
	}

	@RequestMapping("/findItemByName")
	public ModelAndView  item(@RequestParam(value = "name", required = true) String name) {
		List<Items> list = service.findItemByName(name);
		ModelAndView mav = new ModelAndView("item");
		mav.addObject("item", list);
		return mav;
	}

	/**
	 * @return
	 * 跳转到新增接界面
	 */
	@RequestMapping("/toAdd")
	public ModelAndView  toAdd() {
		ModelAndView mav = new ModelAndView("add");
		return mav;
	}


	/**
	 * 新增数据
	 * @param items
	 * @return
	 */
	@RequestMapping("/add")
	public @ResponseBody boolean  addItems(Items items) {
		try {
			service.save(items);
			return true;
		}catch (Exception e) {
			// TODO: handle exception
			e.printStackTrace();
			return false;
		}
	}
}
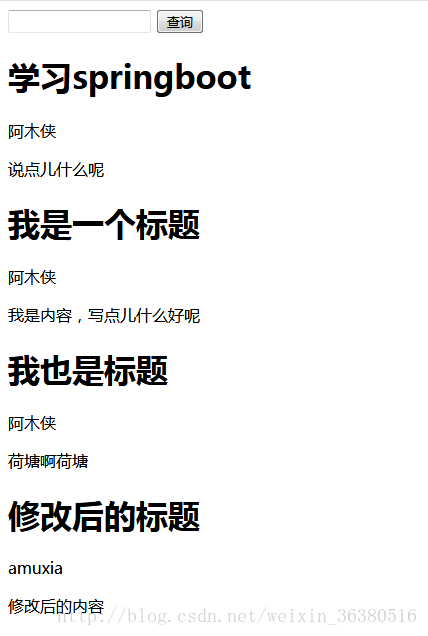
展示页面我们使用thymeleaf模版,新增页面不动,按之前文章中介绍的即可,列表展示(items)代码如下:
<!DOCTYPE html>
<html xmlns:th="http://www.thymeleaf.org">
<head>
<meta charset="utf-8" />
<meta name="viewport" content="width=device-width, initial-scale=1.0" />
<title>springboot学习</title>
</head>

<body>
	<div>
		<form name="findByName" method="post" action="findItemByName">
			<input type="text" name="name" />
			<input type="submit" value="查询" />
		</form>
	</div>
	<div th:each="item : ${list}">
		<h1 th:text="${{item.title}}"></h1>
		<p>
			<a th:text="${{item.name}}"></a>
		</p>
		<p>
			<a th:text="${{item.detail}}"></a>
		</p>
	</div>
</body>
</html>
效果如下:
在输入框中输入阿木侠,搜索他的所有文章信息,效果如下:
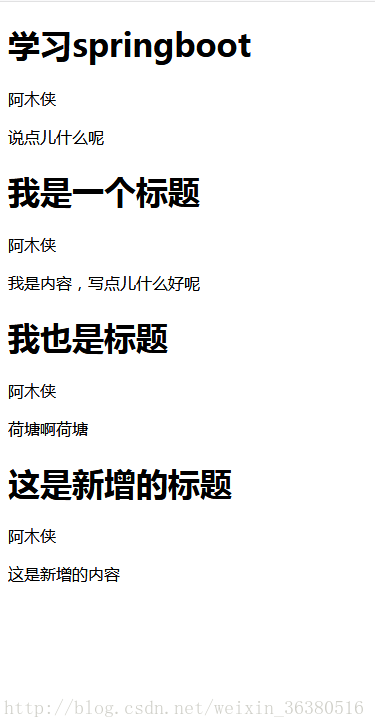
我们看到效果已经实现,展示条件搜索的页面代码如下:
<!DOCTYPE html>
<html xmlns:th="http://www.thymeleaf.org">
<head>
<meta charset="utf-8" />
<meta name="viewport" content="width=device-width, initial-scale=1.0" />
<title>springboot学习</title>
</head>

<body>
	<div th:each="item : ${item}">
		<h1 th:text="${{item.title}}"></h1>
		<p>
			<a th:text="${{item.name}}"></a>
		</p>
		<p>
			<a th:text="${{item.detail}}"></a>
		</p>
	</div>
</body>
</html>
当然,我们一般搜索展示页面和列表展示都一个页面,这里为了直观点理解,呵呵。
这样,一个简单的springboot整合Mybatis的demo就完成了,配置大大简化了,确实很方便,挺好的,也没有什么不好理解的地方,先搭起一个简单的demo,然后一步一步去完善,往复杂去做,边做边学,也是一种挺好的学习方法。