第一步:
创建一个空的‘.xib’文件
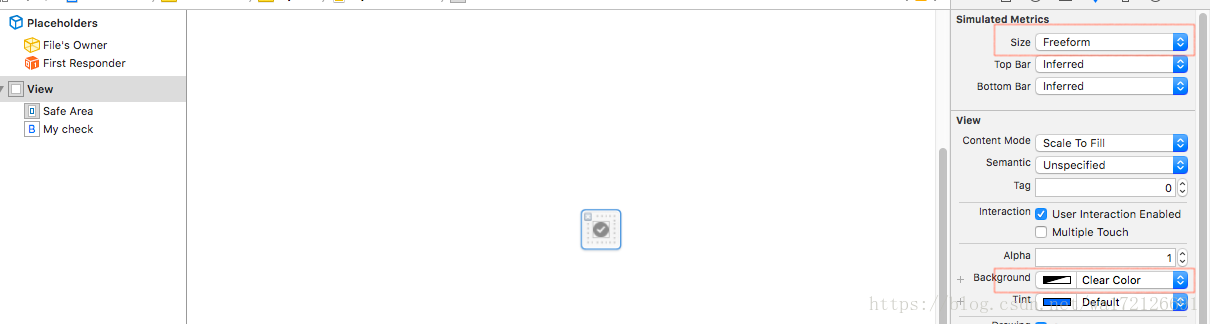
1.将View的 ‘size’设置为‘Freeform’
2.将View的背景色‘background’设置为透明色‘Clear Color’
第二步:
创建一个继承于’UIView’的类‘MyCheckBox’
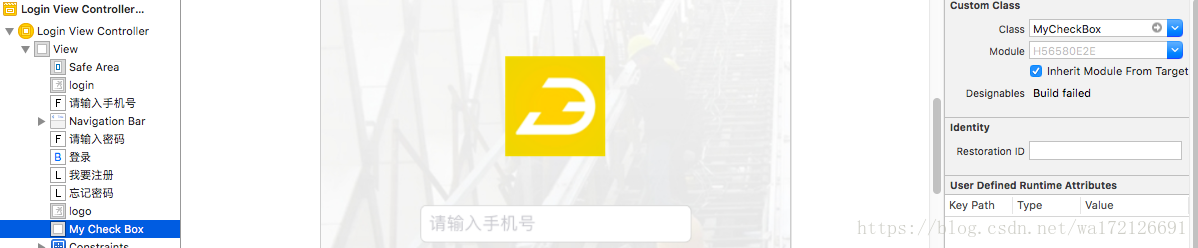
选中‘File’s Owner’将其class设置为 ‘MyCheckBox’

//
//  MyCheckBox.swift
//  H56580E2E
//reserved.
//

import UIKit

@IBDesignable class MyCheckBox: UIView {
    //绑定控件
    @IBOutlet var my_check: UIButton!
    //控件的选择状态(默认值为false)
    @IBInspectable var isCheck:Bool = false{
        didSet{
            my_check.isSelected = isCheck
            if !isCheck{
                let imgs = UIImage(named: "check_false")
                my_check.setImage(imgs, for: UIControlState.normal)
            }else{
                let imgs = UIImage(named: "check_true")
                my_check.setImage(imgs, for: UIControlState.normal)
            }
        }
    }
    //按钮点击事件(模拟复选框)
    @IBAction func ButCheckClick(_ sender: UIButton) {
        //获取Button按钮的isSelected属性,根据它来判断选中或不选中
        let is_check = self.my_check.isSelected
        //print("点击时的属性的属性:\(is_check)")
        if is_check{
            //is_check的值与实际效果是相反的
            my_check.isSelected = false
            self.isCheck = false
            let imgs = UIImage(named: "check_false")
            my_check.setImage(imgs, for: UIControlState.normal)
        }else{
            my_check.isSelected = true
            self.isCheck = true
            let imgs = UIImage(named: "check_true")
            my_check.setImage(imgs, for: UIControlState.normal)
        }


    }

    //初始化属性配置
    func initial(){
        //print("第一次的属性:\(self.my_check.isSelected)")
        self.my_check.isSelected = isCheck
    }
    /*** 下面的几个方法都是为了让这个自定义类能将xib里的view加载进来。这个是通用的,我们不需修改。 ****/
    var contentView:UIView!

    //初始化时将xib中的view添加进来
    override init(frame: CGRect) {
        super.init(frame: frame)
        contentView = loadViewFromNib()
        addSubview(contentView)
        addConstraints()
        //初始化属性配置
        initial()
    }

    //初始化时将xib中的view添加进来
    required init?(coder aDecoder: NSCoder) {
        super.init(coder: aDecoder)
        contentView = loadViewFromNib()
        addSubview(contentView)
        addConstraints()
        //初始化属性配置
        initial()
    }
    //加载xib
    func loadViewFromNib() -> UIView {
        let className = type(of: self)
        let bundle = Bundle(for: className)
        let name = NSStringFromClass(className).components(separatedBy: ".").last
        let nib = UINib(nibName: name!, bundle: bundle)
        let view = nib.instantiate(withOwner: self, options: nil).first as! UIView
        return view
    }
    //设置好xib视图约束
    func addConstraints() {
        contentView.translatesAutoresizingMaskIntoConstraints = false
        var constraint = NSLayoutConstraint(item: contentView, attribute: .leading,
                                            relatedBy: .equal, toItem: self, attribute: .leading,
                                            multiplier: 1, constant: 0)
        addConstraint(constraint)
        constraint = NSLayoutConstraint(item: contentView, attribute: .trailing,
                                        relatedBy: .equal, toItem: self, attribute: .trailing,
                                        multiplier: 1, constant: 0)
        addConstraint(constraint)
        constraint = NSLayoutConstraint(item: contentView, attribute: .top, relatedBy: .equal,
                                        toItem: self, attribute: .top, multiplier: 1, constant: 0)
        addConstraint(constraint)
        constraint = NSLayoutConstraint(item: contentView, attribute: .bottom,
                                        relatedBy: .equal, toItem: self, attribute: .bottom,
                                        multiplier: 1, constant: 0)
        addConstraint(constraint)
    }

}
使用
直接放进去一个 View 控件就行
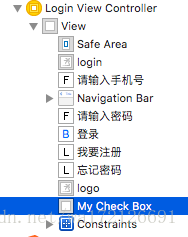
然后将 View控件的 Class 设置为 MyCheckBox就行