1 什么是Oauth2
oauth2是一种协议规范,spring-security-oauth2是对它的一种实现。其次,还有shiro实现,自己根据规范编写代码的实现方式。主流的qq,微信等第三方授权登录方式都是基于oauth2实现的。oauth2的认证方式有授权码(authorization_code),简单(implicit),账户密码(password),客户端(client_credentials)等方式,具体请自行百度不做过多的阐述。本文基于password方式实现。
2 服务器搭建
2.1 pom依赖
新建springboot项目,加入以下两个依赖:
	<dependency>
            <groupId>org.springframework.boot</groupId>
            <artifactId>spring-boot-starter-security</artifactId>
    </dependency>
    <dependency>
            <groupId>org.springframework.security.oauth</groupId>
            <artifactId>spring-security-oauth2</artifactId>
            <version>2.2.4.RELEASE</version>
    </dependency>
2.2 认证服务器配置
认证服务器要继承AuthorizationServerConfigurerAdapter,并加上@EnableAuthorizationServer注解来开启认证服务器。具体代码如下:
package com.example.oauth2.config;

import org.springframework.beans.factory.annotation.Autowired;
import org.springframework.beans.factory.annotation.Qualifier;
import org.springframework.context.annotation.Configuration;
import org.springframework.security.authentication.AuthenticationManager;
import org.springframework.security.core.userdetails.UserDetailsService;
import org.springframework.security.crypto.bcrypt.BCryptPasswordEncoder;
import org.springframework.security.oauth2.config.annotation.configurers.ClientDetailsServiceConfigurer;
import org.springframework.security.oauth2.config.annotation.web.configuration.AuthorizationServerConfigurerAdapter;
import org.springframework.security.oauth2.config.annotation.web.configuration.EnableAuthorizationServer;
import org.springframework.security.oauth2.config.annotation.web.configurers.AuthorizationServerEndpointsConfigurer;
import org.springframework.security.oauth2.config.annotation.web.configurers.AuthorizationServerSecurityConfigurer;
import org.springframework.security.oauth2.provider.error.WebResponseExceptionTranslator;
import org.springframework.security.oauth2.provider.token.TokenEnhancer;
import org.springframework.security.oauth2.provider.token.store.InMemoryTokenStore;

@Configuration
@EnableAuthorizationServer
public class AuthorizationServerConfig extends AuthorizationServerConfigurerAdapter {
    @Autowired
    @Qualifier("userDetailsServiceImpl")
    private UserDetailsService userDetailsService;

    @Autowired
    private AuthenticationManager authenticationManager;

    @Override
    public void configure(AuthorizationServerSecurityConfigurer security) throws Exception {
        security.allowFormAuthenticationForClients()
                .tokenKeyAccess("permitAll()")
                .checkTokenAccess("permitAll()");
    }

    @Override
    public void configure(ClientDetailsServiceConfigurer clients) throws Exception {
        String secret=new BCryptPasswordEncoder().encode("123456");
        clients.inMemory()//使用内存存放client
                .withClient("webapp")//客户端名称
                .secret(secret)//客户端密码
                .scopes("all")//范围
                .authorizedGrantTypes("authorization_code", "password", "refresh_token", "client_credentials", "implicit")//可使用的认证方式
//                .accessTokenValiditySeconds(30)//access_token过期时间,如不设置默认12小时
//                .refreshTokenValiditySeconds(60)//refresh_token过期时间,如不设置默认1个月
                .and()
                .withClient("android")
                .secret(secret)
                .scopes("all")
                .authorizedGrantTypes("authorization_code","password", "refresh_token");
    }

    @Override
    public void configure(AuthorizationServerEndpointsConfigurer endpoints) throws Exception {
        endpoints.tokenStore(new InMemoryTokenStore())
                .authenticationManager(authenticationManager)
                .userDetailsService(userDetailsService);
    }

}
说明:
1.public void configure(ClientDetailsServiceConfigurer clients)该方法用于配置客户端,可存放于内存或数据库中,为了简单方使,这里直接放到内存里,也就是clients.inMemory()方法。如果使用数据库来存放,要实现ClientDetailsService接口,本文中不做详细说明。关于client具体的设置方法在代码注释中已给出。
2.public void configure(AuthorizationServerSecurityConfigurer security)该方法用于配置一些安全设置。
allowFormAuthenticationForClients方法可能是允许client_id,client_secret可以以表单的形式进行提交,如不设置可能只能生成basic凭证后放到请求头里进行提交。
tokenKeyAccess和checkTokenAccess分别对应/oauth/token(获取token,也可以理解成登录接口)和/oauth/check_token(检查token并反回一些简单的用户信息)两个接口,这里直接放行。
3.public void configure(AuthorizationServerEndpointsConfigurer endpoints)该方法用于配置token、认证管理器、异常处理等很多功能。
tokenStore用于设置token存储管理。便于方便,这里直接使用的内存存放token。
authenticationManager认证管理器,使用的默认的认证管理器。
userDetailsService具体实现请看以下代码:
package com.example.oauth2.service.impl;

import com.example.oauth2.dao.UserMapper;
import com.example.oauth2.entity.Account;
import com.example.oauth2.entity.User;
import org.springframework.beans.factory.annotation.Autowired;
import org.springframework.security.authentication.BadCredentialsException;
import org.springframework.security.core.userdetails.UserDetails;
import org.springframework.security.core.userdetails.UserDetailsService;
import org.springframework.security.core.userdetails.UsernameNotFoundException;
import org.springframework.stereotype.Service;

@Service
public class UserDetailsServiceImpl implements UserDetailsService {
    @Autowired
    private UserMapper userMapper;

    @Override
    public UserDetails loadUserByUsername(String s) throws UsernameNotFoundException {
        User user=userMapper.selectByUsername(s);
        if(user==null){
            throw new BadCredentialsException("帐号不存在!");
        }else{
            return new Account(user);
        }
    }
}
其中,User是我数据库对应的实体类,Account是实现了UserDetails接口的帐户类。Account具体代码如下:
package com.example.oauth2.entity;

import lombok.Data;
import org.springframework.security.core.GrantedAuthority;
import org.springframework.security.core.authority.SimpleGrantedAuthority;
import org.springframework.security.core.userdetails.UserDetails;

import java.util.ArrayList;
import java.util.Collection;
import java.util.List;

@Data
public class Account extends User implements UserDetails {
    private String username;

    private String password;

    private String nickname;

    private boolean locked;

    private boolean expire;

    private List<Role> roles;

    public Account(User user){
        username=user.getUsername();
        password=user.getPassword();
        nickname=user.getNickname();
        locked=user.getLocked();
        expire=user.getExpire();
        roles=user.getRoles();
    }

    @Override
    public Collection<? extends GrantedAuthority> getAuthorities() {
        List<GrantedAuthority> list=new ArrayList<>();
        for(Role role:roles){
            list.add(new SimpleGrantedAuthority("ROLE_"+role.getRolename()));
        }
        return list;
    }

    @Override
    public boolean isAccountNonExpired() {
        return !expire;
    }

    @Override
    public boolean isAccountNonLocked() {
        return !locked;
    }

    @Override
    public boolean isCredentialsNonExpired() {
        return true;
    }

    @Override
    public boolean isEnabled() {
        return true;
    }
}
2.3 资源服务器配置
资源服务器要继承ResourceServerConfigurerAdapter,并加上@EnableResourceServer注解来开启资源服务器。具体没什么好说的,这里就是做了一个所有请求都需要认证。具体代码如下:
package com.example.oauth2.config;

import org.springframework.beans.factory.annotation.Autowired;
import org.springframework.context.annotation.Configuration;
import org.springframework.security.config.annotation.web.builders.HttpSecurity;
import org.springframework.security.oauth2.config.annotation.web.configuration.EnableResourceServer;
import org.springframework.security.oauth2.config.annotation.web.configuration.ResourceServerConfigurerAdapter;
import org.springframework.security.oauth2.config.annotation.web.configurers.ResourceServerSecurityConfigurer;
import org.springframework.security.web.util.matcher.RequestMatcher;

import javax.servlet.http.HttpServletRequest;

@Configuration
@EnableResourceServer
public class ResourceServerConfig extends ResourceServerConfigurerAdapter {
    @Override
    public void configure(HttpSecurity http) throws Exception {
        http.requestMatcher(new OAuth2RequestedMatcher())
                .authorizeRequests()
                .anyRequest().authenticated();
    }

    /**
     * 定义OAuth2请求匹配器
     */
    private static class OAuth2RequestedMatcher implements RequestMatcher {
        @Override
        public boolean matches(HttpServletRequest request) {
            String auth = request.getHeader("Authorization");
            //判断来源请求是否包含oauth2授权信息,这里授权信息来源可能是头部的Authorization值以Bearer开头,或者是请求参数中包含access_token参数,满足其中一个则匹配成功
            boolean haveOauth2Token = (auth != null) && auth.startsWith("Bearer");
            boolean haveAccessToken = request.getParameter("access_token")!=null;
            return haveOauth2Token || haveAccessToken;
        }
    }
}
2.4 WebSecurity配置
用过Spring-Security的小伙伴应该都很熟悉这个了,继承WebSecurityConfigurerAdapter类,并加了@EnableWebSecurity注解,如需使用注解做接口鉴权还要加上@EnableGlobalMethodSecurity(prePostEnabled = true)注解。其中authenticationManagerBean很重要,如果不注入这个Bean,使用@Autowired注入的authenticationManager会报以下错误:
Field authenticationManager in com.example.oauth2.config.AuthorizationServerConfig required a bean of type 'org.springframework.security.authentication.AuthenticationManager' that could not be found.
具体代码如下:
package com.example.oauth2.config;

import org.springframework.beans.factory.annotation.Autowired;
import org.springframework.beans.factory.annotation.Qualifier;
import org.springframework.context.annotation.Bean;
import org.springframework.context.annotation.Configuration;
import org.springframework.security.authentication.AuthenticationManager;
import org.springframework.security.config.annotation.authentication.builders.AuthenticationManagerBuilder;
import org.springframework.security.config.annotation.method.configuration.EnableGlobalMethodSecurity;
import org.springframework.security.config.annotation.web.builders.HttpSecurity;
import org.springframework.security.config.annotation.web.configuration.EnableWebSecurity;
import org.springframework.security.config.annotation.web.configuration.WebSecurityConfigurerAdapter;
import org.springframework.security.core.userdetails.UserDetailsService;
import org.springframework.security.crypto.bcrypt.BCryptPasswordEncoder;
import org.springframework.security.crypto.password.PasswordEncoder;

@Configuration
@EnableWebSecurity
@EnableGlobalMethodSecurity(prePostEnabled = true)
public class WebSecurityConfig extends WebSecurityConfigurerAdapter {
    @Autowired
    @Qualifier("userDetailsServiceImpl")
    private UserDetailsService userDetailsService;

    @Bean
    @Override
    public AuthenticationManager authenticationManagerBean() throws Exception {
        return super.authenticationManagerBean();
    }

    @Bean
    public PasswordEncoder passwordEncoder() {
        return new BCryptPasswordEncoder();
    }

    @Override
    protected void configure(AuthenticationManagerBuilder auth) throws Exception {
        auth.userDetailsService(userDetailsService).passwordEncoder(passwordEncoder());
    }

    @Override
    protected void configure(HttpSecurity http) throws Exception {
        http.authorizeRequests()
                .anyRequest().authenticated()
                .and()
                .httpBasic()
                .and()
                .csrf().disable();
    }

}
3 测试
我们使用postman来进行测试,首先要明白,我们这里使用password的方式进行登录,那么需要的参数有:
| 参数名 | 说明 |
|---|---|
| client_id | 在认证服务器中注册的客户端名 |
| client_secret | 在认证服务器中注客户端密码 |
| grant_type | 获取token的方式,本文使用password |
| username | 用户名 |
| password | 密码 |
3.1 使用Basic Auth认证
1.打开postman的Authorization选项卡,选择TYPE为Basic Auth,在如侧输入用户名和密码。如下图:
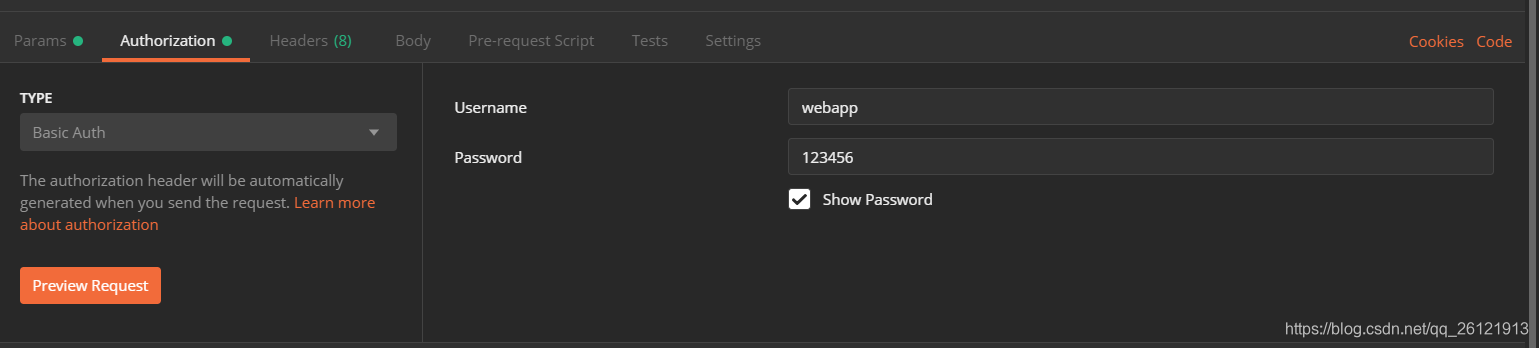
注意:这里的username=client_id,password=client_secret。输入用户名和密码后单击左下方Preview Request按钮,会看到Headers选项卡里多了一项key=Authorization,value=Basic d2ViYXBwOjEyMzQ1Ng==的header。如下图:

切换到Params选项卡,添加其余3个参数,如下图:
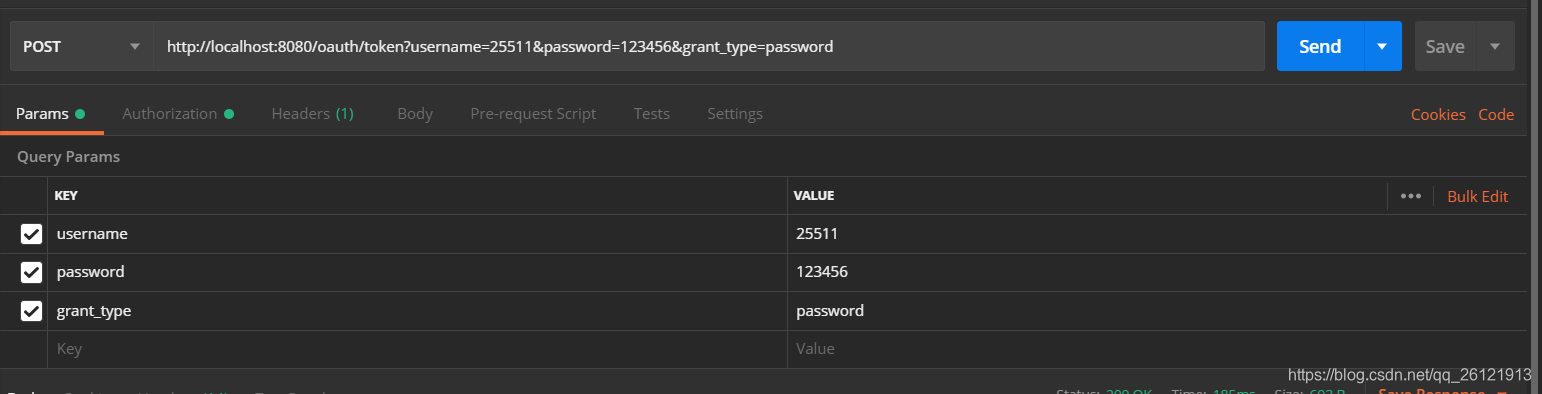
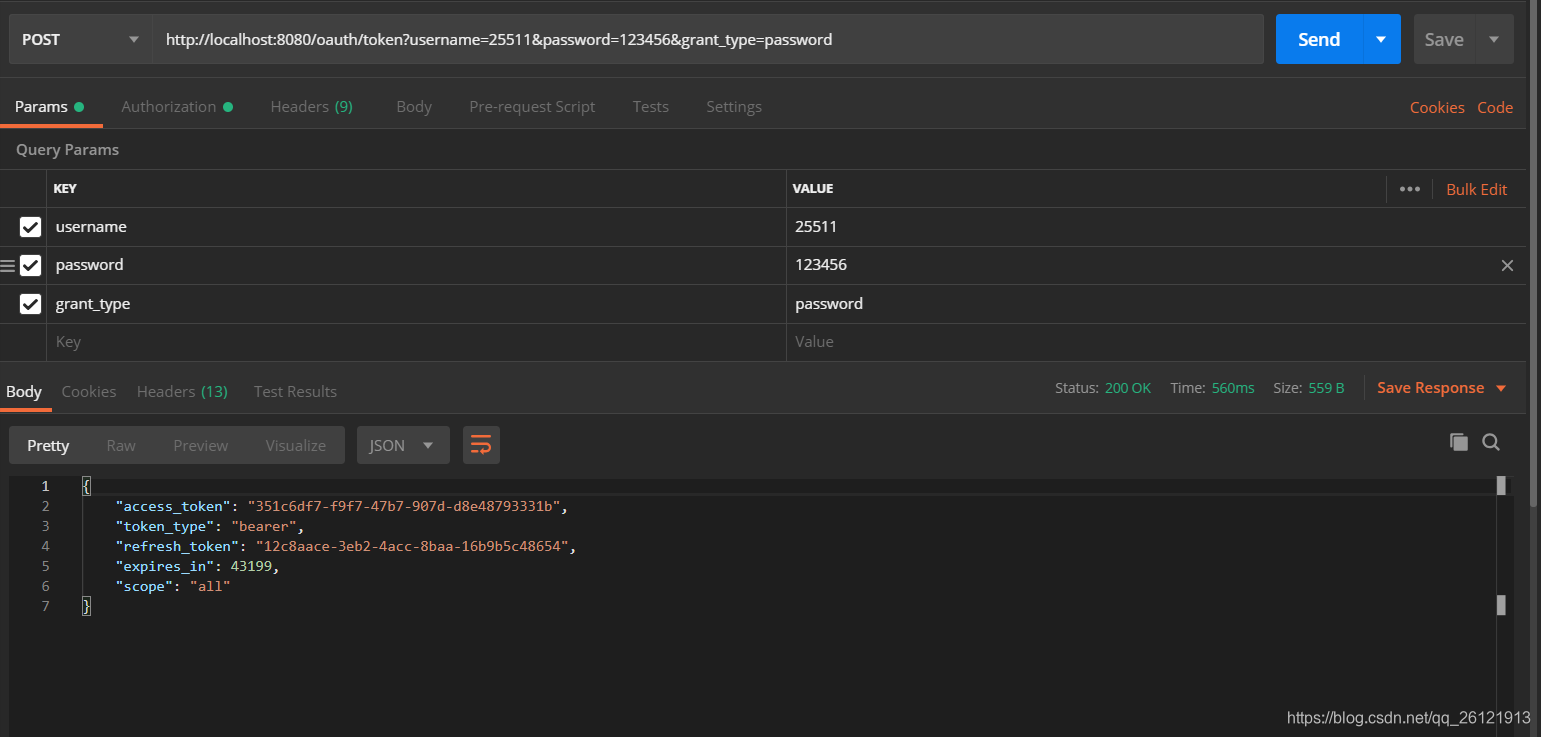
单击Send,获取token成功!
3.2 使用参数认证
与3.1不同的时不需要第一步生成Basic凭证,直接把client_id和client_secret放在params里获取token,如下图:
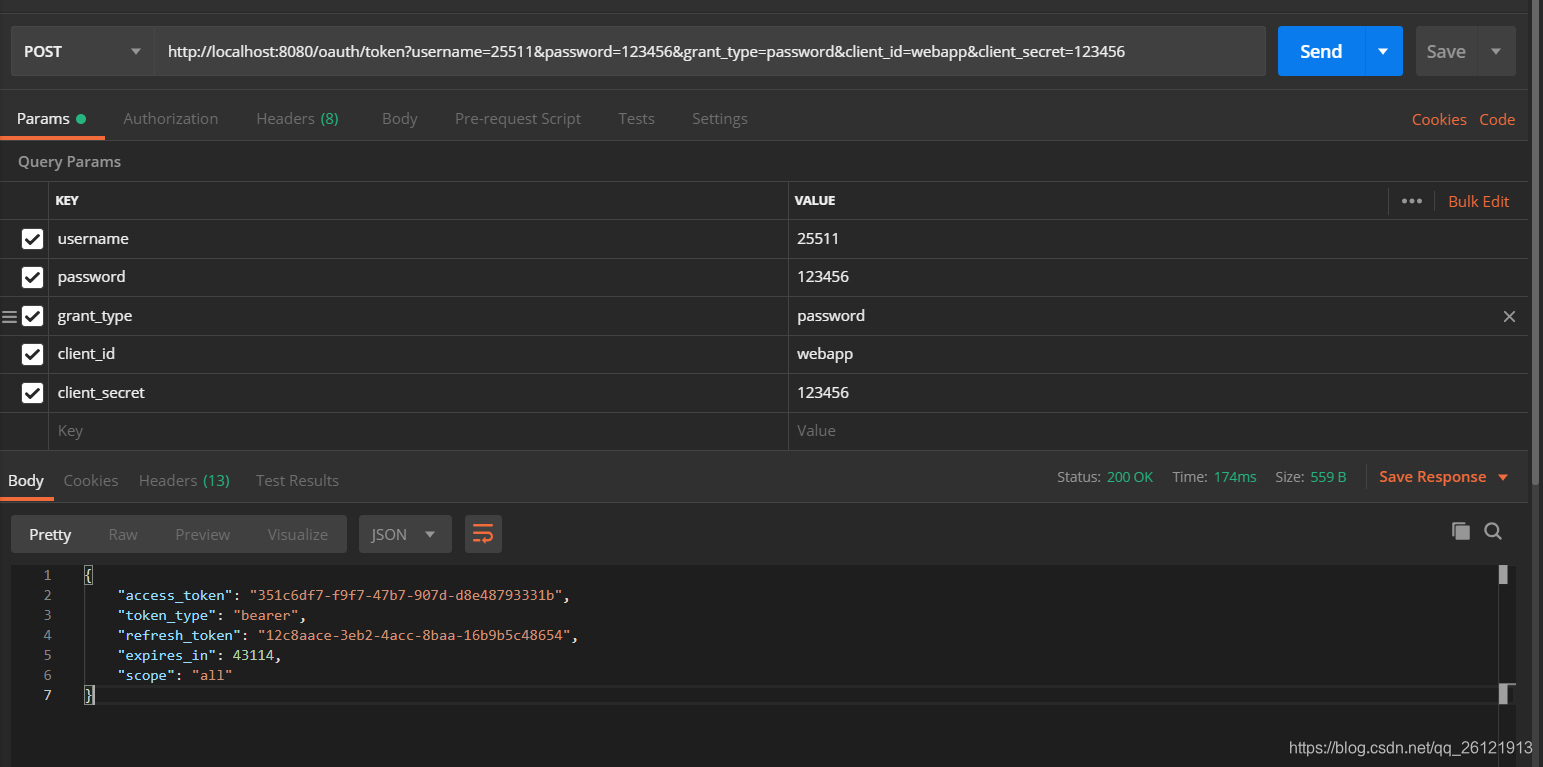
3.1和3.2我们都成功获取token,在返回的数据中,我们可以看到有两个带token的字段,access_token就是我们在访问资源时需要携带的token,这个token一般来说过期时间比较短。另一个就是refresh_token,这个token过期时间一般比较久,当access_token过期时,我们就用refresh_token去重新获取access_token。
3.3 使用refresh_token刷新access_token
首先,如果要想使用refresh_token来刷新access_token,必须在认证服务器配置文件的.authorizedGrantTypes()方法里有“refresh_token”的认证方式。刷新access_token的方法同样是访问/oauth/token。如下图:

在参数里要带上我们在3.1或者3.2里获取的refresh_token。
测试完成,搭建认证服务器成功!
4 结语
学海无涯苦作舟,正逢疫情期间无事可做,学习一下新知识。以前都是eclipse+SSM老三样,刚开始换到Idea+springboot,很多东西都不熟,摸索了好久。本文关于oauth2的知识还不完善,下一章试一下自定义一些返回格式、异常等。武汉加油,中国加油,下期见!
