foolbox是另外一个对抗机器学习库。
安装方法:
pip3 install foolbox
测试代码:
使用VGG19 预训练模型,攻击猫图片。
当然,得去github上下载VGG19的预训练模型库。
http://download.tensorflow.org/models/vgg_19_2016_08_28.tar.gz
__author__ = 'dk'
import tensorflow as tf
import matplotlib.pyplot as plt
from tensorflow.contrib.slim.nets import vgg
import numpy as np
import foolbox
images = tf.placeholder(tf.float32, shape=(None, 224, 224, 3))
preprocessed = images - [123.68, 116.78, 103.94]
logits, _ = vgg.vgg_19(preprocessed, is_training=False)
restorer = tf.train.Saver(tf.trainable_variables())

image, label = foolbox.utils.imagenet_example()
print('label',label)
with foolbox.models.TensorFlowModel(images, logits, (0, 255)) as model:
    restorer.restore(model.session, 'C:\\Users\\dk\\Downloads\\vgg_19_2016_08_28\\vgg_19.ckpt')
    predict_label = np.argmax(model.predictions(image))
    print('predict label',predict_label)

    fmodel = model
    # apply attack on source image
    attack  = foolbox.attacks.FGSM(fmodel)
    adversarial = attack(image, 281)
    difference = (adversarial - image)%256

    adv_label = np.argmax(fmodel.predictions(adversarial))
    print('adversarial class', adv_label)
    plt.subplot(1,3,1)
    plt.title('origin predict label %s'%281)
    plt.imshow(np.asarray(image,dtype=np.int))

    plt.subplot(1,3,2)
    plt.title('adv image label %s'%adv_label)
    plt.imshow(np.asarray(adversarial,dtype=np.int))

    plt.subplot(1,3,3)
    plt.title('difference image')
    plt.imshow(np.asarray(difference,dtype= np.int))
    plt.show()
值得注意的是,foolbox给example.png的lable是282,但是VGG 19识别出来却是281,这使得攻击模型直接就不运行了,因为已经分类失败了。
于是在输入到attack中把label改成 281就可以了。
攻击效果:
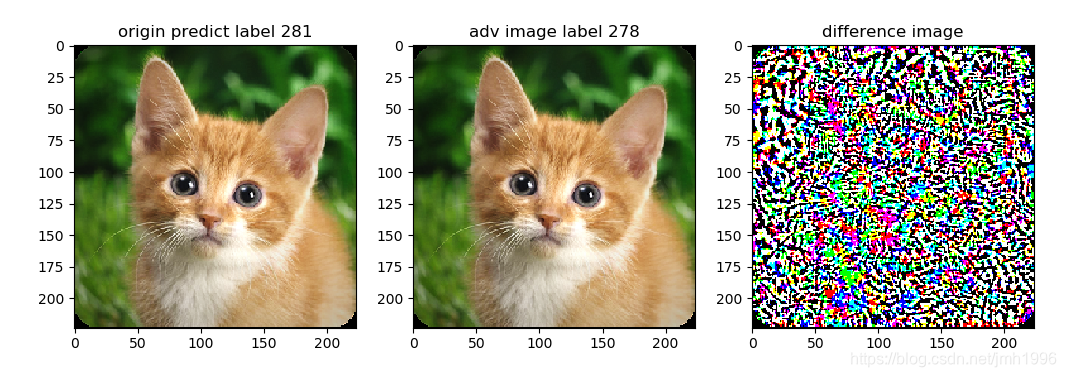
原图的label 是281,攻击样本的label是278,肉眼是看不出adv与原图的差异的。difference差异倒是蛮大的。
