一、项目简介
我们将采用Angular框架来做一个demo,这个demo将要实现的功能如下:
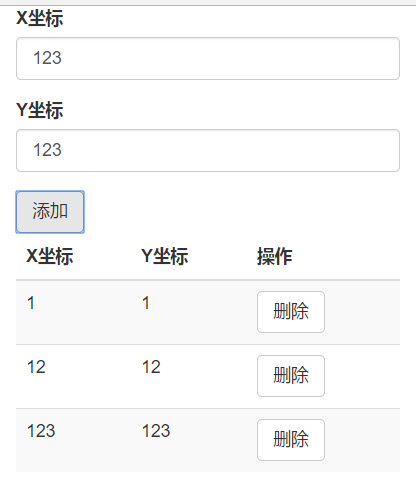
在X坐标和Y坐标文本框输入信息,然后点击添加,就会在下面表格 中出现一项相应的数据,点击每一项旁边的删除按钮,该条信息就会被删除!
因为我们的表格数据是经常刷新的,所以我们把它独立出来作为一个组件。
二、项目目录
--------app
----------dataTable(文件夹)
------------dataTable.component.html
------------dataTable.component.css
------------dataTable.component.ts
----------app.component.html
----------app.component.css
----------app.component.ts
----------app.module.ts
三、代码讲解
1.app.component.html
我们先把主体框架写好
<div class="container">
  <div class="row">
    <form>
      <div class="form-group">
        <label for="exampleInputEmail1">X坐标</label>
        <input type="text" class="form-control" id="exampleInputEmail1" placeholder="xcood" name="xcood">
      </div>
      <div class="form-group">
        <label for="exampleInputPassword1">Y坐标</label>
        <input type="text" class="form-control" id="exampleInputPassword1" placeholder="ycood" name="ycood">
      </div>
      <button type="button" class="btn btn-default" (click)="additem()">添加</button>
    </form>
  </div>
  <div class="row">
    <data-table [array]="addArray"></data-table><!--导入dataTable组件,并且将父组件里面的form表单数据传递给子组件渲染-->
  </div>
</div>2.app.component.ts
我们再父组件需要用到一个添加功能的additem()方法
import { Component } from '@angular/core';

@Component({
  selector: 'app-root',
  templateUrl: './app.component.html',
  styleUrls: ['./app.component.css']
})
export class AppComponent {
  addArray=[];
  xcood: any;
  ycood: any;

  additem(){
    this.xcood = (document.getElementsByName('xcood')[0] as HTMLInputElement).value;
    this.ycood = (document.getElementsByName('ycood')[0] as HTMLInputElement).value;
    this.addArray.push({
      xcood:this.xcood,
      ycood:this.ycood
    })
  }
}
xcood: any;
ycood: any;
的话,那么将会出现如下错误

我们没有声明就直接初始化他们了,肯定会出错,要记住一件事,要用到什么变量,首先要先声明它,再去给它初始化。
在additem()函数里面,我们要初始化这两个变量了,记住要用this,否则获取不到全局作用域声明的变量。因为我们是点击添加按钮再去获取form表单里面的数据,所以在逻辑上我们要把获取的步骤放在additem()函数里面。这里还有一个新的写法,因为之前我直接用
this.xcood = document.getElementsByName('xcood')[0].value;是获取不到数据的,

所以我在网上找了一下,替换成了上面那种写法。
我们在一开始就声明了一个addArray的数组,这个数组即将存放的是一条一条的数据对象,在additem()函数里面每调用一次就把获取到的数据push给这个数组。
接下来我们就要在子组件接收这个数组,并且渲染到表格上。
3.dataTable.component.html
<table class="table table-striped">
  <thead>
    <tr>
      <th>X坐标</th>
      <th>Y坐标</th>
      <th>操作</th>
    </tr>
  </thead>
  <tbody *ngIf="array.length!==0"><!--这里我们判断一下传递过来的数组是否为空,如果是空的话我们就没有必要渲染出来了-->
    <tr *ngFor="let data of array">
      <td>{{data.xcood}}</td>
      <td>{{data.ycood}}</td>
      <td><button type="button" class="btn btn-default" (click)="delete(data)">删除</button></td>
    </tr>
  </tbody>
</table>
4.dataTable.component.ts
import { Component,Input } from '@angular/core';

@Component({
  selector: 'data-table',
  templateUrl: './dataTable.component.html',
  styleUrls: ['./dataTable.component.css']
})
export class DataTableComponent {
	@Input() array:any;//接收父组件传递过来的addArray数组
	index: number;     //跟上面说的一样要先声明
	delete(data){
		this.index = this.array.indexOf(data);
		if (this.index > -1) {
			this.array.splice(this.index, 1);//跟上面说的一样在初始化的时候要用到this
			}
	}
}5.app.module.ts
记得要在app.module.ts里面注册你新建的dataTable组件
import { BrowserModule } from '@angular/platform-browser';
import { NgModule } from '@angular/core';

import { AppComponent } from './app.component';
import { DataTableComponent } from './dataTable/dataTable.component';

@NgModule({
  declarations: [
    AppComponent,
    DataTableComponent
  ],
  imports: [
    BrowserModule
  ],
  providers: [],
  bootstrap: [AppComponent]
})
export class AppModule { }
四、ngx-bootstrap的导入
其实很简单,需要先在cmd输入 cnpm install ngx-bootstrap --save在当前目录下安装该模块
然后在项目最后的出口html文件里面加入
<link href="https://maxcdn.bootstrapcdn.com/bootstrap/3.3.7/css/bootstrap.min.css" rel="stylesheet">