接下来为项目的后续进行功能以及访问分析提供数据支持,我们将访问记录存放到mysql,以便熟悉一下aop的道理。
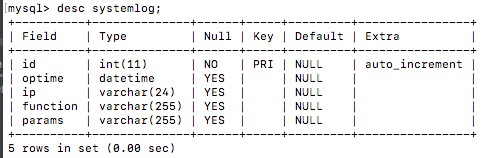
首先先建立我们的数据表
使用mybatis插件生成pojo类以及映射文件
在springmvc配置文件中进行切面的配置
<!--日志处理类-->
    <bean id="systemAspect" class="com.yang.aspect.SystemAspect" />
    <!--aop配置-->
    <aop:config>
        <!--设置切入函数-->
        <aop:pointcut expression="execution(* com.yang.service.*.*(..))" id="servicePoint" />
        <!--切入位置-->
        <aop:aspect ref="systemAspect">
            <aop:after method="writeLog" pointcut-ref="servicePoint" />
        </aop:aspect>
    </aop:config>
在进行存数据是,我们想到,ip地址在request中,但是在切面中是拿不到的,这个时候想到有一个本地线程可以使用,我们可以使用拦截器将本次访问的请求保存到本地线程中,然后再去从该线程中读取数据就可以,接下来先创建本地线程变量的读取request的工具类
package com.yang.util;

import javax.servlet.http.HttpServletRequest;

/**
 * 读取request的本次线程工具类
 */
public class RequestUtil {
    /*类属性,保证其唯一性*/
    public static ThreadLocal<HttpServletRequest> local = new ThreadLocal<>();

    /*获取request*/
    public static HttpServletRequest getRequest() {
        return local.get();
    }

    /*存储request*/
    public static void setRequest(HttpServletRequest request) {
        local.set(request);
        /**
         * 源码, 我们可以知道这个就是将该线程作为键,传入的reuqest作为值封装到map中
         * public void set(T value) {
         *         Thread t = Thread.currentThread();
         *         ThreadLocalMap map = getMap(t);
         *         if (map != null) {
         *             map.set(this, value);
         *         } else {
         *             createMap(t, value);
         *         }
         *     }
         */
    }
}
配置完成我们线程的存取request,接下来我们需要配置拦截器进行将拦截的request使用这个工具类存储到本地线程中
package com.yang.interceptor;

import com.yang.util.RequestUtil;
import org.springframework.web.servlet.HandlerInterceptor;

import javax.servlet.http.HttpServletRequest;
import javax.servlet.http.HttpServletResponse;

/**
 * request拦截器,继承HandlerInterceptor接口
 */
public class RequestInterceptor implements HandlerInterceptor {
    /*只需要重写前置拦截*/
    @Override
    public boolean preHandle(HttpServletRequest request, HttpServletResponse response, Object handler) throws Exception {
        // 保存request
        RequestUtil.setRequest(request);
        return true;
    }
}
接下来我们需要在springmvc配置文件中配置一下,告知spring使用拦截器
    <!--配置拦截器-->
    <mvc:interceptors>
        <mvc:interceptor>
            <!--拦截所有请求-->
            <mvc:mapping path="/*" />
            <!--拦截器位置-->
            <bean class="com.yang.interceptor.RequestInterceptor" />
        </mvc:interceptor>
    </mvc:interceptors>
接下来设置写入日志的切片方法

package com.yang.aspect;

import com.fasterxml.jackson.core.JsonProcessingException;
import com.fasterxml.jackson.databind.ObjectMapper;
import com.yang.domain.Systemlog;
import com.yang.mapper.SystemlogMapper;
import com.yang.util.RequestUtil;
import org.aspectj.lang.JoinPoint;
import org.springframework.beans.factory.annotation.Autowired;

import javax.servlet.http.HttpServletRequest;
import java.util.Date;

/**
 * 配置写入日志的类
 */
public class SystemAspect {

    /*注入mapper*/
    @Autowired
    private SystemlogMapper systemlogMapper;

    /*处理写入日志的方法,切片会把切入点传进来,我们可以接受*/
    public void writeLog(JoinPoint point) throws JsonProcessingException {
        Systemlog systemlog = new Systemlog();
        // 设置日志
        systemlog.setOptime(new Date());
        // 设置request
        HttpServletRequest request = RequestUtil.getRequest();
        // 检测request是否为空,进行第一次授权的时候会先到realm中,不会先到拦截器中
        if (request != null) {
            // 设置ip
            systemlog.setIp(request.getRemoteAddr());
        }
        // 在切入点中获取类名
        String name = point.getTarget().getClass().getName();
        // 从切入点中获取签名
        String signature = point.getSignature().getName();
        // 设置函数名
        systemlog.setFunction(name + ":" + signature);
        // 获取参数,并序列化为字符串
        String params = new ObjectMapper().writeValueAsString(point.getArgs());
        // 设置参数
        systemlog.setParams(params);
        systemlogMapper.insert(systemlog);
    }
}
这个项目基本完成,接下来学习一下poi的使用,也就是导入导出excel文件。
poi的简介:Apache POI是Apache软件基金会的开源项目,POI提供API给Java程序对Microsoft Office格式档案读和写的功能。 .NET的开发人员则可以利用NPOI (POI for .NET) 来存取 Microsoft Office文档的功能。
poi官网文档:https://poi.apache.org/components/spreadsheet/quick-guide.html
csdn的文章:https://www.cnblogs.com/huajiezh/p/5467821.html
接下来在场景中用一下
首先安装依赖,最新版本4.1.2,但是maven没下载下来,改为使用4.1.1
<!--poi依赖,操纵excel文件-->
    <dependency>
      <groupId>org.apache.poi</groupId>
      <artifactId>poi</artifactId>
      <version>4.1.1</version>
    </dependency>
直接在employee中使用导入导出,在jsp文件中设置两个按钮
<a class="easyui-linkbutton" iconCls="icon-edit" id="import">导入</a>
<a class="easyui-linkbutton" iconCls="icon-edit" id="export">导出</a>
编写js文件
    /*监听下载按钮*/
    $('#export').click(function () {
        window.open("employee/download")
    });

    /*设置上传界面*/
    $('#upload').dialog({
        width:260,
        height:180,
        title:"导入Excel",
        buttons:[{
            text:"保存",
            handler:function () {
                // 进行上传
                $('#employUpload').form("submit", {
                    url:"employee/upload/file",
                    success:function (data) {
                        data = $.parseJSON(data);
                        if (data.success) {
                            $.messager.alert("提示", data.msg);
                            // 关闭上传
                            $('#upload').dialog("close");
                            // 重新加载数据表格
                            $("#dg").datagrid("reload");
                        } else {
                            $.messager.alert("温馨提示", data.msg);
                        }
                    }
                })
            },
        },{
            text: "关闭",
            handler:function () {
                $('#upload').dialog("close");
            }
        }],
        closed:true,
    });
    /*监听上传按钮*/
    $('#import').click(function () {
        $('#employUpload').form("clear");
        $('#upload').dialog("open");
    });
    /*监听下载模版按钮*/
    $('#downloadTemp').click(function () {
        window.open("employee/download/template")

    })
如果想要上传文件,需要在springmvc的配置文件中配置一下文件上传解析器
    <!--配置文件上传解析器-->
    <bean id="multipartResolver" class="org.springframework.web.multipart.commons.CommonsMultipartResolver">
        <!--设置上传最大文件大小-->
        <property name="maxUploadSize" value="10240000"/>
    </bean>
编写控制层文件
    /*处理下载*/
    @RequestMapping("/employee/download")
    @ResponseBody
    public void downLoadEmployee(HttpServletResponse response) {
        // 首先获取所有的用户
        List<Employee> employees = employeeService.getAll();
        try {
            // 初始化一个工作簿
            HSSFWorkbook workbook = new HSSFWorkbook();
            // 新建一个sheet表
            HSSFSheet sheet = workbook.createSheet("员工数据");
            // 设置头部的行
            HSSFRow row = sheet.createRow(0);
            // 为每行设置字段
            row.createCell(0).setCellValue("编码");
            row.createCell(1).setCellValue("用户名");
            row.createCell(2).setCellValue("入职时间");
            row.createCell(3).setCellValue("电话");
            row.createCell(4).setCellValue("邮箱");
            row.createCell(5).setCellValue("是否在职");
            row.createCell(6).setCellValue("是否是管理员");

            // 开始设置信息
            // 不再循环中每次都初始化一行,在外面初始化
            HSSFRow employeeRow = null;
            for (int i = 0; i < employees.size(); i++) {
                // 获取一个对象
                Employee employee = employees.get(i);
                // 创建一行
                employeeRow = sheet.createRow(i + 1);
                employeeRow.createCell(0).setCellValue(employee.getId());
                employeeRow.createCell(1).setCellValue(employee.getUsername());
                // 入职日期是时间格式,转化为字符串格式
                SimpleDateFormat simpleDateFormat = new SimpleDateFormat();
                String hireData = simpleDateFormat.format(employee.getHiredate());
                // 设置入职日期
                employeeRow.createCell(2).setCellValue(hireData);
                employeeRow.createCell(3).setCellValue(employee.getPhone());
                employeeRow.createCell(4).setCellValue(employee.getEmail());
                employeeRow.createCell(5).setCellValue(employee.getState() ? "是" : "否");
                employeeRow.createCell(6).setCellValue(employee.getAdmin() ? "是" : "否");
            }
            // 响应给浏览器
            // 设置文件名,iso8859-1需要设置
            String fineName = new String("员工数据.xls".getBytes(StandardCharsets.UTF_8), "iso8859-1");
            // 设置响应头为附件
            response.setHeader("content-Disposition", "attachment;filename=" + fineName);
            workbook.write(response.getOutputStream());
        } catch (Exception e) {
            e.printStackTrace();
        }
    }

    /*处理下载员工模版*/
    @RequestMapping("/employee/download/template")
    @ResponseBody
    public void DownloadTemplate(HttpServletRequest request, HttpServletResponse response) {
        // 先声明一个文件流,最后关闭
        FileInputStream inputStream = null;
        // 获取文件路径
        String realPath = request.getSession().getServletContext().getRealPath("static/employeeTemp.xls");
        try {
            // 读取文件
            inputStream = new FileInputStream(realPath);
            // 响应给浏览器
            // 设置文件名,iso8859-1需要设置
            String fineName = new String("employeeTemp.xls".getBytes(StandardCharsets.UTF_8), "iso8859-1");
            // 设置响应头为附件
            response.setHeader("content-Disposition", "attachment;filename=" + fineName);
            IOUtils.copy(inputStream, response.getOutputStream());
        } catch (Exception e) {
            e.printStackTrace();
        } finally {
            // 如果文件流不为空,则关闭
            if (inputStream != null) {
                try {
                    inputStream.close();
                } catch (IOException e) {
                    e.printStackTrace();
                }
            }
        }
    }

    /*进行文件上传*/
    @RequestMapping("/employee/upload/file")
    @ResponseBody
    public AjaxRes uploadEmployee(MultipartFile excel) {
        AjaxRes ajaxRes = new AjaxRes();
        try {
            // 将上传的文件作为流传入
            HSSFWorkbook workbook = new HSSFWorkbook(excel.getInputStream());
            // 获取第一张工作表,因为模版中只规定创建第一张工作表
            HSSFSheet sheet = workbook.getSheetAt(0);
            // 获取最大行号
            int lastRowNum = sheet.getLastRowNum();
            HSSFRow employeeRow = null;
            for (int i = 1; i <= lastRowNum; i++) {
                Employee employee = new Employee();
                employeeRow = sheet.getRow(i);
                // 设置用户名
                employee.setUsername((String) getCellValue(employeeRow.getCell(1)));
                // 设置入职时间
                employee.setHiredate((Date) getCellValue(employeeRow.getCell(2)));
                // 设置电话,因为11为返回的数字是double,科学技术,我们选转化为BigDecimal然后再转化为字符串
                double phone = (double) getCellValue(employeeRow.getCell(3));
                BigDecimal phoneDecimal = new BigDecimal(String.valueOf(phone));
                employee.setPhone(phoneDecimal.toPlainString());
                // 设置邮箱
                employee.setEmail((String) getCellValue(employeeRow.getCell(4)));
                // 设置是否在职
                String employeeState = (String) getCellValue(employeeRow.getCell(5));
                employee.setState(employeeState.equals("否"));
                // 设置是否是管理员
                String admin = (String) getCellValue(employeeRow.getCell(6));
                employee.setAdmin(admin.equals("是"));
                // 设置初始密码 1234
                employee.setPassword("1234");
                employeeService.insertEmployeeInExcel(employee);
                ajaxRes.setSuccess(true);
                ajaxRes.setMsg("导入成功!");
            }
        } catch (IOException e) {
            e.printStackTrace();
            ajaxRes.setSuccess(false);
            ajaxRes.setMsg("导入失败!");
        }
        return ajaxRes;
    }

    /*设置处理每一行类型的函数*/
    private Object getCellValue(Cell cell) {
        switch (cell.getCellType()) {
            case STRING:
                return cell.getRichStringCellValue().getString();
            case NUMERIC:
                // 判断是否时间
                if (DateUtil.isCellDateFormatted(cell)) {
                    return cell.getDateCellValue();
                } else {
                    return cell.getNumericCellValue();
                }
            case BOOLEAN:
                return cell.getBooleanCellValue();
            case FORMULA:
                return cell.getCellFormula();
        }
        return cell;
    }
到现在为止,这个简单的权限小项目完成了。源码地址github:https://github.com/yang-shixiong/springDemo/tree/master/permissionPro