文章目录
1.在bean.xml中配置context约束
1.曾经的XML配置:
 * <bean id="accountService" class="com.jh.service.impl.AccountServiceImpl"
 * scope=""  init-method=""  destroy-method="">
 * <property name="" value=""|ref=""></property>
 * </bean>
2. 不再是bean约束
注解配置:告知spring在创建容器时要扫描的包 com.jh
<?xml version="1.0" encoding="UTF-8"?>
<beans xmlns="http://www.springframework.org/schema/beans"
       xmlns:xsi="http://www.w3.org/2001/XMLSchema-instance"
       xmlns:context="http://www.springframework.org/schema/context"
       xsi:schemaLocation="http://www.springframework.org/schema/beans
        http://www.springframework.org/schema/beans/spring-beans.xsd
        http://www.springframework.org/schema/context
        http://www.springframework.org/schema/context/spring-context.xsd">

    <!--注解配置:告知spring在创建容器时要扫描的包,配置所需要的标签不是在beans的约束中,而是一个名称为
    context名称空间和约束中-->
    <context:component-scan base-package="com.jh"></context:component-scan>
</beans>
2. 四类注解
2.1 用于创建对象的注解
概念:他们的作用就和在XML配置文件中编写一个<bean标签>实现的功能是一样的;
(1) @Component
作用:用于把当前类对象存入spring容器中;
属性:value:用于指定bean的id。当我们不写时,它的默认值是当前类名,且首字母改小写。
(2) @Controller:一般用在表现层
(3) @Service:一般用在业务层
(4) @Repository:一般用在持久层
以上三个注解他们的作用和属性与Component是一模一样。
他们三个是spring框架为我们提供明确的三层使用的注解,使我们的三层对象更加清晰。
2.2 用于注入数据的注解
概念:他们的作用就和在xml配置文件中的bean标签中写一个<property>标签的作用是一样的;
- (1)Autowired:
作用:自动按照类型注入。只要容器中有唯一的一个bean对象类型和要注入的变量类型匹配,就可以注入成功;

- 如果ioc容器中没有任何bean的类型和要注入的变量类型(IAccountDao)匹配,则报错:
------(如://@Repository(“accountDao1”)不把当前类对象存入spring容器中,就不能寻找一个bean对象类型;
//implements IAccountDao 寻找不到IAccountDao类型匹配)。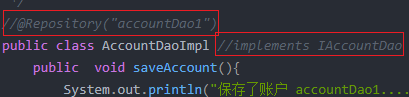
- 如果Ioc容器中有多个类型匹配时:(先查看注入变量名称accountDao1和@Repository(“accountDao1”)id是否相等,相等则匹配,其次再查看变量类型)。

- 出现位置:可以是变量上,也可以是方法上
- 细节:在使用注解注入时,set方法就不是必须的了。
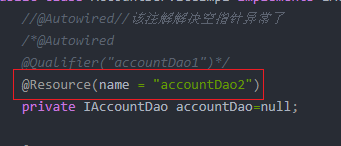
- (2)Qualifier:
作用:在按照类中注入的基础之上再按照名称注入。它在给类成员注入时不能单独使用,要和Autowired一起用。
但是在给方法参数注入时可以(稍后我们讲) - 属性:value:用于指定注入bean的id。

- (3)Resource:
作用:直接按照bean的id注入。它可以独立使用。 - 属性:name:用于指定bean的id。
以上三个注入都只能注入其他bean类型的数据,而基本类型和String类型无法使用上述注解实现。另外,集合类型的注入只能通过XML来实现。
- (4)Value:
作用:用于注入基本类型和String类型的数据 - 属性:value:用于指定数据的值。它可以使用spring中SpEL(也就是spring的el表达式)SpEL的写法:${表达式}
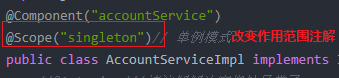
2.3 用于改变作用范围的注解
概念:他们的作用就和在bean标签中使用scope属性实现的功能是一样的;
@Scope
作用:用于指定bean的作用范围
属性:value:指定范围的取值。常用取值:singleton prototype
2.4 和生命周期有关的注解
概念:他们的作用就和在bean标签中使用init-method和destroy-methode的作用是一样的;
@PreDestroy 作用:用于指定销毁方法
@PostConstruct 作用:用于指定初始化方法

3. 四类注解的程序
1.com\jh\dao\impl下的2个持久层实现类
AccountDaoImpl.java
package com.jh.dao.impl;
import com.jh.dao.IAccountDao;
import org.springframework.stereotype.Repository;
/**
* 账户的持久层实现类
*/
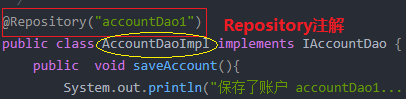
@Repository("accountDao1")
public class AccountDaoImpl implements IAccountDao {
public void saveAccount(){
System.out.println("保存了账户 accountDao1......");
}
}
AccountDaoImpl2.java
package com.jh.dao.impl;
import com.jh.dao.IAccountDao;
import org.springframework.stereotype.Repository;
/**
 * 账户的持久层实现类
 */
@Repository("accountDao2")
public class AccountDaoImpl2 implements IAccountDao {
    public  void saveAccount(){
        System.out.println("保存了账户 accountDao2.....");
    }
}
2.com\jh\dao持久层接口
package com.jh.dao;
/**
 * 账户的持久层接口
 */
public interface IAccountDao {
    void saveAccount();
}
3.com\jh\service\impl业务层的实现类
package com.jh.service.impl;
import com.jh.dao.IAccountDao;
import com.jh.dao.impl.AccountDaoImpl;
import com.jh.service.IAccountService;
import org.springframework.beans.factory.annotation.Autowired;
import org.springframework.beans.factory.annotation.Qualifier;
import org.springframework.context.annotation.Scope;
import org.springframework.stereotype.Component;
import javax.annotation.PostConstruct;
import javax.annotation.PreDestroy;
import javax.annotation.Resource;
@Component("accountService")
@Scope("singleton")// 单例模式
public class AccountServiceImpl implements IAccountService {
    //@Autowired//该注解解决空指针异常了
    /*@Autowired
    @Qualifier("accountDao1")*/
    @Resource(name = "accountDao2")
    private IAccountDao accountDao=null;

    @PostConstruct
    public void init(){
        System.out.println("初始化方法执行了");
    }
    @PreDestroy
    public void destroy(){
        System.out.println("销毁方法执行了");
    }

    public AccountServiceImpl(){
        System.out.println("对象创建了");
    }
    public void  saveAccount(){
        accountDao.saveAccount();
    }
}
4.com\jh\service业务层的接口
package com.jh.service;
/**
 * 账户业务层的接口
 */
public interface IAccountService {
    void saveAccount();
}
5.com\jh\ui表现层
package com.jh.ui;
import com.jh.dao.IAccountDao;
import com.jh.service.IAccountService;
import org.springframework.context.ApplicationContext;
import org.springframework.context.support.ClassPathXmlApplicationContext;
/**
 * 模拟一个表现层,用于调用业务层
 * */
public class Client {
    public static void main(String[] args) {
        //--------ApplicationContext 立即加载----------------------
        //1.获取核心容器对象
        ApplicationContext ac= new ClassPathXmlApplicationContext("bean.xml");
        //2.根据id获取Bean对象
        IAccountService as= (IAccountService)ac.getBean("accountService");
        System.out.println(as);
        as.saveAccount();

        /*IAccountDao adao= (IAccountDao) ac.getBean("accountDao");
        System.out.println(adao);*/
        }
    }
