目录
本篇文章基于对基本属性熟悉的前提下
实例一(带阴影的TextView)
activity_main.xml文件中代码如下:
<RelativeLayout xmlns:android="http://schemas.android.com/apk/res/android"
    xmlns:app="http://schemas.android.com/apk/res-auto"
    xmlns:tools="http://schemas.android.com/tools"
    android:id="@+id/RelativeLayoutParent"
    android:layout_width="match_parent"
    android:layout_height="match_parent"
    android:background="#888888">
    <TextView
        android:layout_width="wrap_content"
        android:layout_height="wrap_content"
        android:layout_centerInParent="true"
        android:shadowColor="#F9F900"
        android:shadowDx="10.0"
        android:shadowDy="10.0"
        android:shadowRadius="3.0"
        android:text="@string/text"
        android:textColor="#4A4AFF"
        android:textSize="30sp"
        />
</RelativeLayout>
结果如下:

阴影相关属性:
shadowRadius: 阴影模糊层度
shadowColor: 阴影颜色
shadowDx:阴影水平坐标
shadowDy: 阴影垂直坐标
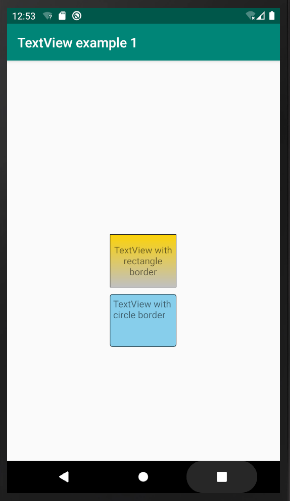
实例二(带边框的TextView)
activity_main.xml文件中代码:
<RelativeLayout xmlns:android="http://schemas.android.com/apk/res/android"
    xmlns:app="http://schemas.android.com/apk/res-auto"
    xmlns:tools="http://schemas.android.com/tools"
    android:id="@+id/RelativeLayoutParent"
    android:layout_width="match_parent"
    android:layout_height="match_parent"
    >
    <TextView
        android:id="@+id/rectangle"
        android:layout_width="100dp"
        android:layout_height="80dp"
        android:gravity="center"
        android:layout_centerInParent="true"
        android:background="@drawable/rectangle"
        android:text="@string/rectborder"
        />
    <TextView
        android:id="@+id/circle"
        android:layout_width="100dp"
        android:layout_height="80dp"
        android:layout_below="@id/rectangle"
        android:background="@drawable/circle"
        android:layout_centerHorizontal="true"
        android:layout_marginTop="10dp"
        android:text="@string/circleborder"
        />
</RelativeLayout>
drawable文件下的圆角边框circle.xml代码如下
<?xml version="1.0" encoding="utf-8"?>
<shape xmlns:android="http://schemas.android.com/apk/res/android">
    <solid android:color="#87CEEB" />

    <stroke
        android:width="2px"
        android:color="#000000" />

    <corners
        android:bottomLeftRadius="10px"
        android:bottomRightRadius="10px"
        android:topLeftRadius="10px"
        android:topRightRadius="10px" />

    <padding
        android:bottom="5dp"
        android:left="5dp"
        android:right="5dp"
        android:top="5dp" />
</shape>
drawable文件的圆角边框rectangle.xml代码如下
<?xml version="1.0" encoding="utf-8"?>
<shape xmlns:android="http://schemas.android.com/apk/res/android" >
    <!-- setting black stroke -->
    <stroke android:width="2px" android:color="#000000"/>
    <!-- gradient -->
    <gradient
        android:angle="270"
        android:endColor="#C0C0C0"
        android:startColor="#FCD209" />
    <!-- setting padding -->
    <padding
        android:left="5dp"
        android:top="5dp"
        android:right="5dp"
        android:bottom="5dp"/>
</shape>
结果如下:
有关于不同像素单位的介绍参看这篇博文:
https://www.captechconsulting.com/blogs/understanding-density-independence-in-android
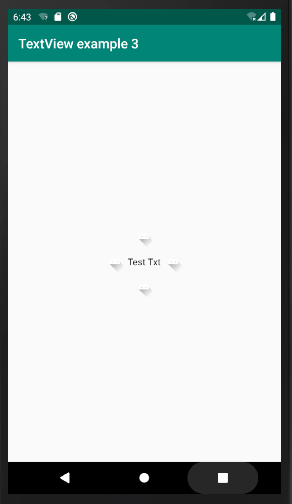
实例三(带图片的TextView)
activity_main.xml文件中代码如下:
<RelativeLayout xmlns:android="http://schemas.android.com/apk/res/android"
    xmlns:tools="http://schemas.android.com/tools"
    android:layout_width="match_parent"
    android:layout_height="match_parent"
    >

    <TextView
        android:id="@+id/txt"
        android:layout_width="wrap_content"
        android:layout_height="wrap_content"
        android:layout_centerInParent="true"
        android:drawableLeft="@drawable/ic_launcher_foreground"
        android:drawableTop="@drawable/ic_launcher_foreground"
        android:drawableRight="@drawable/ic_launcher_foreground"
        android:drawableBottom="@drawable/ic_launcher_foreground"
        android:text="@string/testtxt"
        android:textColor="#000000"
        android:gravity="center"
        android:textAllCaps="false" />

</RelativeLayout>
结果如下:

上面xml文件对TextView的四周图片只有默认设置的效果无法达到动态调整的图片的目的,这里可以通过在Java代码中进行设置
MainActivity.java文件中代码如下:
package com.example.myapplication;

import androidx.appcompat.app.AppCompatActivity;

import android.graphics.drawable.Drawable;
import android.os.Bundle;
import android.widget.TextView;

public class MainActivity extends AppCompatActivity {
    private TextView txt;
    @Override
    protected void onCreate(Bundle savedInstanceState) {
        super.onCreate(savedInstanceState);
        setContentView(R.layout.activity_main);
        txt= (TextView)findViewById(R.id.txt);
        Drawable[] drawable = txt.getCompoundDrawables();
        for(int i = 0; i < drawable.length; i++) {
            drawable[i].setBounds(0, 0, 100, 100);
        }
        txt.setCompoundDrawables(drawable[0], drawable[1], drawable[2], drawable[3]);
    }
}
官方文档函数说明:
setBounds
public void setBounds (int left, int top, int right, int bottom)
Specify a bounding rectangle for the Drawable. This is where the drawable will draw when its draw() method is called.
其中参数left、right代表绘制图片的长;参数top、bottom代表绘制图片的宽。
结果如下:
实例四(使用autoLink属性设置链接类型)
activity_main.xml文件中代码如下:
<RelativeLayout xmlns:android="http://schemas.android.com/apk/res/android"
    xmlns:tools="http://schemas.android.com/tools"
    android:layout_width="match_parent"
    android:layout_height="match_parent"
    >

    <TextView
        android:layout_width="wrap_content"
        android:layout_height="wrap_content"
        android:gravity="center"
        android:layout_centerInParent="true"
        android:text="http://www.baidu.com"
        android:autoLink="email|web"/>

</RelativeLayout>
结果如下:
运行界面

点击后界面

