后置处理器
两种后处理器
Bean后处理器,实现BeanPostProcessor接口
BeanFactory后处理器,实现BeanFactoryPostProcessor接口,也成为容器后处理器。
BeanPostProcessor简介:
Bean后处理器用来对bean的功能进行扩展增强,对Ioc容器中的所有bean都有效,时机执行初始化之前和之后。
bean的生命周期:
代码块->实例化->数据装配->初始化之前->初始化方法->初始化之后->就绪->使用->销毁方法->从容器销毁
先添加jar包
<dependencies>
        <dependency>
            <groupId>junit</groupId>
            <artifactId>junit</artifactId>
            <scope>test</scope>
        </dependency>
        <!--spring-core-->
        <dependency>
            <groupId>org.springframework</groupId>
            <artifactId>spring-core</artifactId>
        </dependency>
        <!--spring-bean-->
        <!-- https://mvnrepository.com/artifact/org.springframework/spring-beans -->
        <dependency>
            <groupId>org.springframework</groupId>
            <artifactId>spring-beans</artifactId>
        </dependency>
        <!--spring-context-->
        <dependency>
            <groupId>org.springframework</groupId>
            <artifactId>spring-context</artifactId>
        </dependency>
        <!--spring-expression-->
        <dependency>
            <groupId>org.springframework</groupId>
            <artifactId>spring-expression</artifactId>
        </dependency>
    </dependencies>
第二步创建配置文件spring.xml
<?xml version="1.0" encoding="UTF-8"?>
<beans xmlns="http://www.springframework.org/schema/beans"
       xmlns:xsi="http://www.w3.org/2001/XMLSchema-instance"
       xsi:schemaLocation="http://www.springframework.org/schema/beans http://www.springframework.org/schema/beans/spring-beans.xsd">

</beans>
第三步书写一个类User
package com.ioc16.entity;

/**
 * package_name:com
 * Author:徐亚远
 * Date:2020/2/14 15:57
 * 项目名:springDemo01
 * Desription:
 **/
public class User {
    private String userName;
    private String password;
    {
        System.out.println("User类的代码块");
    }
    public void init(){
        System.out.println("执行初始化方法username_password:  "+userName+"_"+password);
    }


    public String getPassword() {
        return password;
    }

    public void setPassword(String password) {
        this.password = password;
    }

    public String getUserName() {

        return userName;
    }

    public void setUserName(String userName) {
        this.userName = userName;
    }
}
第四步书写一个类Customer
package com.ioc16.entity;

/**
 * package_name:com.ioc16.entity
 * Author:徐亚远
 * Date:2020/2/14 16:02
 * 项目名:springDemo01
 * Desription:
 **/
public class Customer {
    private String userName;
    private String password;
    {
        System.out.println("Customer类的代码块");
    }
    public void init(){
        System.out.println("执行初始化方法username_password:  "+userName+"__"+password);
    }


    public String getPassword() {
        return password;
    }

    public void setPassword(String password) {
        this.password = password;
    }

    public String getUserName() {

        return userName;
    }

    public void setUserName(String userName) {
        this.userName = userName;
    }
}
第五步书写处理器类实现BeanPostProcessor接口
package com.ioc16.entity;

import org.springframework.beans.BeansException;
import org.springframework.beans.factory.config.BeanPostProcessor;

/**
 * package_name:com.ioc16.entity
 * Author:徐亚远
 * Date:2020/2/14 16:03
 * 项目名:springDemo01
 * Desription:
 **/
public class PostProcessor implements BeanPostProcessor {

    //执行初始化方法之前
    @Override
    public Object postProcessBeforeInitialization(Object bean, String beanName) throws BeansException {
        System.out.println("执行初始化方法username and password before 之前: ");

        return bean;
    }

    //执行初始化方法之后
    @Override
    public Object postProcessAfterInitialization(Object bean, String beanName) throws BeansException {
        System.out.println("执行初始化方法username and password after 之后: ");
        return bean;
    }
}
第六步配置spring.xml文件
<?xml version="1.0" encoding="UTF-8"?>
<beans xmlns="http://www.springframework.org/schema/beans"
       xmlns:xsi="http://www.w3.org/2001/XMLSchema-instance"
       xsi:schemaLocation="http://www.springframework.org/schema/beans http://www.springframework.org/schema/beans/spring-beans.xsd">

    <bean id="user" class="com.ioc16.entity.User" init-method="init">
        <property name="userName" value="admin"/>
        <property name="password" value="123"/>
    </bean>
    <bean id="customer" class="com.ioc16.entity.Customer" init-method="init">
        <property name="userName" value="小徐"/>
        <property name="password" value="456"/>
    </bean>
        <!--配置处理器加进容器中-->
    <bean id="postProcessor" class="com.ioc16.entity.PostProcessor"></bean>
</beans>
书写测试类
package com.ioc16.controller;

import com.ioc16.entity.Customer;
import com.ioc16.entity.User;
import org.springframework.context.ApplicationContext;
import org.springframework.context.support.ClassPathXmlApplicationContext;

/**
 * package_name:com.ioc16.controller
 * Author:徐亚远
 * Date:2020/2/14 16:13
 * 项目名:springDemo01
 * Desription:
 **/
public class Test {
    public static void main(String[] args) {
        ApplicationContext ac = new ClassPathXmlApplicationContext("ioc16/spring.xml");
        User user = (User) ac.getBean("user");
        Customer customer = (Customer) ac.getBean("customer");

    }
}
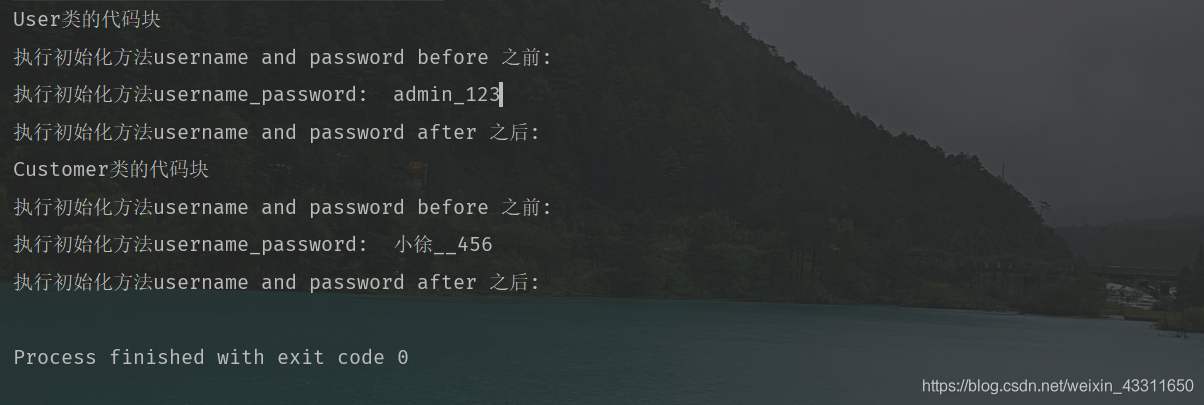
执行结果如图: