sphinxSE是一个mysql存储引擎,它可以编译进入mysql server之中,但必须版本是5.x(5.0.22或者5.0.x更高版本,5.1.12或者更高但5.1.x),在这里我采用的是5.1.55,Sphinx版本是coreseek-3.2.14,注意5.0.x的安装方式不一样,虽然是一个搜索引擎但是SphinxSE本身不存储数据,它是一个内置的客户端,允许mysql服务器与Sphinx守护进程searchd通信,运行查询请求,获取结果,所有的索引,查询均是发生在mysql外部。
SphinxSE应用但的场景包括:
1.更容易的移植mysql FTS应用程序到Sphinx内部
2.允许Sphinx使用编程语言的API,而Sphinx目前都还不完全支持
3.当Sphinx结果集需要在mysql端进行处理时,如join,filter等等,这样可以进行一些优化
一、Mysql的安装
由于需要将sphinx中的储存引擎放入数据库,mysql就需要进行编译安装(Windows可以进行插件式安装),卸载本机mysql命令如下:
sudo apt-get remove mysql-common
卸载完之后就开始进行编译安装mysql
分别解压缩下载好的包:
tar zxvf coreseek-3.2.14.tar.gz
tar zxvf mysql-5.1.55.tar.gz
在mysql源文件夹中创建文件夹storage/sphinx,并且复制coreseek-3.2.14/csft-3.2.14/mysqlse里面的文件夹中的所有文件至新创建的文件夹中
debian62:~/sphinx/mysql-5.1.55/storage# cp ../../coreseek-3.2.14/csft-3.2.14/mysqlse/* sphinx/
现在就需要开始进行编译安装mysql了:
sh BUILD/autorun.sh
./configure --prefix=/usr/local/mysql --with-charset=utf8 --with-extra-charset=all --enable-thread-safe-client --enable-assembler --with-readline --with-big-tables --with-named-curses-libs=/lib/libncursesw.so.5 --with-plugins=sphinx
如果提示libncursesw.so.5找不到,则需要下载包:
sudo apt-get install libncursesw5
也有可能是路径设置不正确,试试/usr/lib/libncursesw.so.5,或者查找该库文件,填上合适的路径
进行安装:
make && make install
如果本机没有mysql组,用户则需要进行创建:
groupadd mysql
useradd -g mysql mysql
设置用户mysql权限:
chown -R root:mysql /usr/local/mysql/
初始化数据库,设置datadir属性
/usr/local/mysql/bin/mysql_install_db --user=mysql --datadir=/usr/local/mysql/var
如果出现以下错误:
FATAL ERROR: Could not find mysqld
则需要执行下面的操作:
mv /etc/mysql/my.cnf /etc/mysql/my.cnf.bak
拷贝启动程序
cp ~/sphinx/mysql-5.1.55/support-files/mysql.server /etc/init.d
chmod 700 /etc/init.d/mysql.server
复制配置文件
cp ~/sphinx/mysql-5.1.55/support-files/my-medium.cnf /etc/my.cnf
启动数据库:
/etc/init.d/mysql.server start
查看启动情况:
netstat -na|grep 3306
tcp 0 0 0.0.0.0:3306 0.0.0.0:* LISTEN
设置mysql密码:
/usr/local/mysql/bin/mysqladmin -u root password 'test123456'
登录进入数据库
/usr/local/mysql/bin/mysql -u root –p
查看数据库引擎:

引擎安装成功!
二 测试sphinxSE引擎
如果之前安装过coreseek,则需要重新进行编译安装,需要增加mysql的支持,具体参考:
http://www.coreseek.cn/products/products-install/install_on_bsd_linux/
在configure时执行下列命令:
./configure --prefix=/usr/local/coreseek/ --without-python --without-unixodbc --with-mmseg --with-mmseg-includes=/usr/local/mmseg3/include/mmseg/ --with-mmseg-libs=/usr/local/mmseg3/lib/ --with-mysql=/usr/local/mysql/
启动索引:
/usr/local/coreseek/bin/indexer -c etc/sphinx.conf
/usr/local/coreseek/bin/indexer –c etc/sphinx.conf –all
/usr/local/coreseek/bin/searchd –c etc/sphinx.conf
如果成功启动后,则在/usr/local/coreseek/var/data文件夹中生成下列文件:

其中
.spa: 存储文本属性(只使用在extern docinfo存储模式中)
.spd: 存储匹配的单词ID对应的文档ID列表
.sph: 存储索引头部信息
.spi: 存储单词列表(单词ID和指向.spd文件的指针)
.spm: 存储MVA数据
.spp: 存储每个单词ID所命中的统计列表,如出现的频率。
如果提示错误:
/usr/local/coreseek/bin/indexer: error while loading shared libraries: libmysqlclient.so.16: cannot open shared object file: No such file or directory
则执行下面命令:
ln -s /usr/local/mysql/lib/mysql/libmysqlclient.so.16 /usr/lib/libmysqlclient.so.16
准备运行sphinxSE:
cd /usr/local/coreseek/etc
cp sphinx.conf.dist sphinx.conf
修改配置文件sphinx.conf中的密码,和分词部分,见文件sphinx.conf
在数据库test中建立数据表供sphinxSE建立索引:
CREATE TABLE t1
(
id INTEGER UNSIGNED NOT NULL,
weight INTEGER NOT NULL,
query VARCHAR(3072) NOT NULL,
group_id INTEGER,
INDEX(query)
) ENGINE=SPHINX CONNECTION="sphinx://localhost:9312/test";
如果需要修改连接,则利用命令:
ALTER TABLE t1 CONNECTION="sphinx://NEWHOST:NEWPORT/NEWINDEXNAME";
sphinxSE对于前面3列有硬性规定,第一列必须为integer unsigned或者bigint类型
(document id),第二列必须为integer 或bigint 类型来匹配weight,第三列为varchar 或 text(对应自己的查询),这种对应关系是固定的,不能省略任何一列,移动顺序,或者改变类型,但是可以修改名字,同样,query列必须进行索引,所有其他列必须不能进行索引。
另外的列必须是integer,timestamp,bigint,varchar,float。它们只能是sphinx中提供的名称里面,而且列的名字必须在sphinx.conf中进行声明,如果在sphinx搜索结果中未出现的属性名,则是NULL值。
特殊的”virtual”属性限制在SphinxSE列中,需要将@替换为_sph_。例如:为了获取虚拟属性@groupby,@count,@distinct这些虚拟属性的值,就需要使用_sph_groupby, _sph_count,
_sph_distinct列名。
建表语句见文件T1.sql
建立数据表documents见文件Example.sql
导入数据库中:
source /usr/local/coreseek/etc/t1.sql;
source /usr/local/coreseek/etc/example.sql;
向数据表documents中插入中文数据见文件D.sql
查看引擎状态:
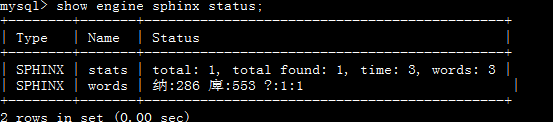
执行查询SQL语句:
select * from test.documents docs join t1 on (docs.id=t1.id) where query="现在;mode=all";
结果为:

执行查询语句
select * from test.documents docs join t1 on (docs.id=t1.id) where query="Google;mode=all";
结果为:

在上面的示例可以看到,查询文本和搜索选项都应当放在where语句中的query列,每一个选项都需要分号;进行分割,属性名=value的复制方式,指定的属性数量不限制,选项如下:
query:查询的文本
mode:匹配的查询模式,必须是”all,any,phrase,boolean,extended”中的任何一个,默认是”all”
sort:对结果集进行排序,必须是”relevance,attr_desc,attr_asc,time_segments,extended”中的任何一个,在冒号之后跟上需要排序的属性名称(除了extended,relevance有些特别):
…where query=’test;sort=attr_asc:group_id’;
…where query=’test;sort=extended:@weight desc,group_id asc’
offset:结果集的偏移量,默认为0
limit:获取结果集中匹配的数量,默认为20
index:搜索的索引名称(sphinx.conf中的配置):
…where query=’test;index=test1’;
…where query=’test;index=test1,test2,test3’;
minid,maxid:匹配的最小,最大文档ID
weights:sphinx全文本域中所分配的权重值,逗号分隔开:
… where query=’test;weights=1,2,3;’;
filter,!filter(包含,不包含):属性名,一系列值,用逗号,分割开:
#只包含组1,5,19
…where query=’test;filter=group_id,1,5,19;’;
#不包含组3,11
…where query=’test;!filter=group_id,3,11’
range,!range:属性名,最小值,最大值用逗号分隔开:
#包含的组范围在3到7
…where query=’test;range=group_id,3,7;’;
#不包含的组范围在5到25
…where query=’test;!range=group_id,5,25;’;
maxmatched:每个查询中的最大匹配值:
…where query=’test;maxmatches=2000;’;
groupby:group-by函数和属性:
…where query=’test;groupby=day:published_ts;’;
…where query=’test;groupby=attr:group_id;’;
groupsort:group-by排序语句:
…where query=’test;groupsort=@count desc;’;
indexweights:当使用多个索引进行查询时,索引名,权重,用逗号分隔开:
…where query=’test;indexweights=idx_exact,2,idx_stemmed,1;’;
非常重要的一点是:相比较设置最大匹配数和在MySQL端使用where,order by,limit,使用Sphinx执行排序,过滤,分隔结果集会有效率的多。原因有两个:第一,sphinx里面有大量的优化能进行比MySQL更好的优化;第二,SphinxSE中searchd程序将可以处理更少的数据量。
注:文档中“见文件”所述所有文件,请咨询微信号

