前言:我是被守望先锋和unity推出的ecs编程模式给骗进来的。
Entitas简介:Entitas是专门用于Unity引擎的一款超快速、轻量级实体组件系统(ECS)。它经过了精心设计,不仅可以快速访问组件,也可以在垃圾收集环境中以最佳方式工作。
Entitas基本概念:
1.Entity表示一个实体,用来存储数据用的。
2.Context表示上下文环境,用来创建和销毁Entity用的。
3.Group表示组,用来将相同类型的Entity归纳到一起用的。
4.Matcher表示匹配查找,用来从Context中获取感兴趣的Group。
5.Collector表示采集,用来从Group中收集变化的Entity。
6.System表示系统,用来处理逻辑的。通常存在五种类型,分别如下:
->.IInitializeSystem只在初始化时调用一次。初始化实现可以写在Initialize方法中。
->.IExecuteSystem会在每帧执行一次。执行逻辑可以写在Execute方法中。
->.ICleanupSystem会在别的System完成后,每帧执行一次。回收逻辑可以写在Cleanup方法中。
->.ReactiveSystem会在Group有变化时执行一次。执行逻辑可以写在Execute方法中。
->Feature会将上述的System进行整合以及创建。
Entitas安装:安装流程如下:
1.下载Entitas,这里我下载的是当前最新的1.12.2版本。
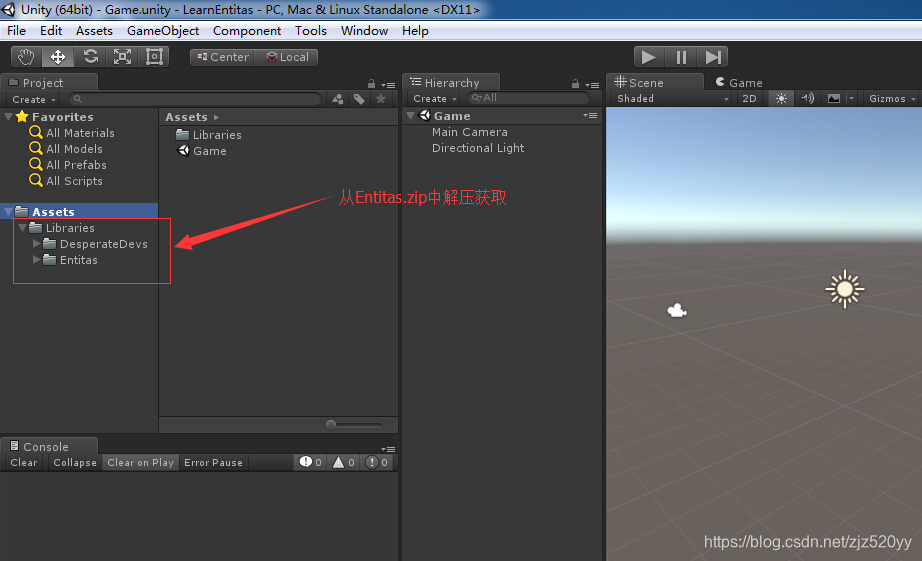
2.创建一个空的Unity工程项目,并创建一个Libraries目录。然后将下载好的Entitas.zip解压并将Assets目录下的Entitas和DesperateDevs复制到Libraries目录下。如图所示:
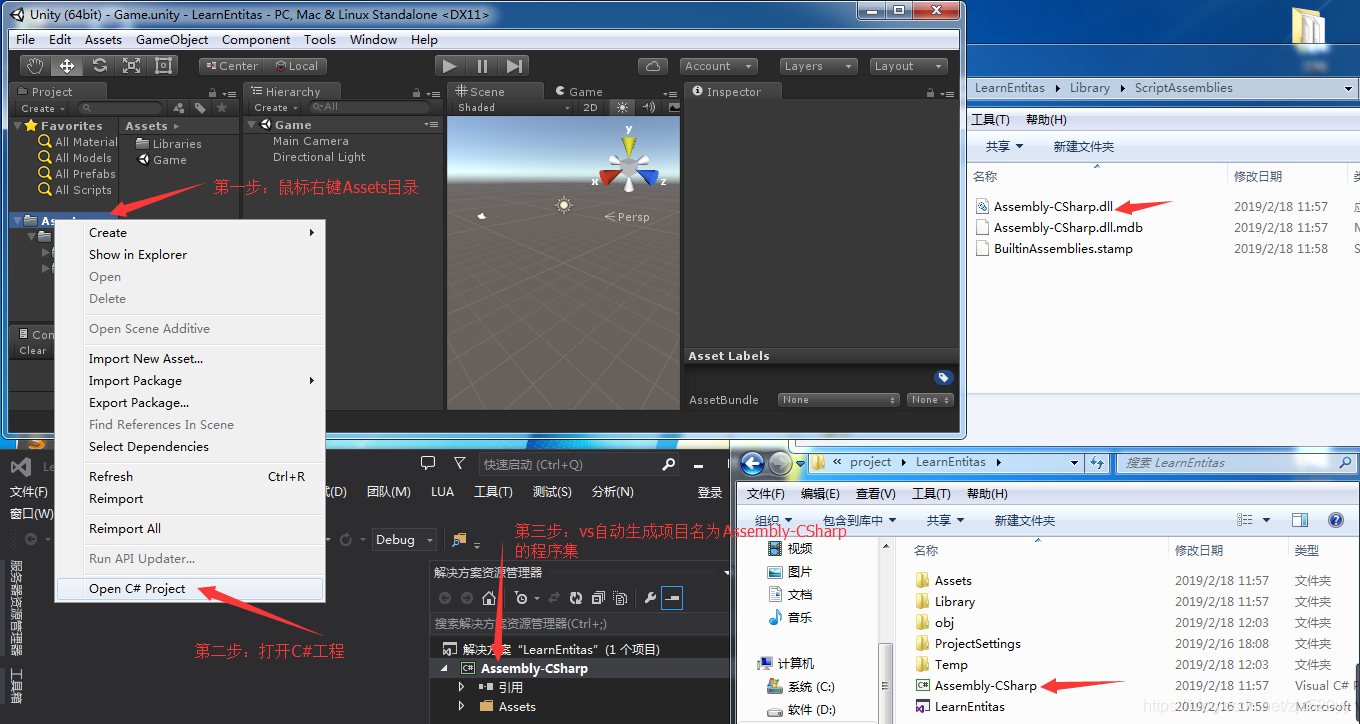
3.鼠标右键点击Unity的Assets目录并在展开操作列表中点击Open C# Project,这样目的是生成项目程序集。如图所示:
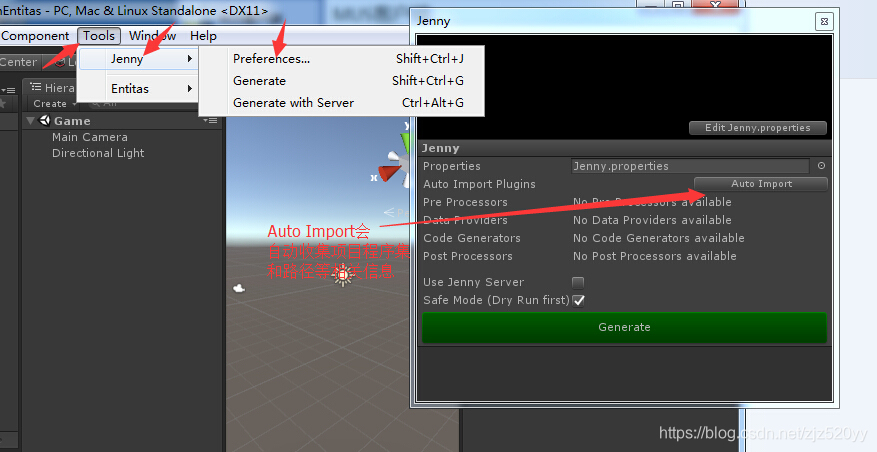
4.选择Tools->Jenny->Preferences->Auto Import来获取代码生成器所需的工程配置信息。如下图所示:
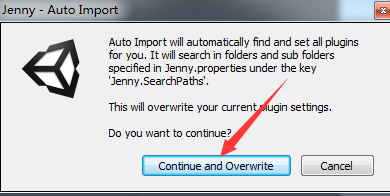
自动导入时,代码生成器会重写配置信息,这里选择Continue and Overwrite就行。如图所示:
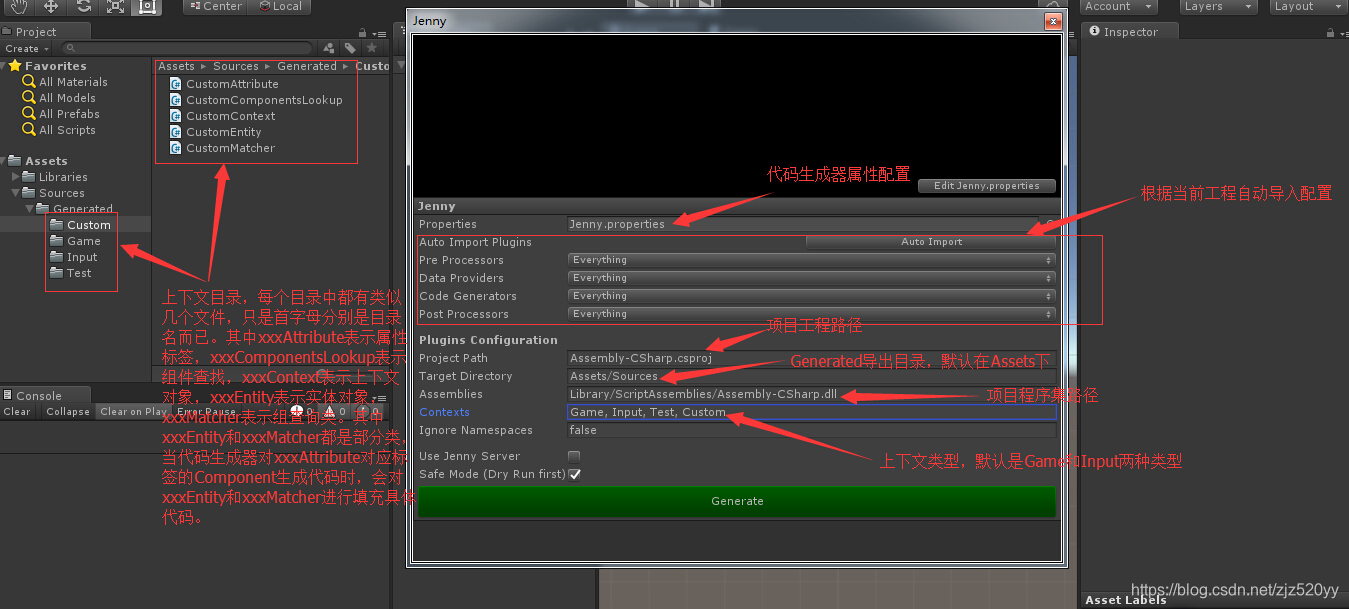
5.在代码生成器中选择Generate(shift + ctrl + g)来导出Entitas工程代码。如图所示:
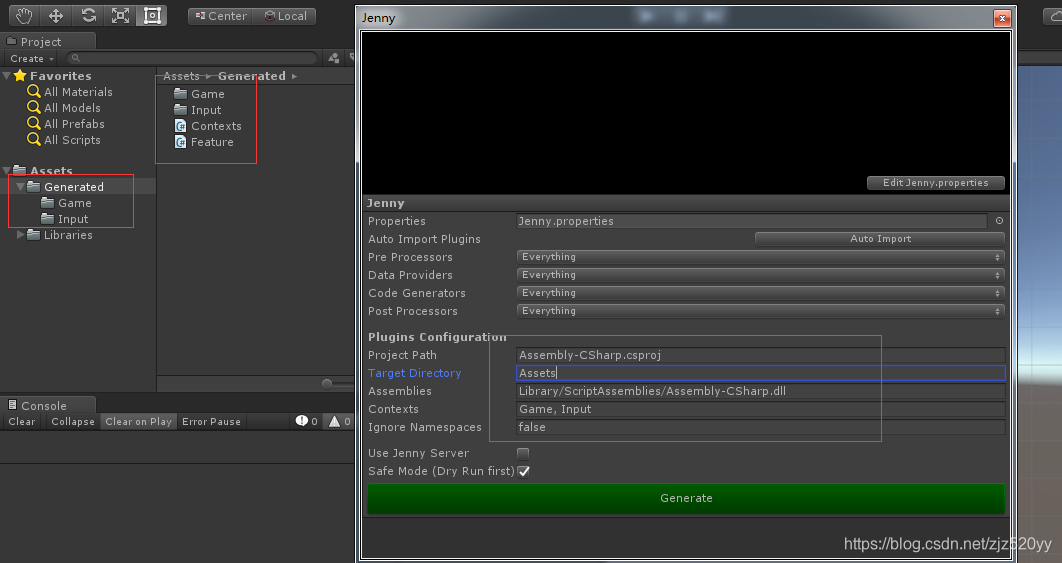
Hello World编写:这里我采用默认的代码导出配置。如图所示导出Entitas环境。
编写流程如下:
1.在Assets目录下新建一个Sources/Components目录,并添加一个DebugMessageComponent.cs文件。这个文件就是包含一个记录日志信息的成员变量。文件内容如下:
using Entitas;

[Game]
public class DebugMessageComponent : IComponent
{
    public string message;
}
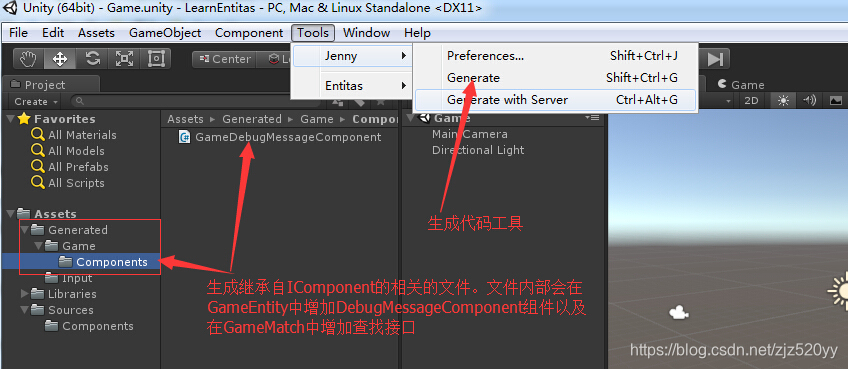
然后使用Tools->Jenny->Generate或者ctrl + shift + g在Generated/Game中创建Components目录并新建一个GameDebugMessageComponent.cs文件。如图所示:
2.在Assets目录下新建一个Sources/Systems目录,并添加一个DebugMessageSystem.cs文件。这个文件就是对DebugMessageComponent实体的变化进行收集,并在执行接口里面进行打印日志信息。文件内容如下:
using System.Collections.Generic;
using Entitas;
using UnityEngine;

public class DebugMessageSystem : ReactiveSystem<GameEntity>
{
    public DebugMessageSystem(Contexts contexts) : base(contexts.game)
    {
    }

    protected override ICollector<GameEntity> GetTrigger(IContext<GameEntity> context)
    {
        // we only care about entities with DebugMessageComponent
        return context.CreateCollector(GameMatcher.DebugMessage);
    }

    protected override bool Filter(GameEntity entity)
    {
        // good practice to perform a final check in case
        // the entity has been altered in a different system.
        return entity.hasDebugMessage;
    }

    protected override void Execute(List<GameEntity> entities)
    {
        // this is the list of entities that meet our conditions
        foreach (var e in entities)
        {
            // we can safely access their DebugMessage component
            // then grab the string data and print it
            Debug.Log(e.debugMessage.message);
        }
    }
}
3.在System目录下添加一个HelloWorldSystem.cs文件。这个文件会在初始化接口调用时创建一个DebugMessageComponent实体对象。文件内容如下:
using Entitas;

public class HelloWorldSystem : IInitializeSystem
{
    // always handy to keep a reference to the context
    // we're going to be interacting with it
    readonly GameContext _context;

    public HelloWorldSystem(Contexts contexts)
    {
        // get the context from the constructor
        _context = contexts.game;
    }

    public void Initialize()
    {
        // create an entity and give it a DebugMessageComponent with
        // the text "Hello World!" as its data
        _context.CreateEntity().AddDebugMessage("Hello World!");
    }
}
4.在Systems目录下添加一个LogMouseClickSystem.cs文件。这个文件会对鼠标左右键进行监听。一旦鼠标左右键触发就会创建一个DebugMessageComponent实体对象。文件内容如下:
using Entitas;
using UnityEngine;

public class LogMouseClickSystem : IExecuteSystem
{
    readonly GameContext _context;

    public LogMouseClickSystem(Contexts contexts)
    {
        _context = contexts.game;
    }

    public void Execute()
    {
        if (Input.GetMouseButtonDown(0))
        {
            _context.CreateEntity().AddDebugMessage("Left Mouse Button Clicked");
        }

        if (Input.GetMouseButtonDown(1))
        {
            _context.CreateEntity().AddDebugMessage("Right Mouse Button Clicked");
        }
    }
}
5.在Systems目录下添加一个CleanupDebugMessageSystem.cs文件。这个文件会对DebugMessageComponent实体进行收集,并在回收接口调用时回收掉收集的实体。文件内容如下:
using Entitas;

public class CleanupDebugMessageSystem : ICleanupSystem
{
    readonly GameContext _context;
    readonly IGroup<GameEntity> _debugMessages;

    public CleanupDebugMessageSystem(Contexts contexts)
    {
        _context = contexts.game;
        _debugMessages = _context.GetGroup(GameMatcher.DebugMessage);
    }

    public void Cleanup()
    {
        // group.GetEntities() always gives us an up to date list
        foreach (var e in _debugMessages.GetEntities())
        {
           e.Destroy();
        }
    }
}
6.在Systems目录中添加一个HelloWorldFeature.cs文件。这个文件主要是按照顺序将各个System添加进来。文件内容如下:
using Entitas;

public class HelloWorldFeature : Feature
{
    public HelloWorldFeature(Contexts contexts) : base ("Tutorial Systems")
    {
        Add(new HelloWorldSystem(contexts));
        Add(new LogMouseClickSystem(contexts)); // new system
        Add(new DebugMessageSystem(contexts));
        Add(new CleanupDebugMessageSystem(contexts)); // new system (we want this to run last)
    }
}
7.在Sources目录下创建一个游戏入口GameController.cs文件。这个文件主要是创建全局Context并构建HelloWorldFeature对象。文件内容如下:
using Entitas;
using UnityEngine;

public class GameController : MonoBehaviour
{
    Systems _systems;

    void Start()
    {
        // get a reference to the contexts
        var contexts = Contexts.sharedInstance;

        // create the systems by creating individual features
        _systems = new Feature("Systems")
            .Add(new HelloWorldFeature(contexts));

        // call Initialize() on all of the IInitializeSystems
        _systems.Initialize();
    }

    void Update()
    {
        // call Execute() on all the IExecuteSystems and
        // ReactiveSystems that were triggered last frame
        _systems.Execute();
        // call cleanup() on all the ICleanupSystems
        _systems.Cleanup();
    }
}
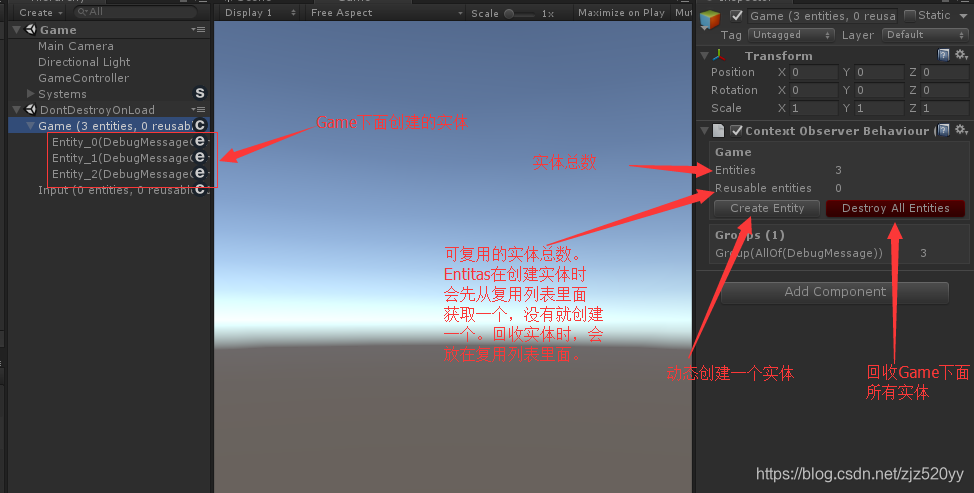
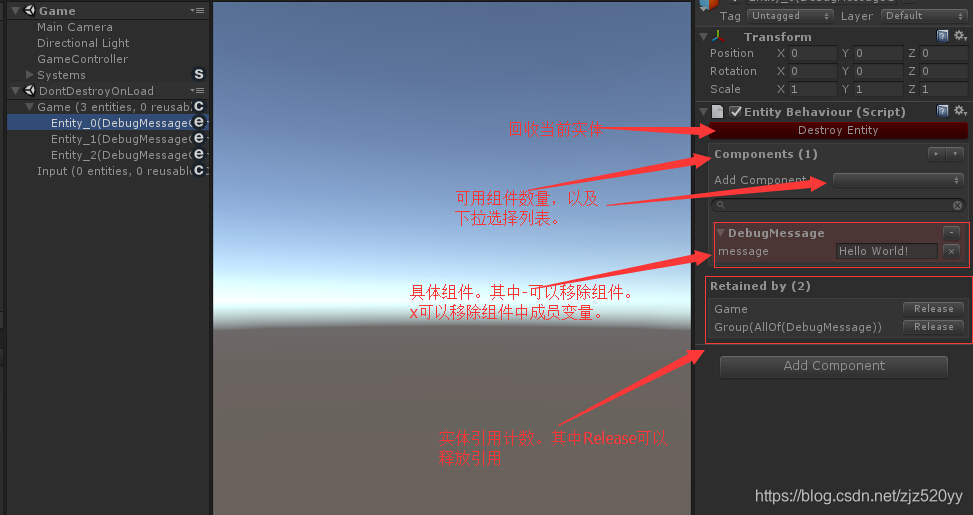
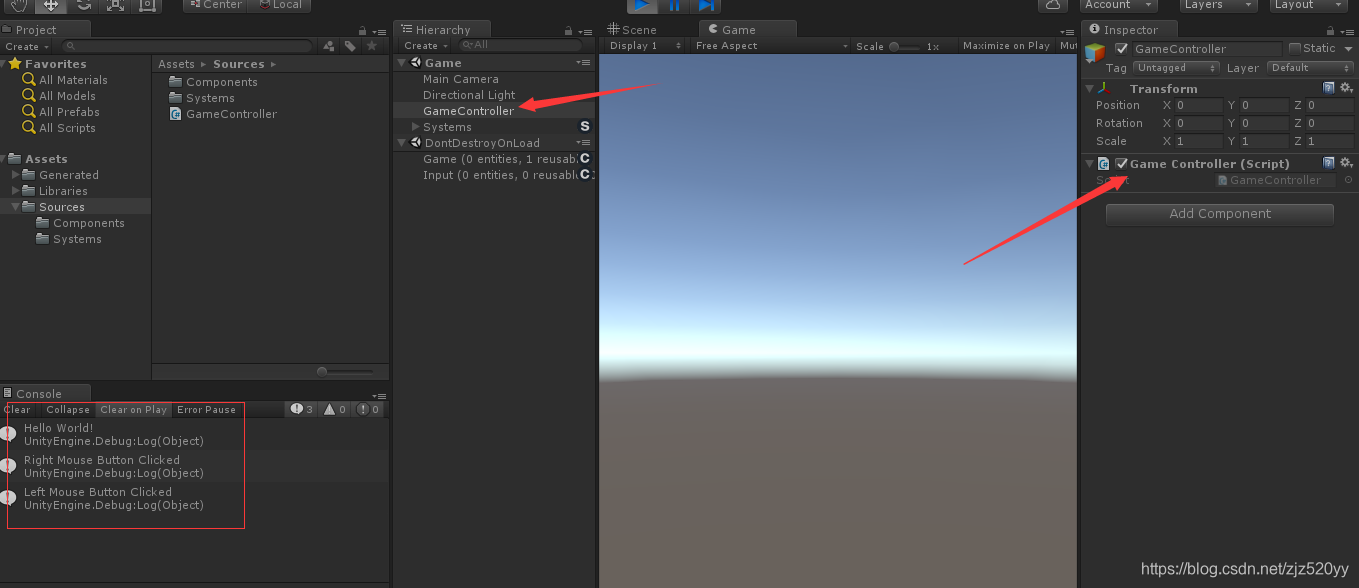
8.在场景中创建一个空的对象GameController,并绑定好上面创建的GameController.cs游戏入口文件。然后点击运行,以及鼠标左右点击,便可以看见DebugMessageComponent实体的打印信息。如图所示:
调试工具简介:基本描述如下图所示: