本文是《深入理解 Android 卷 III》 中 深入理解状态栏一章中的读书笔记。
SystemUI 在源码中的位置 frameworks/base/packages/SystemUI 中。
一、初识 SystemUI
主要讲状态栏和导航栏,它们都运行在 SystemUIService 中
1、SystemUIService 启动过程
在负责启动系统服务的 ServerThread 中,调用
ActivityManagerService.self().systemReady(new Runnable() {
            public void run() {
               ...

                if (!headless) startSystemUi(contextF);
然后启动 SystemUIService
 static final void startSystemUi(Context context) {
        Intent intent = new Intent();
        intent.setComponent(new ComponentName("com.android.systemui",
                    "com.android.systemui.SystemUIService"));
        //Slog.d(TAG, "Starting service: " + intent);
        context.startServiceAsUser(intent, UserHandle.OWNER);
    }
 /**
     * The class names of the stuff to start.
     */
    final Object[] SERVICES = new Object[] {
            0, // system bar or status bar, filled in below.
            com.android.systemui.power.PowerUI.class,
            com.android.systemui.media.RingtonePlayer.class,
            com.android.systemui.settings.SettingsUI.class,
        };
在 SystemUI 中,分离方案实现者是 PhoneStatusBar, 而集成布局方案的实现者则是 TabletStatusBar. 二者的本质功能是一致的,即提供虚拟按键、显示通知信息等,区别仅在与布局不同、以及由此所衍生的定制行为而已。
屏幕换的在 720 dp 以内时,使用分离的布局方案,判断条件在 PhoneWindowManager.setInitialDisplaySize() 中。
二、状态栏的创建
1、创建过程
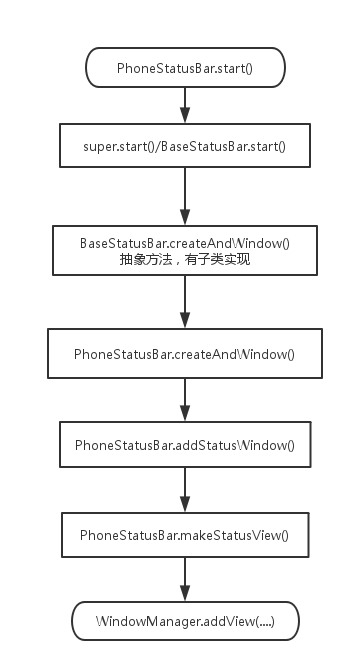
    private void addStatusBarWindow() {
        // Put up the view
        // 状态栏的高度,默认是 25dp, 位置在 frameworks/base/core/res/res/values/dimen.xml 中
        // R.dimen.status_bar_height
        final int height = getStatusBarHeight();

        // Now that the status bar window encompasses the sliding panel and its
        // translucent backdrop, the entire thing is made TRANSLUCENT and is
        // hardware-accelerated.
        final WindowManager.LayoutParams lp = new WindowManager.LayoutParams(
                ViewGroup.LayoutParams.MATCH_PARENT,
                height,
                WindowManager.LayoutParams.TYPE_STATUS_BAR, // 窗口类型
                WindowManager.LayoutParams.FLAG_NOT_FOCUSABLE   // 状态栏不接受按键事件
                    // 状态栏接受导致设备唤醒的事件
                    | WindowManager.LayoutParams.FLAG_TOUCHABLE_WHEN_WAKING
                    // 允许状态栏支持触摸事件序列的拆分
                    | WindowManager.LayoutParams.FLAG_SPLIT_TOUCH,
                PixelFormat.TRANSLUCENT);   // 状态栏的 Surface 像素格式为支持透明度
        // 启动硬件加速
        lp.flags |= WindowManager.LayoutParams.FLAG_HARDWARE_ACCELERATED;

        lp.gravity = getStatusBarGravity();
        lp.setTitle("StatusBar");
        lp.packageName = mContext.getPackageName();

        // 创建 StatusBar 和 导航栏
        makeStatusBarView();
        // 添加到窗口,创建过程完成
        mWindowManager.addView(mStatusBarWindow, lp);
    }
2. 布局

3. 重要变量
三、状态栏显示的通知
四、SystemUI 的体系结构
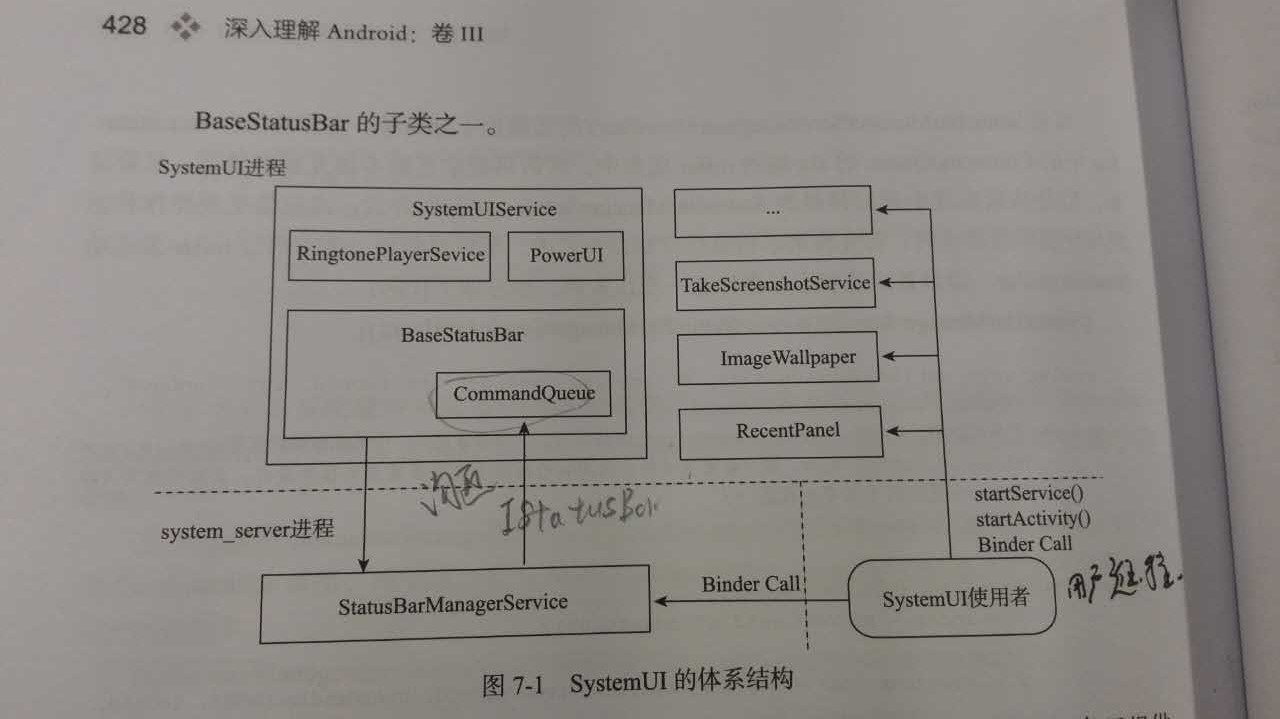
1. SystemUIService
一个普通的 Android Service ,它以一个容器的角色运行于 SystemUI 进程中。
2. CommandQueue
运行在 SystemUI 进程中;
继承 IStatusBar.Stub, 是 IStatusBar 的 Bn 段,是 IStatusBarService 与 BaseStatusBar 进行沟通的桥梁;
3. IStatusBarService;
运行在 system_server 进程中;
即系统服务 StatusBarManagerService 是状态栏、导航栏向外界提供服务的前端接口;它接受操作状态栏、导航栏的请求 并转给 BaseStatusBar;
4. StatusBarManagerService
运行在 system_server 进程中;
是 IStatusBarService 的实现者, 在 ServerThread.run() 方法中启动;
它是 SystemUI 中状态栏和导航栏在 system_server 中的代理。所有对状态栏或者导航栏来有需求的对象都可以通过获取 StatusBarManagerService 的实例或 Bp 端达到其目的。只不过使用者必须拥有能够完成操作的相应权限;
它保存了状态栏/导航栏所需的信息副本,用于在 SystemUI 意外退出之后的恢复;
5.IStatusBar
运行在 SystemUI 进程中;
是 SystemUI 中 CommandQueue 联系 StatusBarManagerSerevice 与 BaseStatusBar 的桥梁;
6. SystemUI 中还包含了 ImageWallpaper、RecentPanel 以及 TakeScreenshotService 等功能的实现。它们是 Service、 Activity 等标准的 Android 应用组件,相互独立。
五、通知信息的显示过程
我们先构建一个显示通知的例子
    private void sendNotification(){
        NotificationManager manager = (NotificationManager) getSystemService(NOTIFICATION_SERVICE);
        Intent intent = new Intent(this, Main2Activity.class);
        PendingIntent pendingIntent = PendingIntent.getActivity(this, 0, intent, 0);
        Notification notification = new  Notification.Builder(this)
                .setAutoCancel(true)
                .setTicker("测试新通知")
                .setSmallIcon(R.mipmap.ic_launcher)
                .setContentTitle("新通知")
                .setContentText("测试测试测出测试")
                .setWhen(System.currentTimeMillis())
                .setContentIntent(pendingIntent)
                .build();
        manager.notify(11232, notification);
    }
通知信息的显示从 NotificationManager.notify(int id, Notification notification) 开始

1、在 NotificationManagerService.enqueueNotificationWithTag() 中
. 调用 checkCallerIsSystemOrSameApp(...) 进行安全检查
checkCallerIsSystemOrSameApp() 会获取通知信息提交者的 UID, 并与 PackageManager 中获取分配给拥有指定包 名的应用程序的 UID 进行比较。如果不一致,则表示有恶意软件尝试通过冒用包名的方式篡改其他应用程序发出的 通知信息,会抛出一个异常,禁止这样的行为。
. 限制每个应用最多只能提交 50 个通知,防止恶意软件或通过注册大量通知导致系统瘫痪
// Limit the number of notifications that any given package except the android
        // package can enqueue.  Prevents DOS attacks and deals with leaks.
        if (!isSystemNotification) {
           ..
                        if (count >= MAX_PACKAGE_NOTIFICATIONS) {
                            ..
                            return;
                        }
                    }
                }
            }
        }
. 根据信息的重要性进行打分,priority 字段,如果分数过低,此通知信息就会被忽略;
pkg, tag, id 在 NotificationManagerService 中共同构成了一则通知的唯一标识。
2. 在 PhoneStatusBar.addNotification() 中
<span style="font-size:14px;">public void addNotification(IBinder key, StatusBarNotification notification) {
        if (DEBUG) Slog.d(TAG, "addNotification score=" + notification.getScore());
        // 1. 将通知内容添加到控件树中, 在 BaseStatusBar 中创建 view
        StatusBarIconView iconView = addNotificationViews(key, notification);
        if (iconView == null) return;

        boolean immersive = false;
        try {
            immersive = ActivityManagerNative.getDefault().isTopActivityImmersive();
            if (DEBUG) {
                Slog.d(TAG, "Top activity is " + (immersive?"immersive":"not immersive"));
            }
        } catch (RemoteException ex) {
        }

        // 2. 为新的通知启动 fullScreenIntent 或进行 ticker
        if (notification.getNotification().fullScreenIntent != null) {
            // Stop screensaver if the notification has a full-screen intent.
            // (like an incoming phone call)
            awakenDreams();

            // not immersive & a full-screen alert should be shown
            if (DEBUG) Slog.d(TAG, "Notification has fullScreenIntent; sending fullScreenIntent");
            try {
                notification.getNotification().fullScreenIntent.send();
            } catch (PendingIntent.CanceledException e) {
            }
        } else {
            // usual case: status bar visible & not immersive

            // show the ticker if there isn't an intruder too
            if (mCurrentlyIntrudingNotification == null) {
                tick(null, notification, true);
            }
        }

        // 3. 更新周边控件
        // Recalculate the position of the sliding windows and the titles.
        setAreThereNotifications();
        updateExpandedViewPos(EXPANDED_LEAVE_ALONE);
    }</span>
3.在 BaseStatusBar.addNotificationViews(...) 中
    protected StatusBarIconView addNotificationViews(IBinder key,
            StatusBarNotification notification) {
        if (DEBUG) {
            Slog.d(TAG, "addNotificationViews(key=" + key + ", notification=" + notification);
        }
        // Construct the icon.
        // 1. 创建一个 StatusBarIconView ,用于显示通知的图标;
        final StatusBarIconView iconView = new StatusBarIconView(mContext,
                notification.getPackageName() + "/0x" + Integer.toHexString(notification.getId()),
                notification.getNotification());
        iconView.setScaleType(ImageView.ScaleType.CENTER_INSIDE);

        // 2. 创建 StatusBarIcon 实例, 用于保存在 Notification 实例中与通知图标相关的信息;
        final StatusBarIcon ic = new StatusBarIcon(notification.getPackageName(),
                notification.getUser(),
                    notification.getNotification().icon,
                    notification.getNotification().iconLevel,
                    notification.getNotification().number,
                    notification.getNotification().tickerText);
        if (!iconView.set(ic)) {
            handleNotificationError(key, notification, "Couldn't create icon: " + ic);
            return null;
        }
        // Construct the expanded view.
        // 3. 创建 NotificaitonData.Entry 实例
        NotificationData.Entry entry = new NotificationData.Entry(key, notification, iconView);
        // 4. 创建通知在下拉卷帘中的控件树,并将其添加到 mPile 中
        if (!inflateViews(entry, mPile)) {
            handleNotificationError(key, notification, "Couldn't expand RemoteViews for: "
                    + notification);
            return null;
        }

        // Add the expanded view and icon.
        //  5.  保存 entry 到 mNotificaitonData 中
        int pos = mNotificationData.add(entry);
        if (DEBUG) {
            Slog.d(TAG, "addNotificationViews: added at " + pos);
        }

        // 6. 更新通知在下拉卷帘中的展开状态;
        updateExpansionStates();
        // 7. 更新状态栏中所有通知图标的显示状态。
        updateNotificationIcons();

        return iconView;
    }
inflateViews(...) 方法描述了下拉卷帘中的控件树的构造,参考 P445.
通知的详细信息由 R.layout.status_bar_notification_row 显示在 mPile 中。
六、系统状态图标的显示
系统状态图标区的意图由一个字符串描述,意图列表在 frameworks/base/core/res/res/values/config.xml 中 config_statusBarIcons 定义。
显示过程
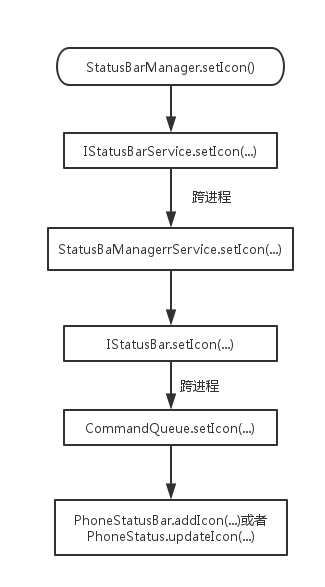
1. 在 StatusBarManagerService.setIcon() 中
调用 enforceStatusBar() 方法,设置者必须拥有签名级系统权限 android.permission.STATUS_BAR 才能设置系统状 态图标。
2. 大多数系统图标通过 PhoneStatusBarPolicy 类设置
PhoneStatusBarPolicy 在 PhoneStatusBar.start() 方法中创建,通过监听一些广播,随后调用相应的方法,最后调用 StatusBarManager.setIcon 进行修改图标。
监听的广播
        // listen for broadcasts
        IntentFilter filter = new IntentFilter();
        filter.addAction(Intent.ACTION_ALARM_CHANGED);
        filter.addAction(Intent.ACTION_SYNC_STATE_CHANGED);
        filter.addAction(AudioManager.RINGER_MODE_CHANGED_ACTION);
        filter.addAction(BluetoothAdapter.ACTION_STATE_CHANGED);
        filter.addAction(BluetoothAdapter.ACTION_CONNECTION_STATE_CHANGED);
        filter.addAction(TelephonyIntents.ACTION_SIM_STATE_CHANGED);
        filter.addAction(TtyIntent.TTY_ENABLED_CHANGE_ACTION);
        mContext.registerReceiver(mIntentReceiver, filter, null, mHandler);
至此,关于导航栏的内容基本结束了。
