HAproxy负载均衡集群的搭建
环境准备
客户端:192.168.4.10/24
HAproxy调度器:eth0:192.168.4.5/24    eth1:192.168.2.5
web1: 192.168.2.100/24
web2: 1992.168.2.200/24
环境搭建
[root@web1 ~]# nmcli connection modify eth1 ipv4.method manual \
ipv4.addresses 192.168.2.100/24 connection.autoconnect yes
[root@web1 ~]# nmcli connection up eth1
[root@web2 ~]# nmcli connection modify eth1 ipv4.method manual \
ipv4.addresses 192.168.2.200/24 connection.autoconnect yes
[root@web2 ~]# nmcli connection up eth1
[root@proxy ~]# nmcli connection modify eth0 ipv4.method manual \
ipv4.addresses 192.168.4.5/24 connection.autoconnect yes
[root@proxy ~]# nmcli connection up eth0
[root@proxy ~]# nmcli connection modify eth1 ipv4.method manual \
ipv4.addresses 192.168.2.5/24 connection.autoconnect yes
[root@proxy ~]# nmcli connection up eth1
一、安装apache,配置apache服务器默认首页
    [root@web1 ~]# yum -y install httpd
    [root@web1 ~]# systemctl start httpd
    [root@web1 ~]# echo "192.168.2.100" > /var/www/html/index.html
    [root@web2 ~]# yum -y install httpd
    [root@web2 ~]# systemctl start httpd
    [root@web2 ~]# echo "192.168.2.200" > /var/www/html/index.html
二、部署HAProxy服务器
1.装包
[root@proxy ~]# yum -y install haproxy
2.修改配置文件
    [root@proxy ~]# vim /etc/haproxy/haproxy.cfg
    global
     log 127.0.0.1 local2   ##[err warning info debug]
     chroot /usr/local/haproxy
     pidfile /var/run/haproxy.pid ##haproxy的pid存放路径
     maxconn 4000     ##最大连接数,默认4000
     user haproxy
     group haproxy
     daemon       ##创建1个进程进入deamon模式运行
    defaults
     mode http    ##默认的模式mode { tcp|http|health }
    option dontlognull  ##不记录健康检查的日志信息
     option httpclose  ##每次请求完毕后主动关闭http通道
     option httplog   ##日志类别http日志格式
     option forwardfor  ##后端服务器可以从Http Header中获得客户端ip
     option redispatch  ##serverid服务器挂掉后强制定向到其他健康服务器
     timeout connect 10000 #如果backend没有指定,默认为10s
     timeout client 300000 ##客户端连接超时
     timeout server 300000 ##服务器连接超时
     maxconn  3000  ##最大连接数
     retries  3   ##3次连接失败就认为服务不可用,也可以通过后面设置
    listen stats 0.0.0.0:1080   #监听端口
        stats refresh 30s   #统计页面自动刷新时间
        stats uri /stats   #统计页面url
        stats realm Haproxy Manager #进入管理解面查看状态信息
        stats auth admin:admin  #统计页面用户名和密码设置

    listen  websrv-rewrite 0.0.0.0:80
       balance roundrobin
       server  web1 192.168.2.100:80 check inter 2000 rise 2 fall 5
       server  web2 192.168.2.200:80 check inter 2000 rise 2 fall 5
3.启动服务,并且设置开机自启动
    [root@proxy ~]# systemctl start haproxy
    [root@proxy ~]# systemctl enable haproxy
客户端测试
客户端与HAProxy负载均衡服务器在同一网段
#测试HAProxy是否正常
[root@client ~]# firefox http://192.168.4.5
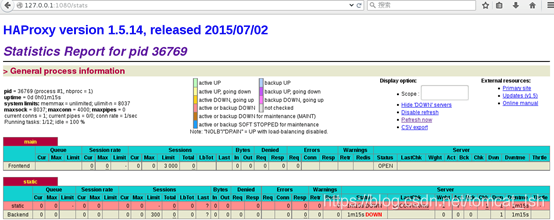
#测试状态监控页面是否正常访问状态监控页的内容,参考图-4所示。
[root@client ~]# firefox http://192.168.4.5:1080/stats