编写配置文件
SpringBoot的配置文件在resources目录下:application.properties
我们可以通过配置文件修改服务的端口号等配置:
server.port=8081
server.servlet.context-path=/firstApp
但是我们不建议使用properties配置文件,建议使用yml方式配置。
删除 application.properties,创建 application.yml
server:
  port: 8080
  servlet:
    context-path: /firstApp
从上面示例可以看到,yml方式的配置文件可以很清楚的看到配置的层级关系,而properties配置文件是用点的方式。
值得注意的是,配置项的冒号后面必须有个空格,比如port: 8080 ,8080前面有一个空格,这个是必须的。
不过大家放心,IDEA会很好的提示并帮助我们进行配置文件的格式化,不用担心这会给我们带来麻烦。
读取配置文件
读取配置很简单,我们使用${配置名} 的方式读取配置,同时可以在配置中读取其他配置
name: jack
desc: my name is ${name}在类中读取配置,只要使用@Value 注解
package com.example.demo;

import org.springframework.beans.factory.annotation.Value;
import org.springframework.web.bind.annotation.RequestMapping;
import org.springframework.web.bind.annotation.RequestMethod;
import org.springframework.web.bind.annotation.RestController;

@RestController
public class HelloWorldController {

    @Value("${name}")
    private String name;

    @Value("${desc}")
    private String desc;

    @RequestMapping(value = "/hello", method = RequestMethod.GET)
    public String hello(){
        return this.name + this.desc;
    }
}
但随着配置项的增加,你会发现这样一个个读取配置很麻烦,不要担心,我们有更好的方式。
加入配置如下:
person:
  name: jack
desc: i am desc创建一个PersonProperise,使用注解ConfigurationProperties 读取指定配置,定义私有变量,会自动加载相应的配置项
package com.example.demo;


import org.springframework.boot.context.properties.ConfigurationProperties;
import org.springframework.stereotype.Component;

@Component
@ConfigurationProperties(prefix = "person")
public class PersonProperties {

    private String name;

    private String desc;

    public String getName() {
        return name;
    }

    public void setName(String name) {
        this.name = name;
    }

    public String getDesc() {
        return desc;
    }

    public void setDesc(String desc) {
        this.desc = desc;
    }
}
在其他类中使用配置:
package com.example.demo;

import org.springframework.beans.factory.annotation.Autowired;
import org.springframework.web.bind.annotation.RequestMapping;
import org.springframework.web.bind.annotation.RequestMethod;
import org.springframework.web.bind.annotation.RestController;

@RestController
public class HelloWorldController {

    @Autowired
    private PersonProperties personProperties;

    @RequestMapping(value = "/hello", method = RequestMethod.GET)
    public String hello(){
        return personProperties.getName() + personProperties.getDesc();
    }
}
多环境配置
实际开发中,我们可能需要针对开发环境,测试环境,生产环境进行不同的配置,该怎么做呢?很简单,拷贝两份配置文件,分别命名为application-dev.yml 和application-prod.yml ,如:
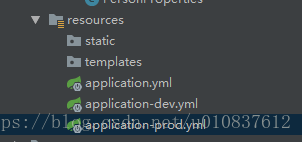
然后在在application.yml 中配置当前启用哪个环境的配置文件
spring:
  profiles:
    active: prod
这样就实现了多环境的配置。
在发布代码的时候,我们也可以在启动的时候指定配置文件:
java -jar demo-0.0.1-SNAPSHOT.jar --spring.profiles.active=prod