WebService
一 什么是webservice
1.1 webservice简介
webservice是系统与系统之间调用的技术,也就是一种远程调用技术
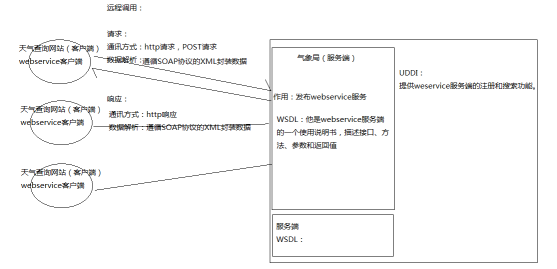
1.2 webservice 工作原理
l Webservice是使用Http发送SOAP协议的数据的一种远程调用技术
l Webservice要开发服务端
l Webservice要开发客户端
l Webservice客户端开发需要阅读服务端的使用说明书(WSDL)
1.3 webservice入门程序
1.3.1 接口
public interface WeatherInterface {
	public String queryWeather(String cityName);
}
1.3.2 接口实现类
@WebService//@WebService表示该类是一个服务类,需要发布其中的public的方法
public class WeatherInterfaceImpl implements WeatherInterface {
	@Override
	public String queryWeather(String cityName) {
		System.out.println("from client..."+cityName);
		String weather = "晴";
		return weather;
	}
}
1.3.3 发布
public class WeatherServer {
	public static void main(String[] args) {
		Endpoint.publish("http://127.0.0.1:12345/weather", new WeatherInterfaceImpl());
	}
}
1.3.4 测试服务
l 第四步:测试服务是否发布成功,通过阅读使用说明书,确定客户端调用的接口、方法、参数和返回值存在,证明服务发布成功。
Ø WSDL地址:服务地址+”?wsdl”
Ø WSDL阅读方式:从下往上

1.3.5 客户端生成
开发步骤
l 第一步:wsimport命令生成客户端代码
wsimport -s . http://127.0.0.1:12345/weather?wsdl
l 第二步:根据使用说明书,使用客户端代码调用服务端
Ø 第一步:创建服务视图,视图是从service标签的name属性获取
Ø 第二步:获取服务实现类,实现类从portType的name属性获取
Ø 第三步:获取查询方法,从portType的operation标签获取
1.3.6 客户端调用
public class WeatherClient {
	public static void main(String[] args) {
		//创建服务视图
		WeatherInterfaceImplService weatherInterfaceImplService = new WeatherInterfaceImplService();
		//获取服务实现类
		WeatherInterfaceImpl weatherInterfaceImpl = weatherInterfaceImplService.getPort(WeatherInterfaceImpl.class);
		//调用查询方法,打印
		String weather = weatherInterfaceImpl.queryWeather("北京");
		System.out.println(weather);
	}
}
1.4 webService 优缺点
优点:
l 发送方式采用http的post发送,http的默认端口是80,防火墙默认不拦截80,所以跨防火墙
l 采用XML格式封装数据,XML是跨平台的,所以webservice也可以跨平台。
l Webservice支持面向对象
缺点:
l 采用XML格式封装数据,所以在传输过程中,要传输额外的标签,随着SOAP协议的不断完善,标签越来越大,导致webservice性能下降
1.5 技术场景
1.5.1适用场景
l 发布一个服务(对内/对外),不考虑客户端类型,不考虑性能,建议使用webservice
l 服务端已经确定使用webservice,客户端不能选择,必须使用webservice
1.5.2 不适用场景
l 考虑性能时不建议使用webservice
l 同构程序下不建议使用webservice,比如java 用RMI,不需要翻译成XML的数据
二 Webservice 二要素
2.1 wsdl
2.1.1 什么是wsdl
WSDL及web服务描述语言,他是webservice服务端使用说明书,说明服务端接口、方法、参数和返回值,WSDL是随服务发布成功,自动生成,无需编写
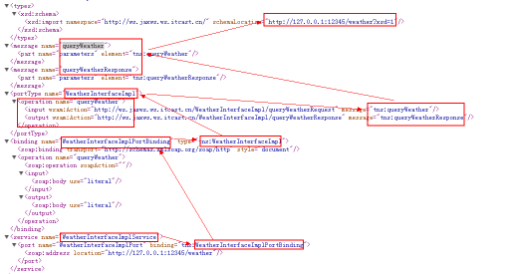
2.1.2 wsdl文档结构

l <service> 服务视图,webservice的服务结点,它包括了服务端点
l <binding> 为每个服务端点定义消息格式和协议细节
l <portType> 服务端点,描述 web service可被执行的操作方法,以及相关的消息,通过binding指向portType
l <message> 定义一个操作(方法)的数据参数(可有多个参数)
l <types> 定义 web service 使用的全部数据类型
2.1.3 详细结构
2.1.4 修改wsdl
WebService的注解都位于javax.jws包下:
@WebService-定义服务,在public class上边
targetNamespace:指定命名空间
name:portType的名称
portName:port的名称
serviceName:服务名称
endpointInterface:SEI接口地址,如果一个服务类实现了多个接口,只需要发布一个接口的方法,可通过此注解指定要发布服务的接口。
@WebMethod-定义方法,在公开方法上边
operationName:方法名
exclude:设置为true表示此方法不是webservice方法,反之则表示webservice方法,默认是false
@WebResult-定义返回值,在方法返回值前边
name:返回结果值的名称
@WebParam-定义参数,在方法参数前边
name:指定参数的名称
作用:
通过注解,可以更加形像的描述Web服务。对自动生成的wsdl文档进行修改,为使用者提供一个更加清晰的wsdl文档。
当修改了WebService注解之后,会影响客户端生成的代码。调用的方法名和参数名也发生了变化
2.2 soap
2.2.1 什么是soap
l SOAP即简单对象访问协议,他是使用http发送的XML格式的数据,它可以跨平台,跨防火墙,SOAP不是webservice的专有协议。
l SOAP=http+xml
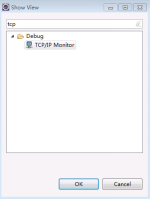
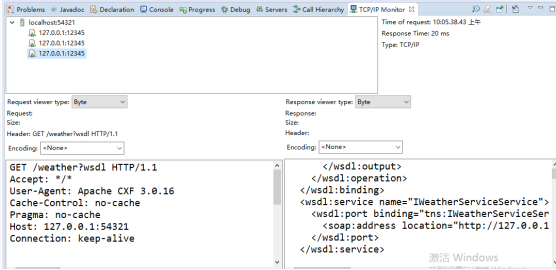
2.2.3 协议获取方式
2.2.3.1 打开视图
2.2.2 协议的格式
l 必需有 Envelope 元素,此元素将整个 XML 文档标识为一条 SOAP 消息
l 可选的 Header 元素,包含头部信息
l 必需有Body 元素,包含所有的调用和响应信息
l 可选的 Fault 元素,提供有关在处理此消息所发生错误的信息
2.2.3.2 配置代理
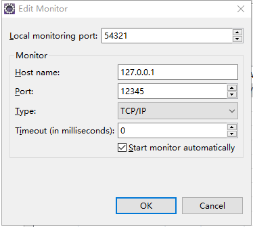
2.2.3.3 测试地址

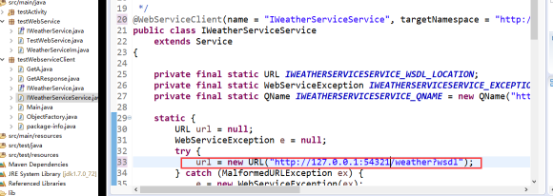
2.2.3.4 修改client的调用端口
修改调用把12345修改成54321
2.2.3.5执行调用获取报文
执行客户端调用 获取报文
POST /weather HTTP/1.1
Accept: text/xml, multipart/related
Content-Type: text/xml; charset=utf-8
SOAPAction: "http://ws.jaxws.ws.itcast.cn/WeatherInterfaceImpl/queryWeatherRequest"
User-Agent: JAX-WS RI 2.2.4-b01
Host: 127.0.0.1:54321
Connection: keep-alive
Content-Length: 214
<?xml version="1.0" ?>
<S:Envelope xmlns:S="http://schemas.xmlsoap.org/soap/envelope/">
<S:Body><ns2:queryWeather xmlns:ns2="http://ws.jaxws.ws.itcast.cn/"><arg0>北京</arg0></ns2:queryWeather>
</S:Body>
</S:Envelope>
HTTP/1.1 200 OK
Transfer-encoding: chunked
Content-type: text/xml; charset=utf-8
Date: Thu, 26 Nov 2015 03:14:29 GMT

<?xml version="1.0" ?>
<S:Envelope xmlns:S="http://schemas.xmlsoap.org/soap/envelope/">
<S:Body>
<ns2:queryWeatherResponse xmlns:ns2="http://ws.jaxws.ws.itcast.cn/"><return>晴</return></ns2:queryWeatherResponse>
</S:Body>
</S:Envelope>
三 webservice客户端四种调用方式
3.1 生成客户端调用方式
Wsimport命令介绍
l Wsimport就是jdk提供的的一个工具,他作用就是根据WSDL地址生成客户端代码
l Wsimport位置JAVA_HOME/bin
l Wsimport常用的参数:
Ø -s,生成java文件的
Ø -d,生成class文件的,默认的参数
Ø -p,指定包名的,如果不加该参数,默认包名就是wsdl文档中的命名空间的倒序
l Wsimport仅支持SOAP1.1客户端的生成
调用公网手机号归属地查询服务
第一步:wsimport生成客户端代码
wsimport -p cn.itcast.mobile -s . http://webservice.we
bxml.com.cn/WebServices/MobileCodeWS.asmx?wsdl
l 第二步:阅读使用说明书,使用生成客户端代码调用服务端
public class MobileClient {

	public static void main(String[] args) {
		//创建服务视图
		MobileCodeWS mobileCodeWS = new MobileCodeWS();
		//获取服务实现类
		MobileCodeWSSoap mobileCodeWSSoap = mobileCodeWS.getPort(MobileCodeWSSoap.class);
		//调用查询方法
		String reuslt = mobileCodeWSSoap.getMobileCodeInfo("13888888", null);
		System.out.println(reuslt);
	}
}
公网天气服务端查询
public class WeatherClient {
	public static void main(String[] args) {
		WeatherWS weatherWS = new WeatherWS();
		WeatherWSSoap weatherWSSoap = weatherWS.getPort(WeatherWSSoap.class);
		ArrayOfString  arrayOfString = weatherWSSoap.getWeather("北京", "");
		List<String> list = arrayOfString.getString();
		for(String str : list){
			System.out.println(str);
		}
	}
}
特点
该种方式使用简单,但一些关键的元素在代码生成时写死到生成代码中,不方便维护,所以仅用于测试。
3.2 service编程调用方式
public class ServiceClient {

	public static void main(String[] args) throws IOException {
		//创建WSDL的URL,注意不是服务地址
		URL url = new URL("http://webservice.webxml.com.cn/WebServices/MobileCodeWS.asmx?wsdl"
		//创建服务名称
		//1.namespaceURI - 命名空间地址
		//2.localPart - 服务视图名
		QName qname = new QName("http://WebXml.com.cn/", "MobileCodeWS");
		//创建服务视图
		//参数解释:
		//1.wsdlDocumentLocation - wsdl地址
		//2.serviceName - 服务名称
		Service service = Service.create(url, qname);
		//获取服务实现类
		MobileCodeWSSoap mobileCodeWSSoap = service.getPort(MobileCodeWSSoap.class);
		//调用查询方法
		String result = mobileCodeWSSoap.getMobileCodeInfo("1866666666", "");
		System.out.println(result);
	}
}
特点
该种方式可以自定义关键元素,方便以后维护,是一种标准的开发方式
3.3 HttpURLConnection调用方式
开发步骤:
第一步:创建服务地址
第二步:打开一个通向服务地址的连接
第三步:设置参数
设置POST,POST必须大写,如果不大写,报如下异常

如果不设置输入输出,会报如下异常

第四步:组织SOAP数据,发送请求
第五步:接收服务端响应,打印
public class HttpClient {
	public static void main(String[] args) throws IOException {
		//第一步:创建服务地址,不是WSDL地址
		URL url = new URL("http://webservice.webxml.com.cn/WebServices/MobileCodeWS.asmx");
		//第二步:打开一个通向服务地址的连接
		HttpURLConnection connection = (HttpURLConnection) url.openConnection();
		//第三步:设置参数
		//3.1发送方式设置:POST必须大写
		connection.setRequestMethod("POST");
		//3.2设置数据格式:content-type
		connection.setRequestProperty("content-type", "text/xml;charset=utf-8");
		//3.3设置输入输出,因为默认新创建的connection没有读写权限,
		connection.setDoInput(true);
		connection.setDoOutput(true);

		//第四步:组织SOAP数据,发送请求
		String soapXML = getXML("15226466316");
		OutputStream os = connection.getOutputStream();
		os.write(soapXML.getBytes());
		//第五步:接收服务端响应,打印
		int responseCode = connection.getResponseCode();
		if(200 == responseCode){//表示服务端响应成功
			InputStream is = connection.getInputStream();
			InputStreamReader isr = new InputStreamReader(is);
			BufferedReader br = new BufferedReader(isr);

			StringBuilder sb = new StringBuilder();
			String temp = null;
			while(null != (temp = br.readLine())){
				sb.append(temp);
			}
			System.out.println(sb.toString());
			is.close();
			isr.close();
			br.close();
		}
		os.close();
	}

	/**
	 * <?xml version="1.0" encoding="utf-8"?>
<soap:Envelope xmlns:xsi="http://www.w3.org/2001/XMLSchema-instance" xmlns:xsd="http://www.w3.org/2001/XMLSchema" xmlns:soap="http://schemas.xmlsoap.org/soap/envelope/">
  <soap:Body>
    <getMobileCodeInfo xmlns="http://WebXml.com.cn/">
      <mobileCode>string</mobileCode>
      <userID>string</userID>
    </getMobileCodeInfo>
  </soap:Body>
</soap:Envelope>
	 * @param phoneNum
	 * @return
	 */
	public static String getXML(String phoneNum){
		String soapXML = "<?xml version=\"1.0\" encoding=\"utf-8\"?>"
		+"<soap:Envelope xmlns:xsi=\"http://www.w3.org/2001/XMLSchema-instance\" xmlns:xsd=\"http://www.w3.org/2001/XMLSchema\" xmlns:soap=\"http://schemas.xmlsoap.org/soap/envelope/\">"
			+"<soap:Body>"
		    +"<getMobileCodeInfo xmlns=\"http://WebXml.com.cn/\">"
		    	+"<mobileCode>"+phoneNum+"</mobileCode>"
		      +"<userID></userID>"
		    +"</getMobileCodeInfo>"
		  +"</soap:Body>"
		+"</soap:Envelope>";
		return soapXML;
	}
}
3.4 Ajax调用方式
<!doctype html>
<html lang="en">
 <head>
  <meta charset="UTF-8">
  <title>Document</title>
  <script type="text/javascript">
	function queryMobile(){
		//创建XMLHttpRequest对象
		var xhr = new XMLHttpRequest();
		//打开连接
		xhr.open("post","http://webservice.webxml.com.cn/WebServices/MobileCodeWS.asmx",true);
		//设置数据类型
		xhr.setRequestHeader("content-type","text/xml;charset=utf-8");
		//设置回调函数
		xhr.onreadystatechange=function(){
			//判断是否发送成功和判断服务端是否响应成功
			if(4 == xhr.readyState && 200 == xhr.status){
				alert(xhr.responseText);
			}
		}
		//组织SOAP协议数据
		var soapXML = "<?xml version=\"1.0\" encoding=\"utf-8\"?>"
		+"<soap:Envelope xmlns:xsi=\"http://www.w3.org/2001/XMLSchema-instance\" xmlns:xsd=\"http://www.w3.org/2001/XMLSchema\" xmlns:soap=\"http://schemas.xmlsoap.org/soap/envelope/\">"
			+"<soap:Body>"
		    +"<getMobileCodeInfo xmlns=\"http://WebXml.com.cn/\">"
		    	+"<mobileCode>"+document.getElementById("phoneNum").value+"</mobileCode>"
		      +"<userID></userID>"
		    +"</getMobileCodeInfo>"
		  +"</soap:Body>"
		+"</soap:Envelope>";
		alert(soapXML);
		//发送数据
		xhr.send(soapXML);
	}
  </script>
 </head>
 <body>
  手机号查询:<input type="text" id="phoneNum"/> <input type="button" value="查询" onclick="javascript:queryMobile();"/>
 </body>
</html>
四 CXF
4.1 什么是cxf
l CXF是一个开源的webservice框架,提供很多完善功能,可以实现快速开发
l CXF支持的协议:SOAP1.1/1.2,REST
l CXF支持数据格式:XML,JSON(仅在REST方式下支持)
4.2 cxf 安装配置与搭建
l 下载地址
http://cxf.apache.org/download.html
l 包结构介绍
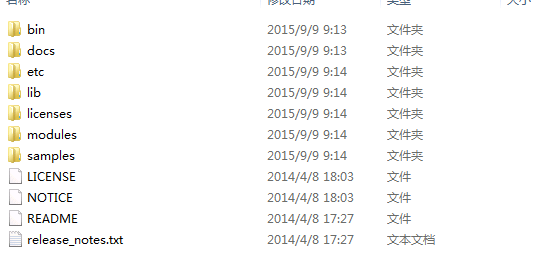
l 安装和配置
Ø 第一步:安装JDK,建议1.7
Ø 第二步:解压apache-cxf-2.7.11.zip到指定目录,创建CXF_HOME
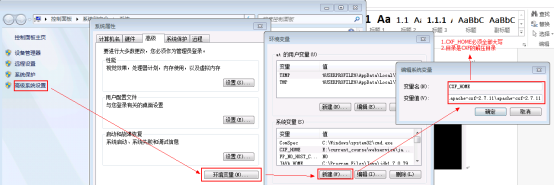
Ø 第三步:把CXF_HOME加入到Path路径下

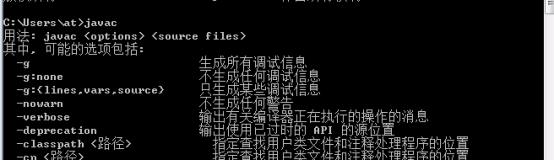
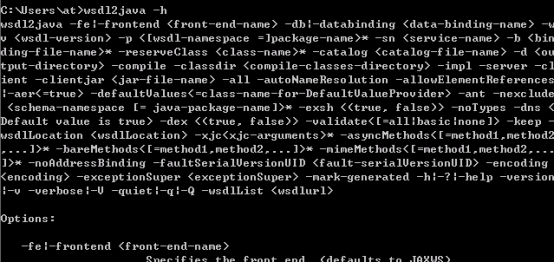
Ø 第四步:测试,在cmd下加入wsdl2java –h
Ø 如果不想使用IDE(比如Eclipse),需要在环境变量下配置如下信息
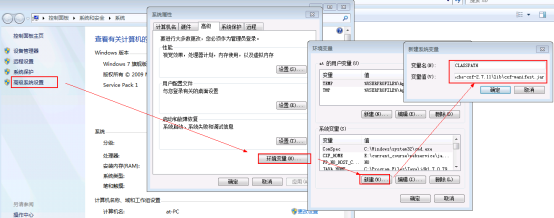
项目中build path..引入包的时候,只引入mainifast包。
4.3 cxf创建服务
开发步骤:
第一步:导入Jar包
第二步:创建SEI接口,要加入@WebService
@WebService
public interface WeatherInterface {

	public String queryWeather(String cityName);
}
第三步:创建SEI实现类
public class WeatherInterfaceImpl implements WeatherInterface {

	@Override
	public String queryWeather(String cityName) {
		System.out.println("from client..."+cityName);
		if("北京".equals(cityName)){
			return "冷且霾";
		} else {
			return "暖且晴";
		}
	}

}
第四步:发布服务, JaxWsServerFactoryBean发布,设置3个参数,1.服务接口;2.服务实现类;3.服务地址;
endpoint仅支持发布实现类,JaxWsServerFactoryBean支持发布接口
public class WeatherServer {
	public static void main(String[] args) {
		JaxWsServerFactoryBean jaxWsServerFactoryBean = new JaxWsServerFactoryBean();
		jaxWsServerFactoryBean.setServiceClass(WeatherInterface.class);
		jaxWsServerFactoryBean.setServiceBean(new WeatherInterfaceImpl());
		jaxWsServerFactoryBean.setAddress("http://127.0.0.1:12345/weather");
		jaxWsServerFactoryBean.create();
	}
}
第五步:测试服务是否发布成功,阅读使用说明书,确定关键点
如果在CXF发布的服务下,直接访问服务地址,会如下异常
此时直接访问使用说明书地址即可http://127.0.0.1:12345/weather?wsdl
4.4 创建客户端
第一步:生成客户端代码
l Wsdl2java命令是CXF提供的生成客户端的工具,他和wsimport类似,可以根据WSDL生成客户端代码
l Wsdl2java常用参数:
-d,指定输出目录
-p,指定包名,如果不指定该参数,默认包名是WSDL的命名空间的倒序
l Wsdl2java支持SOAP1.1和SOAP1.2
wsdl2java -p com.charles.client http://localhost:8080/queryUser?wsdl
第二步:使用说明书,使用生成代码调用服务端
JaxWsProxyFactoryBean调用服务端,设置2个参数,1.设置服务接口;2.设置服务地址
public class WeatherClient {
	public static void main(String[] args) {
		JaxWsProxyFactoryBean jaxWsProxyFactoryBean = new JaxWsProxyFactoryBean();	jaxWsProxyFactoryBean.setServiceClass(WeatherInterface.class);	jaxWsProxyFactoryBean.setAddress("http://127.0.0.1:12345/weather");
		WeatherInterface weatherInterface = jaxWsProxyFactoryBean.create(WeatherInterface.class);
		String weather = weatherInterface.queryWeather("北京");
		System.out.println(weather);
	}
}
五 spring整合cxf发布soap
5.1 服务端开发
第一步:创建web项目(引入jar包)
 <dependency>
			   <groupId>org.apache.cxf</groupId>
			   <artifactId>cxf-rt-frontend-jaxws</artifactId>
			   <version>${cxf.version}</version>
		  </dependency>
		  <dependency>
			   <groupId>org.apache.cxf</groupId>
			   <artifactId>cxf-rt-transports-http</artifactId>
			   <version>${cxf.version}</version>
		  </dependency>
		  <dependency>
			   <groupId>org.apache.cxf</groupId>
			   <artifactId>cxf-rt-transports-http-jetty</artifactId>
			   <version>${cxf.version}</version>
			   <scope>provided</scope>
		  </dependency>
第二步:创建SEI接口
@WebService
public interface IWeatherService {
  @WebResult(name="result")
  public String getA(String a);
}
第三步:创建SEI实现类
public class WeatherServiceIm implements IWeatherService {
	public String getA(String a) {
		return "fsa";
	}
}
第四步:配置spring配置文件,applicationContext.xml,用<jaxws:server标签发布服务,设置1.服务地址;2.设置服务接口;3设置服务实现类
<?xml version="1.0" encoding="UTF-8"?>
<beans xmlns="http://www.springframework.org/schema/beans"
xmlns:xsi="http://www.w3.org/2001/XMLSchema-instance" xmlns:mvc="http://www.springframework.org/schema/mvc"
xmlns:context="http://www.springframework.org/schema/context"
xmlns:aop="http://www.springframework.org/schema/aop"
xmlns:cxf="http://cxf.apache.org/core"
xmlns:jaxws="http://cxf.apache.org/jaxws"
xmlns:jaxrs="http://cxf.apache.org/jaxrs"
xmlns:jpa="http://www.springframework.org/schema/data/jpa"
xmlns:tx="http://www.springframework.org/schema/tx"
xsi:schemaLocation="http://www.springframework.org/schema/beans
http://www.springframework.org/schema/beans/spring-beans-3.2.xsd
http://www.springframework.org/schema/mvc
http://www.springframework.org/schema/mvc/spring-mvc-3.2.xsd
http://www.springframework.org/schema/context
http://www.springframework.org/schema/context/spring-context-3.2.xsd
http://www.springframework.org/schema/aop
http://www.springframework.org/schema/aop/spring-aop-3.2.xsd
http://cxf.apache.org/jaxws
http://cxf.apache.org/schemas/jaxws.xsd
http://cxf.apache.org/jaxrs
http://cxf.apache.org/schemas/jaxrs.xsd
http://www.springframework.org/schema/tx
http://www.springframework.org/schema/tx/spring-tx-3.2.xsd ">
    <bean id="ps" class="yonyon.xiao.serviceIm.WeatherServiceIm"></bean>
	<!-- 服务 -->
	<jaxws:server address="/weather" serviceClass="yonyon.xiao.worn.IWeatherService">
		<jaxws:serviceBean>
			<ref bean="ps"/>
		</jaxws:serviceBean>
	</jaxws:server>
</beans>
第五步:配置web.xml,配置spring配置文件地址和加载的listener,配置CXF的servlet
 <?xml version="1.0" encoding="UTF-8"?>
<web-app xmlns:xsi="http://www.w3.org/2001/XMLSchema-instance" xmlns="http://java.sun.com/xml/ns/javaee" xmlns:web="http://java.sun.com/xml/ns/javaee" xsi:schemaLocation="http://java.sun.com/xml/ns/javaee http://java.sun.com/xml/ns/javaee/web-app_2_5.xsd" id="WebApp_ID" version="2.5">
  <display-name>yonyou--webservice</display-name>
  <context-param>
    <param-name>contextConfigLocation</param-name>
    <param-value>classpath:spring/spring-*.xml</param-value>
  </context-param>
  <listener>
    <listener-class>org.springframework.web.context.ContextLoaderListener</listener-class>
  </listener>
 <!-- cxf的地址映射 -->
  <servlet>
  	<servlet-name>CXF</servlet-name>
  	<servlet-class>org.apache.cxf.transport.servlet.CXFServlet</servlet-class>
  </servlet>
  <servlet-mapping>
  	<servlet-name>CXF</servlet-name>
  	<url-pattern>/ws/*</url-pattern>
  </servlet-mapping>
</web-app>
第六步:部署到tomcat下,启动tomcat
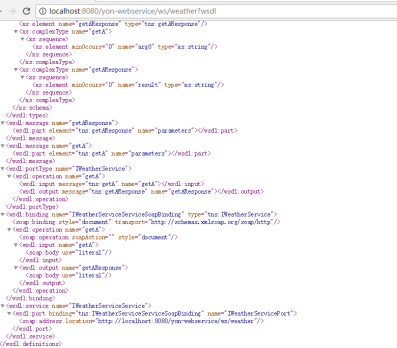
第七步:测试服务,阅读使用说明书
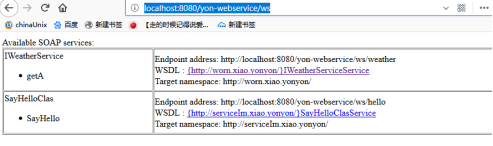
WSDL地址规则:http://ip:端口号/项目名称/servlet拦截路径/服务名称?wsdl
http://localhost:8080/yon-webservice/ws/weather?wsdl
拦截器配置
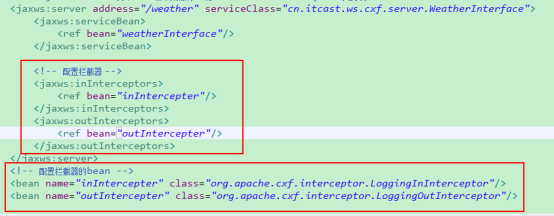
发布方式二
实现类
@WebService
public class SayHelloClas {
	public String SayHello(){
		return "haha";
	}
}
<beans xmlns="http://www.springframework.org/schema/beans"
xmlns:xsi="http://www.w3.org/2001/XMLSchema-instance" xmlns:mvc="http://www.springframework.org/schema/mvc"
xmlns:context="http://www.springframework.org/schema/context"
xmlns:aop="http://www.springframework.org/schema/aop"
xmlns:cxf="http://cxf.apache.org/core"
xmlns:jaxws="http://cxf.apache.org/jaxws"
xmlns:jaxrs="http://cxf.apache.org/jaxrs"
xmlns:jpa="http://www.springframework.org/schema/data/jpa"
xmlns:tx="http://www.springframework.org/schema/tx"
xsi:schemaLocation="http://www.springframework.org/schema/beans
http://www.springframework.org/schema/beans/spring-beans-3.2.xsd
http://www.springframework.org/schema/mvc
http://www.springframework.org/schema/mvc/spring-mvc-3.2.xsd
http://www.springframework.org/schema/context
http://www.springframework.org/schema/context/spring-context-3.2.xsd
http://www.springframework.org/schema/aop
http://www.springframework.org/schema/aop/spring-aop-3.2.xsd
http://cxf.apache.org/jaxws
http://cxf.apache.org/schemas/jaxws.xsd
http://cxf.apache.org/jaxrs
http://cxf.apache.org/schemas/jaxrs.xsd
http://www.springframework.org/schema/tx
http://www.springframework.org/schema/tx/spring-tx-3.2.xsd ">
    <bean id="ps" class="yonyon.xiao.serviceIm.WeatherServiceIm"></bean>
	<!-- 服务 -->
	<jaxws:server address="/weather" serviceClass="yonyon.xiao.worn.IWeatherService">
		<jaxws:serviceBean>
			<ref bean="ps"/>
		</jaxws:serviceBean>
	</jaxws:server>
	<jaxws:endpoint address="/hello" implementor="yonyon.xiao.serviceIm.SayHelloClas"></jaxws:endpoint>
</beans>

<?xml version="1.0" encoding="UTF-8"?>
<web-app xmlns:xsi="http://www.w3.org/2001/XMLSchema-instance" xmlns="http://java.sun.com/xml/ns/javaee" xmlns:web="http://java.sun.com/xml/ns/javaee" xsi:schemaLocation="http://java.sun.com/xml/ns/javaee http://java.sun.com/xml/ns/javaee/web-app_2_5.xsd" id="WebApp_ID" version="2.5">
  <display-name>yonyou--webservice</display-name>
  <context-param>
    <param-name>contextConfigLocation</param-name>
    <param-value>classpath:spring/spring-*.xml</param-value>
  </context-param>
  <listener>
    <listener-class>org.springframework.web.context.ContextLoaderListener</listener-class>
  </listener>
  <servlet>
  	<servlet-name>CXF</servlet-name>
  	<servlet-class>org.apache.cxf.transport.servlet.CXFServlet</servlet-class>
  </servlet>
  <servlet-mapping>
  	<servlet-name>CXF</servlet-name>
  	<url-pattern>/ws/*</url-pattern>
  </servlet-mapping>
  </web-app>
测试地址 http://localhost:8080/yon-webservice/ws
5.2 客户端开发
第一步:引入jar包
第二步:生成客户端代码
第三步:配置spring配置文件,applicationContent.xml
<?xml version="1.0" encoding="UTF-8"?>
<beans xmlns="http://www.springframework.org/schema/beans"
	xmlns:xsi="http://www.w3.org/2001/XMLSchema-instance" xmlns:jaxws="http://cxf.apache.org/jaxws"
	xmlns:jaxrs="http://cxf.apache.org/jaxrs" xmlns:cxf="http://cxf.apache.org/core"
	xsi:schemaLocation="http://www.springframework.org/schema/beans
				            http://www.springframework.org/schema/beans/spring-beans.xsd
				            http://cxf.apache.org/jaxrs http://cxf.apache.org/schemas/jaxrs.xsd
				            http://cxf.apache.org/jaxws http://cxf.apache.org/schemas/jaxws.xsd
				            http://cxf.apache.org/core http://cxf.apache.org/schemas/core.xsd">
	<!-- <jaxws:client实现客户端 ,对JaxWsProxyFactoryBean类封装-->
	<jaxws:client id="weatherClient" address="http://127.0.0.1:8080/yon-webservice/ws/weather" serviceClass="cn.itcast.cxf.weather.WeatherInterface"/>
</beans>
第四步:从spring上下文件获取服务实现类
第五步:调用查询方法,打印
public class WeatherClient {
	public static void main(String[] args) {
		ApplicationContext context = new ClassPathXmlApplicationContext("classpath:applicationContext.xml");
		WeatherInterface  weatherInterface = (WeatherInterface) context.getBean("weatherClient");
		String weather = weatherInterface.queryWeather("保定");
		System.out.println(weather);
	}
}
六 cxf发布rest服务
第一步:导入jar包
第二步:创建学生pojo类,要加入@ XmlRootElement
第三步:创建SEI接口
第四步:创建SEI实现类
public class Student {
	private String id;
	private String name;
	public String getId() {
		return id;
	}
	public void setId(String id) {
		this.id = id;
	}
	public String getName() {
		return name;
	}
	public void setName(String name) {
		this.name = name;
	}}
@WebService
@Path(value="/student")
public interface IStudentService {

	@Path(value="/query/{id}")
	@Produces(MediaType.APPLICATION_ATOM_XML)
	@GET
	public Student queryById(@PathParam("id") String id);

	@Path(value="/querylist/{name}")
	@Produces("application/json;charset=utf-8")
	@GET
	public List<Student> queryByName(@PathParam("name") String name);
}
第四步:创建SEI实现类
public class StudentServiceIm implements IStudentService{
	@Override
	public Student queryById(String id) {
		// TODO Auto-generated method stub
		Student s=new Student();
		s.setId("111111");
		s.setName("张三");
		return s;
	}

	@Override
	public List<Student> queryByName(String name) {
		// TODO Auto-generated method stub
		Student s=new Student();
		s.setId("111111");
		s.setName("张三");
		Student s1=new Student();
		s1.setId("111111");
		s1.setName("张三");
		List li=new ArrayList();
		li.add(s);
		li.add(s1);
		return li;
	}
第五步:发布服务, JAXRSServerFactoryBean发布服务,3个参数,1:服务实现类;2.设置资源类;3.设置服务地址
 public static void main(String[] args) {
	 JAXRSServerFactoryBean refa=new JAXRSServerFactoryBean();
	 refa.setServiceBean(StudentServiceIm.class);
	 refa.setResourceClasses(Student.class,StudentServiceIm.class);
	 refa.setAddress("http://127.0.0.1:12345/user");
	 refa.create();
  }
测试地址
地址1:http://127.0.0.1:12345/user/student/query/1
<?xml version="1.0" encoding="UTF-8" standalone="yes"?><student><id>111111</id><name>寮犱笁</name></student>
地址2 http://127.0.0.1:12345/user/student/querylist/1
{"student":[{"id":111111,"name":"张三"},{"id":111111,"name":"张三"}]}
如果服务端发布时指定请求方式是GET(POST),客户端必须使用GET(POST)访问服务端,否则会报如下异常
如果在同一方法上同时指定XML和JSON媒体类型,在GET请求下,默认返回XML,在POST请求下,默认返回JSON
如果在同一方法上同时指定XML和JSON媒体类型,在GET请求下,默认返回XML,在POST请求下,默认返回JSON
七 spring整合cxf发布rest
开发步骤:
第一步:创建web项目(引入jar包)
第二步:创建POJO类
@XmlRootElement
public class Student {

	private String id;
	private String name;
	public String getId() {
		return id;
	}
	public void setId(String id) {
		this.id = id;
	}
	public String getName() {
		return name;
	}
	public void setName(String name) {
		this.name = name;
	}

}
第三步:创建SEI接口
@WebService
@Path(value="/student")
public interface IStudentService {

	@Path(value="/query/{id}")
	@Produces(MediaType.APPLICATION_ATOM_XML)
	@GET
	public Student queryById(@PathParam("id") String id);

	@Path(value="/querylist/{name}")
	@Produces({"application/json;charset=utf-8",MediaType.APPLICATION_ATOM_XML})
	@GET
	public List<Student> queryByName(@PathParam("name") String name);
}
第四步:创建SEI实现类
public class StudentServiceIm implements IStudentService{
	@Override
	public Student queryById(String id) {
		// TODO Auto-generated method stub
		Student s=new Student();
		s.setId("111111");
		s.setName("张三");
		return s;
	}
	@Override
	public List<Student> queryByName(String name) {
		// TODO Auto-generated method stub
		Student s=new Student();
		s.setId("111111");
		s.setName("张三");
		Student s1=new Student();
		s1.setId("111111");
		s1.setName("张三");
		List li=new ArrayList();
		li.add(s);
		li.add(s1);
		return li;
	}
}
第五步:配置Spring配置文件,applicationContext.xml,<jaxrs:server,设置1.服务地址;2.服务实现类
<beans xmlns="http://www.springframework.org/schema/beans"
xmlns:xsi="http://www.w3.org/2001/XMLSchema-instance" xmlns:mvc="http://www.springframework.org/schema/mvc"
xmlns:context="http://www.springframework.org/schema/context"
xmlns:aop="http://www.springframework.org/schema/aop"
xmlns:cxf="http://cxf.apache.org/core"
xmlns:jaxws="http://cxf.apache.org/jaxws"
xmlns:jaxrs="http://cxf.apache.org/jaxrs"
xmlns:jpa="http://www.springframework.org/schema/data/jpa"
xmlns:tx="http://www.springframework.org/schema/tx"
xsi:schemaLocation="http://www.springframework.org/schema/beans
http://www.springframework.org/schema/beans/spring-beans-3.2.xsd
http://www.springframework.org/schema/mvc
http://www.springframework.org/schema/mvc/spring-mvc-3.2.xsd
http://www.springframework.org/schema/context
http://www.springframework.org/schema/context/spring-context-3.2.xsd
http://www.springframework.org/schema/aop
http://www.springframework.org/schema/aop/spring-aop-3.2.xsd
http://cxf.apache.org/jaxws
http://cxf.apache.org/schemas/jaxws.xsd
http://cxf.apache.org/jaxrs
http://cxf.apache.org/schemas/jaxrs.xsd
http://www.springframework.org/schema/tx
http://www.springframework.org/schema/tx/spring-tx-3.2.xsd ">

	<jaxrs:server address="/student" >
		<jaxrs:serviceBeans>
			<ref bean="studentservice"/>
		</jaxrs:serviceBeans>
	</jaxrs:server>
	<bean name="studentservice" class="yonyon.xiao.serviceIm.StudentServiceIm"></bean>
</beans>
第六步:配置web.xml
<?xml version="1.0" encoding="UTF-8"?>
<web-app xmlns:xsi="http://www.w3.org/2001/XMLSchema-instance" xmlns="http://java.sun.com/xml/ns/javaee" xmlns:web="http://java.sun.com/xml/ns/javaee" xsi:schemaLocation="http://java.sun.com/xml/ns/javaee http://java.sun.com/xml/ns/javaee/web-app_2_5.xsd" id="WebApp_ID" version="2.5">
  <display-name>yon-webservice</display-name>
  <welcome-file-list>
    <welcome-file>index.jsp</welcome-file>
  </welcome-file-list>
  <context-param>
    <param-name>contextConfigLocation</param-name>
    <param-value>classpath:spring/spring-*.xml</param-value>
  </context-param>
  <listener>
    <listener-class>org.springframework.web.context.ContextLoaderListener</listener-class>
  </listener>
 <!-- cxf的地址映射 -->
  <servlet>
  	<servlet-name>CXF</servlet-name>
  	<servlet-class>org.apache.cxf.transport.servlet.CXFServlet</servlet-class>
  </servlet>
  <servlet-mapping>
  	<servlet-name>CXF</servlet-name>
  	<url-pattern>/ws/*</url-pattern>
  </servlet-mapping>
</web-app>
第七步:部署到tomcat下,启动tomcat
第八步:测试服务
REST服务的使用说明书地址:
http://localhost:8080/yon-webservice/ws/student?_wadl