前言:关于短信的发送其实是很简单的,只需要调用一下API即可,本章博客用互亿无线给大家开发这个功能。
第一步:官网打开链接接口地址

网站中有个接口下载,下载后出现下面的文件夹

文件夹介绍:点开文件夹DEMO,里面有各类程序的案例,我们找到java的打开,套用

第二步:编写程序
写看一下程序整体
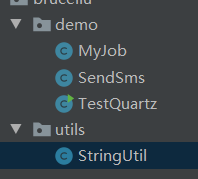
- 首先创建MyJob类,并实现org.quartz.Job接口
public class MyJob implements Job {
    @Override
    public void execute(JobExecutionContext jobExecutionContext) throws JobExecutionException {
        System.out.println("开始发送短信。。。。。。。");
        SendSms.sendMSG("11111111111");//手机号码
    }
}
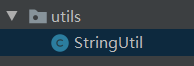
- 拿到\ihuyi-sms-3.3\互亿无线-短信验证码接口文档\DEMO\java\http_post\src\util中的StrinUtil类

- 放到程序创建的utils包中
public class StringUtil {
	public static String str;
	public static final String EMPTY_STRING = "";

	private final static String[] hexDigits = { "0", "1", "2", "3", "4", "5",
			"6", "7", "8", "9", "A", "B", "C", "D", "E", "F" };

	private static String byteToHexString(byte b) {
		int n = b;
		if (n < 0)
			n = 256 + n;
		int d1 = n / 16;
		int d2 = n % 16;
		return hexDigits[d1] + hexDigits[d2];
	}

	/**
	 * 转换字节数组为16进制字串
	 * @param b 字节数组
	 * @return 16进制字串
	 */
	public static String byteArrayToHexString(byte[] b) {
		StringBuffer resultSb = new StringBuffer();
		for (int i = 0; i < b.length; i++) {
			resultSb.append(byteToHexString(b[i]));
		}
		return resultSb.toString();
	}

	public static String MD5Encode(String origin) {
		String resultString = null;
		try {
			resultString = new String(origin);
			MessageDigest md = MessageDigest.getInstance("MD5");
			resultString = byteArrayToHexString(md.digest(resultString
					.getBytes()));
		} catch (Exception ex) {
		}
		return resultString;
	}

}
- 还是一样,拿到sendsms类,复制到程序中
public class SendSms {

    private static String Url = "http://106.ihuyi.cn/webservice/sms.php?method=Submit";

    public static void sendMSG(String phonemsg){
        HttpClient client = new HttpClient();
        PostMethod method = new PostMethod(Url);

        client.getParams().setContentCharset("GBK");
        method.setRequestHeader("ContentType","application/x-www-form-urlencoded;charset=GBK");

        int mobile_code = (int)((Math.random()*9+1)*100000);

        String content = new String("您的验证码是:" + mobile_code + "。请不要把验证码泄露给其他人。");

        NameValuePair[] data = {//提交短信
                new NameValuePair("account", "C82828276"), //查看用户名是登录用户中心->验证码短信->产品总览->APIID
                new NameValuePair("password", "8114a057b6335ae18d917ec90ac9778a"),  //查看密码请登录用户中心->验证码短信->产品总览->APIKEY
                //new NameValuePair("password", util.StringUtil.MD5Encode("密码")),
                new NameValuePair("mobile", phonemsg),
                new NameValuePair("content", content),
        };
        method.setRequestBody(data);

        try {
            client.executeMethod(method);

            String SubmitResult =method.getResponseBodyAsString();

            //System.out.println(SubmitResult);

            Document doc = DocumentHelper.parseText(SubmitResult);
            Element root = doc.getRootElement();

            String code = root.elementText("code");
            String msg = root.elementText("msg");
            String smsid = root.elementText("smsid");

            System.out.println(code);
            System.out.println(msg);
            System.out.println(smsid);

            if("2".equals(code)){
                System.out.println("短信提交成功");
            }

        } catch (HttpException e) {
            // TODO Auto-generated catch block
            e.printStackTrace();
        } catch (IOException e) {
            // TODO Auto-generated catch block
            e.printStackTrace();
        } catch (DocumentException e) {
            // TODO Auto-generated catch block
            e.printStackTrace();
        } finally{
            // Release connection
            method.releaseConnection();
            //client.getConnectionManager().shutdown();
        }

    }
}
相较原代码需要修改的地方

拿到APIID和APIKEY,修改代码即可

- 编写类TestQuartz(SimpleTriggerImpl简单复杂触发器)
public class TestQuartz {

    public static void main(String[] args) throws Exception{
        //创建任务
        JobDetail jobDetail=new JobDetailImpl("myJob","group",MyJob.class);
        //创建一个触发器
        Trigger trigger =new SimpleTriggerImpl("trigger",1,2000);
        //3.创建调度器
        Scheduler scheduler=new StdSchedulerFactory().getScheduler();
        //4.调度任务
        scheduler.scheduleJob(jobDetail,trigger);
        //5.启动
        scheduler.start();
    }
}
运行后控制台打印:
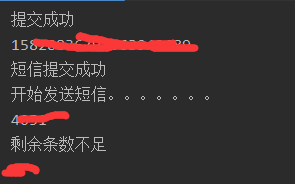
说明成功了
