搭建最基本的varnish系统
1、利用母盘rhel7.3.qcow2创建三个快照:ran1,ran2,ran3,用来做后续的实验
qemu-img create -f qcow2 -b rhel7.3.qcow2 ran1/ran2/ran3
- 1

2、给快照导入镜像,登录3个快照,改名字server1 server2 server3,改ip 172.25.70.1 / 172.25.70.2 / 172.25.70.3 ,这次的yum源直接就能用,然后用真机连接快照server1 server2 server3。

在server1上,varnish缓存服务器
3、在 server1上搭建varnish代理服务器:登录真机172.25.70.250,安装三个varnish安装包。
yum install -y varnish-4.0.5-1.el7.x86_64.rpm varnish-libs-4.0.5-1.el7.x86_64.rpm jemalloc-3.6.0-1.el7.x86_64.rpm -y

4、
rpm -qc varnish 查看varnish服务的配置文件
rpm -qa | grep varnish 查看varnish版本
/etc/varnish/default.vcl      #varnish核心配置文件
/etc/varnish/varnish.params   #varnish的参数配置文件
- 1
- 2

5、vim /usr/lib/systemd/system/varnish.service 是varnish服务启动脚本,里面有一些最基本的参数:varnish的内存大小和缓存的文件数目
- 由于Linux是多用户和多任务的系统,所以默认对每个用户分配的资源是固定的;而varnish的运行也是以varnish的用户身份来运行,所以也会受到系统的限制。


6、vim /etc/varnish/varnish.params /etc/varnish/varnish.params是服务的基本配置文件,将端口改为80


7、 ulimit -a 查看系统的各种参数

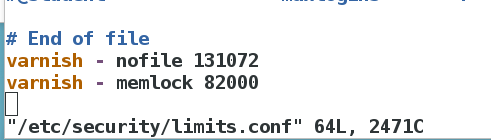
8、(永久生效)vim /etc/security/limits.conf 系统参数限制文件,写入
varnish -  nofile  131072
varlish - memlock  82000
- 1
- 2
- 由于值针对varnish用户,不希望针对所有的用户,所以在配置文件中对varnish用户进行配置!
9、(临时生效、全局)
ulimit -n 131072 修改文件描述符
ulimit -l 82 修改内存

10、 vim /etc/varnish/default.vcl 设置后端服务器 是ip为172.25.70.2这个web服务器

11、开启server1,varnish代理缓存服务器

12、 在server2上,web服务器
安装httpd服务 yum install httpd -y
在httpd服务的默认发布目录/var/www/html下写一个默认发布页面。


13、 测试 :
真机(客户端)通过server1(varnish代理缓存服务器)访问server2(web服务器)的web资源
curl 172.25.70.1(server1的ip) 找的是server2:172.25.70.2的资源
- curl ip测试,此种测试会将默认页面的内容返回,不会做HTML的解析!

14、仍在server1上配置:在 /etc/varnish/defaults.cvl的路径下写入sub vcl_deliver模块
sub vcl_deliver {
if (obj.hits > 0) {
	set resp.http.X-Cache = "HIT from westos cache,从缓存中取";
}
	else {
	set resp.http.X-Cache = "MISS from westos cache,缓存中没有此资源";
}
	return (deliver);
}
- 1
- 2
- 3
- 4
- 5
- 6
- 7
- 8
- 9
15、 systemctl restart varnish 重启varnish服务


16、手动清除缓存
varnishadm ban req.url “~” / 清除所有缓存
varnishadm ban req.url “~” /index.html 仅清除index.html页面缓存
- curl -I 172.25.70.1/index.html 和curl -I 172.25.70.1 这两个命令所构建的http请求报文是不一样的

17、在**真机上**
curl -I 172.25.70.1 - X-Cache是varnish(squid)代理的自定义header,用来记录缓存的命中与否!

curl -I 172.25.70.1/index.html (未清除全部缓存)

搭建具有多个web后端服务器的varnish服务系统
1、在 server3(ip:172.25.70.3) 上,安装httpd服务,且编辑默认发布页面:
server3 bbs.ranran.org
- 1


2、在 server2(ip:172.25.70.2) 上,编辑默认发布页面:
server2 www.ranran.org
- 1
3、在 server1(ip:172.25.70.1)—varnish服务器 上,编辑 varnish核心配置文件/etc/varnish/default.vcl
在请求模块中,
加入两个后端的信息:
backend web1 {
  .host = "172.25.70.2";
  .port = "80";
}
backend web2 {
  .host = "172.25.70.3";
  .port = "80";
}
加入两个后端资源服务器域名:
if (req.http.host ~ "^(www.)?ranran.org") {
      set req.http.host = "www.ranran.org";
      set req.backend_hint = web1;
} elsif (req.http.host ~ "^bbs.ranran.org") {
      set req.backend_hint = web2;
   } else {
	return (synth(405));
 }
- 1
- 2
- 3
- 4
- 5
- 6
- 7
- 8
- 9
- 10
- 11
- 12
- 13
- 14
- 15
- 16
- 17
- 18
- 19
- 20

4、重启服务:systemctl restart varnish

5、在 真机 写入本地解析/etc/hosts:
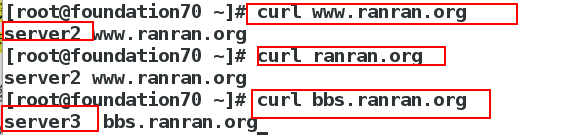
6、在 真机 测试:curl www.ranran.org拿到的是web1的资源、curl bbs.ranran.org拿到的是web2的资源
实现了最基本的具有两台后端,但是两台后端之间没有任何关系