涉及到多线程的使用,总会绕不开一个概念——线程池,关于线程的原理及原始代码实现,这里不讲,网上有很多相关的博客,这里直接来介绍一下在SpringBoot中使用线程池来进行多线程的管理。
1、核心参数介绍
1、CorePoolSize:核心线程数,核心线程会一直存活,即使没有任务需要执行
2、MaxPoolSize:线程池中的最大线程数
3、QueueCapacity:阻塞队列的容量,用来存储等待执行的任务
4、KeepAliveSeconds:线程空闲时间
	//当线程空闲时间达到keepAliveTime时,线程会退出,直到线程数量=corePoolSize
	//如果allowCoreThreadTimeout=true,则会直到线程数量=0
5、RejectedExecutionHandler:拒绝策略
	// 当线程数达到MaxPoolSize时,且队列也慢,则会启用拒绝策略,拒绝的方式有五种:
	/*
	AbortPolicy 丢弃任务,抛运行时异常(默认的方式)
	CallerRunsPolicy 执行任务
	DiscardPolicy 忽视,什么都不会发生(常用方式)
	DiscardOldestPolicy 从队列中踢出最先进入队列(最后一个执行)的任务
	实现RejectedExecutionHandler接口,可自定义处理器
	*/
2、线程池的执行过程
内容来源于博文Java线程池的使用
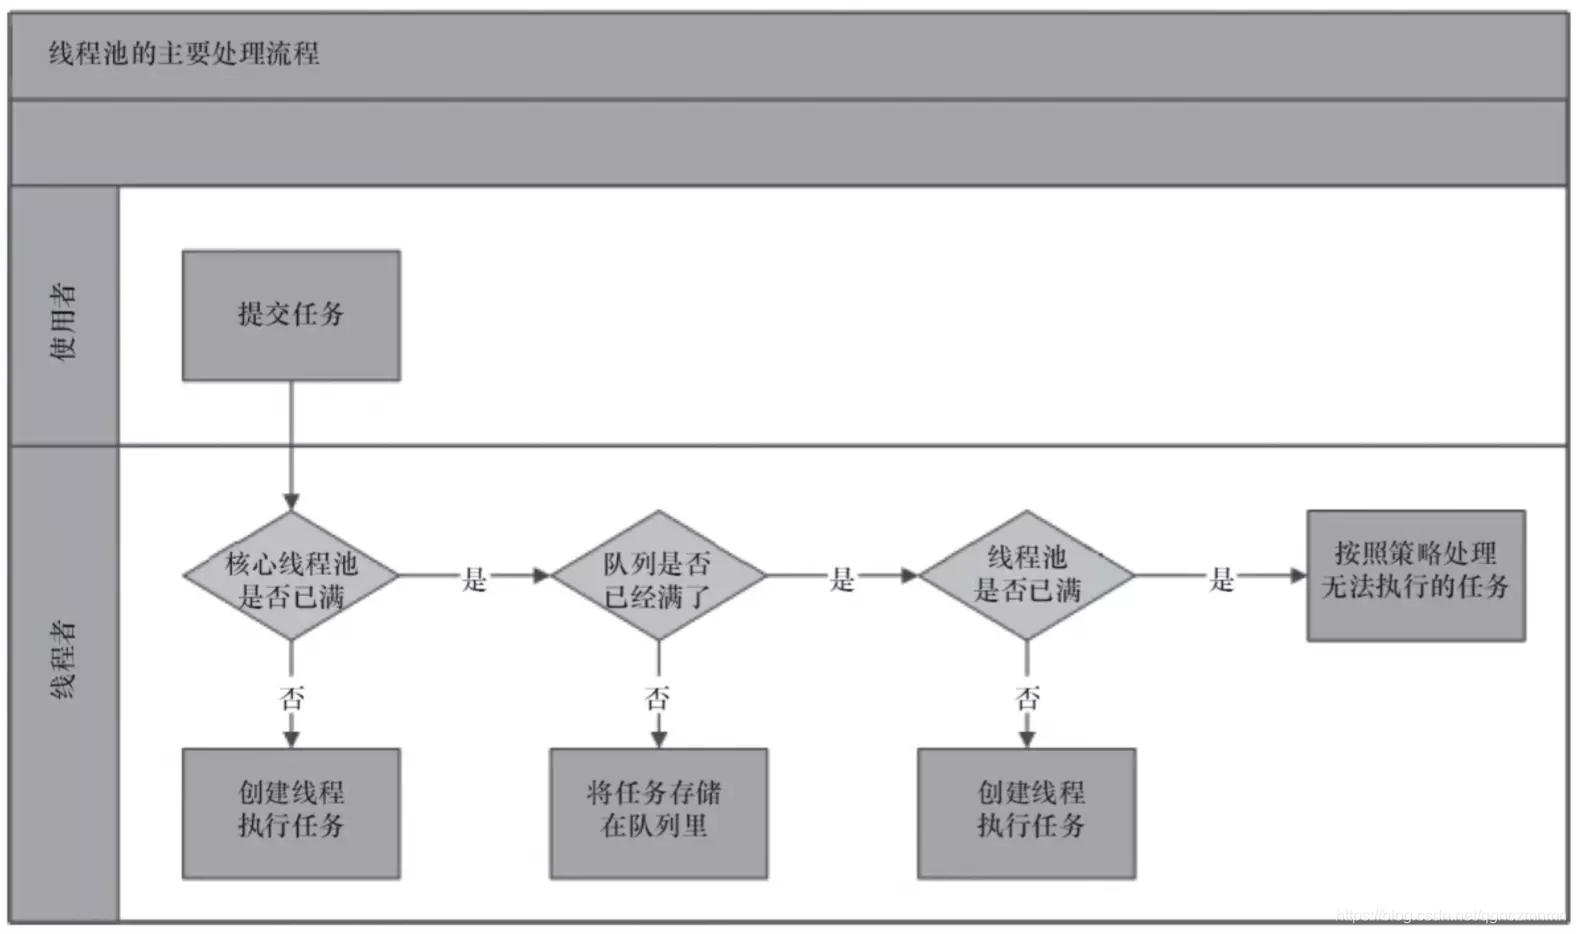
1、判断核心线程池是否已满,如果不是,则创建线程执行任务
2、如果核心线程池满了,判断队列是否满了,如果队列没满,将任务放在队列中
3、如果队列满了,则判断线程池是否已满,如果没满,创建线程执行任务
4、如果线程池也满了,则按照拒绝策略对任务进行处理
3、简单的实现
在SpringBoot中使用注解的方式来生成线程池,从而实现线程的管理,在SpringBoot中使用线程池只需配置一个java.util.concurrent.Executor的Bean,线程池配置类如下:
@Configuration
@EnableAsync  // 开启多线程
public class ExecutorConfig {

	@Bean
	public Executor createExecutor() {
		ThreadPoolTaskExecutor executor = new ThreadPoolTaskExecutor();
		executor.setCorePoolSize(2); // 设置线程池初始化线程数量
		executor.setMaxPoolSize(5); // 设置线程池最大线程数量
		executor.setQueueCapacity(10);// 设置缓冲队列的大小
		executor.setKeepAliveSeconds(200);// 线程的允许空闲时间(单位:s)
		executor.setThreadNamePrefix("Async-Service-"); // 线程名称前缀
		executor.setRejectedExecutionHandler(new ThreadPoolExecutor.DiscardPolicy()); // 设置线程拒绝策略
		executor.initialize();
		return executor;
	}
}
然后是使用:
@Component
public class SubThreads {
	Logger log = LoggerFactory.getLogger(SubThreads.class);

	@PostConstruct // 加上该注解项目启动时就执行一次该方法
	@Async
	public void sendMessage1() throws InterruptedException {
		log.info("发送短信方法---- 1   执行开始");
		Thread.sleep(5000);
		log.info("发送短信方法---- 1   执行结束");
	}

	@PostConstruct // 加上该注解项目启动时就执行一次该方法
	@Async
	public void sendMessage2() throws InterruptedException {

		log.info("发送短信方法---- 2   执行开始");
		Thread.sleep(2000);
		log.info("发送短信方法---- 2   执行结束");
	}

}
测试程序:
@RestController
public class TestController {
	@Autowired
	private SubThreads subThreads;

	@RequestMapping("/thread")
	public void testThread() throws InterruptedException {
		subThreads.sendMessage1();
		subThreads.sendMessage2();
	}
}
最后启动服务,在浏览器中访问,查看输出日志:
  .   ____          _            __ _ _
 /\\ / ___'_ __ _ _(_)_ __  __ _ \ \ \ \
( ( )\___ | '_ | '_| | '_ \/ _` | \ \ \ \
 \\/  ___)| |_)| | | | | || (_| |  ) ) ) )
  '  |____| .__|_| |_|_| |_\__, | / / / /
 =========|_|==============|___/=/_/_/_/
 :: Spring Boot ::        (v2.2.2.RELEASE)

2019-12-16 13:29:56.398  INFO 20464 --- [  restartedMain] com.learn.Application                    : Starting Application on CNBJDRCNB019 with PID 20464 (D:\SDK\workspaces\cradle\learn-springboot-threadpool\target\classes started by Yinghao.Chen in D:\SDK\workspaces\cradle\learn-springboot-threadpool)
2019-12-16 13:29:56.402  INFO 20464 --- [  restartedMain] com.learn.Application                    : No active profile set, falling back to default profiles: default
2019-12-16 13:29:56.479  INFO 20464 --- [  restartedMain] .e.DevToolsPropertyDefaultsPostProcessor : Devtools property defaults active! Set 'spring.devtools.add-properties' to 'false' to disable
2019-12-16 13:29:56.481  INFO 20464 --- [  restartedMain] .e.DevToolsPropertyDefaultsPostProcessor : For additional web related logging consider setting the 'logging.level.web' property to 'DEBUG'
2019-12-16 13:29:57.913  INFO 20464 --- [  restartedMain] o.s.b.w.embedded.tomcat.TomcatWebServer  : Tomcat initialized with port(s): 8885 (http)
2019-12-16 13:29:57.927  INFO 20464 --- [  restartedMain] o.apache.catalina.core.StandardService   : Starting service [Tomcat]
2019-12-16 13:29:57.927  INFO 20464 --- [  restartedMain] org.apache.catalina.core.StandardEngine  : Starting Servlet engine: [Apache Tomcat/9.0.29]
2019-12-16 13:29:58.165  INFO 20464 --- [  restartedMain] o.a.c.c.C.[Tomcat].[localhost].[/]       : Initializing Spring embedded WebApplicationContext
2019-12-16 13:29:58.165  INFO 20464 --- [  restartedMain] o.s.web.context.ContextLoader            : Root WebApplicationContext: initialization completed in 1683 ms
2019-12-16 13:29:58.236  INFO 20464 --- [  restartedMain] com.learn.subthreads.SubThreads          : 发送短信方法---- 1   执行开始
2019-12-16 13:30:03.237  INFO 20464 --- [  restartedMain] com.learn.subthreads.SubThreads          : 发送短信方法---- 1   执行结束
2019-12-16 13:30:03.237  INFO 20464 --- [  restartedMain] com.learn.subthreads.SubThreads          : 发送短信方法---- 2   执行开始
2019-12-16 13:30:05.238  INFO 20464 --- [  restartedMain] com.learn.subthreads.SubThreads          : 发送短信方法---- 2   执行结束
2019-12-16 13:30:05.270  INFO 20464 --- [  restartedMain] o.s.s.concurrent.ThreadPoolTaskExecutor  : Initializing ExecutorService
2019-12-16 13:30:05.272  INFO 20464 --- [  restartedMain] o.s.s.concurrent.ThreadPoolTaskExecutor  : Initializing ExecutorService 'createExecutor'
2019-12-16 13:30:05.691  INFO 20464 --- [  restartedMain] o.s.b.d.a.OptionalLiveReloadServer       : LiveReload server is running on port 35729
2019-12-16 13:30:05.776  INFO 20464 --- [  restartedMain] o.s.b.w.embedded.tomcat.TomcatWebServer  : Tomcat started on port(s): 8885 (http) with context path ''
2019-12-16 13:30:05.781  INFO 20464 --- [  restartedMain] com.learn.Application                    : Started Application in 9.94 seconds (JVM running for 12.883)
2019-12-16 13:30:35.810  INFO 20464 --- [nio-8885-exec-1] o.a.c.c.C.[Tomcat].[localhost].[/]       : Initializing Spring DispatcherServlet 'dispatcherServlet'
2019-12-16 13:30:35.810  INFO 20464 --- [nio-8885-exec-1] o.s.web.servlet.DispatcherServlet        : Initializing Servlet 'dispatcherServlet'
2019-12-16 13:30:35.819  INFO 20464 --- [nio-8885-exec-1] o.s.web.servlet.DispatcherServlet        : Completed initialization in 9 ms
2019-12-16 13:30:35.874  INFO 20464 --- [Async-Service-1] com.learn.subthreads.SubThreads          : 发送短信方法---- 1   执行开始
2019-12-16 13:30:35.874  INFO 20464 --- [Async-Service-2] com.learn.subthreads.SubThreads          : 发送短信方法---- 2   执行开始
2019-12-16 13:30:37.876  INFO 20464 --- [Async-Service-2] com.learn.subthreads.SubThreads          : 发送短信方法---- 2   执行结束
2019-12-16 13:30:40.875  INFO 20464 --- [Async-Service-1] com.learn.subthreads.SubThreads          : 发送短信方法---- 1   执行结束
通过线程名字可以看出,配置的线程池已经起了作用。
