一、简介
Logger,顾名思义,肯定是和日志有关。作者本人用三个词概括了这个Android开源日志库的优点:Simple(简单)、Pretty (漂亮)、Powerful(强大)。
二、使用
2.1 依赖注入
implementation 'com.orhanobut:logger:2.2.0'2.2 初始化
在Application或者activity中添加如下代码:
//简单初始化
Logger.addLogAdapter(new AndroidLogAdapter());


//修改打印基本配置
FormatStrategy formatStrategy = PrettyFormatStrategy.newBuilder()
        .showThreadInfo(false)      //(可选)是否显示线程信息。 默认值为true
        .methodCount(2)               // (可选)要显示的方法行数。 默认2
        .methodOffset(7)               // (可选)设置调用堆栈的函数偏移值,0的话则从打印该Log的函数开始输出堆栈信息,默认是0
      //.logStrategy("")  //(可选)更改要打印的日志策略。 默认LogCat
        .tag("——TAG——")                  //(可选)每个日志的全局标记。 默认PRETTY_LOGGER(如上图)
        .build();
Logger.addLogAdapter(new AndroidLogAdapter(formatStrategy));


//保存log日志到文件中去,只需要换一个适配器即可,当然读写权限还是要申请的
Logger.addLogAdapter(new DiskLogAdapter());


//控制打印开关
//当isLoggable return BuildConfig.DEBUG 就不会打印日志了,很好的控制了日志的打印
Logger.addLogAdapter(new AndroidLogAdapter(){
    @Override
    public boolean isLoggable(int priority, @Nullable String tag) {
        return BuildConfig.DEBUG;
    }
});
接下来只需要在需要打印的地方调用Logger的对应打印方法即可。
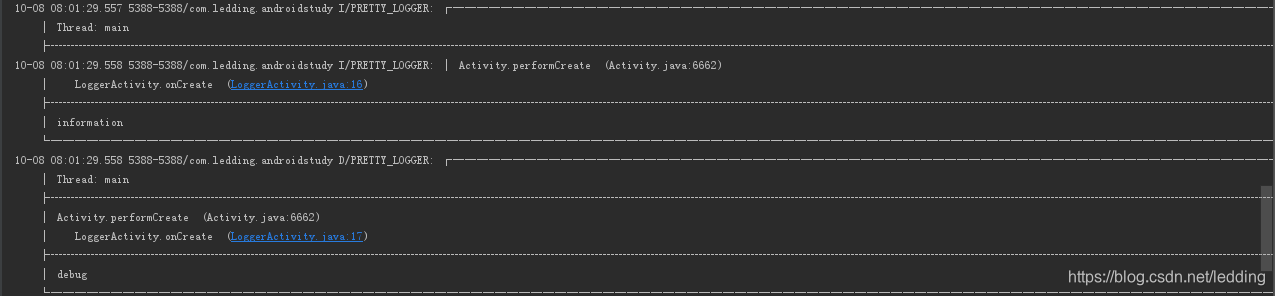
        Logger.i("information");
        Logger.d("debug");
        Logger.v("verbose");
        Logger.e("error");
        Logger.w("warning");
        Logger.wtf("What a Terrible Failure");
        Logger.json("json");
        Logger.xml("xml");
运行一下项目,日志内容就会打印出来。然后~就没有然后了
 Logger除了能打印基本的数据类型之外还对其他数据类型打印进行了格式优化,包括Format类型、List,Map,Set等集合类型、Json数据、XML数据。
三、分析
1.初始化
又到了‘扒别人衣服’的时候了,咱们还是从初始化看起,首先调用了Logger的静态方法addLogAdapter,这个方法又是直接调用LoggerPrinter的addAdapter方法,只是对参数LogAdapter做了个空指针检测并抛出异常。
public final class Logger {

  ...

  @NonNull private static Printer printer = new LoggerPrinter();

  private Logger() {
    //no instance
  }

  public static void printer(@NonNull Printer printer) {
    Logger.printer = checkNotNull(printer);
  }

  public static void addLogAdapter(@NonNull LogAdapter adapter) {
    printer.addAdapter(checkNotNull(adapter));
  }

  ...
}
LoggerPrinter中的addAdapter则是将LogAdapter适配器存储到集合中,同理clearLogAdapters就是清空这个适配器的集合了。
  @Override public void clearLogAdapters() {
    logAdapters.clear();
  }

  @Override public void addAdapter(@NonNull LogAdapter adapter) {
    logAdapters.add(checkNotNull(adapter));
  }
至此,初始化就结束了,那么这个LogAdapter又起到了什么作用呢,前面我们介绍了初始化的时候传入实现了LogAdapter接口的对象,比如AndroidLogAdapter。而该对象又持有一个FormatStrategy。所有的打印样式就是在FormatStrategy的具体对象中实现的。
public class AndroidLogAdapter implements LogAdapter {

  @NonNull private final FormatStrategy formatStrategy;

  public AndroidLogAdapter() {
    this.formatStrategy = PrettyFormatStrategy.newBuilder().build();
  }

  public AndroidLogAdapter(@NonNull FormatStrategy formatStrategy) {
    this.formatStrategy = checkNotNull(formatStrategy);
  }

  @Override public boolean isLoggable(int priority, @Nullable String tag) {
    return true;
  }

  @Override public void log(int priority, @Nullable String tag, @NonNull String message) {
    formatStrategy.log(priority, tag, message);
  }

}
2.打印
打印各级别各类型日志都是调用LoggerPrinter具体实现的方法。而这些方法最终都走了LoggerPrinter的log方法,我们具体看下log的过程。
  private synchronized void log(int priority,
                                @Nullable Throwable throwable,
                                @NonNull String msg,
                                @Nullable Object... args) {
    checkNotNull(msg);

    String tag = getTag();
    String message = createMessage(msg, args);
    log(priority, tag, message, throwable);
  }

  @NonNull private String createMessage(@NonNull String message, @Nullable Object... args)
  {
    return args == null || args.length == 0 ? message : String.format(message, args);
  }
首先使用synchronized同步锁对打印方法进行锁定,避免打印时串行显示,打印格式错乱。然后检测msg是否为空,再调用createMessage方法根据args拍段msg是否是Format类型,如果是则format处理,最后调用重载的log方法。
@Override public synchronized void log(int priority,
                                         @Nullable String tag,
                                         @Nullable String message,
                                         @Nullable Throwable throwable) {
    if (throwable != null && message != null) {
      message += " : " + Utils.getStackTraceString(throwable);
    }
    if (throwable != null && message == null) {
      message = Utils.getStackTraceString(throwable);
    }
    if (Utils.isEmpty(message)) {
      message = "Empty/NULL log message";
    }

    for (LogAdapter adapter : logAdapters) {
      if (adapter.isLoggable(priority, tag)) {
        adapter.log(priority, tag, message);
      }
    }
  }
log方法里就是处理异常,最后获取集合内所有的LogAdapter,并根据isLoggable方法(这个前面控制打印开关讲过)判断是否打印,然后分别调用LogAdapter的log方法的具体实现。我们这里还是看AndroidLogAdapter的log实现。
  @Override public void log(int priority, @Nullable String tag, @NonNull String message) {
    formatStrategy.log(priority, tag, message);
  }
前面分析初始化时我们说到了AndroidLogAdapter持有的FormatStrategy对象,这里打印用到了该对象的log方法,继续往下看。
  @Override public void log(int priority, @Nullable String onceOnlyTag, @NonNull String message) {
    checkNotNull(message);

    String tag = formatTag(onceOnlyTag);

    //打印顶部边框
    logTopBorder(priority, tag);
    //打印头部内容
    logHeaderContent(priority, tag, methodCount);

    //这里获取消息长度,并判断时候超过ANDROID限制的日志输出长度4076个字符
    //get bytes of message with system's default charset (which is UTF-8 for Android)
    byte[] bytes = message.getBytes();
    int length = bytes.length;
    if (length <= CHUNK_SIZE) {
      if (methodCount > 0) {
        logDivider(priority, tag);
      }
      //打印消息内容
      logContent(priority, tag, message);
      //打印底边
      logBottomBorder(priority, tag);
      return;
    }
    //如果消息长度大于4076个字符,则分多次打印
    if (methodCount > 0) {
      logDivider(priority, tag);
    }
    for (int i = 0; i < length; i += CHUNK_SIZE) {
      int count = Math.min(length - i, CHUNK_SIZE);
      //create a new String with system's default charset (which is UTF-8 for Android)
      logContent(priority, tag, new String(bytes, i, count));
    }
    //打印底边
    logBottomBorder(priority, tag);
  }
log打印的具体步骤我写了注释,至此整个打印过程结束。
