分布式全链路追踪 SkyWalking安装以及JavaAgent部署
一、安装环境
- 基础操作系统 CentOS 7
- SkyWalking:SkyWalking6.6.0
- 要求JDK1.8+:
- Apache-Tomacat 7.x
ElasticSearch
In order to activate ElasticSearch 6 as storage, set storage provider to elasticsearch
In order to activate ElasticSearch 7 as storage, set storage provider to elasticsearch7
Required ElasticSearch 6.3.2 or higher. HTTP RestHighLevelClient is used to connect server.
For ElasticSearch 6.3.2 ~ 7.0.0 (excluded), please download the apache-skywalking-bin.tar.gz or apache-skywalking-bin.zip,
For ElasticSearch 7.0.0 ~ 8.0.0 (excluded), please download the apache-skywalking-bin-es7.tar.gz or apache-skywalking-bin-es7.zip.
二、安装SkyWalking
-
解压安装包
[root@example apache-skywalking-apm-bin]# tar -xvf apache-skywalking-apm-6.6.0.tar.gz -C /opt/ -
配置UI端口
2.1 主要目录介绍:

2.3. config:配置文件,主要修改application.yml里的agent采集的信息要存存储到哪里,默认H2,现改为ES。修改namespace为ES集群名,clusterNodes为ES集群各节点URL即可,其他暂时默认即可。# segmentQueryMaxSize: ${SW_STORAGE_ES_QUERY_SEGMENT_SIZE:200} h2: driver: ${SW_STORAGE_H2_DRIVER:org.h2.jdbcx.JdbcDataSource} url: ${SW_STORAGE_H2_URL:jdbc:h2:mem:skywalking-oap-db} user: ${SW_STORAGE_H2_USER:sa} metadataQueryMaxSize: ${SW_STORAGE_H2_QUERY_MAX_SIZE:5000}2.4. webapp:将ES里的数据展示出来的UI项目基本配置,修改一下webapp.yml的server.port端口,默认8080
2.5. bin启动脚本,startup.sh同时启动oap(主要是将探针采集的数据上传到ES)和webapp(相当于zipkin-ui)两个服务,也可单独启动。.bat为windows 启动脚本;.sh为Linux 启动脚本;[root@example apache-skywalking-apm-bin]# ll bin total 40 -rwxr-xr-x. 1 nginx 1002 1352 Dec 24 01:10 oapService.bat -rwxr-xr-x. 1 nginx 1002 1364 Dec 24 01:10 oapServiceInit.bat -rwxr-xr-x. 1 nginx 1002 1597 Dec 24 01:10 oapServiceInit.sh -rwxr-xr-x. 1 nginx 1002 1367 Dec 24 01:10 oapServiceNoInit.bat -rwxr-xr-x. 1 nginx 1002 1616 Dec 24 01:10 oapServiceNoInit.sh -rwxr-xr-x. 1 nginx 1002 1599 Dec 24 01:10 oapService.sh # oapService 服务启动脚本 -rwxr-xr-x. 1 nginx 1002 941 Dec 24 01:10 startup.bat -rwxr-xr-x. 1 nginx 1002 934 Dec 24 01:10 startup.sh #启动oap 和UI 服务 -rwxr-xr-x. 1 nginx 1002 1426 Dec 24 01:10 webappService.bat -rwxr-xr-x. 1 nginx 1002 1630 Dec 24 01:10 webappService.sh # Web UI 启动脚本 -
默认使用H2存储,启动SkyWalking的UI控制台,出现下图则证明启动成功。
[root@example apache-skywalking-apm-bin]# bin/startup.sh SkyWalking OAP started successfully! SkyWalking Web Application started successfully! -
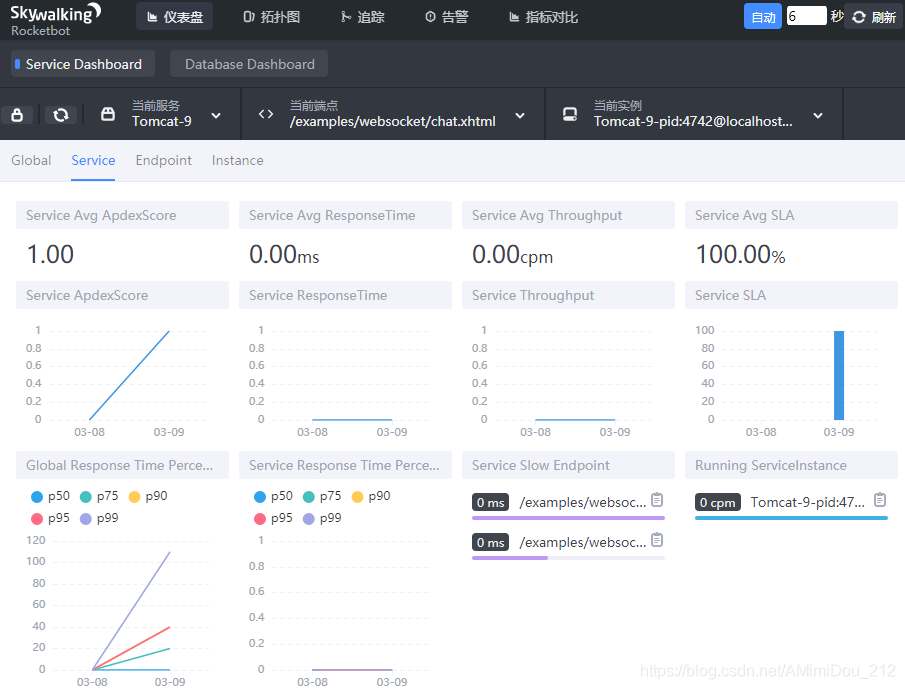
通过Web UI 检测链路:
-
配置后端存储
三、部署JavaAgent
部署JavaAgent 探针流程:
- Agent is available for
JDK 1.6 - 12. # Agent 用于JDK1.6-12 - Find
agent folderin SkyWalking release package # 在SkyWalking 目录下找到agent目录 - Set
agent.service_nameinconfig/agent.config. Could be any String in English. # 在config/agent.config修改agent.service_name名称,显示在UI控制台的名称 - Set
collector.backend_serviceinconfig/agent.config. Default point to127.0.0.1:11800, only works for local backend.# 设置后端Service 采集器collector.backend_service,127.0.0.1:8080仅用于本地后端收集器。 - Add
-javaagent:/path/to/skywalking-package/agent/skywalking-agent.jarto JVM argument. And make sure to add it before the-jarargument. # 添加-javaagent:/path/to/skywalking-package/agent/skywalking-agent.jar到JVM参数之前,确保在 -jar之前。 - Start your application.# 启动你的应用。
The agent release dist is included in Apache official release. New agent package looks like this.
新版Agent 包如下:
+-- agent
    +-- activations
         apm-toolkit-log4j-1.x-activation.jar
         apm-toolkit-log4j-2.x-activation.jar
         apm-toolkit-logback-1.x-activation.jar
         ...
    +-- config
         agent.config
    +-- plugins
         apm-dubbo-plugin.jar
         apm-feign-default-http-9.x.jar
         apm-httpClient-4.x-plugin.jar
         .....
    +-- optional-plugins
         apm-gson-2.x-plugin.jar
         .....
    +-- bootstrap-plugins
         jdk-http-plugin.jar
         .....
    +-- logs
    skywalking-agent.jar
高级功能:
- The default logging output folder is /logs.#默认日志输出到 logs 目录下。
- All plugins are in /plugins folder. The plugin jar is active when it is in there. Remove the plugin jar, it disabled.# 所有支持的插件都存在
agent/plugins目录下,在这个目录下移除插件jar包,这个插件将被禁用。(支持可插拔)
四、案例:在Tomcat 上部署javaAgent。
-
上传Agent目录到指定的Tomcat 器
[root@localhost opt]# ll total 20248 drwxrwxr-x. 8 mysql 1002 143 Mar 8 22:01 agent -
配置Agent配置文件,conf/agent.conf 设置
agent.service_name、collector.backend_service;[root@localhost opt]# vim /opt/agent/config/agent.config # The service name in UI agent.service_name=${SW_AGENT_NAME:Tomcat-9} # Backend service addresses. #你的远程SkyWalking 服务器 collector.backend_service=${SW_AGENT_COLLECTOR_BACKEND_SERVICES:192.168.2.103:11800} -
启动Tomcat服务。

在远程SkyWalking 服务器通过端口查看:[root@example ~]# netstat -natpl| grep java tcp6 0 0 192.168.2.106:11800 192.168.2.115:42108 ESTABLISHED 4091/java注: 正常启动java应用,带上如下参数:
java -javaagent:/path/to/agent/skywalking-agent.jar $yourApp.jar
五、配置后端存储为ES
启动顺序: 先启动elasticsearch, 再启动skywalking, 最后启动加入探针的微服务程序。
