ES多集群间数据同步
1.引言
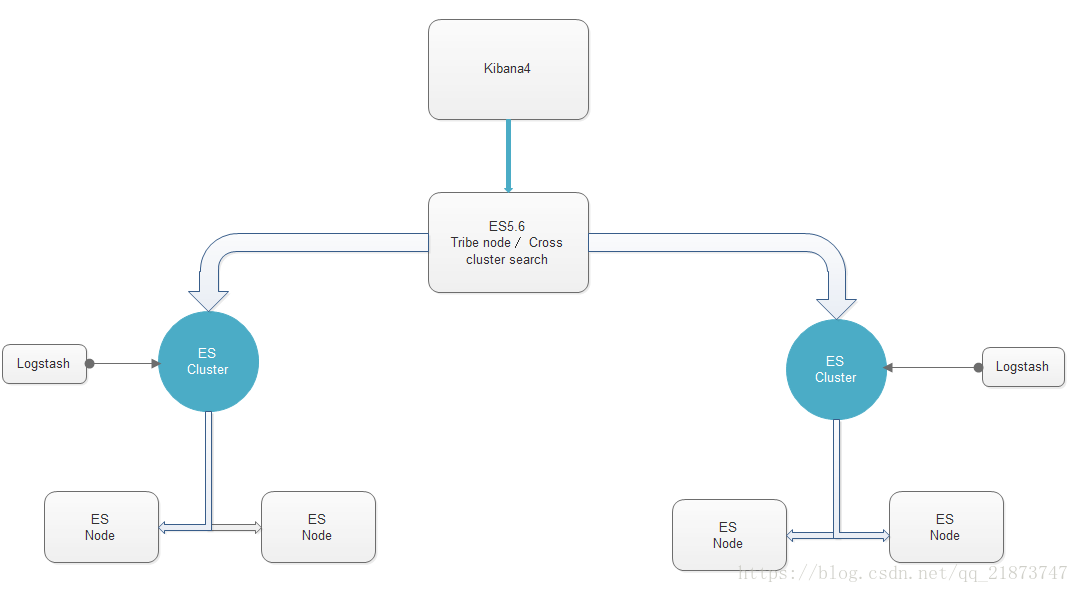
自己在google上搜了一下,自己大概总结了一下集群中某节点要访问远程集群节点中的数据,并保证数据的一致性和稳定性。举个例子,现有三个集群分别是:集群A、集群B和集群C,每个集群对应的有三个节点,一共是九个节点;集群A中的node1中的业务数据需要从集群C中node1中某索引中获取(意思是说:集群A需要的一部分数据被分割在其他两个集群中),这时就需要考虑同步远程集群数据啦啦啦啦。我这里用的是es5.6
2.正题
这里提供了两种方式,tribe节点(部落),Cross cluster search(跨集群搜索,稳定性待测),tribe有两个缺陷问题:如果集群数和节点数很多回导致瓶颈,多个集群下如果有相同索引index的话,他会在多集群中选择一个。而Cross cluster search恰好解决了tribe出现的问题。这两种方式主要都是通过配置文件来实现
3.自动发现机制
自动发现(Disovery)
该模块主要负责集群中节点的自动发现和Master节点的选举。节点之间使用p2p的方式进行直接通信,不存在单点故障的问题。Elasticsearch中,Master节点维护集群的全局状态,比如节点加入和离开时进行shard的重新分配。
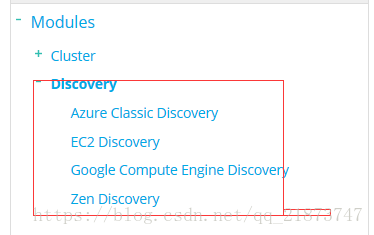
1. Azure discovery 插件方式,多播
扫描二维码关注公众号,回复:
9714382 查看本文章

2. EC2 discovery 插件方式,多播
3. Google Compute Engine (GCE)discovery 插件方式多播
4. zen discovery默认实现 多播/单播
多播配置下,节点向集群发送多播请求,其他节点收到请求后会做出响应。配置参数如下:
    discovery.zen.ping.multicast.group:224.2.2.4  组地址
    discovery.zen.ping.multicast.port:54328  端口
    discovery.zen.ping.multicast.ttl:3 广播消息ttl
    discovery.zen.ping.multicast.address:null绑定的地址,null表示绑定所有可用的网络接口
    discovery.zen.ping.multicast.enabled:true 多播自动发现禁用开关
单播配置下,节点向指定的主机发送单播请求,配置如下:
discovery.zen.ping.unicast.hosts:host1:port1,host2,:port2
3.tribe方式
当我们的数据节点因为写入压力过大时, 可能会使节点之间的心跳通信超过这个时间, 那么可能会引起重新选举master的可能. 这次将新增三个实例分布到这三台服务器上, 做master节点.下面是master节点的主要配置:
cluster.name: eagleye_es node.name: "eagleye_es_xx_master"
node.master: true node.data: false #ping 其它节点的超时时间
discovery.zen.ping_timeout: 30s
#心跳timeout设为2分钟,超过6次心跳没有回应,则认为该节点脱离master,每隔20s发送一次心跳。
discovery.zen.fd.ping_timeout: 120s
discovery.zen.fd.ping_retries: 6
.zen.fd.ping_interval: 20s
#要选出可用master, 最少需要几个master节点
discovery.zen.minimum_master_nodes: 2
path.logs: /var/log/es_master
#不使用交换区
bootstrap.mlockall: true
transport.tcp.port: 8309
transport.tcp.compress: true
http.port: 8209
tribe:
  t1:
    cluster.name:   cluster_one
  t2:
    cluster.name:   cluster_two
    network.host:   10.1.2.3
tribe:
  hot:
   cluster.name: eagleye_es
 blocks:
  write: true
metadata: true
on_conflict: prefer_hot


threadpool:
    search:
      tyep: fixed
      size: 24
#用来保存请求的队列
      queue_size: 100
这里的on_conflict设置,当多个集群内,索引名称有冲突的时候,tribe节点默认会把请求轮询转发到各个集群上,这显然是不可以的。索引设置了一个优先级,在索引名冲突的时候,偏向于转发给某一个集群。
最后我们在查询程序中, 就不能指定集群的名字了, 而是直接通过tribe节点进行检索,如下:

4.Cross cluster search方式
elasticsearch。跨集群搜索节点的yml配置文件只需要列出应该连接到的远程集群,例如:
search:
    remote:
        cluster_one:
            seeds: 127.0.0.1:9300
        cluster_two:
            seeds: 127.0.0.1:9301
cluster_one和cluster_two是表示连接到每个集群的任意集群别名。这些名称随后用于区分本地索引和远程索引。
使用集群设置API为集群中的所有节点添加远程集群的等效示例如下:
PUT _cluster/settings
{
  "persistent": {
    "search": {
      "remote": {
        "cluster_one": {
          "seeds": [
            "127.0.0.1:9300"
          ]
        },
        "cluster_two": {
          "seeds": [
            "127.0.0.1:9301"
          ]
        }
      }
    }
  }
}
通过将其种子设置为null,可以从集群设置中删除远程集群:
PUT _cluster/settings
{
  "persistent": {
    "search": {
      "remote": {
        "cluster_one": {
          "seeds": null
        }
      }
    }
  }
}
要在远程集群cluster_1上搜索twitter索引,必须使用由:字符分隔的群集别名来前缀索引名称:
POST /cluster_one:twitter,twitter/tweet/_search
{
  "query": {
    "match_all": {}
  }
}
二.最终采用的方式ReIndex
重新入库 Reindex
POST _reindex{
"conflicts": "proceed",//有冲突继续,默认是有冲突终止
"size":1000,//设定条数
"source": { "index": "twitter" //
也可以为 ["twitter", "blog"]
"type": "tweet", // 或["type1","type2"] //红字限制范围 ,非必须 限制文档
"query": { "term": { "user": "kimchy" } },//添加查询来限制文档
"sort": { "date": "desc" } //排序
"_source": ["user", "tweet"],//指定字段
"size": 100,//滚动批次1000更改批处理大小:
}, "dest": { "index": "new_twitter"
"op_type": "create"
//设置将导致_reindex只在目标索引中创建丢失的文档,
create
只插入没有的数据
"
version_type": "external",//
没有设置 version_type或设置为internal 将覆盖掉相同id的数据,设置为
external 将更新相同ID文档当version比较后的时候
"routing": "=cat" ,//将路由设置为cat
"pipeline": "some_ingest_pipeline",//指定管道来使用Ingest节点特性
},
"script": { // 执行脚本
"source": "if (ctx._source.foo == 'bar') {ctx._version++; ctx._source.remove('foo')} ",
"lang": "painless"
}
}
Reindex支持从远程的弹性搜索集群中进行索引:
远程拷贝:
需要配置目标es 白名单 :reindex.remote.whitelist: ["10.10.10.130:8400"]
从远程服务器上的转换使用的是on-heap缓冲区,默认值为100mb的最大大小。如果远程索引包含非常大的文档,则需要使用较小的批处理大小。下面的示例设置了非常非常小的批处理大小10。
POST _reindex{ "source": {
"remote": { "host": "http://otherhost:9200", "username": "user", "password": "pass",
"socket_timeout": "1m", //设定超时时间,默认为30秒 "connect_timeout": "10s"//连接超时设置为10秒 }, "index": "source",
"size": 10, "query": { "match": { "test": "data" } } }, "dest": { "index": "dest" }}
URL参数
Reindex API还支持刷新、wait_for_completion、wait_for_active_shards、timeout和requests_per_second。
Response body
The JSON response looks like this:
{ "took" : 639, //从开始到结束整个操作的毫秒数 "updated": 0,//成功更新的文档数。 "created": 123,//成功创建的文档数 "batches": 1,//滚动响应的数量被重新索引所拉回 "version_conflicts": 2,//重新索引命中的版本冲突的数量 "retries": { "bulk": 0,//重试的批量操作的数量 "search": 0 //批量是重试的批量操作的数量 } "throttled_millis": 0,//请求休眠的毫秒数,以符合requests_per_second "failures" : [ ]
//所有索引失败的数组。如果这不是空的,那么请求就会因为这些失败而中止
}
使用Task API获取所有运行的reindex请求的状态:
GET _tasks?detailed=true&actions=*reindex
根据id直接查找任务:
GET /_tasks/taskId:1
取消任务
POST _tasks/task_id:1/_cancel
更改requests_per_second参数的值:
POST _reindex/task_id:1/_rethrottle?requests_per_second=-1
例子:
在集群的es配置文件中配置好
reindex.remote.whitelist:(端口为http协议端口号)
_reindex' -H 'Content-Type:application/json' -d '
并行化执行reindex操作
1、手动并行化
如下是两个slices的手动并行化reindex:
POST _reindex
{
"source": {
"index": "my_index_name",
"slice": { // 第一slice执行操作
"id": 0,
"max": 2
}
},
"dest": {
"index": "my_index_name_new"
}
}
POST _reindex
{
"source": {
"index": "my_index_name",
"slice": { // 第二slice执行操作
"id": 1,
"max": 2
}
},
"dest": {
"index": "my_index_name_new"
}
}
可以通过以下命令查看执行的结果:
GET _refresh
POST my_index_name/_search?size=0&filter_path=hits.total
2、自动并行化
如下是自动划分的n个slices,只是将需要手动划分的过程自动化处理,将一个操作拆分为多个子操作并行化处理,其他查询方式等都一样
POST _reindex?slices=5&refresh
{
"source": {
"index": "my_index_name"
},
"dest": {
"index": "my_index_name_new"
}
}
3、slices数量设置要求
数量不能过大,比如500可能出现CPU问题;
查询性能角度看,设置slices为源索引的分片的倍数是比较合适的,一倍是最有效的;
索引性能角度看,应该随着可用资源的数量线性地扩展;
然而索引或查询性能是否在此过程中占据主导,取决于许多因素,比如重新索引的文档和重新索引的集群。
注意:remote reindex不能使用并行化处理,即不能使用slices参数,这一点官方文档上没有明确指出,但是在使用的时候会报错,去掉即可。
4. 数据量大、无删除操作、有更新时间
数据量较大且无删除操作时,可以使用滚动迁移的方式,减小停止写服务的时间。滚动迁移需要有一个类似于更新时间的字段代表新数据的写时序。可以在数据迁移完成后,再停止写服务,快速更新一次。即可切换到新集群,恢复读写。
{
"source": {
"remote": {
"host": "'${oldClusterHost}'",
"username": "'${oldClusterUser}'",
"password": "'${oldClusterPass}'"
},
"index": "'${indexName}'",
"query": {
"bool": {
"must_not": {
"exists": {
"field": "'${timeField}'"
}
}
}
}
},
"dest": {
"index": "'${indexName}'"
}
}
使用java的reindex API每天将增量数据同步到dev等集群环境中
<dependency>
<span style="white-space:pre;"> </span><groupId>org.elasticsearch.module</groupId>
<artifactId>reindex</artifactId>
<version>2.4.6</version>
</dependency>
由于在项目中使用了es的date字段,所以只需要每天安装开始和结束时间获取数据并进行remote reindex即可:
/**
* 根据每天的开始和结束时间同步增量数据
* 时间格式为"yyyy-MM-dd'T'HH:mm:ss.SSS'Z'"
* @param start 开始时间
* @param end 结束时间
*/
private void reindexGeleevrFromProToDevByDay(String start, String end) {
StringBuilder queryString = new StringBuilder(512);
queryString.append("{")
.append("\"range\" : {")
.append("\"orderTime\" : {")
.append("\"from\" : \"").append(start).append("\",")
.append("\"to\" : \"").append(end).append("\",")
.append("\"include_lower\" : true,")
.append("\"include_upper\" : true,")
.append("\"boost\" : 1.0")
.append("}")
.append("}")
.append("}");
RemoteInfo remoteInfo = getRemoteInfo(queryString.toString());
TransportClient client = ESClient.me();
builder = ReindexAction.INSTANCE.newRequestBuilder(client);
BulkByScrollResponse response = builder.source(ESConfig.COMPANY)
.setRemoteInfo(remoteInfo)
.destination(ESConfig.COMPANY)
.abortOnVersionConflict(true)
.get(/*TimeValue.timeValueHours(1)*/);
// builder.source().setScroll("20m").setRouting("candycane");
long updated = response.getUpdated();
int failed = response.getBulkFailures().size();
logger.info("reindex geleevr on {} updated = {} failed = {}" , date, updated, failed);
}
private static RemoteInfo getRemoteInfo() {
return new RemoteInfo("http", "192.168.10.20", 9200, new BytesArray("{\"match_all\":{}}"), null, null,
Collections.emptyMap(), RemoteInfo.DEFAULT_SOCKET_TIMEOUT, RemoteInfo.DEFAULT_CONNECT_TIMEOUT);
}
private static RemoteInfo getRemoteInfo(String query) {
return new RemoteInfo("http", "192.168.10.20", 9200, new BytesArray(query), null, null,
null, RemoteInfo.DEFAULT_SOCKET_TIMEOUT, RemoteInfo.DEFAULT_CONNECT_TIMEOUT);
}
参考:
点击打开链接https://www.elastic.co/guide/en/elasticsearch/reference/5.6/modules-cross-cluster-search.html#_using_cross_cluster_search
https://www.elastic.co/guide/en/elasticsearch/reference/5.6/modules-tribe.html
