写在开头
学习完了ES 6基础,推荐阅读:ECMAScript 6 全套学习目录 整理 完结
现在开始逐步深入Vue 技术栈,想了想,技术栈专栏的主要内容包括:
1、Vue源码分析
2、手把手教 保姆级 撸代码
3、无惧面试,学以致用,继承创新
4、谈谈前端发展与学习心得
5、手写源码技术栈,附上详细注释
6、从源码中学习设计模式,一举两得
7、编程思想的提升及代码质量的提高
8、通过分析源码学习架构,看看优秀的框架
9、项目实战开发
10、面试准备,完善个人简历
暂时想到的就这么多,把这列举的10点做好了,我觉得也OK了,欢迎一起学习,觉得不错的话,可以关注博主,专栏会不断更新,可以关注一下,传送门~
学习目录
为了方便自己查阅与最后整合,还是打算整个目录,关于Vue技术栈优秀的文章:
Vue 技术栈 教你玩"坏" v8引擎 吃透 js 内存回收机制
文章目录
正文
Vue路由的工作流程
前端路由和后端路由的区别
自从前后端分离后,说路由不再仅是说后端路由了,我们前端也有了路由。路由简单来说,就是分发请求,将对应的请求分发到应该到的位置。
后端路由-mvc的时代:
- 输入url -》 请求发送到服务器 -》 服务器请求解析的路径 -》 拿取对应页面 -》 返回出去
前端路由-spa应用:
- 输入url -》js解析地址 -》 找到对应地址的页面 -》 执行页面生成的js -》 生成页面
前端路由无需发送服务器,通过js进行解析,在浏览器上进行导向
vue-router 工作流程
vue插件
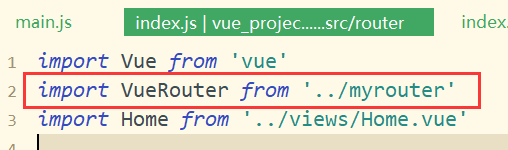
请读者阅读以下代码,这就是vue-router的默认配置,最终返回给vue的是一个new VueRouter,也就是说是一个对象,而这个对象里面就有我们之前图示流程的current变量。
import Vue from 'vue'
import VueRouter from 'vue-router'
import Home from '../views/Home.vue'

Vue.use(VueRouter)

const routes = [
  {
    path: '/',
    name: 'Home',
    component: Home
  },
  {
    path: '/about',
    name: 'About',
    // route level code-splitting
    // this generates a separate chunk (about.[hash].js) for this route
    // which is lazy-loaded when the route is visited.
    component: () => import(/* webpackChunkName: "about" */ '../views/About.vue')
  }
]

const router = new VueRouter({
  routes
})

export default router
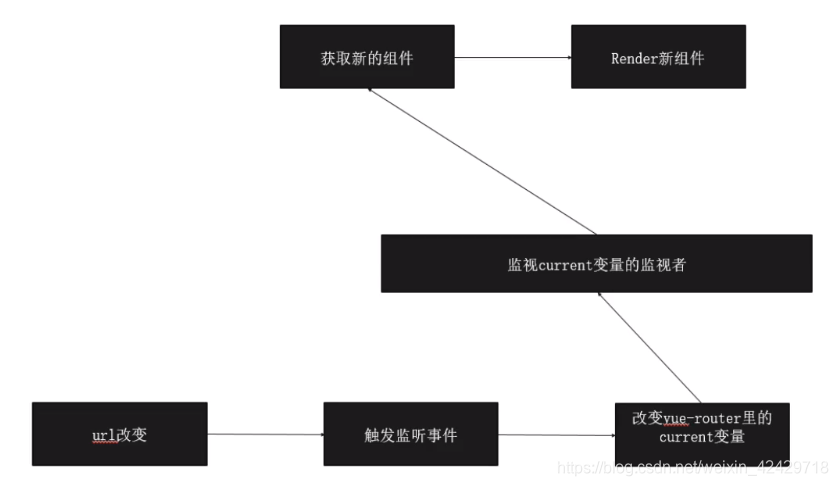
vue 与 vue-router工作过程
再次回到我们的vue路由的工作流程,最下面三个部分是由vue-router来实现的,而上面是vue来工作的,vue一直监视着current变量,而vue-router能改变current,一旦改变,就会触发监听事件,根据current来获取新的组件,然后vue去渲染新的组件,客户就能看到新的界面了。总的来说就是:(两个监听,一个渲染)
上述文字类的表述或许不能让你恍然大悟,接下来我们就化繁为简,将整个路由过程进行实现:
PS:但是在研究深入一点的知识前,为了照顾小白,还是从基础开始讲起,已经熟悉的读者可以选择性阅读。
hash 与 history
vue-router是怎么触发监听事件的呢?
其实就是用到了hash,这里对于前端来说就着重介绍hash了,history记得会有一定兼容性问题。
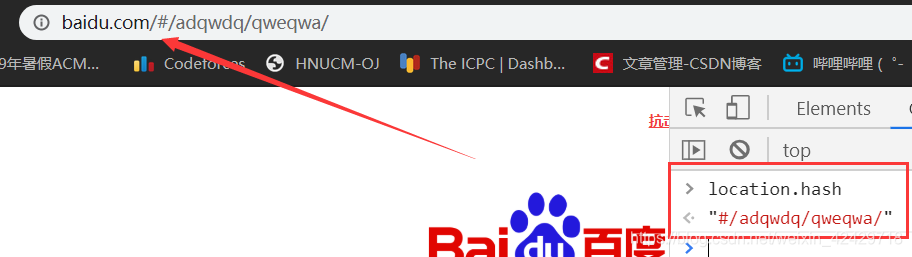
hash
1、#号后的就是hash的内容
2、可以通过location.hash拿到
3、可以通过onhashchange监听hash的改变
history
1、history即正常的路径
2、可以通过location.pathname拿到
3、可以通过onpopstate监听history的改变
对于hash,我们可以在控制台通过location.hash获取值(如果没有#就获得空字符串),如下所示:
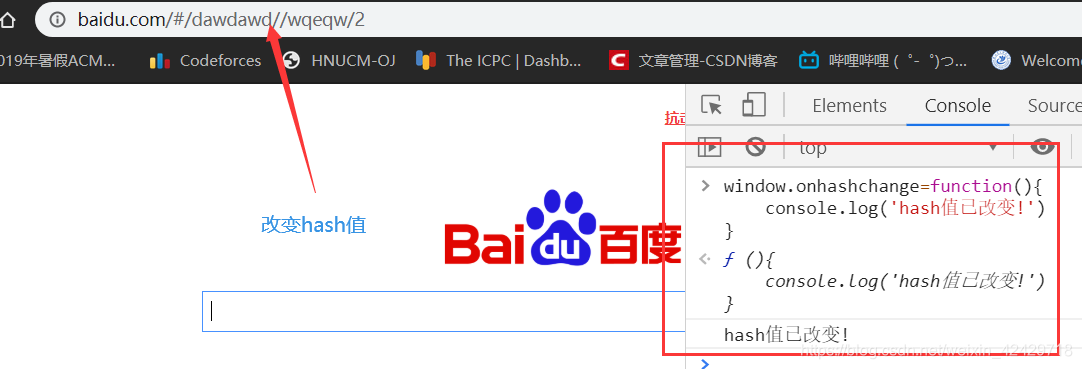
监听hash的改变
window.onhashchange=function(){
	console.log('hash值已改变!')
}
history模式与上述方法类似
vue插件基础知识
vue-router、vuex等其实都是属于vue的插件,这些插件都是我们平常很多次使用的,下文将会循序渐进教你vue插件是如何开发的,我们怎样开发一个vue插件。
我们不管是使用vue-router还是vuex都会调用Vue.use()这个方法,如下图所示,但是你有思考过Vue.use()到底是干什么用的呢?有什么作用呢?

进行实践,在main.js中我们进行如下操作,定义一个方法a,然后调用Vue.use()方法
import Vue from 'vue'
import App from './App.vue'
import router from './router'

Vue.config.productionTip = false

function a(){
  console.log(6);
}

Vue.use(a);
new Vue({
  router,
  render: h => h(App)
}).$mount('#app')
执行结果:

从上述结果来看的话,我们给Vue一个方法,它就会执行一遍
那么,我们给a一个install属性,看看会打印什么:
import Vue from 'vue'
import App from './App.vue'
import router from './router'

Vue.config.productionTip = false

function a(){
  console.log(6);
}
a.install=function(){
	console.log('install!');
}
Vue.use(a);
new Vue({
  router,
  render: h => h(App)
}).$mount('#app')
执行结果:

Vue.use( ) 作用
从上述两个例子来看,Vue.use()作用就是把你给的方法执行一遍,但如果有install属性的话,会执行install属性。
疑惑:如果只是为了执行这个方法或者拥有install属性的某个方法,那干脆自己调用一下好了,为啥还要用Vue.use()执行呢?
解决:其实,在install属性的可以有一个参数传进来,我们将上述代码进行更改:
a.install=function(vue){
	console.log(vue);
}
打印结果:
ƒ Vue (options) {
  if ( true &&
    !(this instanceof Vue)
  ) {
    warn('Vue is a constructor and should be called with the `new` keyword');
  }
  this._init(options);
}
从打印结果来看的话,其实就是一个Vue的类,与下述代码类似的一个类:
import Vue from 'vue'
Vue.mixin( )初识
对于Vue.use( )确实只是执行了一遍给的方法,但完成功能方面、起核心作用的还是vue.mixin()方法,
请看如下代码,在main.js文件内,我们在vue.mixin()中混入data,里面写一个c
import Vue from 'vue'
import App from './App.vue'
import router from './router'

Vue.config.productionTip = false

function a(){
  console.log(6);
}
a.install=function(vue){
	//console.log(vue);
	//全局混入vue实例
	vue.mixin({
		data(){
			return {
				c:'欢迎访问超逸の博客'
			}
		}
	});
}
Vue.use(a);
new Vue({
  router,
  render: h => h(App)
}).$mount('#app')
然后在HelloWorld.vue组件内,显示上文的c

打开界面,查看如下:

由上文可知,在HelloWorld组件里是没有c这个变量的,但是可以进行渲染显示到我们的页面,那么mixin是可以混入全局变量,任何组件可以拿到mixin混入的实例
除了混入data外,我们还可以混入方法,举个栗子:
a.install=function(vue){
	//console.log(vue);
	//全局混入vue实例
	vue.mixin({
		data(){
			return {
				c:'欢迎访问超逸の博客'
			}
		},
		methods::{
			globalMethods:function(){

			}
		}
	});
}
那么,其它组件都可以调用上述的方法,那么这样做有什么好处呢?
一提及到全局可以使用,应该可以想到可复用性这个特点,比如我们开发常见的有些组件需要消息弹窗,可能大部分人会在每个组件进行import注册等等,但是有了mixin()后,我们可以定义一个全局的方法,首先在App.vue写好我们的消息弹窗的方法,用全局的方法去操作App.vue写好的方法,那么就有很高的复用性。
但是data和methods并不是我们mixin方法的关键,最牛的还是可以进行全局生命周期注入 比如created、beforecreated、mounted等等
Vue插件开发一系列api(开始探索源码)
console.log(Vue.util);
执行结果:

Vue.util.defineReactive
很重要的一个就是:Vue.util.defineReactive,它就是Vue监听current变量重要执行者
不妨从源码来学习:
/**
   * Define a reactive property on an Object.
   */
  //Vue的data监听,也是通过这个方法
  function defineReactive$$1 (
    obj,
    key,
    val,
    customSetter,
    shallow
  ) {
	//依赖收集者
    var dep = new Dep();

    var property = Object.getOwnPropertyDescriptor(obj, key);
    if (property && property.configurable === false) {
      return
    }

    // cater for pre-defined getter/setters
    var getter = property && property.get;
    var setter = property && property.set;
    if ((!getter || setter) && arguments.length === 2) {
      val = obj[key];
    }

    var childOb = !shallow && observe(val);
	//双向绑定
    Object.defineProperty(obj, key, {
      enumerable: true,
      configurable: true,
      get: function reactiveGetter () {
        var value = getter ? getter.call(obj) : val;
        if (Dep.target) {
		  //进行依赖收集
          dep.depend();
		  /*采用依赖收集的原因:*/
          //1.data里面的数据并不是所有地方都要用到
          //2.如果我们直接更新整个视图,会造成资源浪费
		  //3.将依赖于某个变量的组件收集起来
          if (childOb) {
            childOb.dep.depend();
            if (Array.isArray(value)) {
              dependArray(value);
            }
          }
        }
        return value
      },
      set: function reactiveSetter (newVal) {
        var value = getter ? getter.call(obj) : val;
        /* eslint-disable no-self-compare */
        if (newVal === value || (newVal !== newVal && value !== value)) {
          return
        }
        /* eslint-enable no-self-compare */
        if (customSetter) {
          customSetter();
        }
        // #7981: for accessor properties without setter
        if (getter && !setter) { return }
        if (setter) {
          setter.call(obj, newVal);
        } else {
          val = newVal;
        }
        childOb = !shallow && observe(newVal);
        //触发依赖的组件产生更新
		dep.notify();
      }
    });
  }
双向绑定
上述关于响应式 双向绑定,强烈推荐之前写过的一篇文章:
手写实现defineReactive
我们可以通过defineReactive来实现Vue监听current的监视者,监听某个第三方的变量
手写:
import Vue from 'vue'
import App from './App.vue'
import router from './router'

Vue.config.productionTip = false

//Vue插件开发一系列api
//console.log(Vue.util.defineReactive);
//test是属于window的对象
var test={
	testa:'计时开始'
}
//设置定时器
setTimeout(function(){
	test.testa='计时结束'
},2000)
function a(){
  console.log(6);
}
a.install=function(vue){
	//console.log(vue);
	//监听testa
	Vue.util.defineReactive(test,'testa');
	//全局混入vue实例
	vue.mixin({
		data(){
			return {
				c:'欢迎访问超逸の博客'
			}
		},
		methods:{
		},
		beforeCreate:function(){
			this.test=test;
		},
		//全局生命周期注入
		created:function(){
			//console.log(this)
		}

	});
}
Vue.use(a);
new Vue({
  router,
  render: h => h(App)
}).$mount('#app')
然后我们在HelloWorld组件进行渲染,查看页面

执行结果:

疑问:为什么要写在beforeCreate里面?
解决:因为create阶段组件已经生成了,this实例已经创建了,而beforeCreate才刚开始。这样HelloWorld组件可以this调用来获取testa的值
Vue.util.extend 与 Vue.extend 的区别
关于这个问题,我百度了一下,貌似很少有人去探究这个问题,既然查不到,那么我们就从源码来学习,这就是一个比较好的方法。源码能够给你答案
console.log(Vue.util.extend);
console.log(Vue.extend);
/**
   * Mix properties into target object.
   */

  //Vue.util.extend
  //其实就是拷贝一份,以后可以直接调用即可
  function extend (to, _from) {
    for (var key in _from) {
      to[key] = _from[key];
    }
    return to
  }

  /**
     * Class inheritance
     */

	//Vue.extend
    Vue.extend = function (extendOptions) {
      extendOptions = extendOptions || {};
      var Super = this;
      var SuperId = Super.cid;
      var cachedCtors = extendOptions._Ctor || (extendOptions._Ctor = {});
      if (cachedCtors[SuperId]) {
        return cachedCtors[SuperId]
      }

      var name = extendOptions.name || Super.options.name;
      if (name) {
        validateComponentName(name);
      }

      var Sub = function VueComponent (options) {
        this._init(options);
      };
      Sub.prototype = Object.create(Super.prototype);
      Sub.prototype.constructor = Sub;
      Sub.cid = cid++;
      Sub.options = mergeOptions(
        Super.options,
        extendOptions
      );
      Sub['super'] = Super;

      // For props and computed properties, we define the proxy getters on
      // the Vue instances at extension time, on the extended prototype. This
      // avoids Object.defineProperty calls for each instance created.
      if (Sub.options.props) {
        initProps$1(Sub);
      }
      if (Sub.options.computed) {
        initComputed$1(Sub);
      }

      // allow further extension/mixin/plugin usage
      Sub.extend = Super.extend;
      Sub.mixin = Super.mixin;
      Sub.use = Super.use;

      // create asset registers, so extended classes
      // can have their private assets too.
      ASSET_TYPES.forEach(function (type) {
        Sub[type] = Super[type];
      });
      // enable recursive self-lookup
      if (name) {
        Sub.options.components[name] = Sub;
      }

      // keep a reference to the super options at extension time.
      // later at instantiation we can check if Super's options have
      // been updated.
      Sub.superOptions = Super.options;
      Sub.extendOptions = extendOptions;
      Sub.sealedOptions = extend({}, Sub.options);

      // cache constructor
      cachedCtors[SuperId] = Sub;
      return Sub
    };
  }
单元测试
关于Vue.extend我们以下面这个单元测试例子来讲解:
由下图可知,我们获取到了HelloWorld的构造函数,然后再拿到组件。简单来说,你可以在任何地方,拿到任何组件,这对于单元测试方面是比较方便的,你可以拿到任何组件里的方法进行测试。

手写Vue-router(核心)
开始前准备
-
在src下创建一个新的文件夹
myrouter,新建一个index.js的文件

-
将之前写过的代码都注释掉,返回最初的模样
-
将VueRouter引用改为我们自己所写的
myrouter
根据上文的流程图,手写vue-router
//记录路由
class historyRouter{
	constructor() {
	    this.current=null;
	}
}
class vueRouter{
	constructor(options) {
	    this.mode=options.mode||'hash';
		this.routes=options.routes||[];
		this.history=new historyRouter;
		//创建routesMap 将数组形式的转换成key-value形式的路由
		this.routesMap=this.createMap(this.routes);
		//事件监听
		this.init();
	}
	init(){
		if(this.mode=='hash'){
			location.hash? '':location.hash='/';
			window.addEventListener('load',()=>{
				this.history.current=location.hash.slice(1);
			});
			window.addEventListener('hashchange',()=>{
				this.history.current=location.hash.slice(1);
			})

		}else{
			location.pathname? '':location.pathname='/';
			window.addEventListener('load',()=>{
				this.history.current=location.pathname;
			});
			window.addEventListener('popstate',()=>{
				this.history.current=location.pathname;
			})
		}
	}
	createMap(routes){
		return routes.reduce((memo,current)=>{
			memo[current.path]=current.component;
			return memo;
		},{})
	}
}

//Vue监视current变量
vueRouter.install=function(Vue){
	Vue.mixin({
		beforeCreate(){
			if(this.$options&&this.$options.router){
				this._root=this;
				this._router=this.$options.router;
				Vue.util.defineReactive(this,'current',this._router.history);
			}else{
				//嵌套路由,如果没有路由,去找父组件
				this._root=this.$parent._root;
			}
		}
	})
	//获取新组件以及render
	Vue.component('router-view',{
		//渲染新组件
		render(h){
			let current=this._self._root._router.history.current;
			//console.log(current);
			let routesMap=this._self._root._router.routesMap;.
			//console.log(routesMap);
			return h(routesMap[current]);
		}
	})
}
//将类暴露出去
export default vueRouter;
总结
对于最后手写的vue-router读者只要弄懂它的思想即可,作为前端开发,我们不能只局限于写业务代码,造轮子等,我们要提高我们的编程思维,弄懂其中的思想与原理,了解底层才能不是一个简单的搬砖工!
附本篇学习源码
链接:https://pan.baidu.com/s/11xAkcdSyMxGTCPyQJafPGg
提取码:0z9j
(链接失效请评论区留言)
结尾
本篇文章是自学而写,当然还会有很多不足的地方,希望您来指正,感激不尽!
学如逆水行舟,不进则退
