前言:这是Bmob 的经典案例,但是由于现在版本升级哪里也不更新了,同时我辅导员助手这个项目正好有这个功能,拿来用一下,上次去计算机程序设计大赛,评委老师提了个建议,说最后用自己的数据库,不要用公司的,这样相当于数据不在自己手里,我自己以前也腾讯上搭过了一个自己的学生Linux服务器和mysql 也使用过 阿里云mysql ,最后作为一个学生党,还是比较喜欢Bomb,对于学生来说,真的是方便与便利。
创建一个失物招领的实例,继承bmob数据库,方便获取、添加数据等。
先讲 布局RecyclerView
在使用RecyclerView时候,必须指定一个适配器Adapter和一个布局管理器LayoutManager。适配器继承RecyclerView.Adapter类,具体实现类似ListView的适配器,取决于数据信息以及展示的UI。布局管理器用于确定RecyclerView中Item的展示方式以及决定何时复用已经不可见的Item,避免重复创建以及执行高成本的findViewById()方法。
    <android.support.v7.widget.RecyclerView
        android:id="@+id/rl_recyclerview"
        android:layout_width="match_parent"
        android:layout_height="match_parent"/>
Item的布局文件
<?xml version="1.0" encoding="utf-8"?>
<LinearLayout xmlns:android="http://schemas.android.com/apk/res/android"
android:id="@+id/ll_item"
android:layout_width="match_parent"
android:layout_height="wrap_content"
android:background="#fff"
android:orientation="vertical">
<TextView
android:id="@+id/tv_title"
android:layout_width="wrap_content"
android:layout_height="wrap_content"
android:layout_marginLeft="10dp"
android:layout_marginTop="5dp"
android:text="@string/t1"
android:textColor="#000"
android:textSize="15sp"/>
<TextView
android:id="@+id/tv_desc"
android:layout_width="wrap_content"
android:layout_height="wrap_content"
android:layout_marginLeft="10dp"
android:layout_marginTop="5dp"
android:text="@string/con1"
android:textColor="#9000"
android:textSize="15sp"/>
<RelativeLayout
android:layout_width="match_parent"
android:layout_height="wrap_content"
android:layout_marginLeft="10dp"
android:layout_marginTop="10dp">
<TextView
android:id="@+id/tv_num"
android:layout_width="wrap_content"
android:layout_height="wrap_content"
android:layout_alignParentRight="true"
android:layout_marginRight="10dp"
android:background="#5CBE6C"
android:padding="5dp"
android:text="16642712339"
android:textColor="#fff"/>
<TextView
android:id="@+id/tv_time"
android:layout_width="wrap_content"
android:layout_height="wrap_content"
android:layout_centerVertical="true"
android:text="2019-05-21 17:04:11"
android:textColor="#9000"/>
</RelativeLayout>
<View
android:layout_width="match_parent"
android:layout_height="0.5dp"
android:layout_marginTop="5dp"
android:background="#5000"/>
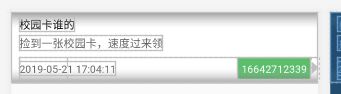
</LinearLayout>创建适配器
标准实现步骤如下:
① 创建Adapter:创建一个继承RecyclerView.Adapter<VH>的Adapter类(VH是ViewHolder的类名)
② 创建ViewHolder:在Adapter中创建一个继承RecyclerView.ViewHolder的静态内部类,记为VH。ViewHolder的实现和ListView的ViewHolder实现几乎一样。
③ 在Adapter中实现3个方法:
nCreateViewHolder()
这个方法主要生成为每个Item inflater出一个View,但是该方法返回的是一个ViewHolder。该方法把View直接封装在ViewHolder中,然后我们面向的是ViewHolder这个实例,当然这个ViewHolder需要我们自己去编写。
  @Override
    public LostAndFoundHolder onCreateViewHolder(ViewGroup parent, int viewType) {
        View view = LayoutInflater.from(mContext).inflate(R.layout.lost_item, parent, false);
        LostAndFoundHolder lostAndFoundHolder = new LostAndFoundHolder(view);
        return lostAndFoundHolder;
    }
onBindViewHolder()
这个方法主要用于适配渲染数据到View中。方法提供给你了一viewHolder而不是原来的convertView。
getItemCount()
这个方法就类似于BaseAdapter的getCount方法了,即总共有多少个条目。
public class LostAndFoundAdapter extends RecyclerView.Adapter<LostAndFoundAdapter.LostAndFoundHolder> {
    private Context mContext;
    private List<LostInfomationReq> lostInfosData;
    private ItemClickListener mItemClickListener;
    public final static int EDIT_CODE = 998;
    public final static int DELETE_CODE = 997;

    public LostAndFoundAdapter(Context context) {
        this.mContext = context;
    }


    public void setData(List<LostInfomationReq> data) {
        this.lostInfosData = data;
    }

    @Override
    public LostAndFoundHolder onCreateViewHolder(ViewGroup parent, int viewType) {
        View view = LayoutInflater.from(mContext).inflate(R.layout.lost_item, parent, false);
        LostAndFoundHolder lostAndFoundHolder = new LostAndFoundHolder(view);
        return lostAndFoundHolder;
    }

    @Override
    public void onBindViewHolder(final LostAndFoundHolder holder, final int position) {
        if (lostInfosData != null) {
            LostInfomationReq lostInfomationReq = lostInfosData.get(position);
            holder.title.setText(lostInfomationReq.getTitle());
            holder.desc.setText(lostInfomationReq.getDesc());
            holder.phoneNum.setText(lostInfomationReq.getPhoneNum());
            holder.time.setText(lostInfomationReq.getCreatedAt());

            holder.llItem.setOnLongClickListener(new View.OnLongClickListener() {
                @Override
                public boolean onLongClick(View v) {
                    //mLongClickListener.onLongClick(position);
                    showWindow(holder, position);
                    return false;
                }
            });
        }
    }

    private void showWindow(LostAndFoundHolder holder, final int pos) {
        //加载布局文件
        View contentview = LayoutInflater.from(mContext).inflate(R.layout.pop_window_view,null);
        final PopupWindow popupWindow = new PopupWindow(contentview, LinearLayout.LayoutParams.WRAP_CONTENT,
                LinearLayout.LayoutParams.WRAP_CONTENT);
        //设置焦点
        popupWindow.setFocusable(true);
        //触摸框外
        popupWindow.setOutsideTouchable(true);
        //点击空白处的时候让PopupWindow消失
        popupWindow.setBackgroundDrawable(new ColorDrawable(0x00000000));
        //设置偏移量
        popupWindow.showAsDropDown(holder.time, 300, -100);

        //showAsDropDown(View anchor):相对某个控件的位置(正左下方),无偏移
       // showAsDropDown(View anchor, int xoff, int yoff):相对某个控件的位置,有偏移
        //showAtLocation(View parent, int gravity, int x, int y):相对于父控件的位置(例如正中央Gravity.CENTER,下方Gravity.BOTTOM等),可以设置偏移或无偏移

        //点击编辑按钮
        contentview.findViewById(R.id.edit_btn).setOnClickListener(new View.OnClickListener() {
            @Override
            public void onClick(View v) {
                //回调给主界面,进行数据操作
                mItemClickListener.onEditOrDeleteClick(pos, EDIT_CODE);
                //销毁弹出框
                popupWindow.dismiss();
            }
        });

        //点击删除按钮
        contentview.findViewById(R.id.delete_btn).setOnClickListener(new View.OnClickListener() {
            @Override
            public void onClick(View v) {
                //回调给主界面,进行数据操作
                mItemClickListener.onEditOrDeleteClick(pos, DELETE_CODE);
                //销毁弹出框
                popupWindow.dismiss();
            }
        });
    }

    @Override
    public int getItemCount() {
        return lostInfosData.size() == 0 ? 0 : lostInfosData.size();
    }

    public class LostAndFoundHolder extends RecyclerView.ViewHolder {
        private TextView title;
        private TextView desc;
        private TextView time;
        private TextView phoneNum;
        private LinearLayout llItem;

        public LostAndFoundHolder(View itemView) {
            super(itemView);
            title = (TextView) itemView.findViewById(R.id.tv_title);
            desc = (TextView) itemView.findViewById(R.id.tv_desc);
            time = (TextView) itemView.findViewById(R.id.tv_time);
            phoneNum = (TextView) itemView.findViewById(R.id.tv_num);
            llItem = (LinearLayout) itemView.findViewById(R.id.ll_item);
        }
    }

    //设置长按事件
    public void setLongClickListener(ItemClickListener clickListener) {
        this.mItemClickListener = clickListener;
    }

    public interface ItemClickListener {
        void onEditOrDeleteClick(int position, int code);
    }
}
其中包括 PopupWindow的使用
长按item 出现弹窗

pop_window_view.xml
<LinearLayout xmlns:android="http://schemas.android.com/apk/res/android"
    android:layout_width="wrap_content"
    android:layout_height="wrap_content"
    android:orientation="horizontal">

    <TextView
        android:id="@+id/edit_btn"
        android:layout_width="wrap_content"
        android:layout_height="wrap_content"
        android:background="@color/blue"
        android:padding="10dp"
        android:text="添加"
        android:textColor="#fff"/>

    <TextView
        android:id="@+id/delete_btn"
        android:layout_width="wrap_content"
        android:layout_height="wrap_content"
        android:padding="10dp"
        android:background="@color/blue"
        android:text="删除"
        android:textColor="#fff" />
</LinearLayout>
使用PopupWindow很简单,可以总结为三个步骤:
- 创建PopupWindow对象实例;
- 设置背景、注册事件监听器和添加动画;
- 显示PopupWindow。
public class LostFoodFragment extends Fragment implements View.OnClickListener, LostAndFoundAdapter.ItemClickListener  {
    private RecyclerView recyclerView;
    private LostAndFoundAdapter lostAndFoundAdapter;
    private List<LostInfomationReq> lostInfomationReqList;

    private long exitTime = 0;
    private final static int REQUEST_CODE = 999;
    public LostFoodFragment() {
        // Required empty public constructor
    }
    @Override
    public void onCreate(Bundle savedInstanceState) {
        super.onCreate(savedInstanceState);

    }
    @Override
    public View onCreateView(LayoutInflater inflater, ViewGroup container,
                             Bundle savedInstanceState) {
        View view = inflater.inflate(R.layout.fragment_lost_food,container,false);
        initView(view);
        initData();
        return view;
    }


    private void initView(View view) {
        recyclerView = (RecyclerView) view.findViewById(R.id.rl_recyclerview);
        recyclerView.setLayoutManager(new LinearLayoutManager(getActivity(), LinearLayoutManager.VERTICAL, false));
        lostAndFoundAdapter = new LostAndFoundAdapter(getActivity());
        lostAndFoundAdapter.setLongClickListener(this);

    }
    private void initData() {
        BmobQuery<LostInfomationReq> lostInfomationReqBmobQuery = new BmobQuery<>();
        lostInfomationReqBmobQuery.order("-updatedAt");//排序
        lostInfomationReqBmobQuery.findObjects(new FindListener<LostInfomationReq>() {
            @Override
            public void done(List<LostInfomationReq> list, BmobException e) {
                if (e == null) {
                    lostInfomationReqList = list;
                    lostAndFoundAdapter.setData(list);
                    recyclerView.setAdapter(lostAndFoundAdapter);
                } else {
                    showToast("查询数据失败");
                }
            }
        });
    }
    private void showToast(String msg) {
        Toast.makeText(getActivity(), msg, Toast.LENGTH_SHORT).show();
    }

    @Override
    public void onClick(View v) {

    }

    @Override
    public void onEditOrDeleteClick(int position, int code) {
        if (code == LostAndFoundAdapter.EDIT_CODE) {
            Intent intent = new Intent(getActivity(), Lost_fondActivity.class);
            Bundle bundle = new Bundle();
            bundle.putSerializable("editData", lostInfomationReqList.get(position));
            intent.putExtras(bundle);
            startActivityForResult(intent, REQUEST_CODE);
        } else if (code == LostAndFoundAdapter.DELETE_CODE) {
            deleteItemData(position);
        }

    }

    private void deleteItemData(final int position) {
        if (lostInfomationReqList.size() != 0) {
            LostInfomationReq lostInfomationReq = new LostInfomationReq();
            lostInfomationReq.setObjectId(lostInfomationReqList.get(position).getObjectId());
            lostInfomationReq.delete(new UpdateListener() {
                @Override
                public void done(BmobException e) {
                    if (e == null) {
                        lostInfomationReqList.remove(position);
                        lostAndFoundAdapter.setData(lostInfomationReqList);
                        lostAndFoundAdapter.notifyDataSetChanged();
                    } else {
                        showToast("删除数据失败");
                    }
                }
            });
        }
    }

    @Override
    public void onActivityResult(int requestCode, int resultCode, Intent data) {
        switch (requestCode) {
            case REQUEST_CODE:
                if (resultCode == RESULT_OK) {
                    refreshData();//数据刷新
                }
                break;
            default:
                break;
        }
        super.onActivityResult(requestCode, resultCode, data);
    }


    /**
     * 查询数据库中最新的数据
     * */
    private void refreshData() {
        BmobQuery<LostInfomationReq> lostInfomationReqBmobQuery = new BmobQuery<>();
        lostInfomationReqBmobQuery.order("-updatedAt");//按更新时间排序
        lostInfomationReqBmobQuery.findObjects(new FindListener<LostInfomationReq>() {
            @Override
            public void done(List<LostInfomationReq> list, BmobException e) {
                if (e == null) {
                    lostInfomationReqList = list;
                    lostAndFoundAdapter.setData(list);
                    lostAndFoundAdapter.notifyDataSetChanged();
                }
            }
        });
    }
}
RecyclerView实现Item点击事件处理
RecyclerView并没有像ListView那样提供了OnItemClick,OnItemLongClick等事件回调接口,所以,我们需要自己去实现。
定义回调事件接口
  public interface ItemClickListener {
        void onEditOrDeleteClick(int position, int code);
    }
声明该接口,并提供setter方法
    //设置长按事件
    public void setLongClickListener(ItemClickListener clickListener) {
        this.mItemClickListener = clickListener;
    }
实现接口
implements View.OnClickListener, LostAndFoundAdapter.ItemClickListener
实现编辑和删除方法
 @Override
    public void onEditOrDeleteClick(int position, int code) {
        if (code == LostAndFoundAdapter.EDIT_CODE) {
            Intent intent = new Intent(getActivity(), Lost_fondActivity.class);
            Bundle bundle = new Bundle();
            bundle.putSerializable("editData", lostInfomationReqList.get(position));
            intent.putExtras(bundle);
            startActivityForResult(intent, REQUEST_CODE);
        } else if (code == LostAndFoundAdapter.DELETE_CODE) {
            deleteItemData(position);
        }

    }

    private void deleteItemData(final int position) {
        if (lostInfomationReqList.size() != 0) {
            LostInfomationReq lostInfomationReq = new LostInfomationReq();
            lostInfomationReq.setObjectId(lostInfomationReqList.get(position).getObjectId());
            lostInfomationReq.delete(new UpdateListener() {
                @Override
                public void done(BmobException e) {
                    if (e == null) {
                        lostInfomationReqList.remove(position);
                        lostAndFoundAdapter.setData(lostInfomationReqList);
                        lostAndFoundAdapter.notifyDataSetChanged();
                    } else {
                        showToast("删除数据失败");
                    }
                }
            });
        }
    }
通过参数传递数据判断 点击按钮
 //点击编辑按钮
                contentview.findViewById(R.id.edit_btn).setOnClickListener(new View.OnClickListener() {
                    @Override
                    public void onClick(View v) {
                        //回调给主界面,进行数据操作
                        mItemClickListener.onEditOrDeleteClick(pos, EDIT_CODE);
                        //销毁弹出框
                        popupWindow.dismiss();
                    }
                });

                //点击删除按钮
                contentview.findViewById(R.id.delete_btn).setOnClickListener(new View.OnClickListener() {
                    @Override
                    public void onClick(View v) {
                        //回调给主界面,进行数据操作
                        mItemClickListener.onEditOrDeleteClick(pos, DELETE_CODE);
                        //销毁弹出框
                        popupWindow.dismiss();
            }
        });

这个和前几篇一样,将数据获取和数据插入。写博客的好处,就是梳理思路,理解过程。
