代码地址:github-spring-cloud地址
前言:前面文章讲了Spring Cloud Config配置中心如何使用,当我们在更新git上面的配置,想要获取最新的配置,需要手动刷新或者利用webhook的机制每次提交代码发送请求来刷新客户端,客户端越来越多的时候,需要每个客户端都执行一遍,这种方案就不太适合了。使用Spring Cloud Bus可以完美解决这一问题。使用消息总线需要依赖mq,本章文章将采用RabbitMq,具体怎么安装RabbitMq可以查看此文章:安装RabbitMq
消息总线(Bus)介绍
Spring cloud bus通过轻量消息代理连接各个分布的节点。这会用在广播状态的变化(例如配置变化)或者其他的消息指令。Spring bus的一个核心思想是通过分布式的启动器对spring boot应用进行扩展,也可以用来建立一个多个应用之间的通信频道。目前唯一实现的方式是用AMQP消息代理作为通道,同样特性的设置(有些取决于通道的设置)在更多通道的文档中。
项目示例
本章节消息总线集成在客户端,本章节在前几张SpringCloud基础上改进。
config-client-bus
添加pom文件
<?xml version="1.0" encoding="UTF-8"?>
<project xmlns="http://maven.apache.org/POM/4.0.0"
         xmlns:xsi="http://www.w3.org/2001/XMLSchema-instance"
         xsi:schemaLocation="http://maven.apache.org/POM/4.0.0 http://maven.apache.org/xsd/maven-4.0.0.xsd">
    <parent>
        <artifactId>spring-cloud-learn</artifactId>
        <groupId>com.sl.learn.cloud</groupId>
        <version>1.0-SNAPSHOT</version>
    </parent>
    <modelVersion>4.0.0</modelVersion>

    <groupId>com.sl.learn.cloud</groupId>
    <artifactId>config-client-bus</artifactId>

    <version>1.0-SNAPSHOT</version>

    <dependencies>
        <dependency>
            <groupId>org.springframework.cloud</groupId>
            <artifactId>spring-cloud-starter-netflix-eureka-client</artifactId>
        </dependency>
        <dependency>
            <groupId>org.springframework.boot</groupId>
            <artifactId>spring-boot-starter-actuator</artifactId>
        </dependency>
        <dependency>
            <groupId>org.springframework.cloud</groupId>
            <artifactId>spring-cloud-starter-bus-amqp</artifactId>
        </dependency>
        <dependency>
            <groupId>org.springframework.boot</groupId>
            <artifactId>spring-boot-starter-web</artifactId>
        </dependency>
        <dependency>
            <groupId>org.springframework.boot</groupId>
            <artifactId>spring-boot-starter-actuator</artifactId>
        </dependency>
        <!-- https://mvnrepository.com/artifact/org.springframework.cloud/spring-cloud-starter-netflix-hystrix -->
        <dependency>
            <groupId>org.springframework.cloud</groupId>
            <artifactId>spring-cloud-starter-config</artifactId>
        </dependency>
    </dependencies>
</project>
添加配置文件bootstrap.properties
spring.application.name=config-client-bus
spring.cloud.config.label=master
spring.cloud.config.profile=dev
spring.cloud.config.uri=http://localhost:8088/
server.port=8098

eureka.client.service-url.defaultZone=http://localhost:8080/eureka/

management.endpoints.web.exposure.include= *
management.endpoint.health.show-details= always
management.endpoint.shutdown.enabled= true
info.app.name =  spring-boot-actuator
info.app.version =  1.0.0
info.app.test =  test


## 开启消息跟踪
spring.cloud.bus.trace.enabled=true

spring.rabbitmq.host=localhost
spring.rabbitmq.port=5672
spring.rabbitmq.username=guest
spring.rabbitmq.password=guest
启动类Application
@SpringBootApplication
@RestController
@RefreshScope
@EnableEurekaClient
@EnableDiscoveryClient
public class ConfigClientBusApplication {

    public static void main(String[] args) {
        SpringApplication.run(ConfigClientBusApplication.class,args);
    }

    @Value("${helloConfig}")
    private String helloConfig;

    @RequestMapping(value = "/hi")
    public String helloConfig() {
        return helloConfig;
    }
}
-
创建配置文件注意两点:
rabbitmq的默认端口为:5672 -
监控 actuator 一定要配下面这几个,不然访问http://localhost:8097/actuator会报404
management.endpoints.web.exposure.include= *
management.endpoint.health.show-details= always
management.endpoint.shutdown.enabled= true
客户端分别启动两个端口8097,8098
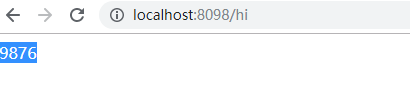
分别访问地址:http://localhost:8098/hi和http://localhost:8097/hi
返回结果为:1233
我们对端口为8098的服务发送一个/actuator/bus-refresh的POST请求,在win10下使用下面命令来模拟webhook。curl -v -X POST http://localhost:8098/actuator/bus-refresh

返回结果为可以看到已经把最新的结果返回:
注意一点springboot2.0访问地址为:actuator/bus-refresh

本篇文章的消息总线在配置中心的使用机制用图表示(图片来源于网上)

