spring boot因为内嵌tomcat容器,所以可以通过打包为jar包的方法将项目发布,但是如何将spring boot项目打包成可发布到tomcat中的war包项目呢?
1. 既然需要打包成war包项目,首先需要在pom.xml文件中修改打包类型,将spring boot默认的<packaging>jar</packaging>修改为<packaging>war</packaging>形式;
2. 其次spring boot的web项目中内嵌tomcat服务器,所以如果我们想要发布war包到tomcat项目,要讲spring boot中内嵌的tomcat包依赖排除,不然产生冲突,打开下面代码中的注释即可。
|
1
2
3
4
5
6
7
8
9
10
11
12
|
<
dependency
>
<
groupId
>org.springframework.boot</
groupId
>
<
artifactId
>spring-boot-starter-web</
artifactId
>
<!--
<exclusions>
<exclusion>
<groupId>org.springframework.boot</groupId>
<artifactId>spring-boot-starter-tomcat</artifactId>
</exclusion>
</exclusions>
-->
</
dependency
>
|
有一点想说的是,如果本地开发的时候依然想要使用spring boot内嵌tomcat进行调试,添加如下依赖即可;
|
1
2
3
4
5
|
<
dependency
>
<
groupId
>org.springframework.boot</
groupId
>
<
artifactId
>spring-boot-starter-tomcat</
artifactId
>
<
scope
>provided</
scope
>
</
dependency
>
|
3. spring boot发布jar包web程序的入口是main函数所在的类,使用@SpringBootApplication注解。但是如果war包发布至tomcat,需要增加 SpringBootServletInitializer 子类,并覆盖它的 configure 方法,或者直接将main函数所在的类继承 SpringBootServletInitializer 子类,并覆盖它的 configure 方法。代码举例如下,
|
1
2
3
4
5
6
7
8
9
10
11
12
13
14
|
@SpringBootApplication
public
class
DemoApplication
extends
SpringBootServletInitializer {
@Override
protected
SpringApplicationBuilder configure(
SpringApplicationBuilder application) {
return
application.sources(DemoApplication.
class
);
}
public
static
void
main(String[] args) {
SpringApplication.run(DemoApplication.
class
, args);
}
}
|
以上就完成了spring boot项目打包war包的所有步骤,可以发布至tomcat7及其以上版本。
但是以上流程改造完spring boot打包war包发布至tomcat6版本之后,浏览器访问项目地址会给出404的错误?为什么呢,一头雾水,经过我一番查阅资料以及实验,得出以下结论,
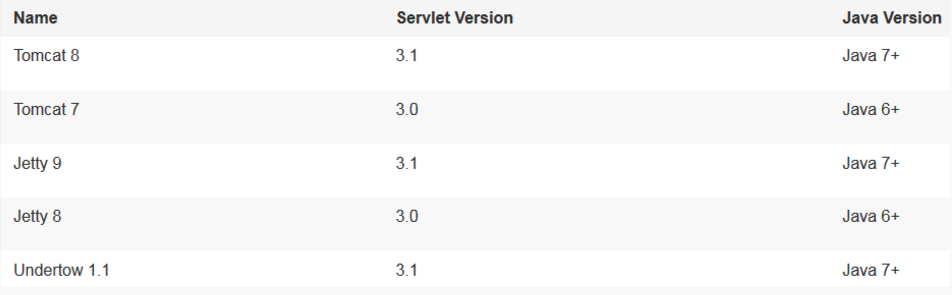
首先spring boot支持的servlet容器如下,可以看出spring boot最低支持的servlet版本是3.0,但是tomcat6的servlet版本是2.5,这样的话上面的流程是无法支持tomcat6发布spring boot项目的,
但是又google了一番,发现已经有人在解决这个问题了,https://github.com/dsyer/spring-boot-legacy,

标题就表明了它是为了让spring boot支持servlet2.5,刚好解决我们的痛点,使用步骤如下:
1. pom.xml中添加spring-boot-legacy的依赖,
|
1
2
3
4
5
|
<
dependency
>
<
groupId
>org.springframework.boot</
groupId
>
<
artifactId
>spring-boot-legacy</
artifactId
>
<
version
>1.1.0.RELEASE</
version
>
</
dependency
>
|
2.手动替换web.xml文件。但是在发布war包中发现metricFilter提示空指针异常,我就简单粗暴的将filter过滤了,注释如下。 所要替换的web.xml文件的未知如下 : {工程目录}/src/main/webapp/WEB-INF/web.xml
|
1
2
3
4
5
6
7
8
9
10
11
12
13
14
15
16
17
18
19
20
21
22
23
24
25
26
27
28
29
30
31
32
33
34
35
36
37
38
39
40
41
42
|
<?
xml
version="1.0" encoding="UTF-8"?>
<
web-app
version="2.5" xmlns="http://java.sun.com/xml/ns/javaee"
xmlns:xsi="http://www.w3.org/2001/XMLSchema-instance"
xsi:schemaLocation="http://java.sun.com/xml/ns/javaee http://java.sun.com/xml/ns/javaee/web-app_2_5.xsd">
<
context-param
>
<
param-name
>contextConfigLocation</
param-name
>
<
param-value
>com.example.DemoApplication</
param-value
>
</
context-param
>
<
listener
>
<
listener-class
>org.springframework.boot.legacy.context.web.SpringBootContextLoaderListener</
listener-class
>
</
listener
>
<!--
<filter>
<filter-name>metricFilter</filter-name>
<filter-class>org.springframework.web.filter.DelegatingFilterProxy</filter-class>
</filter>
<filter-mapping>
<filter-name>metricFilter</filter-name>
<url-pattern>/*</url-pattern>
</filter-mapping>
-->
<
servlet
>
<
servlet-name
>appServlet</
servlet-name
>
<
servlet-class
>org.springframework.web.servlet.DispatcherServlet</
servlet-class
>
<
init-param
>
<
param-name
>contextAttribute</
param-name
>
<
param-value
>org.springframework.web.context.WebApplicationContext.ROOT</
param-value
>
</
init-param
>
<
load-on-startup
>1</
load-on-startup
>
</
servlet
>
<
servlet-mapping
>
<
servlet-name
>appServlet</
servlet-name
>
<
url-pattern
>/</
url-pattern
>
</
servlet-mapping
>
</
web-app
>
|
完成以上两个步骤就可以让spring boot项目支持tomcat6的部署了,解决。
思考:spring boot封装带来了便利性,同时也带来了出问题的解决复杂度,如果不了解原始的spring web开发模式,出现问题很难解决。即使我现在解决了支持tomcat6的spring boot支持问题,但是不太明白解决的原理,filter出现空指针是为什么?所以深入一些原理性的东西,学习技术的基础性的东西非常重要。大家可以明白的可以解释解释2.5支持的原理,以及filter空指针的异常原因。
最后感谢前辈们的资料,