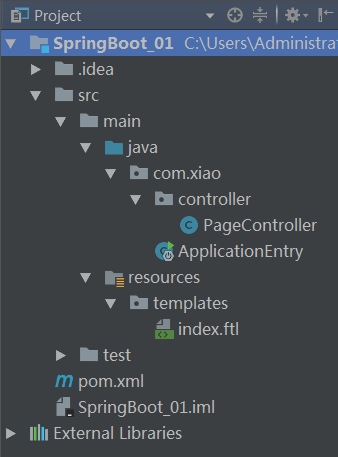
一.工程目录结构如下:
二.在pom.xml中引入web组件以及freemarker组件,如下:
<?xml version="1.0" encoding="UTF-8"?>
<project xmlns="http://maven.apache.org/POM/4.0.0"
         xmlns:xsi="http://www.w3.org/2001/XMLSchema-instance"
         xsi:schemaLocation="http://maven.apache.org/POM/4.0.0 http://maven.apache.org/xsd/maven-4.0.0.xsd">
    <modelVersion>4.0.0</modelVersion>

    <groupId>com.xiao</groupId>
    <artifactId>SpringBoot_01</artifactId>
    <version>1.0-SNAPSHOT</version>
    <packaging>jar</packaging>

    <parent>
        <groupId>org.springframework.boot</groupId>
        <artifactId>spring-boot-starter-parent</artifactId>
        <version>1.5.12.RELEASE</version>
        <relativePath/>
    </parent>

    <properties>
        <project.build.sourceEncoding>UTF-8</project.build.sourceEncoding>
        <project.reporting.outputEncoding>UTF-8</project.reporting.outputEncoding>
        <java.version>1.8</java.version>
    </properties>

    <dependencies>
        <!-- web组件-->
        <dependency>
            <groupId>org.springframework.boot</groupId>
            <artifactId>spring-boot-starter-web</artifactId>
        </dependency>

        <!-- freemarker组件-->
        <dependency>
            <groupId>org.springframework.boot</groupId>
            <artifactId>spring-boot-starter-freemarker</artifactId>
        </dependency>
    </dependencies>
</project>
三.在com.xiao包下创建启动类ApplicationEntry.java:
package com.xiao;

import org.springframework.boot.SpringApplication;
import org.springframework.boot.autoconfigure.SpringBootApplication;
/**
 * @Author 笑笑
 * @Date 21:25 2018/05/02
 */
@SpringBootApplication
public class ApplicationEntry {

    public static void main(String[] args){
        SpringApplication.run(ApplicationEntry.class,args);
    }

}
四.在controller包下创建页面控制类PageController.java:
package com.xiao.controller;

import org.springframework.stereotype.Controller;
import org.springframework.ui.Model;
import org.springframework.web.bind.annotation.RequestMapping;
/**
 * @Author 笑笑
 * @Date 21:28 2018/05/02
 */
@Controller
public class PageController {

    @RequestMapping(value = "/index")
    public String showIndex(Model model){
        model.addAttribute("Say","你好 FreeMarker!");
        return "index";
    }
}
五.在templates(这是springboot默认配置的模板目录)目录下创建模板index.ftl:
${Say}在模板文件中只取了域中的属性用于演示,现在就可以启动程序,访问http://localhost:8080/index进行测试了!
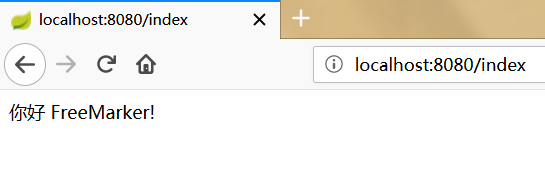
出现上图所示页面,表示环境搭建成功!