Vue模板语法
一、属性绑定
1.属性绑定class
一般的通过CSS设置标签的方式如下:
<!DOCTYPE html>
<html lang="en">
<head>
    <meta charset="UTF-8">
    <meta name="viewport" content="width=device-width, initial-scale=1.0">
    <title>Vue模板语法</title>
    <style>
        .title{
            font-size: 20px;
            color: red;
        }
    </style>
</head>
<body>
    <p class="title">中国,加油</p>
</body>
</html>
显示:

通过数组方式实现
通过数组方式测试如下:
<!DOCTYPE html>
<html lang="en">
<head>
    <meta charset="UTF-8">
    <meta name="viewport" content="width=device-width, initial-scale=1.0">
    <title>Vue模板语法</title>
    <style>
        .title{
            font-size: 20px;
            color: red;
        }
        .sub-title{
            font-weight: 800;
        }
    </style>
</head>
<body>
    <p class="title">中国,加油</p>
    <div id="app">
        <p v-bind:class="[class1,class2]">世界,你好</p>
    </div>
</body>
</html>


<script src="https://cdn.jsdelivr.net/npm/vue"></script>

<script>
    new Vue({
        el:"#app",
        data:{
            class1:'title',
            class2:'sub-title'
        }
    })
</script>
显示:

经过测试,通过<p v-bind:class="[title,sub-title]">世界,你好</p>的方式会报错。
通过下列代码也可以达到同样的效果:
<!DOCTYPE html>
<html lang="en">
<head>
    <meta charset="UTF-8">
    <meta name="viewport" content="width=device-width, initial-scale=1.0">
    <title>Vue模板语法</title>
    <style>
        .title{
            font-size: 20px;
            color: red;
        }
        .sub-title{
            font-weight: 800;
        }
    </style>
</head>
<body>
    <p class="title">中国,加油</p>
    <div id="app">
        <p v-bind:class="[class1,class2]">世界,你好</p>
        <!-- 和下列代码效果相同 <p v-bind:class="class1">世界,你好</p> -->
        <p v-bind:class="[class1]">世界,你好</p>
    </div>
</body>
</html>


<script src="https://cdn.jsdelivr.net/npm/vue"></script>

<script>
    new Vue({
        el:"#app",
        data:{
            // class1:'title',
            class1:'title sub-title',
            // class2:'sub-title'
        }
    })
</script>
通过对象方式实现
对象可以理解成字典。
通过对象方式实现测试:
<!DOCTYPE html>
<html lang="en">
<head>
    <meta charset="UTF-8">
    <meta name="viewport" content="width=device-width, initial-scale=1.0">
    <title>Vue模板语法</title>
    <style>
        .title{
            font-size: 20px;
            color: red;
        }
        .sub-title{
            font-weight: 800;
        }
    </style>
</head>
<body>
    <p class="title">床前明月光</p>
    <div id="app">
        <p v-bind:class="{title:class1,'sub-title':class2}">疑是地上霜</p>
    </div>
</body>
</html>


<script src="https://cdn.jsdelivr.net/npm/vue"></script>

<script>
    new Vue({
        el:"#app",
        data:{
            class1:true,
            class2:true
        }
    })
</script>
显示:

2.属性绑定Style
通过对象方式实现
通过对象有两种方式绑定style:
-
读取对应样式的值
<li :style="{backgroundColor:pBgColor,fontSize:pFontSize}">Vue模板语法</li> -
直接读取整个字符串
<li :style="liStyle">Vue模板语法</li>
用第一种方式实现:
<!DOCTYPE html>
<html lang="en">
<head>
    <meta charset="UTF-8">
    <meta name="viewport" content="width=device-width, initial-scale=1.0">
    <title>Vue模板语法</title>
    <style>
        .title{
            font-size: 20px;
            color: red;
        }
        .sub-title{
            font-weight: 800;
        }
    </style>
</head>
<body>
    <p class="title">过去岁月不可追,未来日子你别催。</p>
    <div id="app">
        <p v-bind:style="{'background-color':color}">莫愁身外七八事,且尽眼前两三杯。</p>
    </div>
</body>
</html>


<script src="https://cdn.jsdelivr.net/npm/vue"></script>

<script>
    new Vue({
        el:"#app",
        data:{
            color:'red'
        }
    })
</script>
显示:

像background-color这种中间有 - 的变量名称,直接使用会报错不能正常显示,有两种解决办法:
- 将其用引号引起来
- 变成驼峰命名的方式,如改为backgroundColor。
显然,如果有多个样式要定义时,直接在p标签中定义会显得很冗长,可以将定义style的代码都放入Vue对象中,即第二种方式,测试如下:
<!DOCTYPE html>
<html lang="en">
<head>
    <meta charset="UTF-8">
    <meta name="viewport" content="width=device-width, initial-scale=1.0">
    <title>Vue模板语法</title>
    <style>
        .title{
            font-size: 20px;
            color: red;
        }
        .sub-title{
            font-weight: 800;
        }
    </style>
</head>
<body>
    <p class="title">仿佛昨天才恋爱,转眼青春就不在。</p>
    <div id="app">
        <p :style="pstyle">当年那个万人迷,如今已成老太太。</p>
    </div>
</body>
</html>


<script src="https://cdn.jsdelivr.net/npm/vue"></script>

<script>
    new Vue({
        el:"#app",
        data:{
            pstyle:{
                'background-color':'red',
                fontSize:"20px"
            }
        }
    })
</script>
显示:

通过数组方式实现
数组方式测试如下:
<!DOCTYPE html>
<html lang="en">
<head>
    <meta charset="UTF-8">
    <meta name="viewport" content="width=device-width, initial-scale=1.0">
    <title>Vue模板语法</title>
    <style>
        .title{
            font-size: 20px;
            color: red;
        }
        .sub-title{
            font-weight: 800;
        }
    </style>
</head>
<body>
    <p class="title">没事喝杯酒,有闲下盘棋。</p>
    <div id="app">
        <p v-bind:style="[class1,class2]">醉里乾坤大,输赢都不急。</p>
    </div>
</body>
</html>


<script src="https://cdn.jsdelivr.net/npm/vue"></script>

<script>
    new Vue({
        el:"#app",
        data:{
            class1:{
                'background-color':'red',
                fontSize:"20px"
            },
            class2:{
                fontWeight:'800'
            }
        }
    })
</script>
显示:

二、执行Javascript和条件判断
1.使用JavaScript表达式
在使用了v-bind的html属性中,或者在使用了{{}}的文本中,可以执行JavaScript。
执行JS测试:
<!DOCTYPE html>
<html lang="en">
<head>
    <meta charset="UTF-8">
    <meta name="viewport" content="width=device-width, initial-scale=1.0">
    <title>Vue模板语法</title>
</head>
<body>
    <div id='app'>
        <p>{{poem}}</p>
        <p v-bind:style="{color:color?'red':'blue'}">{{poem.split(',').reverse().join(',')}}</p>
    </div>
</body>
</html>


<script src="https://cdn.jsdelivr.net/npm/vue"></script>

<script>
    new Vue({
        el:"#app",
        data:{
            poem:'没事喝杯酒,有闲下盘棋,醉里乾坤大,输赢都不急',
            color:false
        }
    })
</script>
显示:
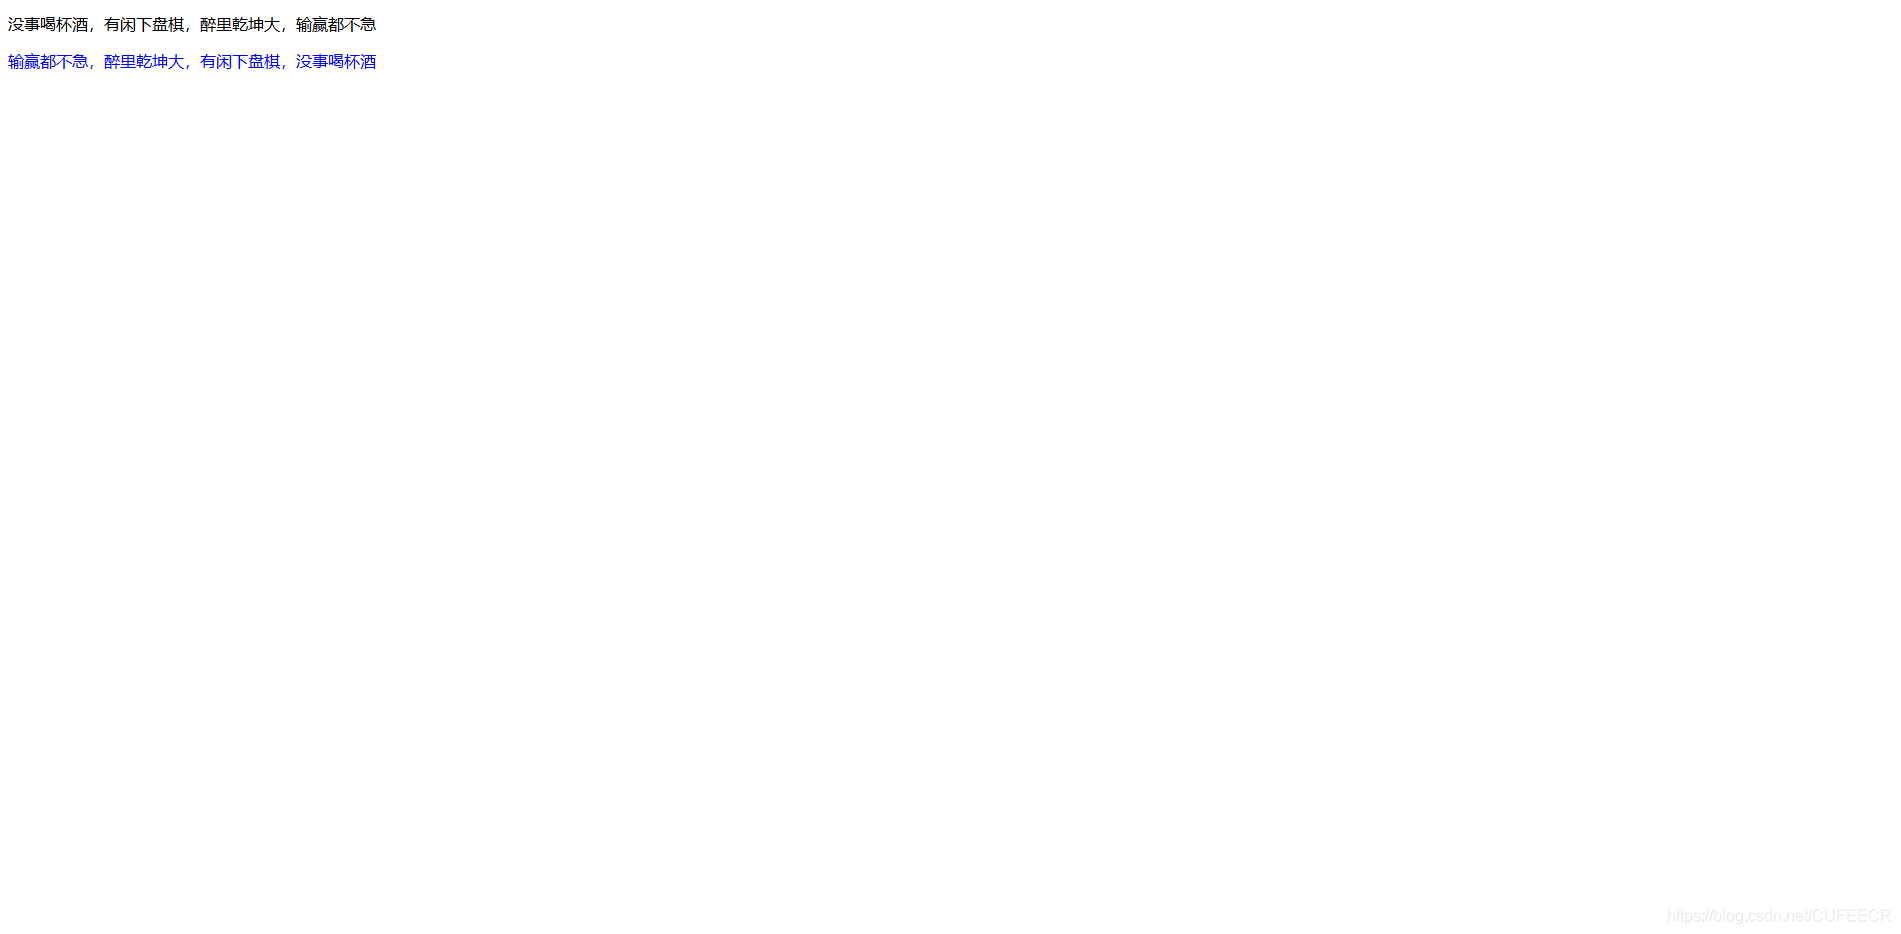
显然,在属性绑定时,可以执行三目运算符操作,从而使字体显示蓝色。
注意:
只能是JavaScript表达式,不能是语句,比如var a=1;a=2;这样的是js语句是不能执行的。
2.条件判断
在模板中,可以根据条件进行渲染。
条件是用v-if、v-else-if和v-else来组合实现的。
条件判断测试:
<!DOCTYPE html>
<html lang="en">
<head>
    <meta charset="UTF-8">
    <meta name="viewport" content="width=device-width, initial-scale=1.0">
    <title>Vue模板语法</title>
</head>
<body>
    <div id='app'>
        <p v-if="weather == 'sunny'">今天出去玩</p>
        <p v-else-if="weather == 'rainy'">今天待在家</p>
        <p v-else>睡觉吧</p>
    </div>
</body>
</html>


<script src="https://cdn.jsdelivr.net/npm/vue"></script>

<script>
    new Vue({
        el:"#app",
        data:{
            weather:'snowy'
        }
    })
</script>
显示:

有时候我们想要在一个条件中加载多个html元素,那么我们可以通过template元素来实现。
再次测试:
<!DOCTYPE html>
<html lang="en">
<head>
    <meta charset="UTF-8">
    <meta name="viewport" content="width=device-width, initial-scale=1.0">
    <title>Vue模板语法</title>
</head>
<body>
    <div id='app'>
        <template v-if="age < 18">
            <p>学习</p>
            <p>玩耍</p>
        </template>
        <template v-else-if="age >= 18 && age < 25">
            <p>找工作</p>
            <p>找女神</p>
        </template>
        <template v-else>
            <p>结婚</p>
            <p>升职</p>
        </template>
    </div>
</body>
</html>


<script src="https://cdn.jsdelivr.net/npm/vue"></script>

<script>
    new Vue({
        el:"#app",
        data:{
            age:30
        }
    })
</script>
显示:

另外,在模板中,Vue会尽量重用已有的元素,而不是重新渲染,这样可以变得更加高效。
例如,在开发用户登录时,如果允许用户在不同的登录方式之间切换,如下:
<!DOCTYPE html>
<html lang="en">
<head>
    <meta charset="UTF-8">
    <meta name="viewport" content="width=device-width, initial-scale=1.0">
    <title>Vue模板语法</title>
</head>
<body>
    <div id='app'>
        <template v-if="loginType == 'username'">
            <label for="">用户名:</label>
            <input type="text" placeholder="请输入用户名"></input>
        </template>
        <template v-else-if="loginType == 'email'">
            <label for="">邮箱:</label>
            <input type="text" placeholder="请输入邮件地址"></input>
        </template>
        <button v-on:click="changeLoginType">切换登录类型</button>
    </div>
</body>
</html>


<script src="https://cdn.jsdelivr.net/npm/vue"></script>

<script>
    new Vue({
        el:"#app",
        data:{
            loginType:'username'
        },
        methods:{
            changeLoginType:function(){

                this.loginType = this.loginType == 'username'?'email':'username'
            }
        }
    })
</script>
显示:

显然,在username的输入框中输入完信息,切换到邮箱中,之前的信息还是保留下来,这样肯定不符合需求的。
如果我们想要让html元素每次切换的时候都重新渲染一遍,可以在需要重新渲染的元素上加上唯一的key属性,其中key属性推荐使用整型或字符串类型。
input标签增加key属性后再测试:
<!DOCTYPE html>
<html lang="en">
<head>
    <meta charset="UTF-8">
    <meta name="viewport" content="width=device-width, initial-scale=1.0">
    <title>Vue模板语法</title>
</head>
<body>
    <div id='app'>
        <template v-if="loginType == 'username'">
            <label for="">用户名:</label>
            <input type="text" placeholder="请输入用户名" key='username'></input>
        </template>
        <template v-else-if="loginType == 'email'">
            <label for="">邮箱:</label>
            <input type="text" placeholder="请输入邮件地址" key='email'></input>
        </template>
        <button v-on:click="changeLoginType">切换登录类型</button>
    </div>
</body>
</html>


<script src="https://cdn.jsdelivr.net/npm/vue"></script>

<script>
    new Vue({
        el:"#app",
        data:{
            loginType:'username'
        },
        methods:{
            changeLoginType:function(){

                this.loginType = this.loginType == 'username'?'email':'username'
            }
        }
    })
</script>
显示:

显然,此时切换登录方式时,会清空输入内容。
当然,也可以通过JS的形式来清空输入内容;
key属性的值可以是包含字符串和整形的任意值,但是尽量应该与该标签的其他属性或所在的父标签的属性等保持一致,以便标识。
此时,其他元素仍然会被高效地复用,因为它们没有添加key属性。
v-show和v-if的对比
v-if是“真正”的条件渲染,因为它会确保在切换过程中条件块内的事件监听器和子组件适当地被销毁和重建;
v-if也是惰性的:如果在初始渲染时条件为假,则什么也不做——直到条件第一次变为真时,才会开始渲染条件块。
相比之下,v-show就简单得多:不管初始条件是什么,元素总是会被渲染,并且只是简单地基于CSS进行切换。
一般来说, v-if有更高的切换开销,而v-show有更高的初始渲染开销。
因此,如果需要非常频繁地切换,则使用v-show较好;
如果在运行时条件很少改变,则使用v-if较好。
三、循环
在模板中可以用v-for指令来循环数组、对象等。
1.循环数组
进行测试:
<!DOCTYPE html>
<html lang="en">
<head>
    <meta charset="UTF-8">
    <meta name="viewport" content="width=device-width, initial-scale=1.0">
    <title>Vue模板语法</title>
</head>
<body>
    <div id='app'>
        <table>
            <tr>
                <td>标题</td>
                <td>作者</td>
            </tr>
            <tr v-for="book in books">
                <td>{{book.title}}</td>
                <td>{{book.author}}</td>
            </tr>
        </table>
    </div>
</body>
</html>


<script src="https://cdn.jsdelivr.net/npm/vue"></script>

<script>
    new Vue({
        el:"#app",
        data:{
            books:[
                {
                    'title':'Python',
                    'author':'author1'
                },
                {
                    'title':'Java',
                    'author':'author2'
                },
                {
                    'title':'PHP',
                    'author':'author3'
                },
                {
                    'title':'C++',
                    'author':'author4'
                }
            ]
        }
    })
</script>
显示:

可以引入序号并显示:
<!DOCTYPE html>
<html lang="en">
<head>
    <meta charset="UTF-8">
    <meta name="viewport" content="width=device-width, initial-scale=1.0">
    <title>Vue模板语法</title>
</head>
<body>
    <div id='app'>
        <table>
            <tr>
                <td>序号</td>
                <td>标题</td>
                <td>作者</td>
            </tr>
            <tr v-for="(book, index) in books">
                <td>{{index+1}}</td>
                <td>{{book.title}}</td>
                <td>{{book.author}}</td>
            </tr>
        </table>
    </div>
</body>
</html>


<script src="https://cdn.jsdelivr.net/npm/vue"></script>

<script>
    new Vue({
        el:"#app",
        data:{
            books:[
                {
                    'title':'Python',
                    'author':'author1'
                },
                {
                    'title':'Java',
                    'author':'author2'
                },
                {
                    'title':'PHP',
                    'author':'author3'
                },
                {
                    'title':'C++',
                    'author':'author4'
                }
            ]
        }
    })
</script>
显示:

注意:
(book, index) in books中,括号中的第一个为循环中的单个对象,在该例中为book,第二个为索引,这与变量名称无关,只与位置有关。
2.循环对象
循环对象跟循环数组是一样的,并且都可以在循环的时候使用接收多个参数。
循环单个对象,进行测试:
<!DOCTYPE html>
<html lang="en">
<head>
    <meta charset="UTF-8">
    <meta name="viewport" content="width=device-width, initial-scale=1.0">
    <title>Vue模板语法</title>
</head>
<body>
    <div id='app'>
        <p v-for="value in user">{{value}}</p>
    </div>
</body>
</html>


<script src="https://cdn.jsdelivr.net/npm/vue"></script>

<script>
    new Vue({
        el:"#app",
        data:{
            user:{
                'name':'Corley',
                'age':18,
                'address':'xxx'
            }
        }
    })
</script>
显示:

此时得到的是字典对象中的值,是默认的。
可以稍微改动得到字典中的键:
<!DOCTYPE html>
<html lang="en">
<head>
    <meta charset="UTF-8">
    <meta name="viewport" content="width=device-width, initial-scale=1.0">
    <title>Vue模板语法</title>
</head>
<body>
    <div id='app'>
        <p v-for="(value,key) in user">
            {{key}} : {{value}}
        </p>
    </div>
</body>
</html>


<script src="https://cdn.jsdelivr.net/npm/vue"></script>

<script>
    new Vue({
        el:"#app",
        data:{
            user:{
                'name':'Corley',
                'age':18,
                'address':'xxx'
            }
        }
    })
</script>
显示:

四、保持状态
循环得到的元素,如果没有使用key属性来唯一标识,如果后期的数据发生了更改,默认是会重用的,并且元素的顺序不会跟着数据的顺序更改而更改。
例如:
<!DOCTYPE html>
<html lang="en">
<head>
    <meta charset="UTF-8">
    <meta name="viewport" content="width=device-width, initial-scale=1.0">
    <title>Vue模板语法</title>
</head>
<body>
    <div id='app'>
        <div v-for="book in books">
            <label for="">{{book}}</label>
            <input type="text" v-bind:placeholder="book">
        </div>
    </div>
</body>
</html>


<script src="https://cdn.jsdelivr.net/npm/vue"></script>

<script>
    new Vue({
        el:"#app",
        data:{
            books:[
                'Python','Java','PHP','C++'
            ]
        }
    })
</script>
显示:

对列表进行随机排序测试:
<!DOCTYPE html>
<html lang="en">
<head>
    <meta charset="UTF-8">
    <meta name="viewport" content="width=device-width, initial-scale=1.0">
    <title>Vue模板语法</title>
</head>
<body>
    <div id='app'>
        <div v-for="book in books">
            <label for="">{{book}}</label>
            <input type="text" v-bind:placeholder="book">
        </div>
        <button @click="changeBooks">重新排序</button>
    </div>
</body>
</html>


<script src="https://cdn.jsdelivr.net/npm/vue"></script>

<script>
    new Vue({
        el:"#app",
        data:{
            books:[
                'Python','Java','PHP','C++'
            ]
        },
        methods:{
            changeBooks:function(){
                // 根据参数的正负进行不同方式的排序
                this.books.sort(function(a,b){
                    // 返回一个正数或负数,可以代表True或False
                    return 5 - Math.random() * 10
                })
            }
        }
    })
</script>
显示:

排序用到方法sort()函数,根据参数的True或者False进行不同方式的排序。
但是在一个输入框输入值之后,再重新排序,输入的值并没有随着之前填入的列表项而移动,而是保持原位不动,示意如下:

显然,这不是我们想看到的,我们需要加入key属性来使之保持同步:
<!DOCTYPE html>
<html lang="en">
<head>
    <meta charset="UTF-8">
    <meta name="viewport" content="width=device-width, initial-scale=1.0">
    <title>Vue模板语法</title>
</head>
<body>
    <div id='app'>
        <div v-for="book in books" v-bind:key="book">
            <label for="">{{book}}</label>
            <input type="text" v-bind:placeholder="book">
        </div>
        <button @click="changeBooks">重新排序</button>
    </div>
</body>
</html>


<script src="https://cdn.jsdelivr.net/npm/vue"></script>

<script>
    new Vue({
        el:"#app",
        data:{
            books:[
                'Python','Java','PHP','C++'
            ]
        },
        methods:{
            changeBooks:function(){
                // 根据参数的正负进行不同方式的排序
                this.books.sort(function(a,b){
                    // 返回一个正数或负数,可以代表True或False
                    return 5 - Math.random() * 10
                })
            }
        }
    })
</script>
显示:

显然,此时数据的位置跟着元素的位置同步变化。
五、触发视图更新
1.直接赋值更新视图
直接赋值更新视图测试:
<!DOCTYPE html>
<html lang="en">
<head>
    <meta charset="UTF-8">
    <meta name="viewport" content="width=device-width, initial-scale=1.0">
    <title>Vue模板语法</title>
</head>
<body>
    <div id='app'>
        <div v-for="book in books">
            <label for="">{{book}}</label>
        </div>
        <button @click="updateList">改变目录</button>
    </div>
</body>
</html>


<script src="https://cdn.jsdelivr.net/npm/vue"></script>

<script>
    new Vue({
        el:"#app",
        data:{
            books:[
                'Python','Java','PHP','C++'
            ]
        },
        methods:{
            updateList:function(){
                // 直接赋值
                this.books = ['C#','Android','Web']
            }
        }
    })
</script>
显示:

也可以通过改变对象的方式来更新视图,如下:
<!DOCTYPE html>
<html lang="en">
<head>
    <meta charset="UTF-8">
    <meta name="viewport" content="width=device-width, initial-scale=1.0">
    <title>Vue模板语法</title>
</head>
<body>
    <div id='app'>
        <div v-for="value in user">
            <label for="">{{value}}</label>
        </div>
        <button @click="updateList">改变目录</button>
    </div>
</body>
</html>


<script src="https://cdn.jsdelivr.net/npm/vue"></script>

<script>
    new Vue({
        el:"#app",
        data:{
            books:[
                'Python','Java','PHP','C++'
            ],
            user:{
                'name':'Corley',
                'age':18,
                'address':'xxx'
            }
        },
        methods:{
            updateList:function(){
                // 直接赋值
                // this.books = ['C#','Android','Web']
                this.user.name = 'Tony',
                this.user.age = 20
            }
        }
    })
</script>
显示:

2.调用函数改变视图
Vue对一些方法进行了包装和变异,以后数组通过这些方法进行数组更新,会出发视图的更新。
push()
添加元素。
push()函数测试:
<!DOCTYPE html>
<html lang="en">
<head>
    <meta charset="UTF-8">
    <meta name="viewport" content="width=device-width, initial-scale=1.0">
    <title>Vue模板语法</title>
</head>
<body>
    <div id='app'>
        <div v-for="book in books">
            <label for="">{{book}}</label>
        </div>
        <button @click="updateList">更新视图</button>
    </div>
</body>
</html>


<script src="https://cdn.jsdelivr.net/npm/vue"></script>

<script>
    new Vue({
        el:"#app",
        data:{
            books:[
                'Python','Java','PHP','C++'
            ],
        },
        methods:{
            updateList:function(){
                // 使用方法
                // 将元素加入列表末尾
                this.books.push('Redis')
            }
        }
    })
</script>
显示:

pop()
删除数组最后一个元素。
pop()函数测试:
<!DOCTYPE html>
<html lang="en">
<head>
    <meta charset="UTF-8">
    <meta name="viewport" content="width=device-width, initial-scale=1.0">
    <title>Vue模板语法</title>
</head>
<body>
    <div id='app'>
        <div v-for="book in books">
            <label for="">{{book}}</label>
        </div>
        <button @click="updateList">更新视图</button>
    </div>
</body>
</html>


<script src="https://cdn.jsdelivr.net/npm/vue"></script>

<script>
    new Vue({
        el:"#app",
        data:{
            books:[
                'Python','Java','PHP','C++'
            ],
        },
        methods:{
            updateList:function(){
                // 使用方法
                // 弹出列表末尾元素
                this.books.pop()
            }
        }
    })
</script>
显示:

shift()
删除数组的第一个元素。
shift()函数测试:
<!DOCTYPE html>
<html lang="en">
<head>
    <meta charset="UTF-8">
    <meta name="viewport" content="width=device-width, initial-scale=1.0">
    <title>Vue模板语法</title>
</head>
<body>
    <div id='app'>
        <div v-for="book in books">
            <label for="">{{book}}</label>
        </div>
        <button @click="updateList">更新视图</button>
    </div>
</body>
</html>


<script src="https://cdn.jsdelivr.net/npm/vue"></script>

<script>
    new Vue({
        el:"#app",
        data:{
            books:[
                'Python','Java','PHP','C++'
            ],
        },
        methods:{
            updateList:function(){
                // 使用方法
                // 删除列表开始元素
                this.books.shift()
            }
        }
    })
</script>
显示:

unshift(item)
在数组的开头位置添加一个元素。
unshift()函数测试:
<!DOCTYPE html>
<html lang="en">
<head>
    <meta charset="UTF-8">
    <meta name="viewport" content="width=device-width, initial-scale=1.0">
    <title>Vue模板语法</title>
</head>
<body>
    <div id='app'>
        <div v-for="book in books">
            <label for="">{{book}}</label>
        </div>
        <button @click="updateList">更新视图</button>
    </div>
</body>
</html>


<script src="https://cdn.jsdelivr.net/npm/vue"></script>

<script>
    new Vue({
        el:"#app",
        data:{
            books:[
                'Python','Java','PHP','C++'
            ],
        },
        methods:{
            updateList:function(){
                // 使用方法
                // 向开头添加元素
                this.books.unshift('HTML')
            }
        }
    })
</script>
显示:

splice(index,howmany,item1,…,itemX)
向数组中添加或者删除或者替换元素。
即splice()函数有3种用法:
splice()函数向指定位置添加元素:
此时有3个参数,意义分别是:- 添加元素起始位置的下标(从0开始)
- 长度,标识添加时,参数值为0
- 添加的值
用法的简单演示如下:
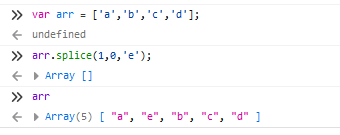
测试如下:
<!DOCTYPE html>
<html lang="en">
<head>
    <meta charset="UTF-8">
    <meta name="viewport" content="width=device-width, initial-scale=1.0">
    <title>Vue模板语法</title>
</head>
<body>
    <div id='app'>
        <div v-for="book in books">
            <label for="">{{book}}</label>
        </div>
        <button @click="updateList">更新视图</button>
    </div>
</body>
</html>


<script src="https://cdn.jsdelivr.net/npm/vue"></script>

<script>
    new Vue({
        el:"#app",
        data:{
            books:[
                'Python','Java','PHP','C++'
            ],
        },
        methods:{
            updateList:function(){
                // 使用方法
                // 向列表指定位置添加元素
                this.books.splice(0,0,'MySQL')
            }
        }
    })
</script>
显示:

此时相当于调用shift()函数。
splice()函数向指定位置删除元素:
此时有2个参数:- 删除元素起始位置的下标(从0开始)
- 删除的元素个数
用法简单演示如下:

测试如下:
<!DOCTYPE html>
<html lang="en">
<head>
    <meta charset="UTF-8">
    <meta name="viewport" content="width=device-width, initial-scale=1.0">
    <title>Vue模板语法</title>
</head>
<body>
    <div id='app'>
        <div v-for="book in books">
            <label for="">{{book}}</label>
        </div>
        <button @click="updateList">更新视图</button>
    </div>
</body>
</html>


<script src="https://cdn.jsdelivr.net/npm/vue"></script>

<script>
    new Vue({
        el:"#app",
        data:{
            books:[
                'Python','Java','PHP','C++'
            ],
        },
        methods:{
            updateList:function(){
                // 使用方法
                // 向列表指定位置删除元素
                this.books.splice(0,2)
            }
        }
    })
</script>
显示:

splice()函数向指定位置替换元素:
此时有多个(不少于3个)参数:- 替换元素起始位置的下标(从0开始)
- 被替换的元素个数(不能为0)
- 其余为要替换的值
如果只有3个参数,则所有被替换的位置被替换成一个值;
如果多于3个参数,则从第三个参数后边的参数被一一对应到列表中的相应位置。
用法简单演示如下:

测试如下:
<!DOCTYPE html>
<html lang="en">
<head>
    <meta charset="UTF-8">
    <meta name="viewport" content="width=device-width, initial-scale=1.0">
    <title>Vue模板语法</title>
</head>
<body>
    <div id='app'>
        <div v-for="book in books">
            <label for="">{{book}}</label>
        </div>
        <button @click="updateList">更新视图</button>
    </div>
</body>
</html>


<script src="https://cdn.jsdelivr.net/npm/vue"></script>

<script>
    new Vue({
        el:"#app",
        data:{
            books:[
                'Python','Java','PHP','C++'
            ],
        },
        methods:{
            updateList:function(){
                // 使用方法
                // 从列表指定位置替换元素
                this.books.splice(0,2,'Redis','MySQL')
            }
        }
    })
</script>
显示:

sort(function)
排序。
sort()函数测试:
<!DOCTYPE html>
<html lang="en">
<head>
    <meta charset="UTF-8">
    <meta name="viewport" content="width=device-width, initial-scale=1.0">
    <title>Vue模板语法</title>
</head>
<body>
    <div id='app'>
        <div v-for="book in books">
            <label for="">{{book}}</label>
        </div>
        <button @click="updateList">更新视图</button>
    </div>
</body>
</html>


<script src="https://cdn.jsdelivr.net/npm/vue"></script>

<script>
    new Vue({
        el:"#app",
        data:{
            books:[
                'Python','Java','PHP','C++'
            ],
        },
        methods:{
            updateList:function(){
                // 使用方法
                // 随机排序
                this.books.sort(function (x,y){
                    a = Math.random()
                    b = Math.random()
                    return a - b
                })
            }
        }
    })
</script>
显示:

reverse()
将数组元素进行反转。
reverse()函数测试:
<!DOCTYPE html>
<html lang="en">
<head>
    <meta charset="UTF-8">
    <meta name="viewport" content="width=device-width, initial-scale=1.0">
    <title>Vue模板语法</title>
</head>
<body>
    <div id='app'>
        <div v-for="book in books">
            <label for="">{{book}}</label>
        </div>
        <button @click="updateList">更新视图</button>
    </div>
</body>
</html>


<script src="https://cdn.jsdelivr.net/npm/vue"></script>

<script>
    new Vue({
        el:"#app",
        data:{
            books:[
                'Python','Java','PHP','C++'
            ],
        },
        methods:{
            updateList:function(){
                // 使用方法
                // 顺序反转
                this.books.reverse()
            }
        }
    })
</script>
显示:

