前言
上篇文章对model.py中的一些函数进行了介绍,今天让我们来学习icdar.py但是由于这篇代码篇幅较大,所以我们先一起学习generator部分,本人才疏学浅若有错误望请原谅。
全部代码
首先附上完整代码
def generator(input_size=512, batch_size=32,
              background_ratio=3./8,
              random_scale=np.array([0.5, 1, 2.0, 3.0]),
              vis=False):
    image_list = np.array(get_images())
    print('{} training images in {}'.format(
        image_list.shape[0], FLAGS.training_data_path))
    index = np.arange(0, image_list.shape[0])
    while True:
        np.random.shuffle(index)
        images = []
        image_fns = []
        score_maps = []
        geo_maps = []
        training_masks = []
        for i in index:
            try:
                im_fn = image_list[i]  # 获取当前索引图像全路径
                im = cv2.imread(im_fn)  # 读取图像
                # print im_fn
                h, w, _ = im.shape  # 获取图像宽、高、通道数
                txt_fn = im_fn.replace(os.path.basename(im_fn).split('.')[1], 'txt')  # 替换成图像对应的txt全路径
                txt_fn = txt_fn.replace("\\", "//")
                temp = txt_fn.split('//')[-1]  # 2020.01.07
                txt_fn = txt_fn.replace(temp, "gt_" + temp)
                if not os.path.exists(txt_fn):
                    print('text file {} does not exists'.format(txt_fn))
                    continue

                text_polys, text_tags = load_annoataion(txt_fn)#读取文本信息

                text_polys, text_tags = check_and_validate_polys(text_polys, text_tags, (h, w))#检查文本多边形是否在相同方向上,并过滤一些无效的多边形
                # if text_polys.shape[0] == 0:
                #     continue
                # random scale this image
                #随机缩放图像,扩充数据集
                rd_scale = np.random.choice(random_scale)#产生随机大小
                im = cv2.resize(im, dsize=None, fx=rd_scale, fy=rd_scale)
                text_polys *= rd_scale#缩放文本框
                # print rd_scale
                # random crop a area from image
                # 如果产生的随机数小于background_ratio=3./8,生成负样本?
                if np.random.rand() < background_ratio:
                    # crop background
                    im, text_polys, text_tags = crop_area(im, text_polys, text_tags, crop_background=True)
                    #crop_area()从图像中随机裁剪一个区域,扩充数据集, 随机数小于3./8时crop_background=True,生成背景框,大于3./8时crop_background=False,随机裁剪图像,并同步裁剪文本标记框

                    if text_polys.shape[0] > 0:# 如果随机生成的背景框中包含文本框,则忽略
                        # cannot find background
                        continue
                    # pad and resize image
                    # 如果随机生成的背景框中不包含文本框,执行以下操作
                    # 填充并调整图像大小
                    new_h, new_w, _ = im.shape
                    max_h_w_i = np.max([new_h, new_w, input_size])
                    im_padded = np.zeros((max_h_w_i, max_h_w_i, 3), dtype=np.uint8)
                    im_padded[:new_h, :new_w, :] = im.copy()
                    im = cv2.resize(im_padded, dsize=(input_size, input_size))
                    score_map = np.zeros((input_size, input_size), dtype=np.uint8)
                    geo_map_channels = 5 if FLAGS.geometry == 'RBOX' else 8
                    geo_map = np.zeros((input_size, input_size, geo_map_channels), dtype=np.float32) # 生成全0的多边形图
                    training_mask = np.ones((input_size, input_size), dtype=np.uint8) # 训练mask,全为1
                else:#产生的随机数大于3./8时,对图片随机裁剪并按相同方法对标记框进行裁剪,同时生成四边形的最小外接矩形:
                    im, text_polys, text_tags = crop_area(im, text_polys, text_tags, crop_background=False)
                    if text_polys.shape[0] == 0:
                        continue
                    h, w, _ = im.shape

                    # pad the image to the training input size or the longer side of image
                    new_h, new_w, _ = im.shape
                    max_h_w_i = np.max([new_h, new_w, input_size])
                    im_padded = np.zeros((max_h_w_i, max_h_w_i, 3), dtype=np.uint8)
                    im_padded[:new_h, :new_w, :] = im.copy()
                    im = im_padded
                    # resize the image to input size
                    new_h, new_w, _ = im.shape
                    resize_h = input_size
                    resize_w = input_size
                    im = cv2.resize(im, dsize=(resize_w, resize_h))
                    resize_ratio_3_x = resize_w/float(new_w)
                    resize_ratio_3_y = resize_h/float(new_h)
                    text_polys[:, :, 0] *= resize_ratio_3_x
                    text_polys[:, :, 1] *= resize_ratio_3_y
                    new_h, new_w, _ = im.shape
                    score_map, geo_map, training_mask = generate_rbox((new_h, new_w), text_polys, text_tags)#数据图,文本框坐标,文本标签

                if vis:
                    fig, axs = plt.subplots(3, 2, figsize=(20, 30))
                    # axs[0].imshow(im[:, :, ::-1])
                    # axs[0].set_xticks([])
                    # axs[0].set_yticks([])
                    # for poly in text_polys:
                    #     poly_h = min(abs(poly[3, 1] - poly[0, 1]), abs(poly[2, 1] - poly[1, 1]))
                    #     poly_w = min(abs(poly[1, 0] - poly[0, 0]), abs(poly[2, 0] - poly[3, 0]))
                    #     axs[0].add_artist(Patches.Polygon(
                    #         poly * 4, facecolor='none', edgecolor='green', linewidth=2, linestyle='-', fill=True))
                    #     axs[0].text(poly[0, 0] * 4, poly[0, 1] * 4, '{:.0f}-{:.0f}'.format(poly_h * 4, poly_w * 4),
                    #                    color='purple')
                    # axs[1].imshow(score_map)
                    # axs[1].set_xticks([])
                    # axs[1].set_yticks([])
                    axs[0, 0].imshow(im[:, :, ::-1])
                    axs[0, 0].set_xticks([])
                    axs[0, 0].set_yticks([])
                    for poly in text_polys:
                        poly_h = min(abs(poly[3, 1] - poly[0, 1]), abs(poly[2, 1] - poly[1, 1]))
                        poly_w = min(abs(poly[1, 0] - poly[0, 0]), abs(poly[2, 0] - poly[3, 0]))
                        axs[0, 0].add_artist(Patches.Polygon(
                            poly, facecolor='none', edgecolor='green', linewidth=2, linestyle='-', fill=True))
                        axs[0, 0].text(poly[0, 0], poly[0, 1], '{:.0f}-{:.0f}'.format(poly_h, poly_w), color='purple')
                    axs[0, 1].imshow(score_map[::, ::])
                    axs[0, 1].set_xticks([])
                    axs[0, 1].set_yticks([])
                    axs[1, 0].imshow(geo_map[::, ::, 0])
                    axs[1, 0].set_xticks([])
                    axs[1, 0].set_yticks([])
                    axs[1, 1].imshow(geo_map[::, ::, 1])
                    axs[1, 1].set_xticks([])
                    axs[1, 1].set_yticks([])
                    axs[2, 0].imshow(geo_map[::, ::, 2])
                    axs[2, 0].set_xticks([])
                    axs[2, 0].set_yticks([])
                    axs[2, 1].imshow(training_mask[::, ::])
                    axs[2, 1].set_xticks([])
                    axs[2, 1].set_yticks([])
                    plt.tight_layout()
                    plt.show()
                    plt.close()

                images.append(im[:, :, ::-1].astype(np.float32))
                image_fns.append(im_fn)
                score_maps.append(score_map[::4, ::4, np.newaxis].astype(np.float32))
                geo_maps.append(geo_map[::4, ::4, :].astype(np.float32))
                training_masks.append(training_mask[::4, ::4, np.newaxis].astype(np.float32))

                if len(images) == batch_size:
                    yield images, image_fns, score_maps, geo_maps, training_masks
                    images = []
                    image_fns = []
                    score_maps = []
                    geo_maps = []
                    training_masks = []
            except Exception as e:
                import traceback
                traceback.print_exc()
                continue
get_images()
首先我们看到的是这样一个函数get_images(),这个函数是前辈自己定义的,那么前辈为什么要定义它呢,首先我们看一下他的定义:
def get_images():
    files = []
    for ext in ['jpg', 'png', 'jpeg', 'JPG']:
        files.extend(glob.glob(
            os.path.join(FLAGS.training_data_path, '*.{}'.format(ext))))
    return files
在学习中我们了解到图片的读取实际需要的是图片的路径+图片的名字.图片的格式,如###.jpg,但是我们用到的icdar2015数据集显然是没有后缀的,那么就需要我们手动填上去于是就有了这么一个函数。
FLAGS.training_data_path
这块值得说一下,这并不是一个函数而是被定义的一个变量这个变量的定义虽然不在这部分但是就在这块说一下,还是先附上代码:
tf.app.flags.DEFINE_string('training_data_path', '/data/ocr/icdar2015/',
                           'training dataset to use')
tf.app.flags.DEFINE_integer('max_image_large_side', 1280,
                            'max image size of training')
tf.app.flags.DEFINE_integer('max_text_size', 800,
                            'if the text in the input image is bigger than this, then we resize'
                            'the image according to this')
tf.app.flags.DEFINE_integer('min_text_size', 10,
                            'if the text size is smaller than this, we ignore it during training')
tf.app.flags.DEFINE_float('min_crop_side_ratio', 0.1,
                          'when doing random crop from input image, the'
                          'min length of min(H, W')
tf.app.flags.DEFINE_string('geometry', 'RBOX',
                           'which geometry to generate, RBOX or QUAD')
这块我们用到了TensorFlow中的定义变量的几个函数分别是:
tf.app.flags.DEFINE_string() :定义一个用于接收 string 类型数值的变量;
tf.app.flags.DEFINE_integer() : 定义一个用于接收 int 类型数值的变量;
tf.app.flags.DEFINE_float() : 定义一个用于接收 float 类型数值的变量;
tf.app.flags.DEFINE_boolean() : 定义一个用于接收 bool 类型数值的变量;
DEFINE_xxx”函数带3个参数,分别是变量名称,默认值,用法描述,例如:
tf.app.flags.DEFINE_string('ckpt_path', 'model/model.ckpt-100000', '''Checkpoint directory to restore''')
那么问题来了变量定义的函数有很多比如tf.Variable那么为什么我们要用这个呢,
那就取决于它的特性了:tf 中定义了 tf.app.flags.FLAGS ,用于接受从终端传入的命令行参数,相当于对Python中的命令行参数模块optpars(参考: python中处理命令行参数的模块optpars )做了一层封装。例如我们输入命令:python flags_test.py --ckpt_path abc/cba --learning_rate 0.001 --train_steps 10000 --is_use_gpu True
。
那么我们就会得到这样的结果:

这样我们就可以通过cmd命令修改路径等参数而不用区具体修改代码了。而FLAGS.training_data_path恰恰保存的就是样本的路径。
cv2.imread
cv2.imread函数来源于OpenCV库,他的作用是读取图片值得一提的是OpenCV是一个很好的图片处理框架,建议大家学习。
xxx.shape
h, w, _ = im.shape # 获取图像宽、高、通道数
因为icdar2015数据集并不大所以我们要做的是对数据集进行扩充,所以我们自然要获取图片的宽高,然后进行处理,值得一提的是数据集的样本标记信息的文件名不符合我们要读取的格式所以后续几句代码都是对路径的改写。最终格式保存到txt_fn中。
load_annoataion
这个函数也是前辈定义的作用是:读取文本标记信息,让我们看一下具体定义:
def load_annoataion(p):
    '''
    load annotation from the text file
    :param p:
    :return:
    '''
    text_polys = []
    text_tags = []
    if not os.path.exists(p):
        return np.array(text_polys, dtype=np.float32)
    with open(p, 'r',encoding='UTF-8') as f:
        reader = csv.reader(f)
        for line in reader:
            label = line[-1]
            # strip BOM. \ufeff for python3,  \xef\xbb\bf for python2
            line = [i.strip('\ufeff').strip('\xef\xbb\xbf') for i in line]

            x1, y1, x2, y2, x3, y3, x4, y4 = list(map(float, line[:8]))
            text_polys.append([[x1, y1], [x2, y2], [x3, y3], [x4, y4]])
            if label == '*' or label == '###':
                text_tags.append(True)
            else:
                text_tags.append(False)
        return np.array(text_polys, dtype=np.float32), np.array(text_tags, dtype=np.bool)
这个函数定义并不复杂我就不赘述了,这里我提示一点在原来的定义中with open(p, ‘r’) as f:
是没有,encoding='UTF-8’这一句的但是由于标记中有的字符很特殊你不给他定义格式的话就会用默认的,就会超出范围,就会报错,所以这里稍加更改。
在代码中这个函数是这样写的:
text_polys, text_tags = load_annoataion(txt_fn)
这里我要说一下文本标记信息的格式:
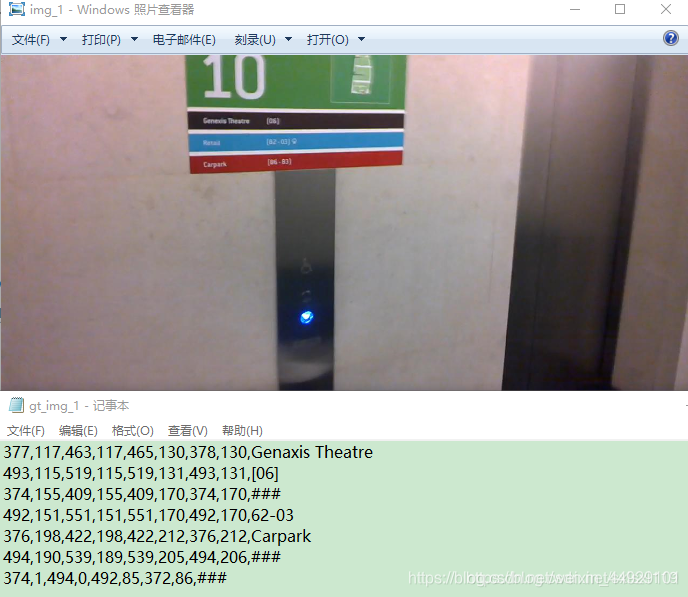
txt中每一行的前8个数字分别是文本框的左上x1,左上y1,右上x2,右上y2,右下x3,右下y3,左下x4,左下y4。最后一列有的是英文有的是数字,有的是###,不是###的表示文本框里面的内容,因为该数据集是英文的,所以基本上是英文和数字。是###的表示标记的文本比较模糊,难以辨认。这个函数读取的就是坐标和文本信息。
check_and_validate_polys
这个函数依然是前辈自己定义的:
text_polys, text_tags = check_and_validate_polys(text_polys, text_tags, (h, w))
作用是:检查文本多边形是否在相同方向上,并过滤一些无效的多边形
让我们看一下它的定义:
def check_and_validate_polys(polys, tags, xxx_todo_changeme):
    '''
    check so that the text poly is in the same direction,
    and also filter some invalid polygons
    :param polys:
    :param tags:
    :return:
    '''
    (h, w) = xxx_todo_changeme
    if polys.shape[0] == 0:
        return polys
    polys[:, :, 0] = np.clip(polys[:, :, 0], 0, w-1)
    polys[:, :, 1] = np.clip(polys[:, :, 1], 0, h-1)

    validated_polys = []
    validated_tags = []
    for poly, tag in zip(polys, tags):
        p_area = polygon_area(poly)
        if abs(p_area) < 1:
            # print poly
            print('invalid poly')
            continue
        if p_area > 0:
            print('poly in wrong direction')
            poly = poly[(0, 3, 2, 1), :]
        validated_polys.append(poly)
        validated_tags.append(tag)
    return np.array(validated_polys), np.array(validated_tags)
没有什么陌生的函数那么我们往下看。
缩放函数
rd_scale = np.random.choice(random_scale)#产生随机大小
                im = cv2.resize(im, dsize=None, fx=rd_scale, fy=rd_scale)
                text_polys *= rd_scale#缩放文本框
这三句我们放在一起说,random函数的作用是产生随机数,用来当做缩放的尺寸,cv2.resize则是完成了图片的缩放,最后一句是对文本框标记的缩放。
根据产生的随机数对数据进行处理
缩放分为两部分:
1)产生的随机数小于3./8时,生成背景图,作为负样本
if np.random.rand() < background_ratio:   # 如果产生的随机数小于background_ratio=3./8,生成负样本?

   # 从图像中随机裁剪一个区域,扩充数据集, 注意这里的crop_background=True
   im, text_polys, text_tags = crop_area(im, text_polys, text_tags, crop_background=True)
   if text_polys.shape[0] > 0:  # 如果随机生成的背景框中包含文本框,则忽略
       # cannot find background
       continue

   # 如果随机生成的背景框中不包含文本框,执行以下操作
   # 填充并调整图像大小
   new_h, new_w, _ = im.shape    # 表示生成的不包含文本的背景框
   max_h_w_i = np.max([new_h, new_w, input_size])   # 选择三者中最大的值
   im_padded = np.zeros((max_h_w_i, max_h_w_i, 3), dtype=np.uint8)  # 生成一个全0矩阵
   im_padded[:new_h, :new_w, :] = im.copy()   # 将图拷贝在全0矩阵上
   im = cv2.resize(im_padded, dsize=(input_size, input_size))   # 将其缩放成指定大小
   score_map = np.zeros((input_size, input_size), dtype=np.uint8)  # 生成空0的得分图
   geo_map_channels = 5 if FLAGS.geometry == 'RBOX' else 8  # 根据不同的类型,确定通道数
   geo_map = np.zeros((input_size, input_size, geo_map_channels), dtype=np.float32)  # 生成全0的多边形图
   training_mask = np.ones((input_size, input_size), dtype=np.uint8)    # 训练mask,全为1
这里我还要稍加解释max_h_w_i = np.max([new_h, new_w, input_size]) 大家可以看出比较大的是input_size而我们说的im.shape尺寸应该小于他,然后我们im_padded = np.zeros((max_h_w_i, max_h_w_i, 3), dtype=np.uint8)相当于用大尺寸做了一张空白图,然后im_padded[:new_h, :new_w, :] = im.copy() 将图片拷贝到新图片中尺寸相当于缩小部分的地方,这会生成什么效果呢。
我自己做了一个图片但是无奈因为网络问题传不上来,我描述一下吧就是一张下图片沾到大图片上,会有大片的空白。
2)产生的随机数大于3./8时,对图片随机裁剪并按相同方法对标记框进行裁剪,同时生成四边形的最小外接矩形:
else:  # 如果产生的随机数大于background_ratio=3./8,
    # 从图像中随机裁剪一个区域,扩充数据集 , 注意这里的crop_background=False
    im, text_polys, text_tags = crop_area(im, text_polys, text_tags, crop_background=False)
    if text_polys.shape[0] == 0:
          continue
    h, w, _ = im.shape

    # 将图像填充到训练输入尺寸或图像的较长边
    new_h, new_w, _ = im.shape
    max_h_w_i = np.max([new_h, new_w, input_size])          # 选择三者中最大值
    im_padded = np.zeros((max_h_w_i, max_h_w_i, 3), dtype=np.uint8)   # 生成全0图
    im_padded[:new_h, :new_w, :] = im.copy()     # 将图像拷贝在全0图上
    im = im_padded
    # resize the image to input size
    new_h, new_w, _ = im.shape      # 新图的尺寸
    resize_h = input_size
    resize_w = input_size
    im = cv2.resize(im, dsize=(resize_w, resize_h))    # 缩放到指定尺寸
    resize_ratio_3_x = resize_w/float(new_w)   # 缩放比例
    resize_ratio_3_y = resize_h/float(new_h)
    text_polys[:, :, 0] *= resize_ratio_3_x    # 坐标x乘以缩放比例
    text_polys[:, :, 1] *= resize_ratio_3_y
    new_h, new_w, _ = im.shape    # 最终新图的尺寸
    score_map, geo_map, training_mask = generate_rbox((new_h, new_w), text_polys, text_tags)
这块原理和上面恰好相反,这相当于裁剪图片,值得一提的是无论是哪种最后我们都要把图片尺寸变回原来的尺寸,否则没法训练。
这两段代码主要依赖于这样一个函数:crop_area(),从而完成这样的功能:从图像中随机裁剪一个区域,扩充数据集, 随机数小于3./8时crop_background=True,生成背景框,
大于3./8时crop_background=False,随机裁剪图像,并同步裁剪文本标记框。函数由前辈自己定义:
def crop_area(im, polys, tags, crop_background=False, max_tries=50):
    '''
    make random crop from the input image
    :param im:
    :param polys:
    :param tags:
    :param crop_background:
    :param max_tries:
    :return:
    '''
    h, w, _ = im.shape
    pad_h = h//10
    pad_w = w//10
    h_array = np.zeros((h + pad_h*2), dtype=np.int32)
    w_array = np.zeros((w + pad_w*2), dtype=np.int32)
    for poly in polys:
        poly = np.round(poly, decimals=0).astype(np.int32)
        minx = np.min(poly[:, 0])
        maxx = np.max(poly[:, 0])
        w_array[minx+pad_w:maxx+pad_w] = 1
        miny = np.min(poly[:, 1])
        maxy = np.max(poly[:, 1])
        h_array[miny+pad_h:maxy+pad_h] = 1
    # ensure the cropped area not across a text
    h_axis = np.where(h_array == 0)[0]
    w_axis = np.where(w_array == 0)[0]
    if len(h_axis) == 0 or len(w_axis) == 0:
        return im, polys, tags
    for i in range(max_tries):
        xx = np.random.choice(w_axis, size=2)
        xmin = np.min(xx) - pad_w
        xmax = np.max(xx) - pad_w
        xmin = np.clip(xmin, 0, w-1)
        xmax = np.clip(xmax, 0, w-1)
        yy = np.random.choice(h_axis, size=2)
        ymin = np.min(yy) - pad_h
        ymax = np.max(yy) - pad_h
        ymin = np.clip(ymin, 0, h-1)
        ymax = np.clip(ymax, 0, h-1)
        if xmax - xmin < FLAGS.min_crop_side_ratio*w or ymax - ymin < FLAGS.min_crop_side_ratio*h:
            # area too small
            continue
        if polys.shape[0] != 0:
            poly_axis_in_area = (polys[:, :, 0] >= xmin) & (polys[:, :, 0] <= xmax) \
                                & (polys[:, :, 1] >= ymin) & (polys[:, :, 1] <= ymax)
            selected_polys = np.where(np.sum(poly_axis_in_area, axis=1) == 4)[0]
        else:
            selected_polys = []
        if len(selected_polys) == 0:
            # no text in this area
            if crop_background:
                return im[ymin:ymax+1, xmin:xmax+1, :], polys[selected_polys], tags[selected_polys]
            else:
                continue
        im = im[ymin:ymax+1, xmin:xmax+1, :]
        polys = polys[selected_polys]
        tags = tags[selected_polys]
        polys[:, :, 0] -= xmin
        polys[:, :, 1] -= ymin
        return im, polys, tags

    return im, polys, tags
后续的代码就是plt绘图方面的说实话本人也不是特别清楚所以暂时不谈,后续的文章会补上。
后续的话
这块模块主要是对数据集的扩充,由于本人才疏学浅大量引用了多位前辈的结论,所以在这特此声明,对各位前辈致以诚挚谢意,和未能一一提及来处的抱歉,由于时间较晚,今天的介绍就先写到这,icdar的剩余模块我们还会在以后的文章一起学习。
