==> 学习汇总(持续更新)
==> 从零搭建后端基础设施系列(一)-- 背景介绍
1.深入浅出之BIO
JAVA的BIO可以说用起来非常简单了,相对于C/C++繁琐的创建、参数指定等,JAVA只需要几步即可。但是如果是新接触JAVA BIO的,是比较难理解,例如本菜鸟,刚接触这个的时候,虽然能照壶画瓢的写出来,但是过后马上忘记,追根究底还是封装得太好,以至于用起来用感觉有点迷糊,理解得不透彻。所以我要把这些相关概念,都给挖清楚。注:不论JAVA如何封装,其底层要么是用windows的socket模型,要么用的是linux的socket模型,所以如果懂得了底层的原理,我们只需要去理解,JAVA为什么要这么封装,封装的手法是怎样的即可。
1.1 简单代码示例
server
public class BIOServer {

    public static void main(String[] args) throws IOException {
        //创建服务端套接字 & 绑定host:port & 监听client
        ServerSocket serverSocket = new ServerSocket(9999);
        //等待客户端连接到来
        Socket socket = serverSocket.accept();
        //拿到输入流 -- client write to server
        InputStream in = socket.getInputStream();
        //拿到输出流 -- server write to client
        OutputStream out = socket.getOutputStream();
        while (true){
            //将数据读到buf中
            byte[] buf = new byte[32];
            //server read from client
            int len = in.read(buf);
            //如果len == 1,说明client已经断开连接
            if(len == -1){
                throw  new RuntimeException("连接已断开");
            }

            System.out.println("recv:" + new String(buf, 0, len));

            //将读出来的数据写回给client
            //如果不使用偏移量,可能会将buf中的无效数据也写回给client
            out.write(buf, 0, len);
        }
    }
}
client
public static void main(String[] args) throws IOException, InterruptedException {
        //创建客户端套接字 & 连接服务器
        Socket socket = new Socket("127.0.0.1", 9999);
        //拿到输入流 -- server write to client, client read from server
        InputStream in = socket.getInputStream();
        //拿到输出流 -- client write to server
        OutputStream out = socket.getOutputStream();
        byte[] send = "hello".getBytes();
        while (true){
            //client write to server
            out.write(send);
            byte[] buf = new byte[32];
            //read from server
            int len = in.read(buf, 0 ,send.length);
            //如果len == 1,说明server已经断开连接
            if(len == -1){
                throw  new RuntimeException("连接已断开");
            }
            System.out.println("recv:" + new String(buf, 0, len));
            Thread.sleep(1000);
        }
    }
1.2 BIO相关概念
- BIO
BIO中的B是Blocking的意思,所以这是一种阻塞的IO模型 - ServerSocket / Socket
服务端 / 客户端套接字,其封装了SocketImpl的操作。SocketImpl是啥呢?
/**
 * The abstract class {@code SocketImpl} is a common superclass
 * of all classes that actually implement sockets. It is used to
 * create both client and server sockets.
 * <p>
 * A "plain" socket implements these methods exactly as
 * described, without attempting to go through a firewall or proxy.
 *
 * @author  unascribed
 * @since   JDK1.0
 */
public abstract class SocketImpl implements SocketOptions {
    /**
     * The actual Socket object.
     */
    Socket socket = null;
    ServerSocket serverSocket = null;
	……
}
源码中有解释,大概意思说,这是一个公共的抽象类,所有的socket实现类,都要继承该 类。并且是用来创建server和client socket的。 那么socket都有哪几种实现类呢?
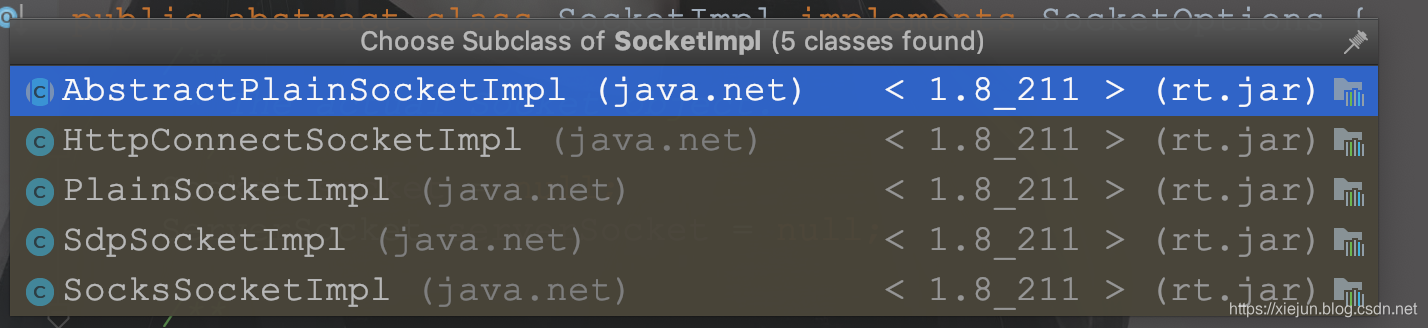
其中需要关注AbstractPlainSocketImpl 和 SocksSocketImpl实现,AbstractPlainSocketImpl是SocketImpl默认的实现,可以这么理解,AbstractPlainSocketImpl简单的实现了,create、accept、listen、bind、connect等操作。
/**
 * Default Socket Implementation. This implementation does
 * not implement any security checks.
 * Note this class should <b>NOT</b> be public.
 *
 * @author  Steven B. Byrne
 */
abstract class AbstractPlainSocketImpl extends SocketImpl
{
……
}
SocksSocketImpl间接继承AbstractPlainSocketImpl,SocksSocketImpl再将默认实现,封装一层。
/**
 * SOCKS (V4 & V5) TCP socket implementation (RFC 1928).
 * This is a subclass of PlainSocketImpl.
 * Note this class should <b>NOT</b> be public.
 */

class SocksSocketImpl extends PlainSocketImpl implements SocksConsts {
……
}
它对SOCKS V4&V5协议进行封装,它会先尝试是否可以用V4协议,不行就会用V5。两个协议的区别。一般情况下ServerSocket / Socket, 默认会使用SocksSocketImpl。
	/**
     * Sets impl to the system-default type of SocketImpl.
     * @since 1.4
     */
    void setImpl() {
        if (factory != null) {
            impl = factory.createSocketImpl();
            checkOldImpl();
        } else {
            // No need to do a checkOldImpl() here, we know it's an up to date
            // SocketImpl!
            impl = new SocksSocketImpl();
        }
        if (impl != null)
            impl.setSocket(this);
    }
最后,我们应该都清楚ServerSocket / Socket是什么回事了吧,其实就是前者封装了服务端的操作,后者封装了客户端的操作,所以不要傻傻分不清了。
- InputStream / OutputStream
输入输出流,JAVA将一切IO操作都定义为流的操作,socket IO也不例外,所以ServerSocket的InputStream对应Socket的OutputStream,意思为client 写数据到OutputStream,server从InputStream中读取出来。反之亦然。
顺便提一句,Socket使用的stream是SocketInputStream / SocketOutputStream,它们又继承了FileInputStream / FileOutputStream,因为socket也是一种文件描述符(fd)。
1.3 一张图理解BIO
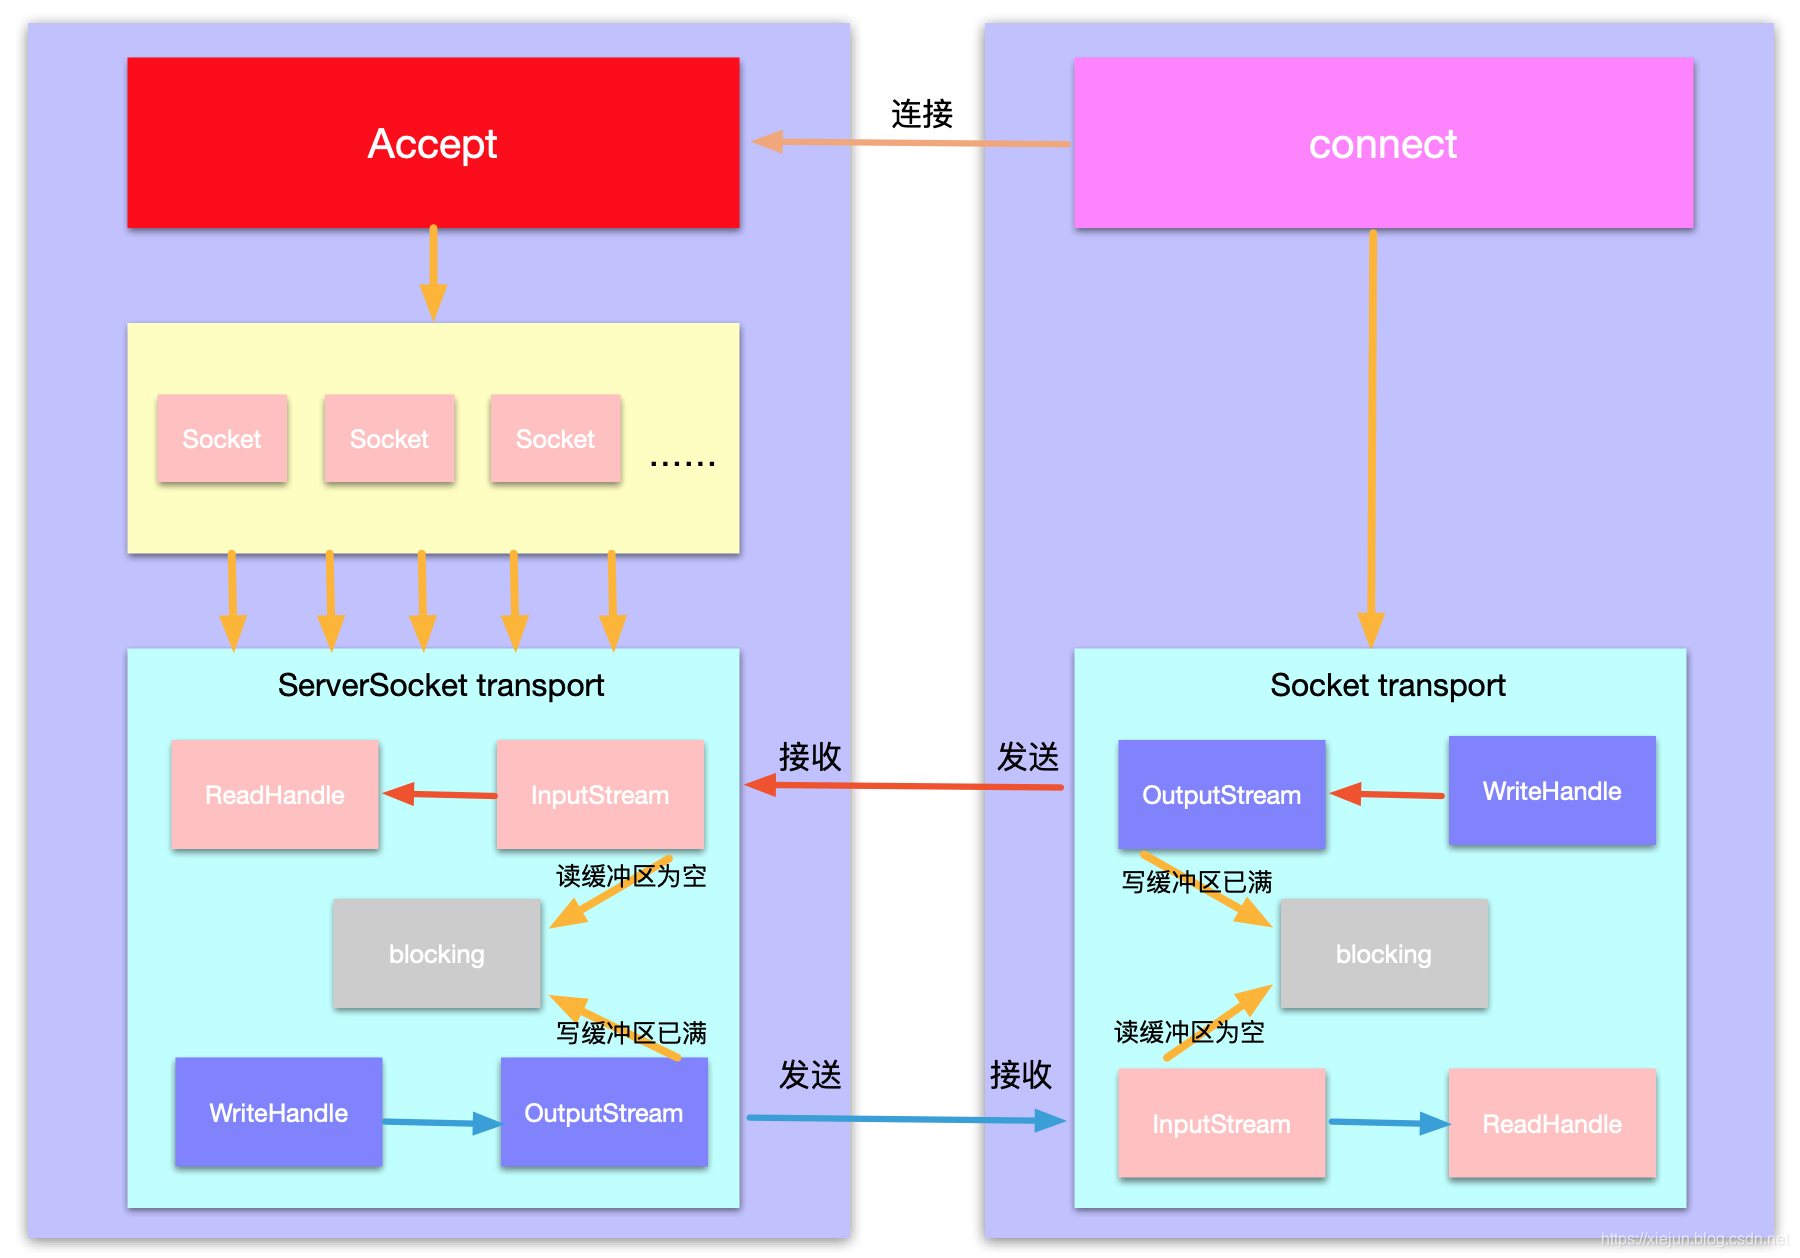
从图中可以看出
- 服务端
1.使用一个线程accept客户端的请求,accept会阻塞
2.使用N个线程处理和客户端之前的通信
3.每个线程(socket)都拥有自己的transport逻辑。内部读写可分离成读线程和写线程。
4.read和write都会阻塞。 - 客户端
1.逻辑很简单,一个线程处理读写,或者读写双线程都行。
1.4 Q&A
-
BIO只能是阻塞的吗?
是的,ServerSocket并没有提供设置非阻塞的参数,而你又改不了底层的代码,所以只能是阻塞的。为什么会产生这样的疑问呢?因为在C/C++中,就算你不使用select模型,你照样可以用非阻塞模式。 -
write可以设置为非阻塞吗?
答案是可以的,但是JAVA BIO不支持,所以read的时候,如果读缓冲区为空,是会阻塞在那里的,同理,write的时候,写缓冲区已满,也会阻塞再那里。 -
如何理解Socket中的InputStream / OutputStream ?
其实答案就在上图中,你可以理解为每个socket都有两条管道,一条可以将数据发送出去(out),另一条可以将另一端发送来的数据读出来(in)。 -
BIO真的只能一个client一个线程处理吗?
当然了,你要是强行一个线程处理所有的事情,那肯定是没问题的,但是效率会非常之慢就是了。例如当你阻塞在read/write的时候,就会accept不到client的请求,又或者你阻塞在别的client的read的时候,其它client的read、write你都不能进行处理。说白了就是强行串行化了。 -
……
2.深入浅出之NIO
java NIO真的比较绕,因为它不直接使用流的概念,而使用Channel。还加入了一个缓冲区Buffer的概念,所以我觉得要想弄明白NIO,首先先弄清楚什么是Buffer和Channel。其次才是selector,select底层模型其实比较简单, 一句话概括就是选择可用的socket进行accept、read和write操作。2.1 简单代码示例
serverpublic class NIOServer {
public static void main(String[] args) throws IOException {
//创建服务端socket通道 & 绑定host:port
ServerSocketChannel serverSocketChannel = ServerSocketChannel.open().bind(new InetSocketAddress(9999));
//设置为非阻塞模式
serverSocketChannel.configureBlocking(false);
//新创建一个selector(其实可以为每一个channel单独创建一个selector)
Selector selector = Selector.open();
//将该通道注册到该selector上,并且注明感兴趣的事件,因为是服务端通道,所以只对accept事件感兴趣
serverSocketChannel.register(selector, SelectionKey.OP_ACCEPT);
while (true){
//selector会帮我们去轮询,当前是否有我们感兴趣的事件发生,一直阻塞到有为止
//select还有一个方法,可以指定阻塞时间,超过这个时间就会返回,此时可能返回的key个数为0
selector.select();
//若返回的key个数不为0,那么就可以一一处理这些事件
Set<SelectionKey> selectionKeys = selector.selectedKeys();
Iterator<SelectionKey> iterator = selectionKeys.iterator();
while (iterator.hasNext()){
SelectionKey selectionKey = iterator.next();
//remove是为了下一次select的时候,重复处理这些已经处理过的事件
//什么意思呢?其实selector.selectedKeys()返回来的set,就是其
//内部操作的set,引用的是同一个set,所以我们如果不在外面remove已经
//处理的事件,那么下一次,还会再次出现。需要注意的是,如果在外面对set
//进行add操作,会抛异常,简单的说就是在外只删不增,在内只增不删。
iterator.remove();
//SelectionKey.OP_ACCEPT事件
if(selectionKey.isAcceptable()){
SocketChannel socketChannel = ((ServerSocketChannel) selectionKey.channel()).accept();
socketChannel.configureBlocking(false);
socketChannel.register(selector, SelectionKey.OP_READ);
//SelectionKey.OP_READ事件
} else if(selectionKey.isReadable()){
//selectionKey.channel()返回的SelectableChannel是SocketChannel的父类
//所以可以直接强转
SocketChannel socketChannel = (SocketChannel)selectionKey.channel();
//NIO规定,必须要用Buffer进行读写
ByteBuffer buffer = ByteBuffer.allocate(32);
int len = socketChannel.read(buffer);
if(len == -1){
throw new RuntimeException("连接已断开");
}
//上面那一步只是读到缓冲区,这里是从缓冲区真正的拿出数据
byte[] buf = new byte[len];
//这个操作可以举个例子
//例如read(buffer)的时候,其实内部是调用了buffer.put这个方法
//那么read结束,position的位置必定等于len
//所以我们必须重置一下position为0,才可以从头开始读,但是读到什么地方呢?
//那就需要设置limit = position,所以flip后,position=0, limit = len
buffer.flip();
buffer.get(buf);
System.out.println("recv:" + new String(buf, 0, len));
//注册写事件
selectionKey.interestOps(selectionKey.interestOps() | SelectionKey.OP_WRITE);
//SelectionKey.OP_WRITE事件
} else if(selectionKey.isWritable()){
SocketChannel socketChannel = (SocketChannel)selectionKey.channel();
//写数据,也要用Buffer来写
int len = socketChannel.write(ByteBuffer.wrap("hello".getBytes()));
if(len == -1){
throw new RuntimeException("连接已断开");
}
//这里为什么要取消写事件呢?因为只要底层的写缓冲区不满,就会一直收到这个事件
//所以只有想写数据的时候,才要注册这个写事件
selectionKey.interestOps(selectionKey.interestOps() & ~SelectionKey.OP_WRITE);
}
}
}
}
}
client
public class NIOClient {
    public static void main(String[] args) throws IOException, InterruptedException {
        //创建客户端socket通道 & 连接host:port
        SocketChannel socketChannel = SocketChannel.open();
        //设置为非阻塞模式
        socketChannel.configureBlocking(false);
        //非阻塞的形式连接服务器,如果直接使用open带参数的,连接的时候是阻塞连接
        socketChannel.connect(new InetSocketAddress("127.0.0.1", 9999));
        //新创建一个selector
        Selector selector = Selector.open();
        //将该通道注册到该selector上,并且注明感兴趣的事件
        socketChannel.register(selector, SelectionKey.OP_CONNECT | SelectionKey.OP_READ);
        while (true){
            selector.select();
            Set<SelectionKey> selectionKeys = selector.selectedKeys();
            Iterator<SelectionKey> iterator = selectionKeys.iterator();
            while (iterator.hasNext()){
                SelectionKey selectionKey = iterator.next();
                iterator.remove();
                //连接事件
                if(selectionKey.isConnectable()){
                    //看源码的注释可以知道,如果不使用带参数的open,那么需要手动调用这个方法完成连接
                    //如果是阻塞模式,该方法会阻塞到连接成功,非阻塞模式下,会立刻返回,已连接true,未连接false
                    if(socketChannel.finishConnect()){
                        //需要取消连接事件,否则会一直触发该事件,注册写事件
                        selectionKey.interestOps(selectionKey.interestOps() & ~SelectionKey.OP_CONNECT | SelectionKey.OP_WRITE);
                    }
                } else if(selectionKey.isReadable()){
                    ByteBuffer buffer = ByteBuffer.allocate(32);
                    int len = socketChannel.read(buffer);
                    if(len == -1){
                        throw  new RuntimeException("连接已断开");
                    }
                    byte[] buf = new byte[len];
                    buffer.flip();
                    buffer.get(buf);
                    System.out.println("recv:" + new String(buf, 0, len));
                    selectionKey.interestOps(selectionKey.interestOps() | SelectionKey.OP_WRITE);
                } else if(selectionKey.isWritable()){
                    int len = socketChannel.write(ByteBuffer.wrap("hello".getBytes()));
                    if(len == -1){
                        throw  new RuntimeException("连接已断开");
                    }
                    selectionKey.interestOps(selectionKey.interestOps() & ~SelectionKey.OP_WRITE);
                    //这个只是控制一下发送数据的速度
                    Thread.sleep(1000);
                }
            }
        }
    }
}
2.2 NIO相关概念
- Buffer概念
缓冲区,它的内存分配有两种实现,第一种是jvm堆内存分配缓冲区大小,第二种是直接内存分配缓冲区大小。这两种的详细区别,这里不好展开讲,简单说呢,使用jvm堆内存做缓冲区,易于垃圾回收,速度比直接内存更快,但是将数据拷贝到内核空间却需要两次,第一次是拷贝到对外内存,对外内存再到内核空间。如图
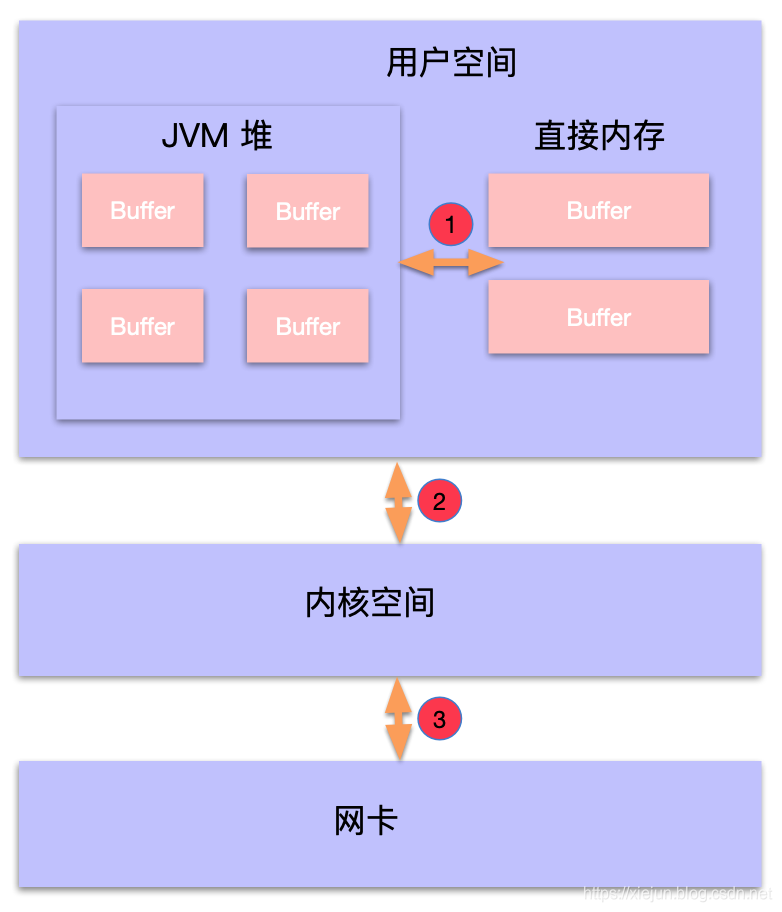
然后,我们来讲本质上,Buffer是这个什么东西,其实它就是一个数组,然后给你提供各种骚操作,仅此而已。 - Buffer重要的几个参数
直接来个读写的例子
//分配32个字节大小的空间
ByteBuffer buffer = ByteBuffer.allocate(32);
//需要写入的字节数组
byte[] writeBuf = "hello".getBytes();
//调用put将数据写入缓冲区
buffer.put(writeBuf);
//重置position和limit,为下一次的读做准备
buffer.flip();
byte[] readBuf = new byte[5];
//将缓冲区的数据读到readBuf数组中
buffer.get(readBuf);
System.out.println(new String(readBuf));
接下来,我们来断点调试看看Buffer中参数的变化
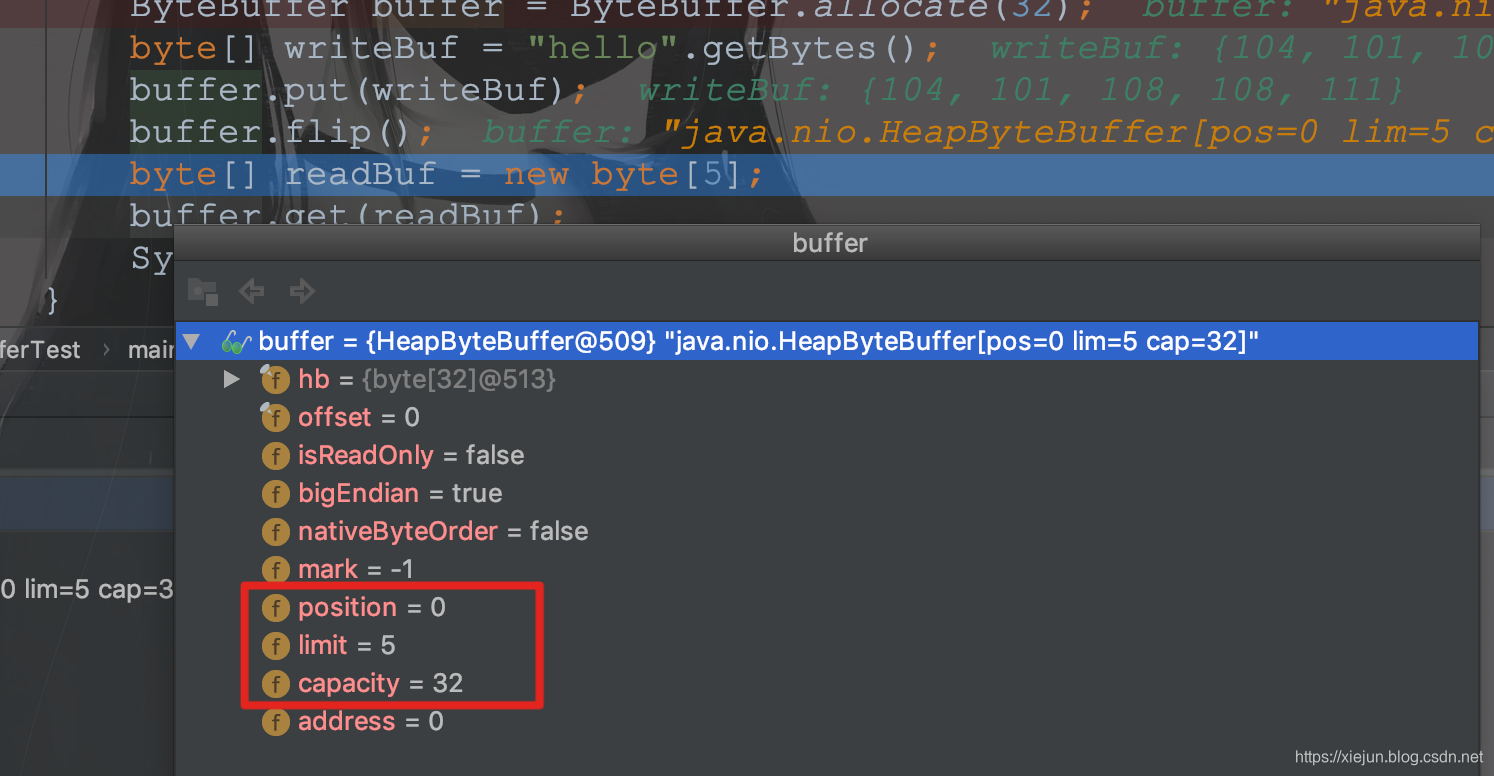
首先,分配大小后

看,IDE都给你把重点参数显眼的放在第一行了。
1.hb就是Buffer中的那个数组,就是那个高大上的缓冲区
2.position就是当前可操作的位置(例如开始从position读,开始从position写)
3.limit就是可操作的限定范围(例如读的时候,你不能读超过limit后面的数据,写的时候,你不能写超过limit后的数据)。一般初始化时limit=cap
4.cap就是Buffer(hb)的大小
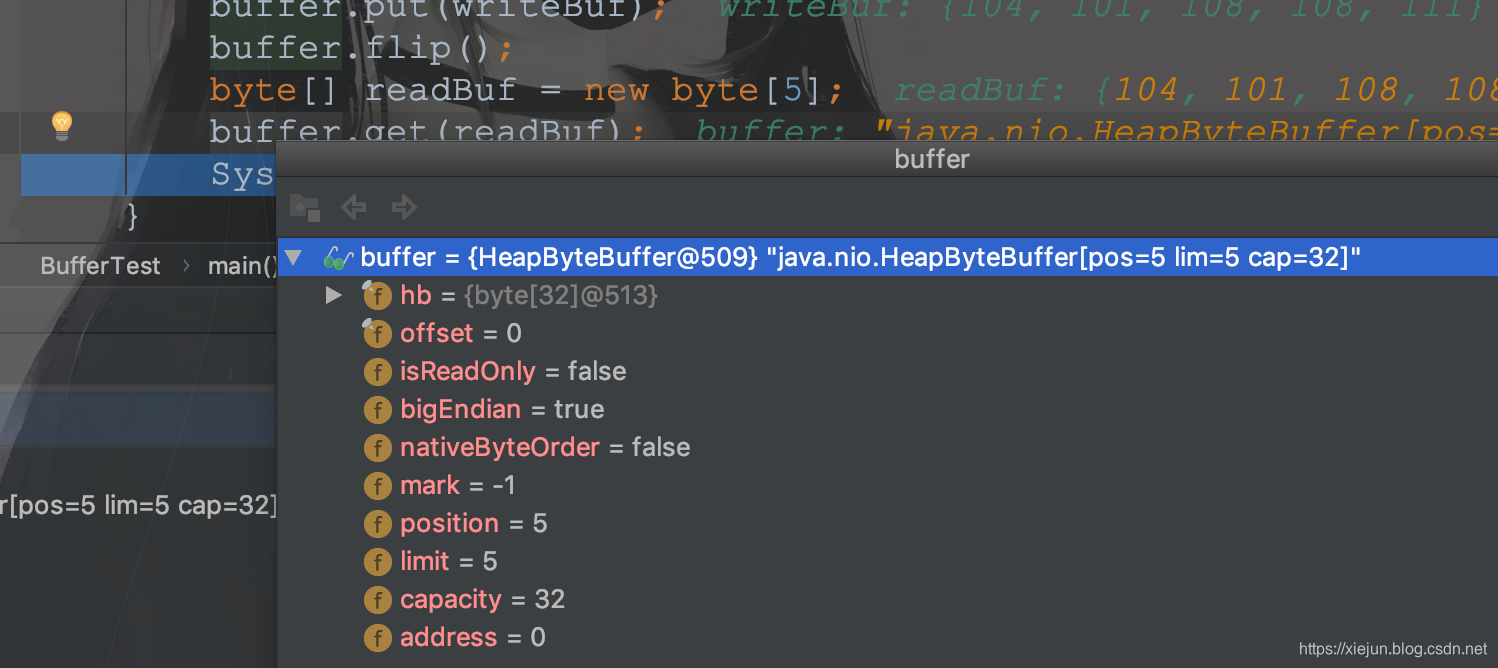
接下来将数据写入缓冲区
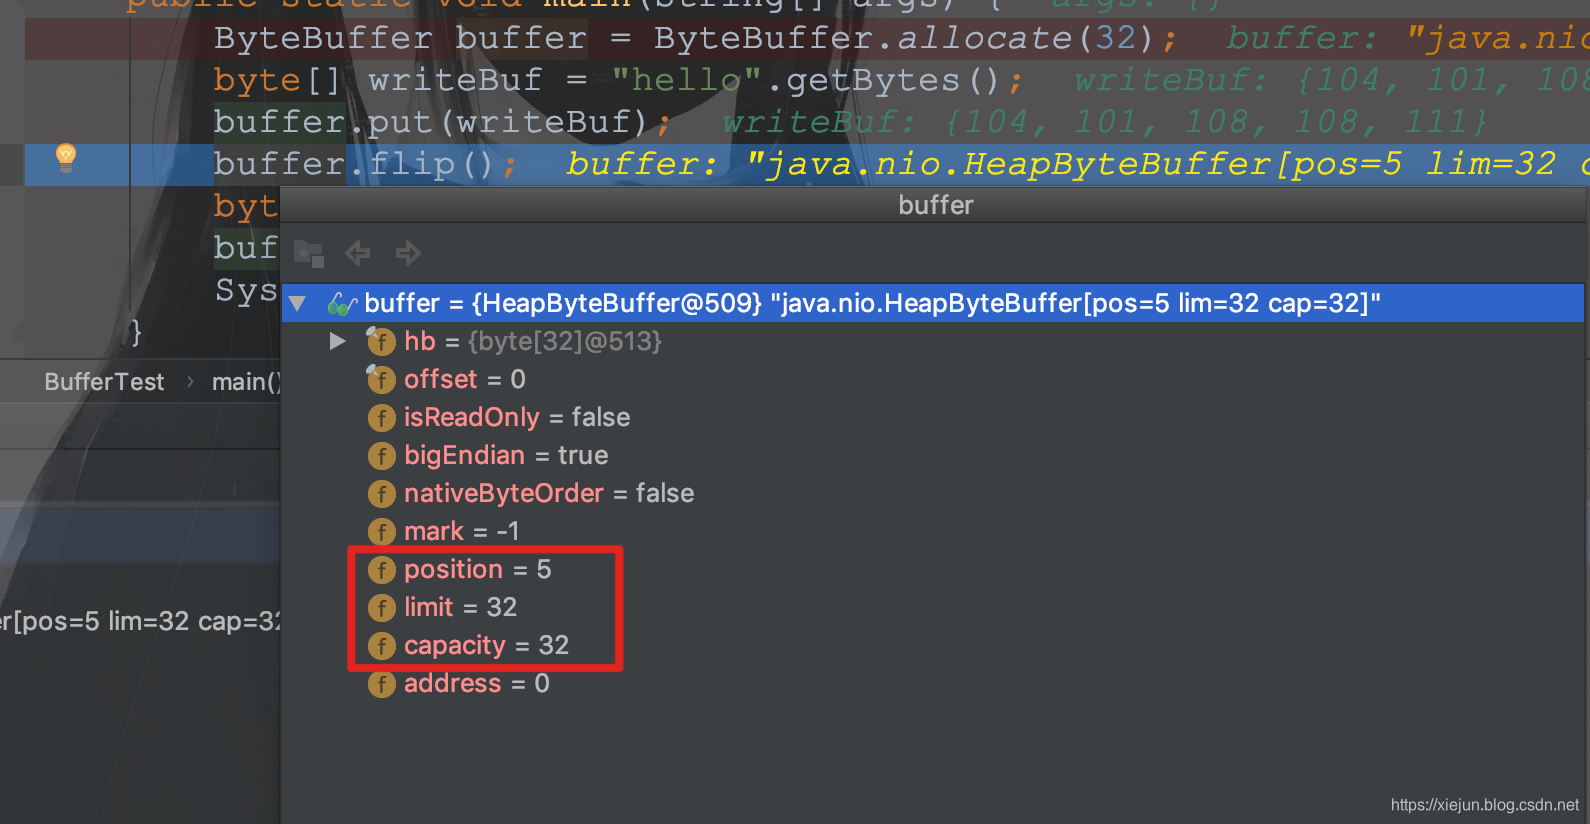
可以看到,只有position变了,因为写入了5个字节,那么下一次写入的位置肯定是hb[5]的位置,所以position=5
让我们想一想,如果下一次读的时候,我们直接从hb[5]开始读吗?显示不会,这样根本就读不到东西,所以就有了flip这个方法,看一下它的源码
public final Buffer flip() {
    limit = position; //将limit限制到5这个位置,相当于写的末尾
    position = 0;    //将position重新置为0,相当于写的开始
    mark = -1;
    return this;
}
调用这个方法后,读的时候,就会从写的开始读到写的末尾,是不是正好把写进去的数据读出来了?只要弄清楚了这三个参数的意义,其它参数不过是在这三个参数上锦上添花。
最后读取数据
到这里可能会有人疑惑,那如果我要再次写入呢?现在limit=position了,写不进去了。没错,所以还需要一个重新置位的方法clear
将代码修改后
ByteBuffer buffer = ByteBuffer.allocate(32);
while (true){
    byte[] writeBuf = "hello".getBytes();
    buffer.put(writeBuf);
    buffer.flip();
    byte[] readBuf = new byte[5];
    buffer.get(readBuf);
    buffer.clear();
    System.out.println(new String(readBuf));
}
来看一下clear的源码
public final Buffer clear() {
    position = 0;
    limit = capacity;
    mark = -1;
    return this;
}
看,是不是回到了最初的样子~
- chanel概念
chanel和inputstream / outputstream的区别是,前者是双向的,后者是单向的。也就是说,只要你创建一个chanel,你可以用这个chanel进行读写操作。并且chanel是基于Buffer来操作的,不管是读还是写都需要通过Buffer这个东东。画个图,简单理解一下。
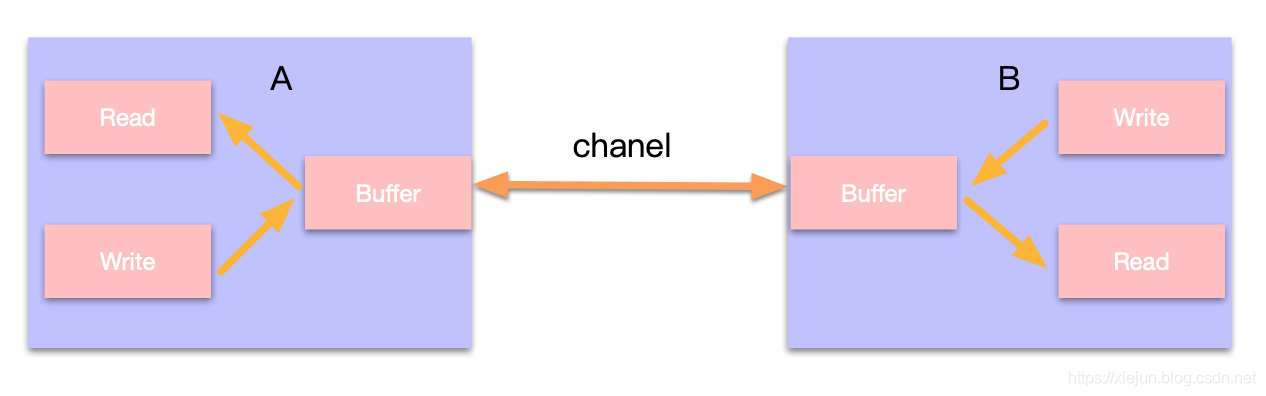
图中很直观的表现出A和B的chanel都是通过Buffer来读写数据的。上图虽然只画了一个Buffer,但是不止可以有一个Buffer,你可以创建一个读Buffer一个写Buffer都是可以的。
chanel的读写方法,请看定义
public abstract int read(ByteBuffer buffer)
public abstract int write(ByteBuffer buffer)
- chanel的两种实现对比
FileChannel和SocketChannel,读写的实现的区别FileChannel的读写继承至SeekableByteChannel,SocketChannel继承至ReadableByteChannel,如图
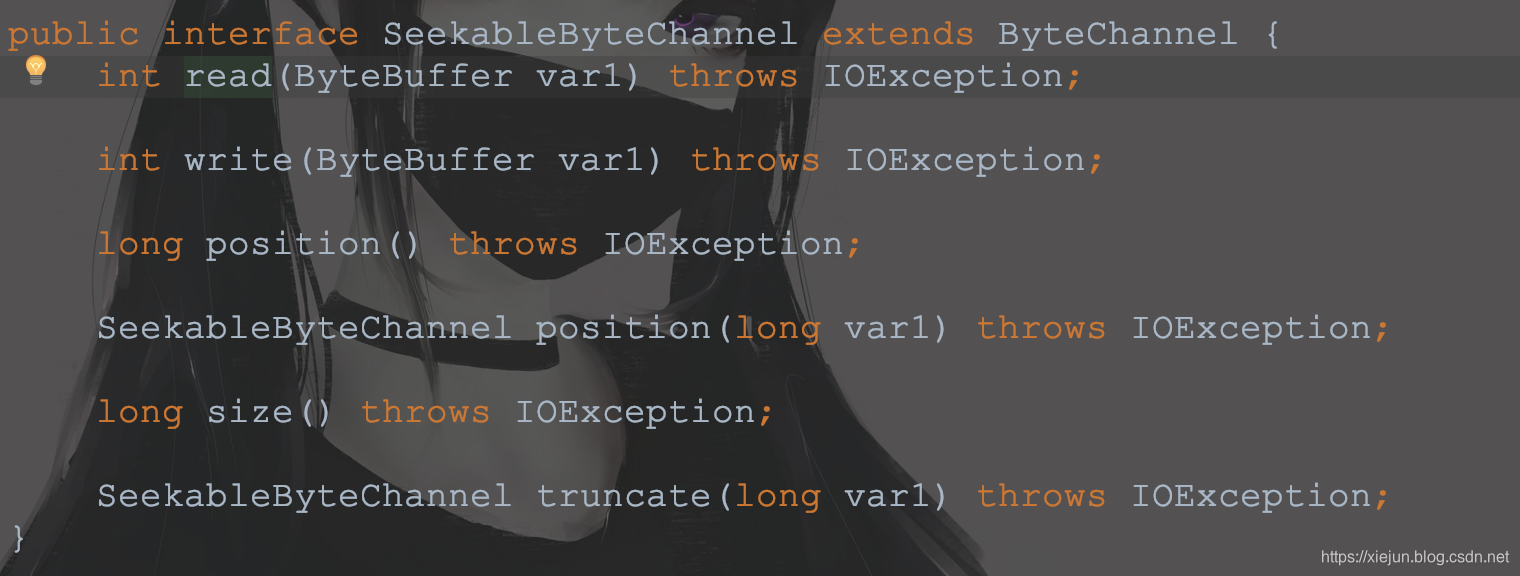

很明显,从名字就可以看出,SeekableByteChannel支持记录文件的当前位置,所以当使用
FileChannel读写文件的时候,不仅需要注意文件position的值,还需要Buffer position的值。这里来一个FileChannel读写文件的小例子。
public static void main(String[] args) throws IOException, InterruptedException {
        //创建文件通道
        FileChannel fileChannel = FileChannel.open(new File("a.txt").toPath(), new StandardOpenOption[]{StandardOpenOption.WRITE, StandardOpenOption.READ});
        //读缓冲区
        ByteBuffer readBuffer = ByteBuffer.allocate(32);
        int i = 0;
        while (true){
            //记录写入的字节数
            int wLen = fileChannel.write(ByteBuffer.wrap(("" + ++i) .getBytes()));
            //将文件的位置重置为写之前的位置,为下次读做准备
            //这里是需要特别注意的,如果没有这一步,你写是写成功了,但是读永远不会成功,因为此时position永远在末尾
            fileChannel.position(fileChannel.position() - wLen);
            //文件数据读到buffer中,读取完后,position的位置又回到上一步写结束的位置了
            int rLen = fileChannel.read(readBuffer);
            byte[] buf = new byte[rLen];
            //Buffer的读操作
            readBuffer.flip();
            readBuffer.get(buf);
            readBuffer.clear();
            System.out.println(new String(buf));
            Thread.sleep(1000);
        }
    }
SocketChannel的话,就只需要关注Buffer就行,比较简单。FileChannel不能设置非阻塞,并且看实现,也不能使用selector。
- selector
选择器,这个是最好懂的了,如果不明白的话,可以去百度搜select模型,如果是熟悉windows的,可以看我之前写过的文章select模型服务器设计,如果是熟悉linux的,已经有很多人分析过select模型了。
2.3 一张图理解NIO
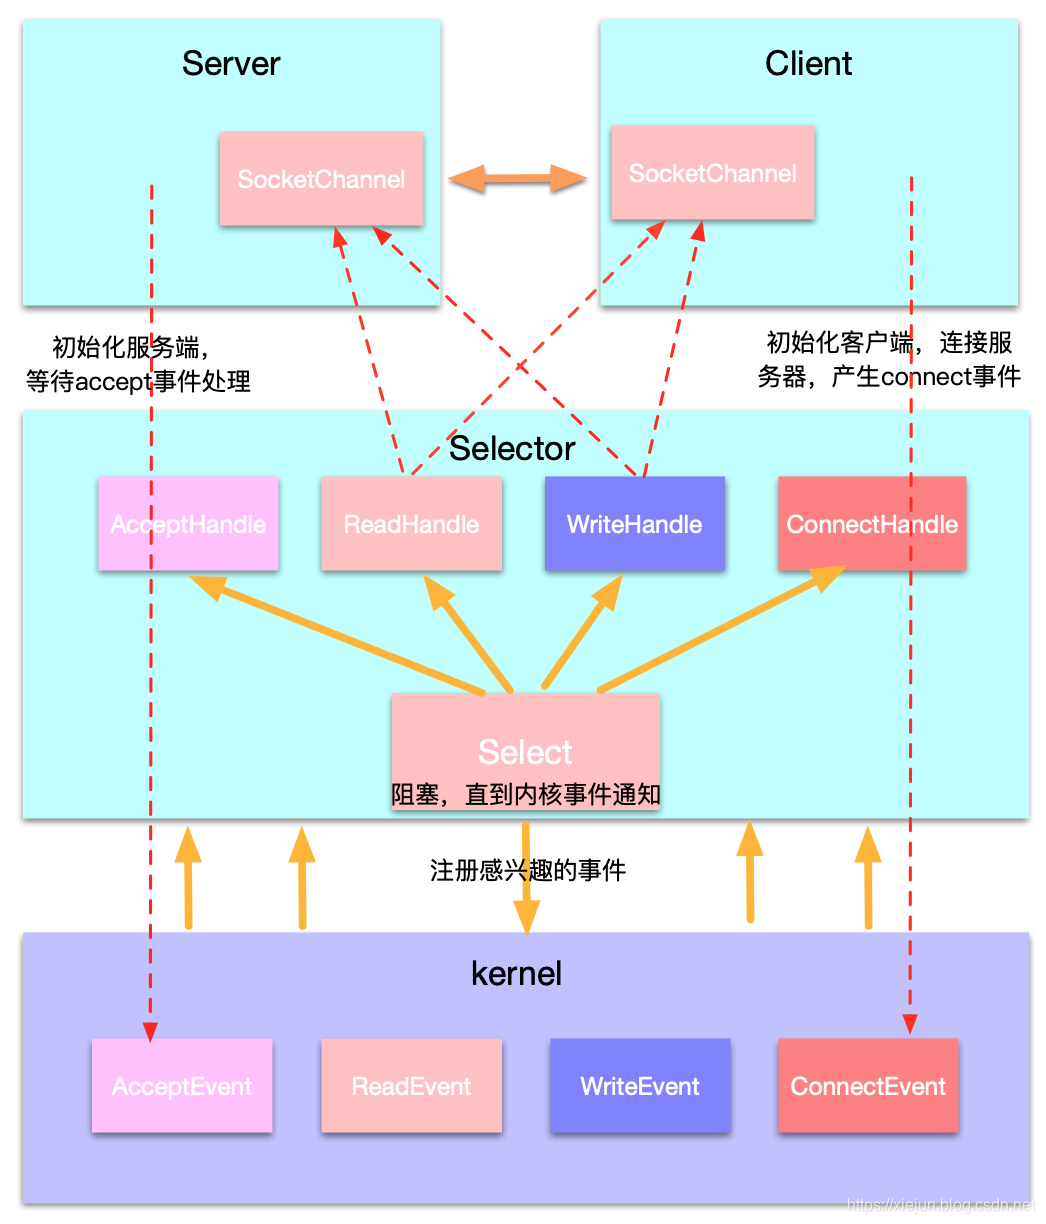
从图中可以看到,我们不再主动的去请求内核,而是让它有主动通知我们。
最终,我们都是在读处理和写处理中,用channel发送/接收数据。
2.4 Q&A
-
Channel和Buffer的关系?
可以这么类比
channel.read(buffer)
buffer.read(buf)
相当于
in.read(buf)
抛开stream和channel的差别,其实只是多了一个缓冲区。如图

-
使用Buffer的好处?
肯定很多人在写demo的时候,觉得Buffer并没有什么用啊?
因为可能demo一般都这么写
ByteBuffer buffer = ByteBuffer.allocate(32);
……
channel.read(buffer);
……
byte[] buf = new byte[32];
buffer.read(buf);
瞧,这样不是脱了裤子放屁吗?为什么不直接内核copy到我的buf呢?没错,如果是这样写,确实太鸡肋了,但是这样写,就可以体现出好处了。
ByteBuffer buffer = ByteBuffer.allocate(1024 * 4);
……
channel.read(buffer);
……
while(true){
byte[] buf = new byte[32];
buffer.read(buf);
//handle
}
如果有1024 * 4个字节,那么没有缓冲区,需要1024 * 4 / 32 次IO操作,
现在有了缓冲区,那么只需要一次IO操作,其它操作都在内存中进行,是不是高效了很多呢? -
write事件有什么用?
我们假设如果不支持write异步,那么是不是会发生BIO的write阻塞的问题?
所以,这个write事件就是,当可以写的时候,我会通知你,你不需要阻塞在那里等着。
可能有人会疑问,那我想写的内容,如何异步的时候写呢?SelectionKey有这么一个方法attach(Object ob)方法,可以附加参数,所以,当你想异步写的时候,先把写的内容放进去,等收到可写消息,再拿出来写即可。 -
connect事件有什么用?
因为connect都是客户端发起,一般只会发起一次,直接阻塞调用不就好了?
确实是可以的,但是为了解耦发起连接和处理连接这两个事情,所以需要异步connect。 -
为什么我在别的线程增加感兴趣的事件不生效?
准确的说,可能会生效,这是为什么呢?因为select会阻塞,当select阻塞的时候,你再
增加例如写事件,那么此时它是不会自动感知到的,必须得等下一次才能拿到最新的感兴趣事件。这时候就需要一个方法了,wakeup,可以直接唤醒select,这样下一次select的时候,就能拿到你新增感兴趣的事件了。
3.深入浅出之AIO
如果理解了NIO,那么AIO其实就不难。NIO是通知你,有可用事件,需要你去处理一下,读写还是得你自己搞定。AIO也是通知你,但是,它是通知你,已经读完/写完了,你只需要从Buffer中取数就行了,真正意义上的异步。NIO为什么不是真正意义上的异步呢?因为,当收到读事件,我们需要主动发起一次IO操作,这是同步进行的。3.1 简单代码示例
server
public static void main(String[] args) throws IOException, InterruptedException {
        //创建异步服务端通道 & 绑定host:port
        AsynchronousServerSocketChannel serverSocketChannel = AsynchronousServerSocketChannel.open().bind(new InetSocketAddress(9999));
        //异步accept客户端请求,第一个参数是附加参数,透传进去的,可以为null
        //第二个参数是异步处理,回调的时候会调用里面的方法
        serverSocketChannel.accept(serverSocketChannel, new AcceptHandle());
        //main线程阻塞
        while (true){
            Thread.sleep(10000);
        }
    }

    //accept事件处理
    static class AcceptHandle implements CompletionHandler<AsynchronousSocketChannel, AsynchronousServerSocketChannel>{

        //当有客户端请求进来,会自动回调这个方法
        @Override
        public void completed(AsynchronousSocketChannel socketChannel, AsynchronousServerSocketChannel serverSocketChannel) {
            //异步处理读事件,其中第一个参数是Buffer,用来存放读取的数据
            //第二个参数是附加参数,一直透传,啥也不干
            //第三个参数是异步处理读结果的类,当读成功或者失败的时候,会回调里面的方法
            ChannelInfo channelInfo = new ChannelInfo(socketChannel);
            socketChannel.read(channelInfo.getReadBuffer(), channelInfo, new ReadHandle());
            serverSocketChannel.accept(serverSocketChannel, this);
        }

        @Override
        public void failed(Throwable throwable, AsynchronousServerSocketChannel serverSocketChannel) {
            throwable.printStackTrace();
        }
    }

    //read事件处理
    static class ReadHandle implements CompletionHandler<Integer, ChannelInfo>{

        //当读成功时会回调(只要不报错,都算是成功)
        @Override
        public void completed(Integer integer, ChannelInfo channelInfo) {
            //读取长度大于0再处理
            if(integer > 0){
                //channel Buffer正常操作
                ByteBuffer buffer = channelInfo.getReadBuffer();
                buffer.flip();
                byte[] buf = new byte[buffer.remaining()];
                buffer.get(buf);
                buffer.clear();
                System.out.println("recv:" + new String(buf));
                //异步写,参数和read参数一模一样
                channelInfo.getWriteBuffer().put(buf);
                channelInfo.getWriteBuffer().flip();
                channelInfo.getSocketChannel().write(channelInfo.getWriteBuffer(), channelInfo, new WriteHandle());
            }
            //这一步一定要有,否则就只能接收到一次
            //其实说白了,你想异步读数据,那么就传一个人家规定好的回调方法,完成的时候,让他自动的去调用你这个方法
            //所以,每读一次,都需要传一次
            channelInfo.getSocketChannel().read(channelInfo.getReadBuffer(), channelInfo, this);
        }

        @Override
        public void failed(Throwable throwable, ChannelInfo channelInfo) {
            throwable.printStackTrace();
        }
    }

    //write时间处理
    static class WriteHandle implements CompletionHandler<Integer, ChannelInfo>{

        //写完成后,会调用这个方法
        @Override
        public void completed(Integer integer, ChannelInfo channelInfo) {
            System.out.println("write bytes:" + integer);
            channelInfo.getWriteBuffer().clear();
        }

        @Override
        public void failed(Throwable throwable, ChannelInfo channelInfo) {
            throwable.printStackTrace();
        }
    }

    @Getter
    @Setter
    static class ChannelInfo{
        AsynchronousSocketChannel socketChannel;
        ByteBuffer readBuffer;
        ByteBuffer writeBuffer;
        public ChannelInfo(AsynchronousSocketChannel socketChannel){
            this.socketChannel = socketChannel;
            this.readBuffer = ByteBuffer.allocate(32);
            this.writeBuffer = ByteBuffer.allocate(32);
        }
    }
client
public static void main(String[] args) throws IOException, ExecutionException, InterruptedException {
        //创建客户端通道
        AsynchronousSocketChannel socketChannel = AsynchronousSocketChannel.open();
        //异步连接,使用Future.get等待连接成功后返回
        //当然也可以使用方法回调,这里简单演示,就不用了
        socketChannel.connect(new InetSocketAddress("127.0.0.1", 9999)).get();
        ByteBuffer readBuffer = ByteBuffer.allocate(32);
        ByteBuffer writeBuffer = ByteBuffer.allocate(32);
        while (true){
            //正常buffer写操作
            writeBuffer.put("hello".getBytes());
            writeBuffer.flip();
            //异步写,使用Future.get等待写成功
            socketChannel.write(writeBuffer).get();
            writeBuffer.clear();
            //异步读,使用Future.get等待读成功
            int len = socketChannel.read(readBuffer).get();
            byte[] buf = new byte[len];
            readBuffer.flip();
            readBuffer.get(buf);
            readBuffer.clear();
            System.out.println("recv:" + new String(buf));
            Thread.sleep(1000);
        }
    }
3.2 AIO相关概念
AIO的概念NIO的基本差不多,我觉得只有一个需要讲一下。那就是CompletionHandler
这是个什么东东呢?来看一下它的接口定义
public interface CompletionHandler<V,A> {

    /**
     * Invoked when an operation has completed.
     *
     * @param   result
     *          The result of the I/O operation.
     * @param   attachment
     *          The object attached to the I/O operation when it was initiated.
     */
    void completed(V result, A attachment);

    /**
     * Invoked when an operation fails.
     *
     * @param   exc
     *          The exception to indicate why the I/O operation failed
     * @param   attachment
     *          The object attached to the I/O operation when it was initiated.
     */
    void failed(Throwable exc, A attachment);
}
看出来了吧,只要你实现了这个接口,然后将它当做参数传进去。那么,当它完成读/写的时候会回调completed这个方法,同理报错的时候,会回调failed这个方法。当你深入源码中,会发现,确实有这么一段代码调用了这两个方法。
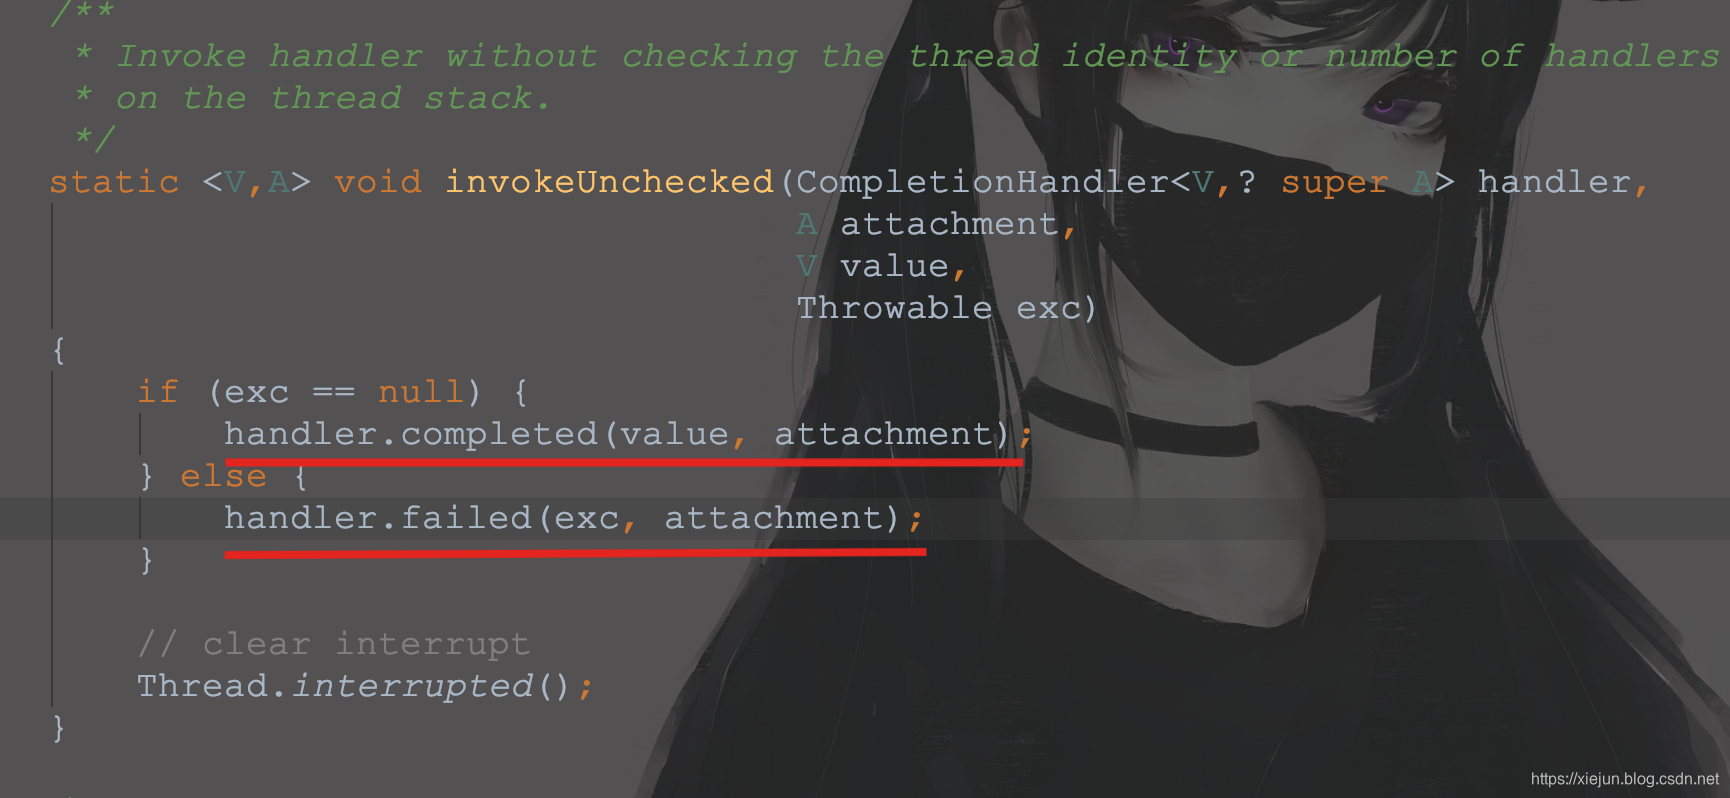
其中的attachment是附加参数,一直透传,不会被改变。
所以,总结一下就是,你异步的发起read操作,将Buffer和CompletionHandler当做参数传进去即可,其中Buffer是用来缓存从内核读取到的数据的,CompletionHandler里的方法是读取完成后会被调用的,一目了然了就。
3.3 一张图理解AIO
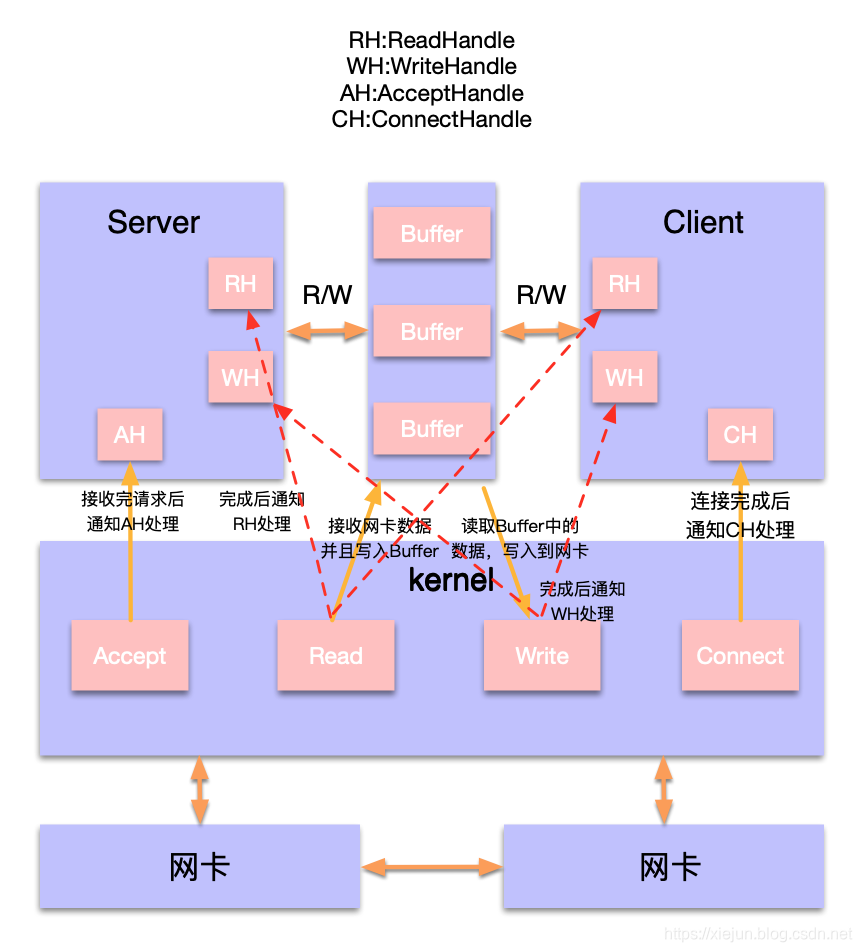
这个图较之NIO的,从下往上更加明显,给人的感觉就像是Server和Client就是通过Buffer来R/W一样。其实异步的目的就是让我们更专注于这一部分而已。其它都交给系统帮你完成,完全的解耦开来。
3.4 Q&A
-
为什么在completed方法中,需要再一次调用accept/read?
其实底层有两种做法,第一种就是这种,你每调一次read,传一个handle进去,
处理完了,它回调handle中的方法。第二种是你只需要调一次read,传一个handle进去
底层会有一个死循环,不停的read,然后不停的调用handle中是方法。如果优化得好,第二种未尝不可,但是缺少可定制化的效果吧估计是。使用第一种,你可以想什么时候read就
什么时候read,但是使用第二种你就会不停的被调用,你会被迫的去处理它。 -
为什么根据网上很多人的写的AIO demo都只能发送/接收一次数据?
答案就是上面第一点,没有再次调用read/write。就不能再次接收/发送。 -
AIO中的接口一般都有附加参数,这是为什么?
你想想,异步操作,当你提交一个read请求,不是立即顺序处理的,而是在另一个地方处理,那是不是会碰到你想用的某个参数,在另一个地方用不到?所以提交一个异步请求的时候就需要一个附加参数,一直透传,等它回调你的处理方法的时候,你再拿出来,就可以使用到这个参数了。 -
AIO性能会比NIO更好吗?
理论来说是的,因为异步I/O是一个底层支持的操作,你想想,中断是不是比你轮询有效率得多。但是却几乎没有任何框架用AIO这种模型,为什么呢?因为java的AIO,甚至linux的AIO都有一点猫腻,嘿嘿,这个下回分解,这里不再展开了。
4.总结
最后总结一下使用上的流程。
-
BIO
server端:
1.创建ServerSocket(有的构造函数已经包含了bind)
2.accept等待client连接
3.使用accept返回的Socket中的InputStream/OutputStream进行通信client端:
1.创建Socket(有的构造函数已经包含了connect)
2.使用Socket中的InputStream/OutputStream进行通信 -
NIO
server端:
1.创建ServerSocketChannel
2.使用ServerSocketChannel中的ServerSocket绑定host:port
3.设置非阻塞模式
4.创建Selector
5.将ServerSocketChannel注册到selector中(这个清楚,别理解反拉)
6.select阻塞
7.遍历就绪的事件
8.一一处理就绪事件Client端:
1.创建SocketChannel
2.设置非阻塞模式
3.连接server
4.创建Selector
5.将SocketChannel注册到selector中(这个清楚,别理解反拉)
6.select阻塞
7.遍历就绪的事件
8.一一处理就绪事件 -
AIO
server端:
1.创建AsynchronousServerSocketChannel
2.异步调用accept
3.AcceptHandle里异步调用read(这一步不是必须的,demo常规操作而已)
4.ReadHandle处理读完成的数据
5.WriteHandle确认写成功client端:
1.创建AsynchronousSocketChannel
2.异步调用connect
3.ConnectHandle里异步调用read(这一步不是必须的,demo常规操作而已)
4.ReadHandle处理读完成的数据
5.WriteHandle确认写成功
4.1 BIO、NIO和AIO优缺点
不想照抄网上了,就大家自己多多思考了。
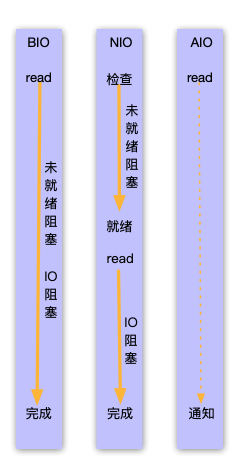
4.2 一张图理解三者区别
这个图相信大家都见过,这里只是为了加深印象,画一下。
4.3 详细代码实例
==> CODE
后续还会围绕socket进行一系列的文章深入探讨。

 博客专家
博客专家