Spring boot 自启动starter
Spring boot starter自定义
我们在学习spring boot的过程中发现了很多已经写好的starter类但是你知道吗?在我们日常的开发中我们也可以自己制作starter,ok以下听狗头哥哥慢慢给你娓娓道来!
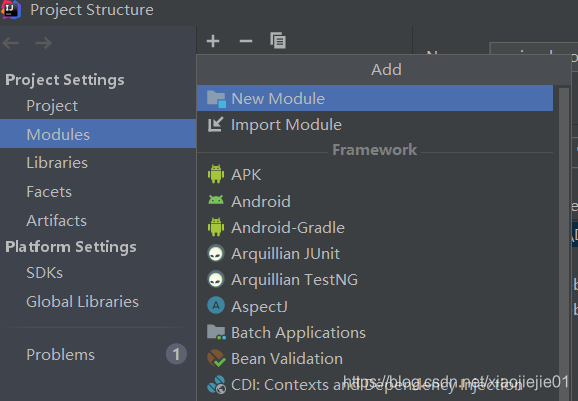
一. 创建项目spring-boot-starter-diy
在该项目中添加module:dog-spring-boot-starter和dog-spring-boot-starter-autoconfigure

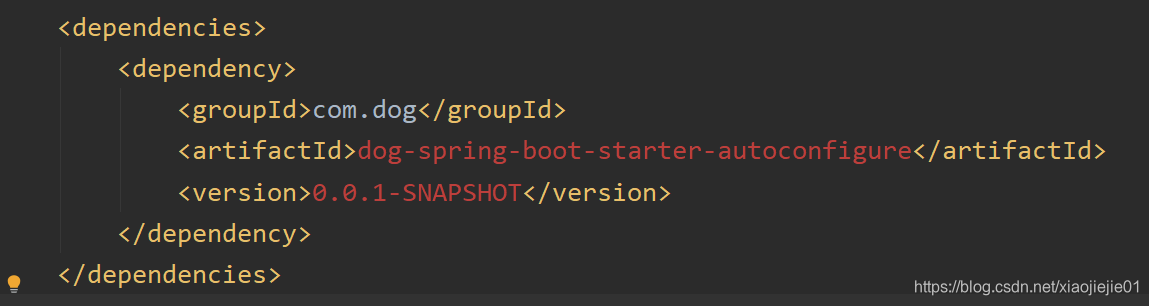
二.在dog-spring-boot-starter中添加一个自己的dependency
三.好了做好以上准备可以在dog-spring-boot-starter-autoconfigure中写自己的starter了,先编写自己的HelloProperties:
import org.springframework.boot.context.properties.ConfigurationProperties;

@ConfigurationProperties(prefix = "com.hello")
public class HelloProperties {
    private String prefix;
    private String suffix;

    public String getPrefix() {
        return prefix;
    }

    public void setPrefix(String prefix) {
        this.prefix = prefix;
    }

    public String getSuffix() {
        return suffix;
    }

    public void setSuffix(String suffix) {
        this.suffix = suffix;
    }
}
然后是自己的HelloService:
public class HelloService {
    HelloProperties helloProperties;

    public HelloProperties getHelloProperties() {
        return helloProperties;
    }

    public void setHelloProperties(HelloProperties helloProperties) {
        this.helloProperties = helloProperties;
    }
    public String sayHello(String name){
        return helloProperties.getPrefix()+name+helloProperties.getSuffix();
    }
}
然后写自己的HelloServiceAutoConfiguration:
import org.springframework.beans.factory.annotation.Autowired;
import org.springframework.boot.autoconfigure.condition.ConditionalOnWebApplication;
import org.springframework.boot.context.properties.EnableConfigurationProperties;
import org.springframework.context.annotation.Bean;
import org.springframework.context.annotation.Configuration;

@Configuration
@ConditionalOnWebApplication
@EnableConfigurationProperties(HelloProperties.class)
public class HelloServiceAutoConfiguration {
    @Autowired
    HelloProperties helloProperties;
    @Bean
    public HelloService helloService(){
        HelloService service = new HelloService();
        service.setHelloProperties(helloProperties);
        return service;
    }
}
然后在resource下创建META-INF/spring.factories配置如下:

然后点击右侧maven:
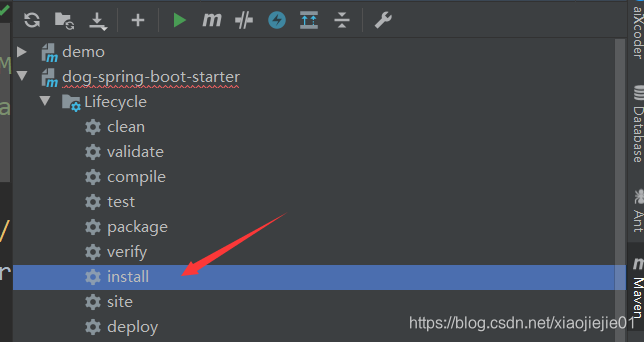
之后会在target目录下生成jar包dog-spring-boot-starter-autoconfigure-0.0.1-SNAPSHOT.jar完成。
四.完成上面这些后我们可以创建新的项目来测试我们写的starter,自己的controller:
import com.dog.HelloService;
import org.springframework.beans.factory.annotation.Autowired;
import org.springframework.web.bind.annotation.RequestMapping;
import org.springframework.web.bind.annotation.RestController;

@RestController
public class HelloController {
    @Autowired
    HelloService helloService;
    @RequestMapping("/hello")
    public String hello(){
        return helloService.sayHello("goutou");
    }
}
之后我们要导入自己写的jar包在resource目录下创建自己的lib包复制jar包在maven依赖中导入该jar包
<dependency>
			<groupId>com.dog</groupId>
			<artifactId>dog-spring-boot-starter-autoconfigure</artifactId>
			<version>0.0.1-SNAPSHOT</version>
            <systemPath>${basedir}/src/main/resources/lib/dog-spring-boot-starter-autoconfigure-0.0.1-SNAPSHOT.jar</systemPath>
        </dependency>
然后启动项目;访问http://localhost:8080/hello。ok我们的自定义starter已经完成了。
谢谢大家有帮助的点赞支持一下!