概述:drawable 资源是一个比较广泛的概念,drawable目录下面用好几种drawable资源。包括: 1. Bitmap File, (.png, .png, .gif), 映射的类型是BitmapDrawable。 2. Nine-Patch File, 点9文件, 映射的类型是NinePatchDrawable。 3. Layer List, 层级列表, 索引越大,越在最上面, 映射的类型是LayerListDrawable。 4. State List, 申请列表, 映射的类型是StateListDrawable。 5. Level List, 等级列表, 每个item都有一个maxLevel值, 映射类型是LevelListDrawable。6. Transition Drawable, 两个drawable资源之间切换, 映射的类型是TransitionDrawable。 7. Inset Drawable, 如果View的背景需要比View的尺寸小的时候,这个时候就派上用场了。 8. Clip Drawable,剪切drawable, 映射的类型是 ClipDrawable。 9. Scale Drawable, 缩放drawable, 映射的类型ScaleDrawable。 10. Shape Drawable, 几何形状, 映射的类型ShapeDrawable。
一、Bitmap
android系统支持3中格式: .png(支持最好), .jpg(可以接受), .gif(不推荐)。
文件位置:res/drawable/filename.png (.png, .jpg, .gif)
映射类型:BitmapDrawable。
引用方式: 1. 在java中, R.drawable.filename。 2. 在xml中, @[package:]drawable/filename。
实例:
<ImageView
    android:layout_height="wrap_content"
    android:layout_width="wrap_content"
    android:src="@drawable/myimage" />
Resources res =XML BitmapgetResources(); Drawable drawable = res.getDrawable(R.drawable.myimage);
文件位置:res/drawable/filename.xml
映射类型:BitmapDrawable。
引用方式: 1. 在java中, R.drawable.filename。 2. 在xml中, @[package:]drawable/filename。
<?xml version="1.0" encoding="utf-8"?>
<bitmap
    xmlns:android="http://schemas.android.com/apk/res/android"
    android:src="@[package:]drawable/drawable_resource"
    android:antialias=["true" | "false"]
    android:dither=["true" | "false"]
    android:filter=["true" | "false"]
    android:gravity=["top" | "bottom" | "left" | "right" | "center_vertical" |
                      "fill_vertical" | "center_horizontal" | "fill_horizontal" |
                      "center" | "fill" | "clip_vertical" | "clip_horizontal"]
    android:mipMap=["true" | "false"]
    android:tileMode=["disabled" | "clamp" | "repeat" | "mirror"] />
<bitmap>
定义一个bitmap资源。
xmlns:android
只有<bitmap>作为xml的根节点的时候需要填写这个属性, 如果<bitmap>作为其他节点的子节点的时候,就不要这个属性了, 比如<bitmap>作为<item>的子节点的时候,就不需要了。
android:src
指向的bitmap资源。
android:antialias
boolean类型, 是否抗锯齿。
android:dither
boolean类型, 是否脉冲。
android:filter
android:gravity
关键字,
top |
Put the object at the top of its container, not changing its size. |
bottom |
Put the object at the bottom of its container, not changing its size. |
left |
Put the object at the left edge of its container, not changing its size. |
right |
Put the object at the right edge of its container, not changing its size. |
center_vertical |
Place object in the vertical center of its container, not changing its size. |
fill_vertical |
Grow the vertical size of the object if needed so it completely fills its container. |
center_horizontal |
Place object in the horizontal center of its container, not changing its size. |
fill_horizontal |
Grow the horizontal size of the object if needed so it completely fills its container. |
center |
Place the object in the center of its container in both the vertical and horizontal axis, not changing its size. |
fill |
Grow the horizontal and vertical size of the object if needed so it completely fills its container. This is the default. |
clip_vertical |
Additional option that can be set to have the top and/or bottom edges of the child clipped to its container's bounds. The clip is based on the vertical gravity: a top gravity clips the bottom edge, a bottom gravity clips the top edge, and neither clips both edges. |
clip_horizontal |
Additional option that can be set to have the left and/or right edges of the child clipped to its container's bounds. The clip is based on the horizontal gravity: a left gravity clips the right edge, a right gravity clips the left edge, and neither clips both edges. |
android:tileMode
关键字
| Value | Description |
|---|---|
disabled |
Do not tile the bitmap. This is the default value. |
clamp |
Replicates the edge color if the shader draws outside of its original bounds |
repeat |
Repeats the shader's image horizontally and vertically. |
mirror |
Repeats the shader's image horizontally and vertically, alternating mirror images so that adjacent images always seam. |
<?xml version="1.0" encoding="utf-8"?>
<bitmap xmlns:android="http://schemas.android.com/apk/res/android"
    android:src="@drawable/icon"
    android:tileMode="repeat" />
二、Nine-Patch
文件位置:res/drawable/filename.9.png
映射类型:NinePatchDrawable。
引用方式:1. 在java中, R.drawable.filename。 2. 在xml中, @[package:]drawable/filename。
实例:
<Button
    android:layout_height="wrap_content"
    android:layout_width="wrap_content"
    android:background="@drawable/myninepatch" />
XML Nine-Patch
文件位置:res/drawable/filename.xml
映射类型:NinePatchDrawable。
引用方式:1. 在java中, R.drawable.filename。 2. 在xml中, @[package:]drawable/filename。
<?xml version="1.0" encoding="utf-8"?>
<nine-patch
    xmlns:android="http://schemas.android.com/apk/res/android"
    android:src="@[package:]drawable/drawable_resource"
    android:dither=["true" | "false"] />
<nine-patch>
.9资源。
xmlns:android
命名空间, 值为:“http://schemas.android.com/apk/res/android”。这个值是固定的。
android:src
指向的一个.9资源。
android:dither
三、Layer List
文件位置:res/drawable/filename
映射类型:LayerListDrawable。
引用方式:1. 在java中, R.drawable.filename。 2. 在xml中, @[package:]drawable/filename。
<?xml version="1.0" encoding="utf-8"?>
<layer-list
    xmlns:android="http://schemas.android.com/apk/res/android" >
    <item
        android:drawable="@[package:]drawable/drawable_resource"
        android:id="@[+][package:]id/resource_name"
        android:top="dimension"
        android:right="dimension"
        android:bottom="dimension"
        android:left="dimension" />
</layer-list>
<layer-list>
层级列表。
xmlns:android
命名空间, 和上面一样, 下面如果还有这个属性,就不做解释了。
<item>
android:drawable
指向的一个drawable资源。
android:id
指定一个id,可以通过View.findViewById(int)或Activity.findViewById(int)找到。然后可以做些修改。方便在java代码中,动态修改。
android:top, android:right, android:bottom, android:left
分别是,上,右, 下, 左。
在使用<layer-list>的时候有一个地方需要注意,<item>可以是一个自闭节点,然后指向一个drawable资源,也可以包含<bitmap>节点。
实例:
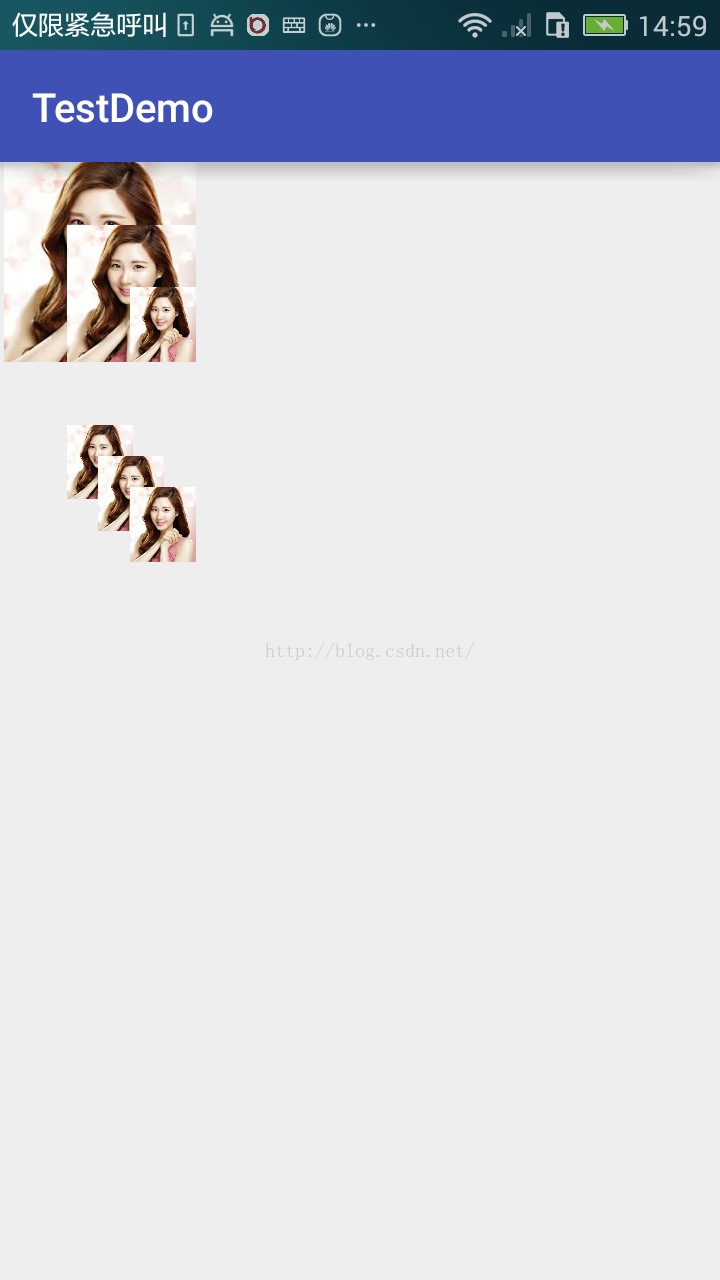
主布局文件:
<?xml version="1.0" encoding="utf-8"?>
<LinearLayout xmlns:android="http://schemas.android.com/apk/res/android"
    android:layout_width="match_parent"
    android:layout_height="match_parent"
    android:orientation="vertical">

    <ImageView
        android:layout_width="100dp"
        android:layout_height="100dp"
        android:src="@drawable/layer_list1" />

    <ImageView
        android:layout_width="100dp"
        android:layout_height="100dp"
        android:src="@drawable/layer_list2" />
</LinearLayout>
layer_list1.xml 文件:
<?xml version="1.0" encoding="utf-8"?>
<layer-list xmlns:android="http://schemas.android.com/apk/res/android">

    <item
        android:id="@+id/image1"
        android:drawable="@mipmap/images1" />

    <item
        android:id="@+id/image1"
        android:drawable="@mipmap/images1"
        android:top="100dp"
        android:left="100dp"/>

    <item
        android:id="@+id/image1"
        android:top="200dp"
        android:left="200dp"
        android:drawable="@mipmap/images1" />
</layer-list>
layer_list2.xml 文件:
<?xml version="1.0" encoding="utf-8"?>
<layer-list xmlns:android="http://schemas.android.com/apk/res/android">

    <item>
        <bitmap android:src="@mipmap/images3"
            android:gravity="center" />
    </item>
    <item android:top="100dp" android:left="100dp">
        <bitmap android:src="@mipmap/images3"
            android:gravity="center" />
    </item>
    <item android:top="200dp" android:left="200dp">
        <bitmap android:src="@mipmap/images3"
            android:gravity="center" />
    </item>
</layer-list>
效果图:
四、State List
申明列表, 描述列表。
简单说就是,事先在xml文件中,列出一系列drawable和状态对应的<item>。
文件位置:res/drawable/filename。
映射类型:StateListDrawable。
引用方式:1. 在java中, R.drawable.filename。 2. 在xml中, @[package:]drawable/filename。
<?xml version="1.0" encoding="utf-8"?>
<selector xmlns:android="http://schemas.android.com/apk/res/android"
    android:constantSize=["true" | "false"]
    android:dither=["true" | "false"]
    android:variablePadding=["true" | "false"] >
    <item
        android:drawable="@[package:]drawable/drawable_resource"
        android:state_pressed=["true" | "false"]
        android:state_focused=["true" | "false"]
        android:state_hovered=["true" | "false"]
        android:state_selected=["true" | "false"]
        android:state_checkable=["true" | "false"]
        android:state_checked=["true" | "false"]
        android:state_enabled=["true" | "false"]
        android:state_activated=["true" | "false"]
        android:state_window_focused=["true" | "false"] />
</selector>
<selector>
android:constantSize
boolean类型。
android:dither
boolean类型。
android:variablePadding
boolean类型。
<item>
android:drawable
指向drawable资源。
android:state_pressed
boolean类型,表示:按下状态。后面的都是各种不同的状态。比如获得焦点状态, 被选择状态等等。。
实例:
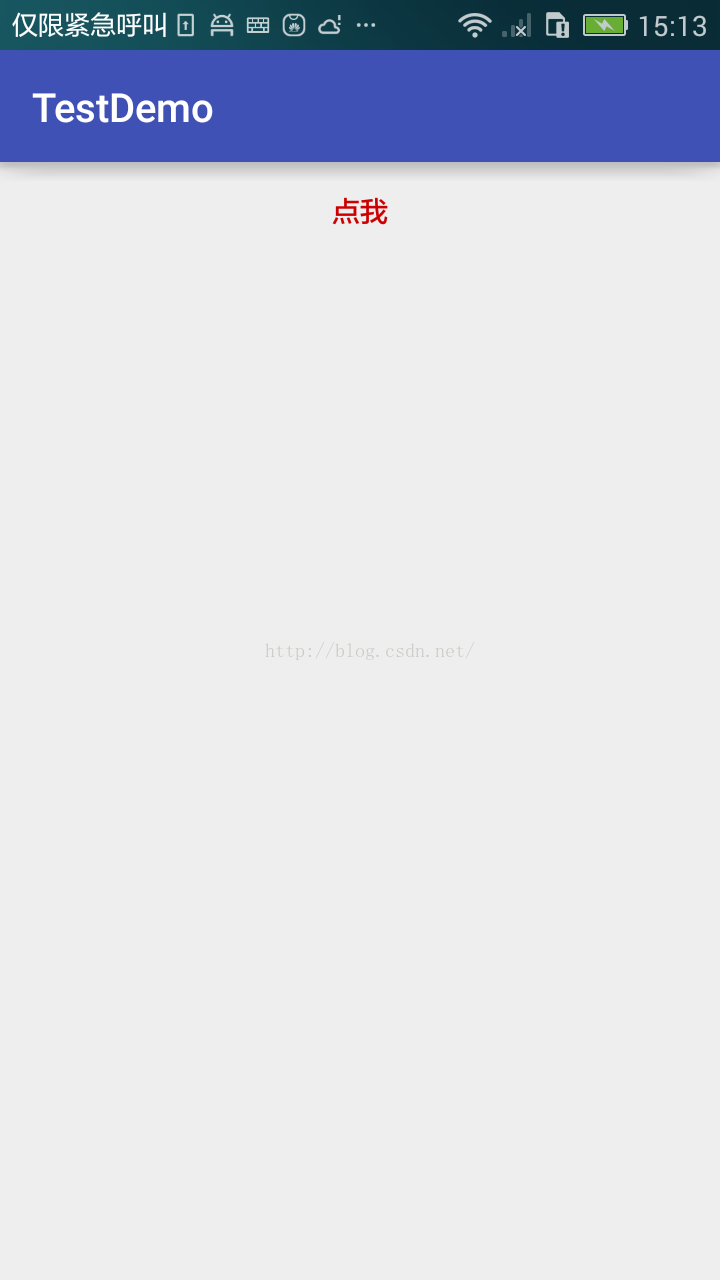
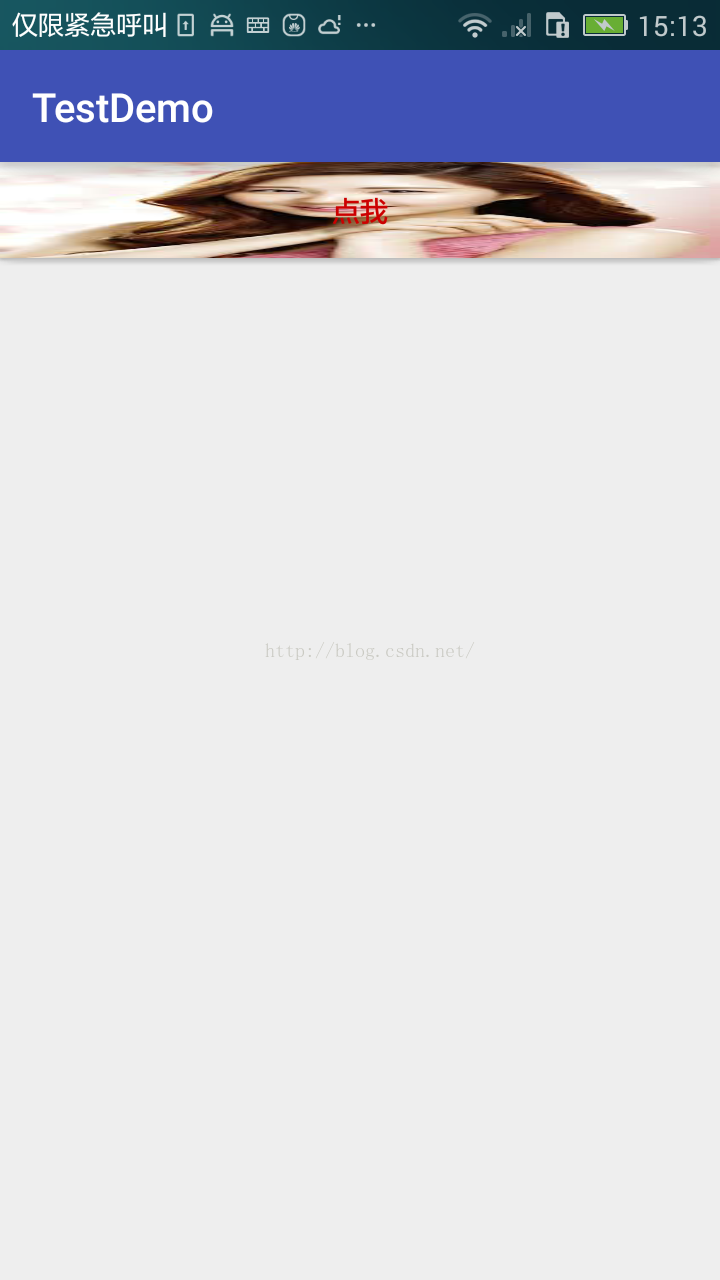
主布局文件:
<?xml version="1.0" encoding="utf-8"?>
<LinearLayout xmlns:android="http://schemas.android.com/apk/res/android"
    android:layout_width="match_parent"
    android:layout_height="match_parent"
    android:orientation="vertical">

    <Button
        android:layout_width="match_parent"
        android:layout_height="wrap_content"
        android:background="@drawable/state_list_drawable"
        android:text="点我"
        android:textColor="@android:color/holo_red_dark" />
</LinearLayout>
state_list_drawable.xml 文件:
<?xml version="1.0" encoding="utf-8"?>
<selector xmlns:android="http://schemas.android.com/apk/res/android">

    <item android:drawable="@mipmap/images1" android:state_pressed="true" />
    <item android:drawable="@mipmap/images2" android:state_focused="true" />
    <item android:drawable="@mipmap/images3" android:state_hovered="true" />
</selector>
效果图:
五、Level List
文件位置:res/drawable/filename。
映射类型:LevelListDrawable。
引用方式:1. 在java中, R.drawable.filename。 2. 在xml中, @[package:]drawable/filename。
<?xml version="1.0" encoding="utf-8"?>
<level-list
    xmlns:android="http://schemas.android.com/apk/res/android" >
    <item
        android:drawable="@drawable/drawable_resource"
        android:maxLevel="integer"
        android:minLevel="integer" />
</level-list>
<level-list>
<item>
android:drawable
指向drawable资源。
android:maxLevel
最大level。
android:minLevel
最小level。
实例:
主布局文件:
<?xml version="1.0" encoding="utf-8"?>
<LinearLayout xmlns:android="http://schemas.android.com/apk/res/android"
    android:layout_width="match_parent"
    android:layout_height="match_parent">

    <ImageView
        android:id="@+id/imageView"
        android:layout_width="match_parent"
        android:layout_height="match_parent"
        android:src="@drawable/level_list" />
</LinearLayout>
level_list.xml 文件:
<?xml version="1.0" encoding="utf-8"?>
<level-list xmlns:android="http://schemas.android.com/apk/res/android">

    <item
        android:drawable="@mipmap/images1"
        android:maxLevel="0" />

    <item
        android:drawable="@mipmap/images2"
        android:maxLevel="1" />
</level-list>
java代码:
@Override
protected void onCreate(Bundle savedInstanceState) {
    super.onCreate(savedInstanceState);
    setContentView(R.layout.activity_level_list);

    final ImageView image = (ImageView) findViewById(R.id.imageView);
    assert image != null;
    image.setClickable(true);
    image.setOnClickListener(new View.OnClickListener() {
        @Override
        public void onClick(View v) {
            LevelListDrawable drawable = (LevelListDrawable) image.getDrawable();
            if (drawable.getLevel() == 0) {
                image.setImageLevel(1);
            } else {
                image.setImageLevel(0);
            }
        }
    });
}
六、Transition Drawable
文件位置:res/drawable/filename。
映射类型:TransitionDrawable。
引用方式:1. 在java中, R.drawable.filename。 2. 在xml中, @[package:]drawable/filename。
<?xml version="1.0" encoding="utf-8"?>
<transition
xmlns:android="http://schemas.android.com/apk/res/android" >
    <item
        android:drawable="@[package:]drawable/drawable_resource"
        android:id="@[+][package:]id/resource_name"
        android:top="dimension"
        android:right="dimension"
        android:bottom="dimension"
        android:left="dimension" />
</transition>
实例:
主布局文件:
<?xml version="1.0" encoding="utf-8"?>
<LinearLayout xmlns:android="http://schemas.android.com/apk/res/android"
    android:layout_width="match_parent"
    android:layout_height="match_parent"
    android:orientation="vertical">

    <ImageButton
        android:id="@+id/imageButton"
        android:layout_width="match_parent"
        android:layout_height="match_parent"
        android:src="@drawable/transition" />
</LinearLayout>
transition.xml 文件:
<?xml version="1.0" encoding="utf-8"?>
<transition xmlns:android="http://schemas.android.com/apk/res/android">

    <item android:drawable="@mipmap/images1" />
    <item android:drawable="@mipmap/images2" />
</transition>
java代码:
@Override
protected void onCreate(Bundle savedInstanceState) {
    super.onCreate(savedInstanceState);
    setContentView(R.layout.activity_transation);

    ImageButton imageButton = (ImageButton) findViewById(R.id.imageButton);
    assert imageButton != null;
     TransitionDrawable drawable = (TransitionDrawable) imageButton.getDrawable();
    drawable.startTransition(1000);  // 图片切换时间为1s
}
七、Inset Drawable
文件位置:res/drawable/filename。
映射类型:TransitionDrawable。
引用方式:1. 在java中, R.drawable.filename。 2. 在xml中, @[package:]drawable/filename。
<?xml version="1.0" encoding="utf-8"?>
<inset
    xmlns:android="http://schemas.android.com/apk/res/android"
    android:drawable="@drawable/drawable_resource"
    android:insetTop="dimension"
    android:insetRight="dimension"
    android:insetBottom="dimension"
    android:insetLeft="dimension" />
实例:
主布局文件:
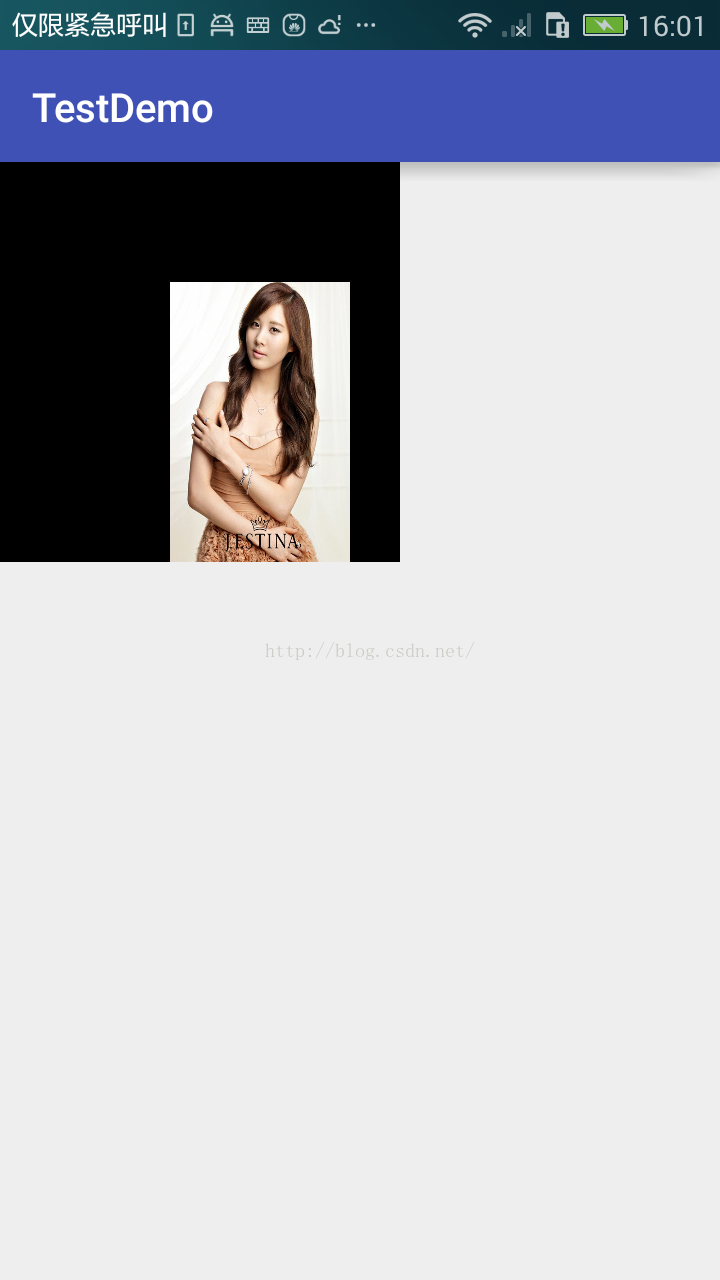
<?xml version="1.0" encoding="utf-8"?>
<LinearLayout xmlns:android="http://schemas.android.com/apk/res/android"
    android:layout_width="match_parent"
    android:layout_height="match_parent"
    android:orientation="vertical">

    <!-- 为了看得更明显, 背景设置成黑色了 #000000 -->
    <ImageView
        android:layout_width="200dp"
        android:layout_height="200dp"
        android:background="#000000"
        android:src="@drawable/inset" />
</LinearLayout>
inset.xml 文件:
<?xml version="1.0" encoding="utf-8"?>
<inset xmlns:android="http://schemas.android.com/apk/res/android"
    android:drawable="@mipmap/images3"
    android:insetLeft="100dp"
    android:insetTop="100dp" />
效果图:
八、Clip Drawable
文件位置:res/drawable/filename。
映射类型:TransitionDrawable。
引用方式:1. 在java中, R.drawable.filename。 2. 在xml中, @[package:]drawable/filename。
<?xml version="1.0" encoding="utf-8"?>
<clip
    xmlns:android="http://schemas.android.com/apk/res/android"
    android:drawable="@drawable/drawable_resource"
    android:clipOrientation=["horizontal" | "vertical"]
    android:gravity=["top" | "bottom" | "left" | "right" | "center_vertical" |
                     "fill_vertical" | "center_horizontal" | "fill_horizontal" |
                     "center" | "fill" | "clip_vertical" | "clip_horizontal"] />
android:clipOrientation
剪切方向,horizontal:水平。 vertical:垂直。
实例:
主布局文件:
<?xml version="1.0" encoding="utf-8"?>
<LinearLayout xmlns:android="http://schemas.android.com/apk/res/android"
    android:layout_width="match_parent"
    android:layout_height="match_parent"
    android:orientation="vertical">

    <ImageView
        android:id="@+id/imageView"
        android:layout_width="match_parent"
        android:layout_height="match_parent"
        android:src="@drawable/clip" />
</LinearLayout>
clip.xml 问价:
<?xml version="1.0" encoding="utf-8"?>
<clip xmlns:android="http://schemas.android.com/apk/res/android"
    android:clipOrientation="horizontal"
    android:drawable="@mipmap/images4"
    android:gravity="left" />
java代码:
@Override
protected void onCreate(Bundle savedInstanceState) {
    super.onCreate(savedInstanceState);
    setContentView(R.layout.activity_clip);

    ImageView image = (ImageView) findViewById(R.id.imageView);
    assert image != null;
    ClipDrawable drawable = (ClipDrawable) image.getDrawable();
    Log.e(TAG, "onCreate: level = " + drawable.getLevel());
    drawable.setLevel(drawable.getLevel() + 7000);
}
效果图:
九、Scale Drawable
文件位置:res/drawable/filename。
映射类型:TransitionDrawable。
引用方式:1. 在java中, R.drawable.filename。 2. 在xml中, @[package:]drawable/filename。
<?xml version="1.0" encoding="utf-8"?>
<scale
    xmlns:android="http://schemas.android.com/apk/res/android"
    android:drawable="@drawable/drawable_resource"
    android:scaleGravity=["top" | "bottom" | "left" | "right" | "center_vertical" |
                          "fill_vertical" | "center_horizontal" | "fill_horizontal" |
                          "center" | "fill" | "clip_vertical" | "clip_horizontal"]
    android:scaleHeight="percentage"
    android:scaleWidth="percentage" />
十、Shape Drawable
文件位置:res/drawable/filename。
映射类型:TransitionDrawable。
引用方式:1. 在java中, R.drawable.filename。 2. 在xml中, @[package:]drawable/filename。
<?xml version="1.0" encoding="utf-8"?>
<shape
    xmlns:android="http://schemas.android.com/apk/res/android"
    android:shape=["rectangle" | "oval" | "line" | "ring"] >
    <corners
        android:radius="integer"
        android:topLeftRadius="integer"
        android:topRightRadius="integer"
        android:bottomLeftRadius="integer"
        android:bottomRightRadius="integer" />
    <gradient
        android:angle="integer"
        android:centerX="float"
        android:centerY="float"
        android:centerColor="integer"
        android:endColor="color"
        android:gradientRadius="integer"
        android:startColor="color"
        android:type=["linear" | "radial" | "sweep"]
        android:useLevel=["true" | "false"] />
    <padding
        android:left="integer"
        android:top="integer"
        android:right="integer"
        android:bottom="integer" />
    <size
        android:width="integer"
        android:height="integer" />
    <solid
        android:color="color" />
    <stroke
        android:width="integer"
        android:color="color"
        android:dashWidth="integer"
        android:dashGap="integer" />
</shape>
<corners> 角度
<gradient> 渐变
<padding> 空隙
<size> 大小
<solid> 填充颜色
<stroke> 边框。
实例:
主布局文件:
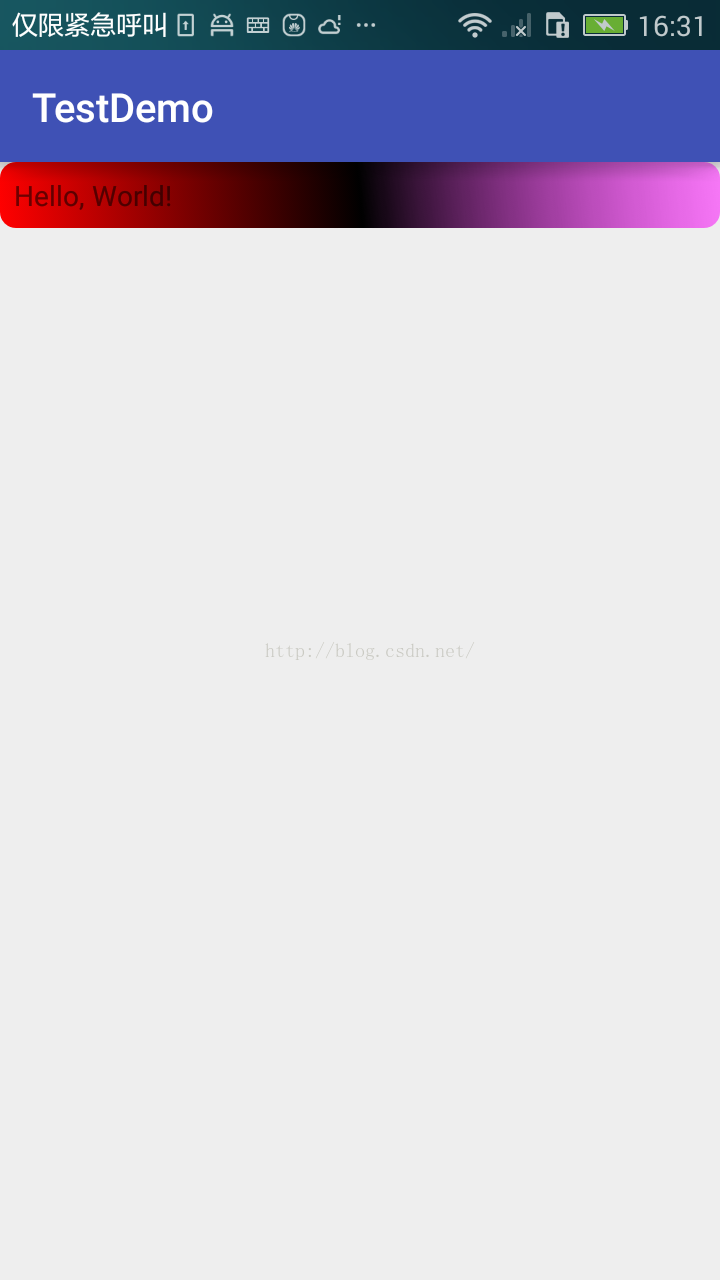
<?xml version="1.0" encoding="utf-8"?>
<LinearLayout xmlns:android="http://schemas.android.com/apk/res/android"
    android:layout_width="match_parent"
    android:layout_height="match_parent"
    android:orientation="vertical">

    <TextView
        android:id="@+id/textView"
        android:layout_width="match_parent"
        android:layout_height="wrap_content"
        android:background="@drawable/shape"
        android:text="Hello, World!" />
</LinearLayout>
shape.xml 文件:
<?xml version="1.0" encoding="utf-8"?>
<shape xmlns:android="http://schemas.android.com/apk/res/android"
    android:shape="rectangle">

    <gradient
        android:angle="45"
        android:startColor="#FFFF0000"
        android:centerColor="#000000"
        android:endColor="#80FF00FF" />

    <padding
        android:left="7dp"
        android:top="7dp"
        android:right="7dp"
        android:bottom="7dp" />

    <corners android:radius="8dp" />
</shape>
效果图: