如果要写树形结构,详细大家都拜读过此文章模板吧?这个很实用,但是不理解给我后面带来很多的烦恼,要修改有点困难,所以要先了解下作者是怎么实现的这个功能;下文的作者是值链接的作者,不是本文的作者。
作者做的树形结构,基于本地静态的json格式,我们可能是从后端或者数据库获取,但是万变不离其中(很多地方修改起来非常痛苦,心累啊!改了好久,对json不太熟悉,希望大家不要采坑。想要学习的请认真看完):
https://www.cnblogs.com/wpw1215/p/12021521.html
我来分析下作者的基本思路,根据作者的思路来进行修改;
第一:作者的静态json格式,若是我们是动态获取的那要按照这个格式。作者的格式已经多格式化过了,大家不知道怎么格式化就参考格式化工具,检查下json格式对不对!
 // 源数据
    const data = [
        {
            id: 1,
            name: "高配室",
            spread: true,
            tempChildren: [],
            children: [
                {
                    id: 2,
                    name: "第一个子节点",
                    edit: false,
                    checked: false,
                    children: [
                        {
                            id: 8,
                            edit: false,
                            checked: false,
                            name: "孙子节点",
                            children: []
                        },
                    ]
                },
                {
                    id: 5,
                    name: "第二个子节点",
                    checked: false,
                    edit: false,
                    children: []
                },
            ]
        }
    ];
发现没有,如果由子类children不为空[...]。不然children[]为空或null
比如我们从后台接收的json格式如下(后端按照我说的给我的):
[{"GroupID":0,"GroupName":"根节点中国","ChildID":1,"spread":true,"tempChildInfo":[],"childInfo":[{"GroupID":7658,"ChildID":0,"PlicyID":0,"GroupName":"第1子节点山东省2","ParentID":0,"childInfo":[]},{"GroupID":9555,"ChildID":1,"PlicyID":0,"GroupName":"第2子节点广东省","ParentID":0,"childInfo":[{"GroupID":17811,"ChildID":1,"PlicyID":0,"GroupName":"第1孙节点深圳市","ParentID":9555,"childInfo":[{"GroupID":27590,"ChildID":0,"PlicyID":0,"GroupName":"第1曾孙节南山区点","ParentID":17811,"childInfo":null},{"GroupID":28320,"ChildID":0,"PlicyID":0,"GroupName":"第2曾孙节宝安区点","ParentID":17811,"childInfo":null}]},{"GroupID":20401,"ChildID":0,"PlicyID":0,"GroupName":"第2孙节点广州市","ParentID":9555,"childInfo":null}]}]}]根据格式化工具:https://www.sojson.com/
这样看就清晰很多了嘛!
let myooo =
[{
	"GroupID": 0,
	"GroupName": "根节点中国",
	"ChildID": 1,
	"spread": true,
	"tempChildInfo": [],
	"childInfo": [{
		"GroupID": 7658,
		"ChildID": 0,
		"PlicyID": 0,
		"GroupName": "第1子节点山东省2",
		"ParentID": 0,
		"childInfo": []
	}, {
		"GroupID": 9555,
		"ChildID": 1,
		"PlicyID": 0,
		"GroupName": "第2子节点广东省",
		"ParentID": 0,
		"childInfo": [{
			"GroupID": 17811,
			"ChildID": 1,
			"PlicyID": 0,
			"GroupName": "第1孙节点深圳市",
			"ParentID": 9555,
			"childInfo": [{
				"GroupID": 27590,
				"ChildID": 0,
				"PlicyID": 0,
				"GroupName": "第1曾孙节南山区点",
				"ParentID": 17811,
				"childInfo": null
			}, {
				"GroupID": 28320,
				"ChildID": 0,
				"PlicyID": 0,
				"GroupName": "第2曾孙节宝安区点",
				"ParentID": 17811,
				"childInfo": null
			}]
		}, {
			"GroupID": 20401,
			"ChildID": 0,
			"PlicyID": 0,
			"GroupName": "第2孙节点广州市",
			"ParentID": 9555,
			"childInfo": null
		}]
	}]
}]
注意,最高级是根节点,而且是唯一的,因为在数据库建立这个根,没有建立同级别的;
如果客户需要建立跟这个一个级别的,很简单的思路,就是在页面上把这个根节点隐藏掉,界面上对第1字节的就认为是最高级的,把它命名为根节点或者本地,这样就可以在隐藏的根节点中新建一个子节点就是了。
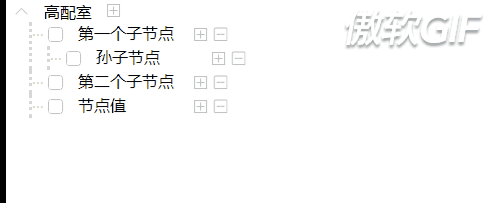
如下图,做了一个这个,同级就是在根节点上的新建。道理其实很简单;
代码上接收如何做到根作者一样的格式?myooo才是后台接收过来的的,这样就跟上文一致了。
  let tempData =
             [
                  {
                      "GroupID": 0,
                      "GroupName":"根节点",
                      "ChildID":1,
                      "spread":true,
                      "tempChildInfo":[],
                      "childInfo":myooo
                  }
              ];
上面是接收的数据,那我们肯定有请求才有接收,请求格式根接收一致,格式最好根作者的一样;
 // 发送数据给后端处理
    let data = {
          "id": 随机数id,
          "actionType": 1,//约定发送查询的内容
          "moduleType": 1,//约定发送查询的内容
          "reqData": ""
        }
      var sendStr = JSON.stringify(data);
      console.log("发送数据(转换后):" + sendStr);
      ws.send(sendStr);
好了,JSON格式说完了,CSS布局几个地方需要注意:
第一: 这个点点可以通过css的来改变或者隐藏,颜色变化;
第二:![]() 这个编辑的颜色也是通过css改变
这个编辑的颜色也是通过css改变
第三:![]() 选中后的颜色可以通过css改变
选中后的颜色可以通过css改变
第四:比较重要和关键,新建群组的子类它会自动往后缩进,那也是css来改变,不是方法
以上的大家试试找找作者在哪里写的?看看颜色在哪里,如下:
<style>
    .containerParent {
        display: flex;
        flex-direction: column;
        width: auto;
    }

    .containerChildren {
        margin-left: 15px;
        width: 300px;
        border-left-style: dotted;
        border-color: #D8D8D8;
    }

    .parentChild {
        width: 300px;
    }

    .operaion_row-button {
        display: inline-block;
        min-width: 50px;
    }

    .editContainer {
        display: inline-block;
        padding-left: 10px;
        padding-right: 10px;
        width: 100px;
        height: 20px;
        max-width: 100px;
        overflow: hidden;
        text-overflow: ellipsis;
        white-space: nowrap
    }

    .editContainer:focus {
        color: goldenrod;
    }

    .Icon_class {
        width: 15px;
        height: 15px;
    }

    .parentIcon {
        margin-left: 10px;
    }

    .parent_span {
        margin-left: 10px;
    }

    .descriter {
        display: inline-block;
        margin-top: -3px;
        color: #D8D8D8;
        vertical-align: top;
    }

    .focusClass {
        color: blue;
    }
</style>
接下来是作者用动态布局来实现,这一招真是高!
 // 获取父级数据,这个父级就是根节点内容
    function getParent(currentData) {
        if (currentData.id == "") return;//判断是不是删除的群组
        let html = "";
        currentData.map(data => { //这个是递归,也就是循环的意思
            let htmlValue = "";
            if (data.id != 9999) {//这个是删除群组功能用的,被删除的id变为9999就是删除的意思

//这个就是动态布局
htmlValue = `
          <div class= "containerParent">
            <div class="parentChild">
              <img  src = ${data.spread == true ? "./imgs/free.svg" : "./imgs/shrink.svg"}  alt="切换是否显示图标" class="Icon_class" onclick = ${`"toggleFnc(${data.id})"`} />
              <span data-appid=${data.id} class="parent_span">${data.name}</span>
              <img  src = "./imgs/add.svg"  alt="新增按钮" class="Icon_class parentIcon" onclick = ${`"add(${data.id})"`} />
            </div>
            ${data.children && data.children.length > 0 ? getChildren(data.children) : ""}
          </div>
        `
            }


            html += htmlValue;//这个是刷新页面用的
        })

        return html;//这个是刷新页面用的
    }
来看看它的布局:
<div class= "containerParent">
            <div class="parentChild">

                //img就是拿个伸缩图标
              <img  src = ${data.spread == true ? "./imgs/free.svg" : "./imgs/shrink.svg"}  alt="切换是否显示图标" class="Icon_class" onclick = ${`"toggleFnc(${data.id})"`} />


              <span data-appid=${data.id} class="parent_span">${data.name}</span>//获取父类名称

              //根节点的新增按钮,这里注意没有删除按钮,就是只能新建第1子节点,不能新建根节点同级的意思。
              <img  src = "./imgs/add.svg"  alt="新增按钮" class="Icon_class parentIcon" onclick = ${`"add(${data.id})"`} />
            </div>

            //这个是判断是否还有子类,如果根节点由子类就调用子类的方法 getChildren(data.children)
            ${data.children && data.children.length > 0 ? getChildren(data.children) : ""}
          </div>
1.伸缩图标的功能:
实际上是调用toggleFnc(${data.id})的方法,把就是把data.id,也就是父id传过去:
 // 切换子树中的显示状态
    function toggleFnc(val) { //val就是传过来的data.id,根节点的id就是0
        data.map(currentData => { //这个是遍历循环
            if (currentData.id == val) { //currentData.id 这个就是子类的id,val就是根节点id


                let temCuttentchildren = currentData.children;
                let temCuttenttempChildren = currentData.tempChildren;//这个tempChildren作者定义为[]空就是为空在这里使用

                //相互替换置空就是为了伸缩效果
                currentData.children = temCuttenttempChildren
                currentData.tempChildren = temCuttentchildren;

                currentData.spread = !currentData.spread //=true这个删除后就没有伸缩效果图
            }
        })
        container.innerHTML = getParent(data);//为了刷新页面使用
    };
新增功能等下根子类一起说,现在看看子类的调用方法
//    获取子树数据,写法类似父类
    function getChildren(data) {//父类的data
        let currentData;
        let html = "";
        if (data.id == "" || data.id == 9999) return html;//删除的就不用管
        data.map((cuttentDate) => { //循环功能,遍历功能、递归功能的意思

        //在一些地方需要获取子类的群组id,所以我就自己写个方法,不需要可以忽略
        window.allphonegroupname(cuttentDate.GroupName,cuttentDate.GroupID);//把这个值传出去
            //这个cuttentDate 一定要是Object对象,否则不能进入判断
            if(!(cuttentDate instanceof Object)){
                  cuttentDate=JSON.parse(cuttentDate)
            }


            if (cuttentDate.id == 9999) return html;//删除的就不用管
            let htmlValue
            if (cuttentDate.id) { //这个cuttentDate 一定要是Object对象,否则不能进入
                //能进入到这里才是子类或者孙类···

                let spanVal = `<img  src = "./imgs/define.svg"  alt="确定按钮" class="Icon_class" onclick = ascertain(${cuttentDate.id})>`;
                let inputClick = cuttentDate.id + "checkbox" //<img>的id使用动态方式

                htmlValue =
                    `
          <div class="containerChildren">
                 <span class="descriter">...</span>
                 ${cuttentDate.checked == true ?
                        `<img  src = "./imgs/checked.svg" onclick = ${`"selectionFunc(${cuttentDate.id},${cuttentDate.checked})"`}  id=${inputClick} alt="选中按钮" class="Icon_class" >` :
                        `<img  src = "./imgs/unChecked.svg" onclick = ${`"selectionFunc(${cuttentDate.id},${cuttentDate.checked})"`}  id=${inputClick} alt="不选中按钮" class="Icon_class">`
                    }

             <span id=${cuttentDate.id} contenteditable = ${cuttentDate["edit"]} class="editContainer" title=${cuttentDate.name}>${cuttentDate.name}</span>
              ${cuttentDate.edit == false ? "" : spanVal}

              <img  src = "./imgs/add.svg"  alt="新增按钮" class="Icon_class" onclick = ${`"add(${cuttentDate.id})"`}>
              <img  src = "./imgs/remove.svg"  alt="删除按钮" class="Icon_class" onclick = ${`"remove(${cuttentDate.id})"`}>

            ${cuttentDate.children && cuttentDate.children.length > 0 ? getChildren(cuttentDate.children) : ""}
          </div >

        `
            }
            html += htmlValue //刷新使用
        })

        return html //刷新使用
    }
看看它的布局
                    `
          <div class="containerChildren">
                 <span class="descriter">...</span>
                //这个其实就是判断有没有选中,选中是打勾图片,不是是其他图片,不是checkebox,我就用input的chekbox
                 ${cuttentDate.checked == true ?
                        `<img  src = "./imgs/checked.svg" onclick = ${`"selectionFunc(${cuttentDate.id},${cuttentDate.checked})"`}  id=${inputClick} alt="选中按钮" class="Icon_class" >` :
                        `<img  src = "./imgs/unChecked.svg" onclick = ${`"selectionFunc(${cuttentDate.id},${cuttentDate.checked})"`}  id=${inputClick} alt="不选中按钮" class="Icon_class">`
                    }

            //获取群组名称
             <span id=${cuttentDate.id} contenteditable = ${cuttentDate["edit"]} class="editContainer" title=${cuttentDate.name}>${cuttentDate.name}</span>

              ${cuttentDate.edit == false ? "" : spanVal} //这个判断新增或删除,弹出确定按钮,我是不需要,我都让他显示

                //add(${cuttentDate.id}新增方法
              <img  src = "./imgs/add.svg"  alt="新增按钮" class="Icon_class" onclick = ${`"add(${cuttentDate.id})"`}>
                //remove(${cuttentDate.id})删除方法
              <img  src = "./imgs/remove.svg"  alt="删除按钮" class="Icon_class" onclick = ${`"remove(${cuttentDate.id})"`}>
             //判断还有没有子类,如果没有就结束,还有就继续循环,遍历,递归
            ${cuttentDate.children && cuttentDate.children.length > 0 ? getChildren(cuttentDate.children) : ""}
          </div >

        `
这种动态格式写法大家自己摸索,要回举一反三,怎么写判断,嵌套几种判断如何去写。
根据这个其他的还需要说嘛?最简单的的是调用哪个方法,把改id传过去,然后方法内接收处理;比如删除功能
 // 删除数据
    function remove(val) { //val就是传过来的id,是子类id,不可能是根节点的,根节点没有删除
        let removeVal = function (data) { //该方法
            data.map(currentData => { //循环,删除,遍历的意思
                if (currentData.id == val) {
                    currentData.id = 9999; //如果要删除的群组就将它置为9999
                } else if (currentData.children.length > 0) {
                    removeVal(currentData.children);//删除的群组有子类,就顺便调用这个方法,把子类也删除了
                }
            })
        }
        removeVal(data);//把数据传过去
        container.innerHTML = getParent(data);//刷新页面
    }
这个把把内容放在哪个位置,全局变量如下:
    const container = document.getElementById("container"); //把界面放在这个位置
    container.addEventListener("dblclick", dbClickFnc, false)
    container.innerHTML = getParent(data); //刷新页面
我一般是这么修改,需要刷新界面 window.shuaxin(mydata);:
function shuaxin(data){

      const container = document.getElementById("container");
      container.addEventListener("dblclick", dbClickFnc, false)
      container.innerHTML = getParent(data);
      // console.log("html:"+container.innerHTML);

    }

     // 源数据,跟作者一致的格式
      let mydata =
         [
              {
                  "GroupID": 0,
                  "GroupName":"根节点",
                  "ChildID":1,
                  "spread":true,
                  "tempChildInfo":[],
                  "childInfo":[]
              }
          ];


        const arrId = [];

    let isEditMode = false;//是否是编辑状态
    let edit = false;
为了全局变量通过某种方式发送给后端。我这个改动非常大,具体以后再发!