SpringBoot入门教程01——构建第一个SpringBoot应用
简介
Spring Boot是由Pivotal团队提供的全新框架,其设计目的是用来简化新Spring应用的初始搭建以及开发过程。该框架使用了特定的方式来进行配置,从而使开发人员不再需要定义样板化的配置,而且通过一系列Starter POMs的定义,整合各项功能,使得依赖管理工作变得更为简单。
构建应用
环境:
- jdk 1.8或以上
- idea社区版
- maven(idea 自带的即可,设置阿里云中央仓库)
- Spring Assistant插件(idea MarketPlace安装,免费)
打开idea -> new Project -> Spring Assistant -> 填写Group Id、Artifact Id -> (建议非必须)勾上Devloper Tools下的Spring Boot DevTools、Lombok、Spring Configuration Processor ->勾上Web下的Spring Web ->点击Next即可。
工程目录
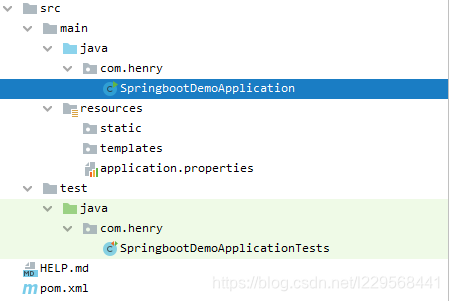
- pom文件为基本的依赖管理文件
- resouces 资源文件
- statics 静态资源
- templates 模板资源
- application.properties 配置文件
- SpringbootDemoApplication 程序入口
pom.xml
<?xml version="1.0" encoding="UTF-8"?>
<project xmlns="http://maven.apache.org/POM/4.0.0" xmlns:xsi="http://www.w3.org/2001/XMLSchema-instance"
	xsi:schemaLocation="http://maven.apache.org/POM/4.0.0 https://maven.apache.org/xsd/maven-4.0.0.xsd">
	<modelVersion>4.0.0</modelVersion>
	<parent>
		<groupId>org.springframework.boot</groupId>
		<artifactId>spring-boot-starter-parent</artifactId>
		<version>2.3.1.RELEASE</version>
		<relativePath/> <!-- lookup parent from repository -->
	</parent>
	<groupId>com.henry</groupId>
	<artifactId>springboot-demo</artifactId>
	<version>0.0.1-SNAPSHOT</version>
	<name>springboot-demo</name>
	<description>Demo project for Spring Boot</description>

	<properties>
		<java.version>1.8</java.version>
	</properties>

	<dependencies>
		<dependency>
			<groupId>org.springframework.boot</groupId>
			<artifactId>spring-boot-starter-web</artifactId>
		</dependency>

		<dependency>
			<groupId>org.springframework.boot</groupId>
			<artifactId>spring-boot-devtools</artifactId>
			<scope>runtime</scope>
			<optional>true</optional>
		</dependency>
		<dependency>
			<groupId>org.springframework.boot</groupId>
			<artifactId>spring-boot-configuration-processor</artifactId>
			<optional>true</optional>
		</dependency>
		<dependency>
			<groupId>org.projectlombok</groupId>
			<artifactId>lombok</artifactId>
			<optional>true</optional>
		</dependency>
		<dependency>
			<groupId>org.springframework.boot</groupId>
			<artifactId>spring-boot-starter-test</artifactId>
			<scope>test</scope>
			<exclusions>
				<exclusion>
					<groupId>org.junit.vintage</groupId>
					<artifactId>junit-vintage-engine</artifactId>
				</exclusion>
			</exclusions>
		</dependency>
	</dependencies>

	<build>
		<plugins>
			<plugin>
				<groupId>org.springframework.boot</groupId>
				<artifactId>spring-boot-maven-plugin</artifactId>
			</plugin>
		</plugins>
	</build>

</project>
功能演示
应用构建好之后,运行SpringbootDemoApplication的main方法,springboot应用就启动起来了
下面我们写个Controller来测试下springboot应用
import org.springframework.web.bind.annotation.RequestMapping;
import org.springframework.web.bind.annotation.RestController;

@RestController
public class HelloController {


    @RequestMapping("/")
    public String index(){


        return "Welcome to Spring Boot!";
    }
}
启动SpringbootDemoApplication的main方法,打开浏览器localhost:8080,浏览器显示:
Welcome to Spring Boot!
PS:如果构建应用时,勾选了开发者工具Spring Boot DevTools,每次写完代码之后idea会自动重新加载,不需要重启应用就能进行测试
神奇之处
- 你没有做任何的web.xml配置
- 你没有做任何的sping mvc的配置——springboot为你做了
- 你没有配置tomcat ——springboot内嵌tomcat.
打包运行
由于本项目用的时idea内置的maven,所以打包通过idea工具打包
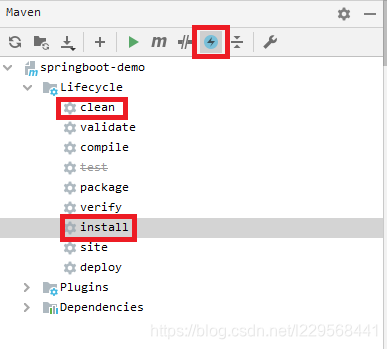
如图
扫描二维码关注公众号,回复:
12593039 查看本文章

- 点击⚡符号,跳过测试(一次性操作,适用所有项目)
- 然后点击Lifecycle下的clean
- 点击Lifecycle下的install
打包完成后,打开idea的Terminal工具,输入命令
cd target
java -jar springboot-demo-0.0.1-SNAPSHOT.jar