1、使用逆向工程的前端代码
这种方式可以快速地搭建前端环境。
1、生成菜单目录

2、将renren-generator生成的product模块的前端代码brand-add-or-update.vue和brand.vue复制到product模块下

此时控制台显示:
但是显示的页面没有新增和删除功能,这是因为权限控制的原因。
3、更改权限
权限定义位置:
      <el-form-item>
        <el-button @click="getDataList()">查询</el-button>
        <el-button v-if="isAuth('product:brand:save')" type="primary" @click="addOrUpdateHandle()">新增</el-button>
        <el-button v-if="isAuth('product:brand:delete')" type="danger" @click="deleteHandle()" :disabled="dataListSelections.length <= 0">批量删除</el-button>
      </el-form-item>
在“index.js”中定义的权限,现在将它设置为返回值为true,即可显示添加和删除功能。

点击新增按钮,增加品牌:

4、效果优化
前端代码
<template>
  <div class="mod-config">
    <el-form
      :inline="true"
      :model="dataForm"
      @keyup.enter.native="getDataList()"
    >
      <el-form-item>
        <el-input
          v-model="dataForm.key"
          placeholder="参数名"
          clearable
        ></el-input>
      </el-form-item>
      <el-form-item>
        <el-button @click="getDataList()">查询</el-button>
        <el-button
          v-if="isAuth('product:brand:save')"
          type="primary"
          @click="addOrUpdateHandle()"
          >新增</el-button
        >
        <el-button
          v-if="isAuth('product:brand:delete')"
          type="danger"
          @click="deleteHandle()"
          :disabled="dataListSelections.length <= 0"
          >批量删除</el-button
        >
      </el-form-item>
    </el-form>
    <el-table
      :data="dataList"
      border
      v-loading="dataListLoading"
      @selection-change="selectionChangeHandle"
      style="width: 100%"
    >
      <el-table-column
        type="selection"
        header-align="center"
        align="center"
        width="50"
      >
      </el-table-column>
      <el-table-column
        prop="brandId"
        header-align="center"
        align="center"
        label="品牌id"
      >
      </el-table-column>
      <el-table-column
        prop="name"
        header-align="center"
        align="center"
        label="品牌名"
      >
      </el-table-column>
      <el-table-column
        prop="logo"
        header-align="center"
        align="center"
        label="品牌logo地址"
      >
      </el-table-column>
      <el-table-column
        prop="descript"
        header-align="center"
        align="center"
        label="介绍"
      >
      </el-table-column>
      <!--
         v-model="scope.row.showStatus" : 绑定当前行的状态
         @change="updateBrandStatus(scope.row)" 监听显示状态按钮变化,并将一整行数据传过来
         active-value="1" : 表示按钮激活状态为1,反之为0
       -->
      <el-table-column
        prop="showStatus"
        header-align="center"
        align="center"
        label="显示状态"
      >
        <template slot-scope="scope">
          <el-switch
            v-model="scope.row.showStatus"
            active-color="#13ce66"
            inactive-color="#ff4949"
            :active-value="1"
            :inactive-value="0"
            @change="updateBrandStatus(scope.row)"
          >
          </el-switch>
        </template>
      </el-table-column>
      <el-table-column
        prop="firstLetter"
        header-align="center"
        align="center"
        label="检索首字母"
      >
      </el-table-column>
      <el-table-column
        prop="sort"
        header-align="center"
        align="center"
        label="排序"
      >
      </el-table-column>
      <el-table-column
        fixed="right"
        header-align="center"
        align="center"
        width="150"
        label="操作"
      >
        <template slot-scope="scope">
          <el-button
            type="text"
            size="small"
            @click="addOrUpdateHandle(scope.row.brandId)"
            >修改</el-button
          >
          <el-button
            type="text"
            size="small"
            @click="deleteHandle(scope.row.brandId)"
            >删除</el-button
          >
        </template>
      </el-table-column>
    </el-table>
    <el-pagination
      @size-change="sizeChangeHandle"
      @current-change="currentChangeHandle"
      :current-page="pageIndex"
      :page-sizes="[10, 20, 50, 100]"
      :page-size="pageSize"
      :total="totalPage"
      layout="total, sizes, prev, pager, next, jumper"
    >
    </el-pagination>
    <!-- 弹窗, 新增 / 修改 -->
    <add-or-update
      v-if="addOrUpdateVisible"
      ref="addOrUpdate"
      @refreshDataList="getDataList"
    ></add-or-update>
  </div>
</template>

<script>
// 导入的组件
import AddOrUpdate from "./brand-add-or-update";
export default {
  data() {
    return {
      dataForm: {
        key: "",
      },
      dataList: [],
      pageIndex: 1,
      pageSize: 10,
      totalPage: 0,
      dataListLoading: false,
      dataListSelections: [],
      addOrUpdateVisible: false,
    };
  },
  components: {
    AddOrUpdate,
  },
  activated() {
    this.getDataList();
  },
  methods: {
    // 获取数据列表
    getDataList() {
      this.dataListLoading = true;
      this.$http({
        url: this.$http.adornUrl("/product/brand/list"),
        method: "get",
        params: this.$http.adornParams({
          page: this.pageIndex,
          limit: this.pageSize,
          key: this.dataForm.key,
        }),
      }).then(({ data }) => {
        if (data && data.code === 0) {
          this.dataList = data.page.list;
          this.totalPage = data.page.totalCount;
        } else {
          this.dataList = [];
          this.totalPage = 0;
        }
        this.dataListLoading = false;
      });
    },
    // 监听显示状态 打开 true,关闭false
    updateBrandStatus(data) {
      console.log("最新信息", data);
      // 发送的数据只需要为品牌id和状态即可,对数据进行解构
      // 由于后端接收到的showStatus(前端为true)要么为0,要么为1,还要转化
      //  定义了active-value,可以将showStatus ? 1 : 0去掉
      let { brandId, showStatus } = data;
      //发送请求,修改状态
      this.$http({
        url: this.$http.adornUrl("/product/brand/update"),
        method: "post",
        data: this.$http.adornData(
          { brandId: brandId, showStatus: showStatus },
          false
        ),
      }).then(({ data }) => {
        this.$message({
          message: "状态更新成功",
          type: "success",
        });
      });
    },
    // 每页数
    sizeChangeHandle(val) {
      this.pageSize = val;
      this.pageIndex = 1;
      this.getDataList();
    },
    // 当前页
    currentChangeHandle(val) {
      this.pageIndex = val;
      this.getDataList();
    },
    // 多选
    selectionChangeHandle(val) {
      this.dataListSelections = val;
    },
    // 新增 / 修改
    addOrUpdateHandle(id) {
      this.addOrUpdateVisible = true;
      this.$nextTick(() => {
        this.$refs.addOrUpdate.init(id);
      });
    },
    // 删除
    deleteHandle(id) {
      var ids = id
        ? [id]
        : this.dataListSelections.map((item) => {
            return item.brandId;
          });
      this.$confirm(
        `确定对[id=${ids.join(",")}]进行[${id ? "删除" : "批量删除"}]操作?`,
        "提示",
        {
          confirmButtonText: "确定",
          cancelButtonText: "取消",
          type: "warning",
        }
      ).then(() => {
        this.$http({
          url: this.$http.adornUrl("/product/brand/delete"),
          method: "post",
          data: this.$http.adornData(ids, false),
        }).then(({ data }) => {
          if (data && data.code === 0) {
            this.$message({
              message: "操作成功",
              type: "success",
              duration: 1500,
              onClose: () => {
                this.getDataList();
              },
            });
          } else {
            this.$message.error(data.msg);
          }
        });
      });
    },
  },
};
</script>
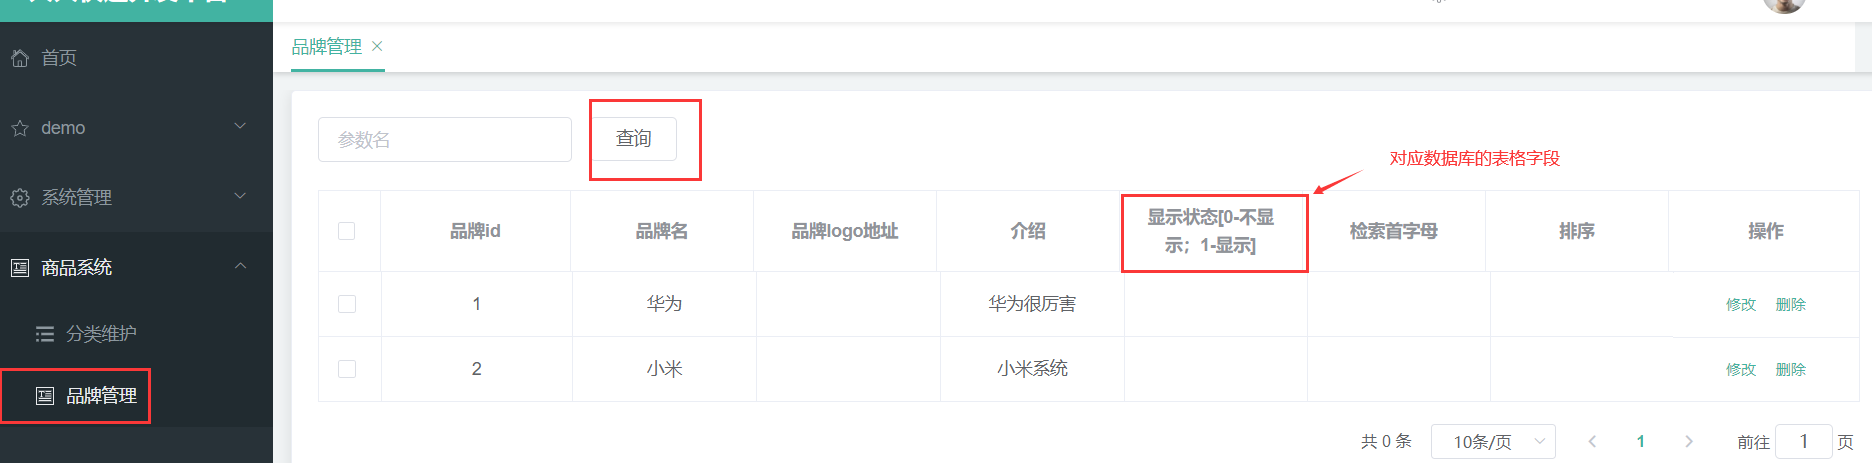
(1)快速显示开关

对应数据库显示状态数据:

2、云存储OSS
1、介绍

方式1:
在大量用户后,服务器带宽会有一些瓶颈。

方式2(推荐):

2、开通云存储
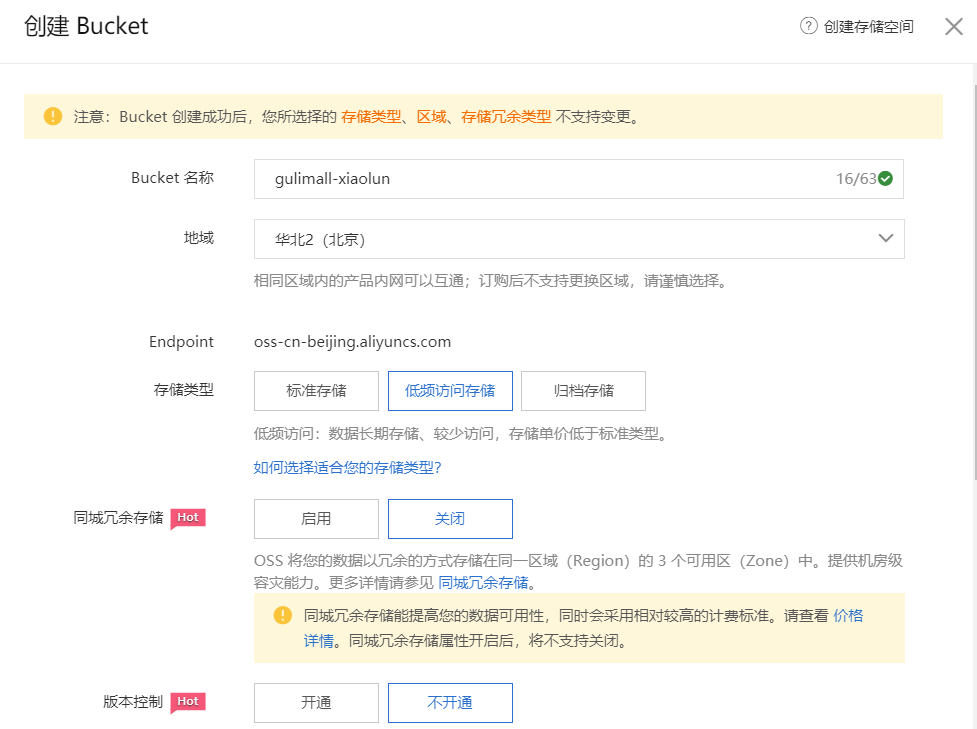
1、创建Bucket

2、上传文件并查看

3、使用Java SDK上传文件
(1)参考文档
https://help.aliyun.com/document_detail/84781.html?spm=a2c4g.11186623.6.953.4adf26fdpnXPwi
(2)安装依赖
<dependency>
    <groupId>com.aliyun.oss</groupId>
    <artifactId>aliyun-sdk-oss</artifactId>
    <version>3.10.2</version>
</dependency>
(3)在测试类中书写上传文件流
// Endpoint以杭州为例,其它Region请按实际情况填写。
String endpoint = "http://oss-cn-hangzhou.aliyuncs.com";
// 云账号AccessKey有所有API访问权限,建议遵循阿里云安全最佳实践,创建并使用RAM子账号进行API访问或日常运维,请登录 https://ram.console.aliyun.com 创建。
String accessKeyId = "<yourAccessKeyId>";
String accessKeySecret = "<yourAccessKeySecret>";

// 创建OSSClient实例。
OSS ossClient = new OSSClientBuilder().build(endpoint, accessKeyId, accessKeySecret);

// 上传文件流。
InputStream inputStream = new FileInputStream("<yourlocalFile>");
ossClient.putObject("<yourBucketName>", "<yourObjectName>", inputStream);

// 关闭OSSClient。
ossClient.shutdown();
endpoint、accessKeyId、accessKeySecret的取值如下:
首先,创建RAM用户
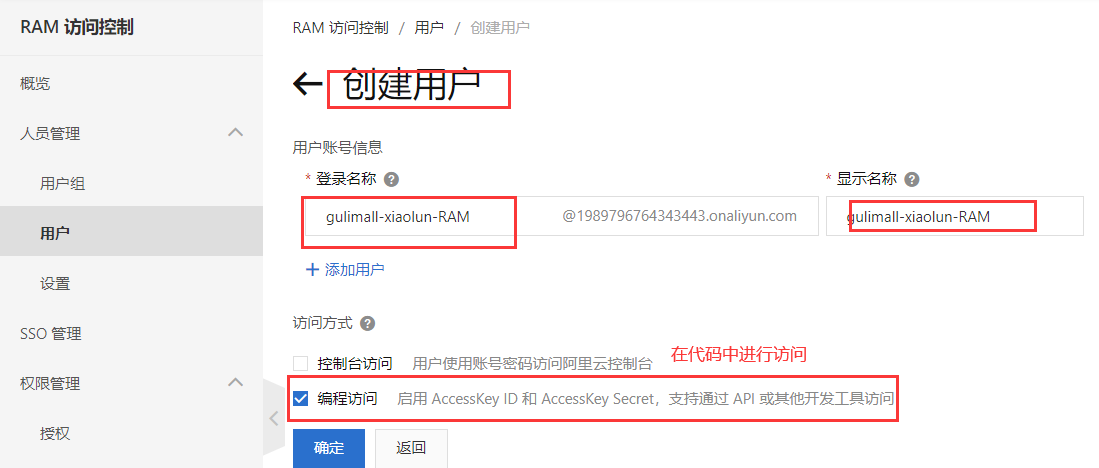
创建用户完毕后,会得到一个“AccessKey ID”和“AccessKeySecret”,然后复制这两个值到代码的“AccessKey ID”和“AccessKeySecret”。
其中,AccessKey ID可以在认证管理界面可以看到:

AccessKeySecret只在创建的时候可以看见一次,因此要保存好。
为RAM添加访问控制权限:

(4)基本代码如下
@org.junit.Test
public void testUpload() throws FileNotFoundException {


   // Endpoint
   String endpoint = "oss-cn-beijing.aliyuncs.com";
   // 阿里云主账号AccessKey拥有所有API的访问权限,风险很高。您创建并使用RAM账号进行API访问。
   String accessKeyId = "xx";
   String accessKeySecret = "xx";

   // 创建OSSClient实例。
   OSS ossClient = new OSSClientBuilder().build(endpoint, accessKeyId, accessKeySecret);

   // 上传文件流。
   InputStream inputStream = new FileInputStream("C:\\Users\\34938\\Pictures\\Camera Roll\\美丽风景\\295804.jpg");
   //"<yourBucketName>", "<yourObjectName>"
   ossClient.putObject("gulimall-xiaolun", "295804.jpg", inputStream);

   // 关闭OSSClient。
   ossClient.shutdown();
   System.out.println("上传成功。。。。");
}
(5)SpringCloud Alibaba方式
参考文档:
https://github.com/alibaba/spring-cloud-alibaba/blob/master/README-zh.md

common模块中添加依赖:
<!--引入alibaba的oss-->
<dependency>
  <groupId>com.alibaba.cloud</groupId>
  <!--注释的依赖无法导入,有报错-->
  <!--<artifactId>aliyun-oss-spring-boot-starter</artifactId>-->
  <artifactId>spring-cloud-starter-alicloud-oss</artifactId>
</dependency>
在application.yml中配置access-key、secret-key和endpoint信息
spring:
  cloud:
    alicloud: # 配置OSS服务对应的accessKey,secretKey和endpoint
      access-key: LTAIxxx
      secret-key: xc1Hxxx
      oss:
        endpoint: oss-cn-beijing.aliyuncs.com
使用ossClient进行相关操作:
//注入 OSSClient
@Autowired
OSSClient ossClient;

@org.junit.Test
public void testUpload() throws FileNotFoundException {


  // 上传文件流。
  InputStream inputStream = new FileInputStream("C:\\Users\\34938\\Pictures\\Camera Roll\\美丽风景\\295804.jpg");
  //"<yourBucketName>", "<yourObjectName>"
  ossClient.putObject("gulimall-xiaolun", "295804.jpg", inputStream);

  // 关闭OSSClient。
  ossClient.shutdown();
  System.out.println("上传成功。。。。");
}
3、OSS获取服务端签名
1、新建第三方模块gulimall-third-party

添加Spring Web和OpenFeign依赖。
2、pom文件依赖
<dependencies>
  <!--依赖common类-->
  <dependency>
    <groupId>com.xiaolun.gulimall</groupId>
    <artifactId>gulimall-common</artifactId>
    <version>0.0.1-SNAPSHOT</version>
    <exclusions>
      <!--在第三方模块中,没有使用到mybatis,将其排除-->
      <exclusion>
        <groupId>com.baomidou</groupId>
        <artifactId>mybatis-plus-boot-starter</artifactId>
      </exclusion>
    </exclusions>
  </dependency>
  <dependency>
    <groupId>org.springframework.boot</groupId>
    <artifactId>spring-boot-starter-web</artifactId>
  </dependency>
  <dependency>
    <groupId>org.springframework.cloud</groupId>
    <artifactId>spring-cloud-starter-openfeign</artifactId>
  </dependency>

  <dependency>
    <groupId>org.springframework.boot</groupId>
    <artifactId>spring-boot-starter-test</artifactId>
    <scope>test</scope>
  </dependency>
  <!--引入alibaba的oss-->
  <dependency>
    <groupId>com.alibaba.cloud</groupId>
    <!--注释的依赖无法导入,有报错-->
    <!--<artifactId>aliyun-oss-spring-boot-starter</artifactId>-->
    <artifactId>spring-cloud-starter-alicloud-oss</artifactId>
  </dependency>
</dependencies>
添加依赖管理:
<dependencyManagement>
  <dependencies>
    <dependency>
      <groupId>org.springframework.cloud</groupId>
      <artifactId>spring-cloud-dependencies</artifactId>
      <version>${spring-cloud.version}</version>
      <type>pom</type>
      <scope>import</scope>
    </dependency>
    <!--springalibaba依赖-->
    <dependency>
      <groupId>com.alibaba.cloud</groupId>
      <artifactId>spring-cloud-alibaba-dependencies</artifactId>
      <version>2.1.0.RELEASE</version>
      <type>pom</type>
      <scope>import</scope>
    </dependency>
  </dependencies>
</dependencyManagement>
3、编写配置文件
(1)bootstrap.properties
# 改名字,对应nacos里的配置文件名
spring.application.name=gulimall-third-party
spring.cloud.nacos.config.server-addr=127.0.0.1:8848
spring.cloud.nacos.config.namespace=a5160322-7446-468c-91c8-dee9fbedcc00

spring.cloud.nacos.config.ext-config[0].data-id=oss.yml
spring.cloud.nacos.config.ext-config[0].group=DEFAULT_GROUP
spring.cloud.nacos.config.ext-config[0].refresh=true
nacos文件中创建命名空间,并添加oss.yml文件:
spring:
  cloud:
    alicloud: # 配置OSS服务对应的accessKey,secretKey和endpoint
      access-key: LTAI4xxxxx
      secret-key: xc1HWxxxx
      oss:
        endpoint: oss-cn-beijing.aliyuncs.com
        bucket: gulimall-xiaolun

(2)application.yml文件
server:
  port: 30000
spring:
  cloud:
    nacos:
      discovery:
        server-addr: 127.0.0.1:8848
  application:
    name: gulimall-third-party
4、编写测试类
将product文件中的文件上传测试放到第三方的测试类下,进行测试能否上传成功。
package com.xiaolun.gulimall.thirdparty;


import com.aliyun.oss.OSSClient;
import org.junit.Test;
import org.junit.runner.RunWith;
import org.springframework.beans.factory.annotation.Autowired;
import org.springframework.boot.test.context.SpringBootTest;
import org.springframework.test.context.junit4.SpringJUnit4ClassRunner;

import java.io.FileInputStream;
import java.io.FileNotFoundException;
import java.io.InputStream;

@RunWith(SpringJUnit4ClassRunner.class)
@SpringBootTest(classes = {

    GulimallThirdPartyApplication.class})
public class GulimallThirdPartyApplicationTests {


   @Autowired
   OSSClient ossClient;

   @Test
   public void testUpload() throws FileNotFoundException {


      // 上传文件流。
      InputStream inputStream = new FileInputStream("C:\\Users\\34938\\Pictures\\Camera Roll\\美丽风景\\295804.jpg");
      //"<yourBucketName>", "<yourObjectName>"
      ossClient.putObject("gulimall-xiaolun", "295804.jpg", inputStream);

      // 关闭OSSClient。
      ossClient.shutdown();
      System.out.println("上传成功。。。。");
   }
}
5、编写gulimall/thirdparty/controller/ossController.java类
package com.xiaolun.gulimall.thirdparty.controller;

import com.aliyun.oss.OSS;
import com.aliyun.oss.common.utils.BinaryUtil;
import com.aliyun.oss.model.MatchMode;
import com.aliyun.oss.model.PolicyConditions;
import com.xiaolun.common.utils.R;
import org.springframework.beans.factory.annotation.Autowired;
import org.springframework.beans.factory.annotation.Value;
import org.springframework.web.bind.annotation.RequestMapping;
import org.springframework.web.bind.annotation.RestController;

import java.text.SimpleDateFormat;
import java.util.Date;
import java.util.LinkedHashMap;
import java.util.Map;

/**
 * @time: 2021-01-13 14:01
 * @author: likunlun
 * @description: 文件签名后直传
 */
@RestController
public class ossController {


	@Autowired
	OSS ossClient;

	@Value("${spring.cloud.alicloud.oss.endpoint}")
	private String endpoint;
	@Value("${spring.cloud.alicloud.oss.bucket}")
	private String bucket;
	@Value("${spring.cloud.alicloud.access-key}")
	private String accessId;

	@RequestMapping("/oss/policy")
	public R policy() {


		String host = "https://" + bucket + "." + endpoint; // host的格式为 bucketname.endpoint
		// callbackUrl为 上传回调服务器的URL,请将下面的IP和Port配置为您自己的真实信息。
//		String callbackUrl = "http://88.88.88.88:8888";
		String format = new SimpleDateFormat("yyyy-MM-dd").format(new Date());
		// 用户上传文件时指定的前缀,以每一天的日期为一个目录
		String dir = format;
		Map<String, String> respMap = null;
		try {


			long expireTime = 30;
			long expireEndTime = System.currentTimeMillis() + expireTime * 1000;
			Date expiration = new Date(expireEndTime);
			// PostObject请求最大可支持的文件大小为5 GB,即CONTENT_LENGTH_RANGE为5*1024*1024*1024。
			PolicyConditions policyConds = new PolicyConditions();
			policyConds.addConditionItem(PolicyConditions.COND_CONTENT_LENGTH_RANGE, 0, 1048576000);
			policyConds.addConditionItem(MatchMode.StartWith, PolicyConditions.COND_KEY, dir);

			String postPolicy = ossClient.generatePostPolicy(expiration, policyConds);
			byte[] binaryData = postPolicy.getBytes("utf-8");
			String encodedPolicy = BinaryUtil.toBase64String(binaryData);
			String postSignature = ossClient.calculatePostSignature(postPolicy);

			respMap = new LinkedHashMap<String, String>();
			respMap.put("accessid", accessId);
			respMap.put("policy", encodedPolicy);
			respMap.put("signature", postSignature);
			respMap.put("dir", dir);
			respMap.put("host", host);
			respMap.put("expire", String.valueOf(expireEndTime / 1000));

		} catch (Exception e) {


			// Assert.fail(e.getMessage());
			System.out.println(e.getMessage());
		} finally {


			ossClient.shutdown();
		}
		return R.ok().put("data", respMap);
	}
}
6、主启动类开启注册功能
@EnableDiscoveryClient
7、测试
http://localhost:30000/oss/policy
浏览器显示:

(1)配置gateway路由转发
# 第三方的路由转发配置
- id: third_party_route
  uri: lb://gulimall-third-party
  predicates:
    - Path=/api/thirdparty/**
  filters:
    - RewritePath=/api/thirdparty/(?<segment>/?.*),/$\{

    segment}
(2)测试
http://localhost:88/api/thirdparty/oss/policy
4、OSS前后端联调测试上传
1、上传封装好的组件
upload文件夹到components目录下,一个是单文件上传,另外一个是多文件上传

修改好组件的配置,将其融入到原来的系统中后,开始上传,遇到了下面的跨域报错:

需要在阿里云上开启跨域访问。
2、阿里云上开启跨域访问
(1)bucket域名位置

(2)配置规则


3、再次测试
(1)前端开启上传图片

使用vue插件查看显示状态的双向绑定。

(2)阿里云后端查看

3、校验
1、前端校验
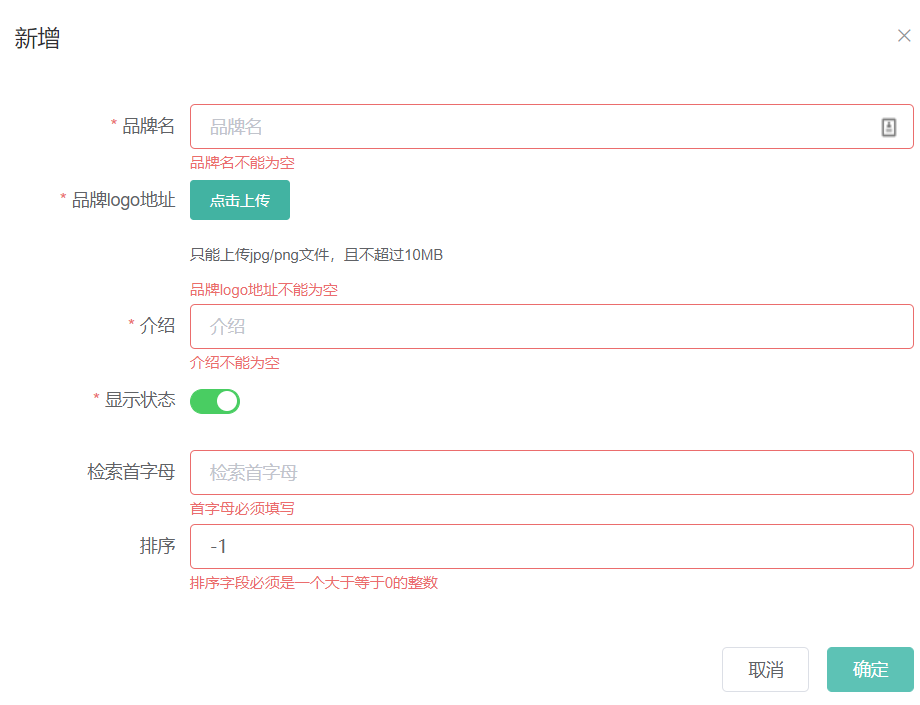
主要在前端\product\brand-add-or-update.vue中对文件进行修改,使用到了自定义校验器。
2、后端校验JSR303
1、介绍
在Java中提供了一系列的校验方式,它这些校验方式在“javax.validation.constraints”包中,提供了如@Email,@NotNull等注解。在非空处理方式上提供了@NotNull,@NotEmpty和@NotBlank。
(1)@NotNull
The annotated element must not be null. Accepts any type。
注解元素禁止为null,能够接收任何类型
(2)@NotEmpty
the annotated element must not be null nor empty.
该注解修饰的字段不能为null或""。支持字符序列,集合长度,map长度和数组长度的结算。
(3)@NotBlank(推荐)
The annotated element must not be null and must contain at least one non-whitespace character. Accepts CharSequence。
该注解不能为null,并且至少包含一个非空白字符。接收字符序列。
2、基础校验
1、使用校验注解
/**
 * 品牌名
 */
@NotBlank
private String name;
2、在请求方法种,使用校验注解@Valid,开启校验。
/**
* 保存
*/
@RequestMapping("/save")
  public R save(@Valid @RequestBody BrandEntity brand){


  brandService.save(brand);
  return R.ok();
}
postman中发送下面的请求进行测试:
http://localhost:88/api/product/brand/save

返回下面的报错信息:
{


    "timestamp": "2021-01-14T12:52:42.690+0000",
    "status": 400,
    "error": "Bad Request",
    "errors": [
        {


            "codes": [
                "NotBlank.brandEntity.name",
                "NotBlank.name",
                "NotBlank.java.lang.String",
                "NotBlank"
            ],
            "arguments": [
                {


                    "codes": [
                        "brandEntity.name",
                        "name"
                    ],
                    "arguments": null,
                    "defaultMessage": "name",
                    "code": "name"
                }
            ],
            "defaultMessage": "不能为空",
            "objectName": "brandEntity",
            "field": "name",
            "rejectedValue": "",
            "bindingFailure": false,
            "code": "NotBlank"
        }
    ],
    "message": "Validation failed for object='brandEntity'. Error count: 1",
    "path": "/product/brand/save"
}
defaultMessage": “不能为空”,这些错误消息定义ValidationMessages_zh_CN.properties文件中。可以自定义错误消息,覆盖默认的错误提示:
/**
* 品牌名
*/
@NotBlank(message = "品牌名必须非空")
private String name;
但是这种返回的错误结果并不符合我们的业务需要。我们需要自定义封装。
3、给校验的Bean后,紧跟BindResult,获取到校验的结果。
拿到校验的结果,就可以自定义的封装。
/**
    * 保存
    * BindResult,获取到校验的结果,以便自定义封装校验的结果。
    */
   @RequestMapping("/save")
   public R save(@Valid @RequestBody BrandEntity brand, BindingResult result) {


      // 自定义封装校验结果
      if (result.hasErrors()) {


         Map<String, String> map = new HashMap<>();
         //1.获取错误的校验结果
         result.getFieldErrors().forEach((item) -> {


            //获取发生错误时的提示message
            String message = item.getDefaultMessage();
            //获取发生错误属性的名字字段
            String field = item.getField();
            map.put(field, message);
         });
         // 将不合法的数据封装成一个map
         return R.error(400, "提交的数据不合法").put("data", map);
      } else {


         brandService.save(brand);
      }
      return R.ok();
      // 原始写法
//    brandService.save(brand);
//        return R.ok();
   }
对BrandEntity字段添加注解:
package com.xiaolun.gulimall.product.entity;

import com.baomidou.mybatisplus.annotation.TableId;
import com.baomidou.mybatisplus.annotation.TableName;

import java.io.Serializable;

import lombok.Data;
import org.hibernate.validator.constraints.URL;

import javax.validation.constraints.*;

/**
 * 品牌
 *
 * @author likunlun
 * @email [email protected]
 * @date 2021-01-04 16:04:32
 */
@Data
@TableName("pms_brand")
public class BrandEntity implements Serializable {


   private static final long serialVersionUID = 1L;

   /**
    * 品牌id
    */
   @TableId
   private Long brandId;
   /**
    * 品牌名
    */
   @NotBlank(message = "品牌名不能为空,必须提交")
   private String name;
   /**
    * 品牌logo地址
    * @NotBlank 这个注解的含义,是要求提交的数据中要包含logo字段;
    * @URL 要保证提交的URL地址是一个合法的URL地址(没有要求它不可以为null)。
    */
   @NotBlank
   @URL(message = "logo必须是一个合法的url地址")
   private String logo;
   /**
    * 介绍
    */
   private String descript;
   /**
    * 显示状态[0-不显示;1-显示]
    */
   private Integer showStatus;
   /**
    * 检索首字母
    * @Pattern 自定义的正则表达式只是规定了检索首字符的范围,
    * 对于有多少个字符并没有限定,需要后来进行更改。
    */
   @NotBlank
   @Pattern(regexp = "^[a-zA-Z]$",message = "检索首字母必须是一个字符")
   private String firstLetter;
   /**
    * 排序
    */
   @NotNull
   @Min(value = 0,message = "排序必须大于等于0")
   private Integer sort;
}
测试结果:

这种是针对于该请求设置了一个内容校验,如果针对于每个请求都单独进行配置,显然不是太合适,实际上可以统一的对于异常进行处理。
4、统一异常处理
(1)将Brand中的controller恢复为原始写法
@RequestMapping("/save")
public R save(@Valid @RequestBody BrandEntity brand) {


//		 原始写法
  brandService.save(brand);
  return R.ok();
}
(2)抽取公共异常处理类
package com.xiaolun.gulimall.product.exception;

/**
 * @time: 2021-01-14 21:23
 * @author: likunlun
 * @description: 集中处理所有注解
 */

import com.xiaolun.common.exception.BizCodeEnum;
import com.xiaolun.common.utils.R;
import lombok.extern.slf4j.Slf4j;
import org.springframework.validation.BindingResult;
import org.springframework.web.bind.MethodArgumentNotValidException;
import org.springframework.web.bind.annotation.ExceptionHandler;
import org.springframework.web.bind.annotation.RestControllerAdvice;

import java.util.HashMap;
import java.util.Map;

/**
 * 集中处理所有异常
 */
@Slf4j
@RestControllerAdvice(basePackages = "com.xiaolun.gulimall.product.controller")
public class GulimallExceptionAdvice {


   // @ExceptionHandler 表示能够处理的异常
   @ExceptionHandler(value = MethodArgumentNotValidException.class)
   public R handleValidException(MethodArgumentNotValidException exception) {


      Map<String, String> map = new HashMap<>();
      BindingResult bindingResult = exception.getBindingResult();
      bindingResult.getFieldErrors().forEach(fieldError -> {


         String message = fieldError.getDefaultMessage();
         String field = fieldError.getField();
         map.put(field, message);
      });
      log.error("数据校验出现问题{},异常类型{}", exception.getMessage(), exception.getClass());
      return R.error(400, "数据校验出现问题").put("data", map);
   }

   // 当上面的异常不能精确匹配到,就会来到该方法(大的异常处理类)
   @ExceptionHandler(value = Throwable.class)
   public R handleException(Throwable throwable) {


      log.error("未知异常{},异常类型{}", throwable.getMessage(), throwable.getClass());
      return R.error(BizCodeEnum.UNKNOW_EXEPTION.getCode(), BizCodeEnum.UNKNOW_EXEPTION.getMsg());
   }
}
对于错误状态码的理解:
上面代码中,针对于错误状态码,我们进行随意定义的,然而正规开发过程中,错误状态码有着严格的定义规则,如该在项目中错误状态码可以定义:
错误码和错误信息定义成一个类。错误码定义规则为5位数字,前两位表示业务场景,后三位表示错误码。比如:10001,10表示通用场景,001表示系统未知异常。将错误码定义为枚举类型,方便错误信息描述。
错误码列表:10:通用;11:商品;12:订单;13:购物车;14:物流。
(3)枚举类型-封装错误状态码
package com.xiaolun.common.exception;

/***
 *  * @time: 2021-01-14 21:38
 *  * @author: likunlun
 *  * @description: 错误码枚举类型
 * 错误码和错误信息定义类
 * 1. 错误码定义规则为5为数字
 * 2. 前两位表示业务场景,最后三位表示错误码。例如:100001。10:通用 001:系统未知异常
 * 3. 维护错误码后需要维护错误描述,将他们定义为枚举形式
 * 错误码列表:
 *  10: 通用
 *      001:参数格式校验
 *  11: 商品
 *  12: 订单
 *  13: 购物车
 *  14: 物流
 */
public enum BizCodeEnum {


   // 枚举类型是一个私有构造器,可以用来封装状态码。
   UNKNOW_EXEPTION(10000, "系统未知异常"),
   VALID_EXCEPTION(10001, "参数格式校验失败");

   private int code;
   private String msg;

   BizCodeEnum(int code, String msg) {


      this.code = code;
      this.msg = msg;
   }

   public int getCode() {


      return code;
   }

   public String getMsg() {


      return msg;
   }
}
测试:

3、分组校验
主要完成多场景的复杂校验。
1、创建分组标识
(1)增加情况
package com.xiaolun.common.valid;

/**
 * @time: 2021-01-14 21:58
 * @author: likunlun
 * @description: 新增接口
 */
public interface AddGroup {


}
(2)修改情况
package com.xiaolun.common.valid;

/**
 * @time: 2021-01-14 21:58
 * @author: likunlun
 * @description: 修改接口
 */
public interface UpdateGroup {


}
2、给校验注解标注上groups,指定该注解什么情况下需要进行校验。
package com.xiaolun.gulimall.product.entity;

import com.baomidou.mybatisplus.annotation.TableId;
import com.baomidou.mybatisplus.annotation.TableName;
import com.xiaolun.common.valid.AddGroup;
import com.xiaolun.common.valid.UpdateGroup;
import lombok.Data;
import org.hibernate.validator.constraints.URL;

import javax.validation.constraints.*;
import java.io.Serializable;

/**
 * 品牌
 *
 * @author likunlun
 * @email [email protected]
 * @date 2021-01-04 16:04:32
 */
@Data
@TableName("pms_brand")
public class BrandEntity implements Serializable {


   private static final long serialVersionUID = 1L;

   /**
    * 品牌id
    */
   @Null(message = "新增操作时,不能指定id", groups = {

    AddGroup.class})
   @NotNull(message = "修改必须指定品牌id", groups = {

    UpdateGroup.class})
   @TableId
   private Long brandId;
   /**
    * 品牌名
    * 在修改和更新时都需要校验
    */
   @NotBlank(message = "品牌名不能为空,必须提交", groups = {

    AddGroup.class, UpdateGroup.class})
   private String name;
   /**
    * 品牌logo地址
    *
    * @NotBlank 这个注解的含义,是要求提交的数据中要包含logo字段;
    * @URL 要保证提交的URL地址是一个合法的URL地址(没有要求它不可以为null)。
    */
   @NotBlank(groups = {

    AddGroup.class})
   @URL(message = "logo必须是一个合法的url地址", groups = {

    AddGroup.class, UpdateGroup.class})
   private String logo;
   /**
    * 介绍
    */
   private String descript;
   /**
    * 显示状态[0-不显示;1-显示]
    */
   private Integer showStatus;
   /**
    * 检索首字母
    *
    * @Pattern 自定义的正则表达式只是规定了检索首字符的范围,
    * 对于有多少个字符并没有限定,需要后来进行更改。
    */
   @NotBlank(groups = {

    AddGroup.class})
   @Pattern(regexp = "^[a-zA-Z]$", message = "检索首字母必须是一个字符", groups = {

    AddGroup.class, UpdateGroup.class})
   private String firstLetter;
   /**
    * 排序
    */
   @NotNull(groups = {

    AddGroup.class})
   @Min(value = 0, message = "排序必须大于等于0", groups = {

    AddGroup.class, UpdateGroup.class})
   private Integer sort;

}
3、业务方法参数上使用@Validated注解指定分组
	/**
	 * 保存
	 *
	 * @Validated 中可以指定class进行校验
	 */
	@RequestMapping("/save")
	public R save(@Validated({

    AddGroup.class}) @RequestBody BrandEntity brand) {


//		 原始写法
		brandService.save(brand);
		return R.ok();
	}

	/**
	 * 修改
	 */
	@RequestMapping("/update")
	public R update(@RequestBody @Validated({

    UpdateGroup.class}) BrandEntity brand) {


		brandService.updateById(brand);
		return R.ok();
	}

默认没有指定分组的校验注解,比如@NotNull,在分组校验下不生效,只会在@Validated(此时默认为未分组)中生效。同理,在BrandEntity中指定分组校验时,但是在Controller中只使用@Validated注解而未非组时,BrandEntity中指定的分组校验不起作用。
4、自定义校验注解
1、编写一个自定义的校验注解
common中添加注解依赖:
<!--添加注解依赖-->
<dependency>
  <groupId>javax.validation</groupId>
  <artifactId>validation-api</artifactId>
</dependency>
自定义校验注解:
package com.xiaolun.common.valid;

import javax.validation.Constraint;
import javax.validation.Payload;
import java.lang.annotation.Documented;
import java.lang.annotation.Retention;
import java.lang.annotation.Target;

import static java.lang.annotation.ElementType.*;
import static java.lang.annotation.RetentionPolicy.RUNTIME;

//validatedBy关联自定义的校验器和自定义的校验注解
@Documented
@Constraint(validatedBy = {

    ListValueConstraintValidator.class})
@Target({

    METHOD, FIELD, ANNOTATION_TYPE, CONSTRUCTOR, PARAMETER, TYPE_USE})
@Retention(RUNTIME)
public @interface ListValue {


   String message() default "{com.xiaolun.common.valid.ListValue.message}";

   Class<?>[] groups() default {

    };

   Class<? extends Payload>[] payload() default {

    };

   // 指定两个值0,1,已经配置到 private Integer showStatus;中了
   int[] value() default {

    };
}
ValidationMessages.properties文件中封装着message信息:
com.xiaolun.common.valid.ListValue.message=必须提交指定的值
2、编写一个自定义的校验器
package com.xiaolun.common.valid;

import javax.validation.ConstraintValidator;
import javax.validation.ConstraintValidatorContext;
import java.util.HashSet;
import java.util.Set;

/**
 * @time: 2021-01-14 22:31
 * @author: likunlun
 * @description: 自定义的校验器
 * ListValue 注解;Integer 是 private Integer showStatus;中数据类型
 */
public class ListValueConstraintValidator implements ConstraintValidator<ListValue, Integer> {


   // 只能为0/1,所以使用集合
   private Set<Integer> set = new HashSet<>();

   /**
    * 初始化方法
    * 将注解ListValue的详细信息返回
    */
   @Override
   public void initialize(ListValue constraintAnnotation) {


      int[] value = constraintAnnotation.value();
      for (int i : value) {


         set.add(i);
      }
   }

   /**
    * @param value 表示前端将数据showStatus提交给后端,需要校验的值。校验成功返回true。
    * @param context
    * @return
    */
   @Override
   public boolean isValid(Integer value, ConstraintValidatorContext context) {


      return set.contains(value);
   }
}
3、关联自定义的校验器和自定义的校验注解
@Constraint(validatedBy = {

    ListValueConstraintValidator.class})
validatedBy中可以指定多个不同的校验器。
4、使用案例
/**
 * 显示状态[0-不显示;1-显示]
 * 自定义注解,value = {0,1} 标识只能使用0/1
 */
@ListValue(value = {

    0,1},groups ={

    AddGroup.class})
private Integer showStatus;
测试:

打开前端VSCode界面进行前后端联调,在品牌管理中进行新增操作,点击确定后,返回操作成功:

但是在点击显示状态按钮时,控制端会报错,因为前端发送给后台的数据只有两个,分别是brandId和showStatus:

找到下面的请求地址,并找到对应的UpdateGroup分组:
@RequestMapping("/update")
public R update(@Validated({

    UpdateGroup.class}) @RequestBody BrandEntity brand) {


  brandService.updateById(brand);
  return R.ok();
}
但是,传来的数据没有品牌名,品牌名不能为空,会有报错产生。
5、解决方法
为更新状态添加分组,为状态更新只设定一个请求的url。
(1)新增分组
package com.xiaolun.common.valid;

/**
 * @time: 2021-01-14 22:56
 * @author: likunlun
 * @description: 修改状态的一个接口标识
 */
public interface UpdateStatusGroups {


}
(2)新增url
/**
* 修改状态
* 校验品牌id 和显示状态
*/
@RequestMapping("/update/status")
public R updateStatus(@Validated({

    UpdateStatusGroups.class}) @RequestBody BrandEntity brand) {


  brandService.updateById(brand);
  return R.ok();
}
(3)实体类
@NotNull(groups = {

    AddGroup.class, UpdateStatusGroups.class})
@ListValue(value = {

    0, 1}, groups = {

    AddGroup.class, UpdateStatusGroups.class})
private Integer showStatus;
后台对发来的请求,只会校验showStatus字段,对品牌名等不会校验。
(4)前端修改请求URL(+ status)
updateBrandStatus(data) {
  this.$http({
  	url: this.$http.adornUrl("/product/brand/update/status"),
}
4、属性分组
1、介绍
1、概述
(1)SPU和SKU
SPU(Standard Product Unit)标准化产品单元是商品信息聚合的最小单位,是一组复用、易检索的标准化信息的集合,该集合描述了一个产品的特性。
SKU(Stock Keeping Unit)库存量单位是库存进出计量的基本单元,可以以件、盒和托盘为单位。它是对于大型连锁超市DC(配送中心)物流管理的一个必要方法。现在已经被引申为产品统一编号的简称,每种产品均对应有一个唯一的SKU号。
(2)基本属性(规格参数)与销售属性
属性是以三级分类组织起来的,属性名是确定的,但是值是每一个不同商品来决定的,规格参数中有些是可以提供检索的。
2、数据库表结构


2、前端组件抽取和父子组件交互
1、介绍
用户可以根据接口文档信息进行前后端联调,文档地址如下:
https://easydoc.xyz/s/78237135/ZUqEdvA4/OXTgKobR
Element组件地址:
https://element.eleme.cn/#/zh-CN
结合组件,可以在脚手架已经搭好的工程上完成用户需求。
属性分组效果:

前端最后结果展示:

2、抽取工具类
(1)抽取成工具类common

(2)引入generator生成的文件modules\product-bk\attrgroup-add-or-update.vue

3、子组件向父组件发送事件
(1)子组件传递信息

(2)父组件接收信息

3、获取分类属性分组
(1)前端发送响应

(2)后端响应

4、新增分组-级联选择器
1、效果

为了让级联选择器只有三层,需要过滤[ ]数据:

5、分组修改-级联选择器回显
1、回显数据效果图

2、修改代码
(1)前端代码

(2)后端代码

用到了递归查询。
5、品牌管理
1、品牌分类关联与级联更新
1、保存数据

实现代码如下,这里为了不影响mysql的性能,不使用到两个表之间的关联查询。

2、级联更新

实现效果如下:
(1)修改品牌管理目录中的品牌名,导致关联分类也进行修改


(2)修改分类维护目录中的手机类,关联分类也进行修改


6、平台属性
1、规格参数新增与VO
1、模糊查询
(1)前端发送请求
http://localhost:88/api/product/attrgroup/list/0?t=1615553273521&page=1&limit=10&key=
(2)修改后端代码,使其具有模糊查询功能

(3)前端显示

2、新增VO实体类
(1)规格参数点击新增时的URL地址

(2)新建AttrVo
(3)AttrVo接收前端传递过来的数据

(4)对应数据库表的级联修改

注意:如果属性分组在新增的时候,没有填写,就不会新建关联关系,对应下面的“规格参数修改”中的第一种(新增关联关系)情况。
(5)结果展示

2、获取规格参数列表
1、操作
(1)修改后端代码
3、规格参数修改
1、操作
(1)后端对应代码

点击规格参数中的某一行数据进行修改时,会出现下面的界面。

后台代码对应两种情况,第一种情况:由于没有关联关系,我们需要对该行数据进行新增操作;反之,是修改操作。

4、销售属性维护
1、操作
(1)后端代码

销售属性不存在分组设置。
(2)前端展示

5、查询/删除属性分组关联规格参数
1、查询操作
(1)前端展示

点击关联后的效果:

规格参数界面展示:

(2)后端代码

(3)数据库关系

2、删除操作
(1)后端代码


(2)数据库代码


使用到的SQL语句,以及分隔符separator=“ or ”的原因:

6、查询分组未关联的属性
1、操作
(1)后台代码

(2)前端展示
当前分组能够关联的是本分类下的没有被其他分组关联的属性,分组只关联规格参数属性,不关联销售属性。

查询关联

(3)数据库操作
属性表pms_attr

属性分组表pms_attr_group

关联表pms_attr_attrgroup_relation

此时,只有属性表中“入市年份”没有关联。
7、新增分组与属性关联
1、操作
(1)前端界面

(2)后端代码

7、商品维护
1、获取会员等级相关接口
1、操作
(1)运行后台会员代码gulimall-member
(2)前端操作
访问路径:
http://localhost:88/api/member/memberlevel/list?t=1615724444302&page=1&limit=10&key=
界面显示

(3)数据库ums_member_level界面

2、获取分类关联的品牌
1、操作
(1)前端

前端在选择三级分类后,向后台发送请求,当查询到数据后,可以在”选择品牌“这里进行选择:

(2)后端

(3)数据库

3、获取分类下所有分组及属性
1、操作
(1)前端界面

路径地址:
/product/attrgroup/{catelogId}/withattr
(2)后端代码

4、VO抽取
1、操作
(1)前端界面

发送保存请求:
http://localhost:88/api/product/spuinfo/save
前端向后端发送的数据内容:
{


  "spuName": "华为 HUAWEI Mate 40 Pro",
  "spuDescription": "华为 HUAWEI Mate 40 Pro-商品描述",
  "catalogId": 225,
  "brandId": 14,
  "weight": 0,
  "publishStatus": 0,
  "decript": [
    "https://gulimall-xiaolun.oss-cn-beijing.aliyuncs.com/2021-03-14/d8a06f65-1990-4349-86ee-513398dc1bd4_5b5e74d0978360a1.jpg"
  ],
  "images": [
    "https://gulimall-xiaolun.oss-cn-beijing.aliyuncs.com/2021-03-14/496c1b99-371c-45b5-8237-f65a6c64004f_5b5e74d0978360a1.jpg",
    "https://gulimall-xiaolun.oss-cn-beijing.aliyuncs.com/2021-03-14/04ad3ac8-a847-4c7b-8de0-8b8b8c7f51e3_6a1b2703a9ed8737.jpg"
  ],
  "bounds": {


    "buyBounds": 0,
    "growBounds": 0
  },
  "baseAttrs": [
    {


      "attrId": 7,
      "attrValues": "白色;黑色",
      "showDesc": 0
    },
    {


      "attrId": 8,
      "attrValues": "A2020",
      "showDesc": 1
    }
  ],
  "skus": [
    {


      "attr": [
        {


          "attrId": 11,
          "attrName": "颜色",
          "attrValue": "黑色"
        },
        {


          "attrId": 12,
          "attrName": "内存",
          "attrValue": "6GB"
        }
      ],
      "skuName": "华为 HUAWEI Mate 40 Pro 黑色 6GB",
      "price": 0,
      "skuTitle": "华为 HUAWEI Mate 40 Pro 黑色 6GB",
      "skuSubtitle": "",
      "images": [
        {


          "imgUrl": "",
          "defaultImg": 0
        },
        {


          "imgUrl": "https://gulimall-xiaolun.oss-cn-beijing.aliyuncs.com/2021-03-14/04ad3ac8-a847-4c7b-8de0-8b8b8c7f51e3_6a1b2703a9ed8737.jpg",
          "defaultImg": 1
        }
      ],
      "descar": [
        "黑色",
        "6GB"
      ],
      "fullCount": 0,
      "discount": 0,
      "countStatus": 0,
      "fullPrice": 0,
      "reducePrice": 0,
      "priceStatus": 0,
      "memberPrice": [
        {


          "id": 2,
          "name": "铜牌会员",
          "price": 0
        },
        {


          "id": 3,
          "name": "银牌等级",
          "price": 0
        }
      ]
    },
    {


      "attr": [
        {


          "attrId": 11,
          "attrName": "颜色",
          "attrValue": "黑色"
        },
        {


          "attrId": 12,
          "attrName": "内存",
          "attrValue": "8GB"
        }
      ],
      "skuName": "华为 HUAWEI Mate 40 Pro 黑色 8GB",
      "price": 0,
      "skuTitle": "华为 HUAWEI Mate 40 Pro 黑色 8GB",
      "skuSubtitle": "",
      "images": [
        {


          "imgUrl": "",
          "defaultImg": 0
        },
        {


          "imgUrl": "",
          "defaultImg": 0
        }
      ],
      "descar": [
        "黑色",
        "8GB"
      ],
      "fullCount": 0,
      "discount": 0,
      "countStatus": 0,
      "fullPrice": 0,
      "reducePrice": 0,
      "priceStatus": 0,
      "memberPrice": [
        {


          "id": 2,
          "name": "铜牌会员",
          "price": 0
        },
        {


          "id": 3,
          "name": "银牌等级",
          "price": 0
        }
      ]
    },
    {


      "attr": [
        {


          "attrId": 11,
          "attrName": "颜色",
          "attrValue": "白色"
        },
        {


          "attrId": 12,
          "attrName": "内存",
          "attrValue": "6GB"
        }
      ],
      "skuName": "华为 HUAWEI Mate 40 Pro 白色 6GB",
      "price": 0,
      "skuTitle": "华为 HUAWEI Mate 40 Pro 白色 6GB",
      "skuSubtitle": "",
      "images": [
        {


          "imgUrl": "",
          "defaultImg": 0
        },
        {


          "imgUrl": "",
          "defaultImg": 0
        }
      ],
      "descar": [
        "白色",
        "6GB"
      ],
      "fullCount": 0,
      "discount": 0,
      "countStatus": 0,
      "fullPrice": 0,
      "reducePrice": 0,
      "priceStatus": 0,
      "memberPrice": [
        {


          "id": 2,
          "name": "铜牌会员",
          "price": 0
        },
        {


          "id": 3,
          "name": "银牌等级",
          "price": 0
        }
      ]
    },
    {


      "attr": [
        {


          "attrId": 11,
          "attrName": "颜色",
          "attrValue": "白色"
        },
        {


          "attrId": 12,
          "attrName": "内存",
          "attrValue": "8GB"
        }
      ],
      "skuName": "华为 HUAWEI Mate 40 Pro 白色 8GB",
      "price": 0,
      "skuTitle": "华为 HUAWEI Mate 40 Pro 白色 8GB",
      "skuSubtitle": "",
      "images": [
        {


          "imgUrl": "",
          "defaultImg": 0
        },
        {


          "imgUrl": "",
          "defaultImg": 0
        }
      ],
      "descar": [
        "白色",
        "8GB"
      ],
      "fullCount": 0,
      "discount": 0,
      "countStatus": 0,
      "fullPrice": 0,
      "reducePrice": 0,
      "priceStatus": 0,
      "memberPrice": [
        {


          "id": 2,
          "name": "铜牌会员",
          "price": 0
        },
        {


          "id": 3,
          "name": "银牌等级",
          "price": 0
        }
      ]
    }
  ]
}
(2)后端代码
将上面的传送数据通过Json生成Java实体类功能生成相应的Vo:

访问网址:
http://www.bejson.com/
具体实现类:

(3)数据库
pms_attr表中销售属性

pms_sku_sale_attr_value表sku销售属性拼接笛卡尔积:

pms_sku_info信息表:

pms_spu_info信息表:

pms_brand表:

pms_sku_images表中:

https://gulimall-xiaolun.oss-cn-beijing.aliyuncs.com/2021-03-14/04ad3ac8-a847-4c7b-8de0-8b8b8c7f51e3_6a1b2703a9ed8737.jpg

https://gulimall-xiaolun.oss-cn-beijing.aliyuncs.com/2021-03-14/d8a06f65-1990-4349-86ee-513398dc1bd4_5b5e74d0978360a1.jpg
5、商品保存debug完成
1、设置服务启动内存

并将每个服务最大占用内存设置为:100M:

2、debug调试

由于在实现方法上添加了事务注解@Transactional,只有该方法执行完毕,才能看到数据库中的结果,可以通过在数据库中执行下面的语句查看数据库中数据变化:
set session transaction isolation level read uncommitted;
8、商品管理
1、SPU检索
1、前端操作
(1)界面展示

访问路径:
http://localhost:88/api/product/spuinfo/list?t=1616764131245&page=1&limit=10
2、后端操作
(1)代码

2、SKU检索
1、前端操作
(1)界面展示

访问地址:
http://localhost:88/api/product/skuinfo/list?t=1616765101721&page=1&limit=10&key=&catelogId=225&brandId=14&min=0&max=6000
2、后端操作
(1)代码

9、仓库管理
1、整合ware服务并获取仓库列表
1、前端界面

访问地址:
http://localhost:88/api/ware/wareinfo/list?t=1616765618991&page=1&limit=10&key=
2、后端操作
(1)代码

2、查询库存
1、前端操作

访问地址:
http://localhost:88/api/ware/waresku/list?t=1616766246468&page=1&limit=10&skuId=&wareId=
2、后端操作
查询某个sku在某个库存,保存的数量。

3、查询采购需求
1、前端操作

访问路径:
http://localhost:88/api/ware/purchasedetail/list?t=1616766427918&page=1&limit=10&key=&status=&wareId=
2、后端操作
(1)介绍
所有的商品库存应该是采购完成之后自动加上去的,不是手动添加的。
采购单由采购需求来支配,采购需求创建有下面两种方式:
-
人工在后台建立采购需求;
-
系统自动发出低库存预警,并且创建出了采购需求(自动化)。
(2)代码

4、合并采购需求
1、操作
采购流程图:

(1)新增采购单

展示界面:

上面的采购人姓名来自于管理员列表:

(2)分配采购人员

展示界面:

(3)查询所有新建/已分配(未出发)的采购单

访问网址:
http://localhost:88/api/ware/purchase/unreceive/list?t=1616767337903
在采购需求界面点击“批量操作”,会有一个“合并整单”,需要查出采购单中"新建"/已分配状态的或者(表示还没有被领取的采购单)。一旦给某个人“已分配”采购单,并且这个人“领取”了采购单,说明这个人已经出发了这个采购单就固定了,就不能再向这个采购单添加新内容了。

(4)点击合并需求
访问网址:
http://localhost:88/api/ware/purchase/merge

请求参数:
{purchaseId: 1, items: [10, 11]}
后端代码:

在采购需求中,当没有分配采购人员的时候,将会触发新建一个采购单。

新建的采购单界面:

5、领取采购单
1、操作
在手机APP等其他自应用软件,可以看到当前分配给他的所有采购单,该采购人员选择采购单点击确认领取,出去采购,此时,要改变采购单状态。同时,已经被领取的采购单在采购需求中就不能在进行分配了,此时状态变成“已采购”。当采购单完成的时候,点击已完成。
(1)领取采购单
访问网址:
http://localhost:88/api/ware/purchase/received

后端代码:

当采用上面的http网址通过postman向后端(采购单id=1)发送请求,此时对应的采购单状态变成"已领取",采购需求界面对应的采购单(采购单id=1)状态变为“正在采购”。
采购单变成已领取:

采购需求变成正在采购:

6、完成采购
1、前端操作
采购人员在采购单任务后,点击已完成,之后,采购需求中的采购单id、采购商品id和采购数量就会确认,这些数量就会加到库存里面中去。
访问网址:
http://localhost:88/api/ware/purchase/done

# 请求参数 采购单id=4;三个采购项(10,11,12);3表示已完成;不用写原因
{"id":4,"items": [
        {"itemId": 10,"status": 3,"reason": ""},
        {"itemId": 11,"status": 3,"reason": ""},
        {"itemId": 12,"status": 3,"reason": ""}
    ]
}
(1)根据商品管理中的skuid创建采购需求

创建采购需求:

将上述创建的三个采购需求合并放到一个整单上:

(2)采购单显示

分配采购人员:

(3)采购人员接收(领取)采购单
使用postman进行模拟。

采购单状态改变:


(4)采购人员完成采购单

采购单状态发生改变:


商品库存发生改变:

2、后端代码

如果没有库存记录,对应新增操作;反之,对应更新操作。
10、SPU规格维护
1、操作-查询
(1)前端

访问路径:
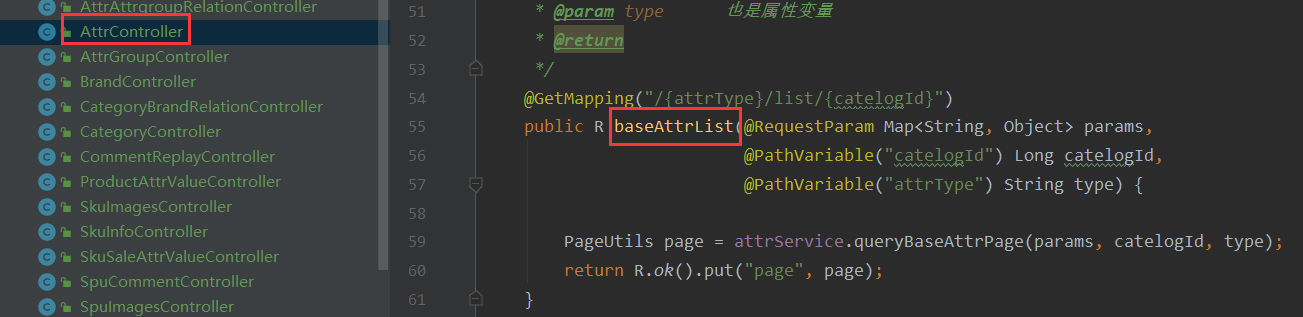
http://localhost:88/api/product/attr/base/listforspu/1
进入界面:

(2)后端-查询

2、操作-更新
(1)前端操作


访问网址:
http://localhost:88/api/product/attr/update/1

//携带参数
0: {attrId: 7, attrName: "机身颜色", attrValue: "白色", quickShow: 0}
1: {attrId: 8, attrName: "入网型号", attrValue: "B2021", quickShow: 0}
(2)后端操作
 11
11
11、分布式基础篇总结
327143708765.png" alt=“image-20210327143708765” style=“zoom:33%;” />
(4)采购人员完成采购单
采购单状态发生改变:
商品库存发生改变:
2、后端代码
如果没有库存记录,对应新增操作;反之,对应更新操作。
10、SPU规格维护
1、操作-查询
(1)前端
访问路径:
http://localhost:88/api/product/attr/base/listforspu/1
进入界面:
(2)后端-查询
2、操作-更新
(1)前端操作
访问网址:
http://localhost:88/api/product/attr/update/1

//携带参数
0: {attrId: 7, attrName: "机身颜色", attrValue: "白色", quickShow: 0}
1: {attrId: 8, attrName: "入网型号", attrValue: "B2021", quickShow: 0}
(2)后端操作
11
11、分布式基础篇总结
