Manim文档及源码笔记-CE教程BE05英文笔记速览版
Interactivity _ Mathematical Animations WITH EASE
前言
这次筛选到了Behackl博士的教程,逐步拆解,更为细腻~
参考视频在此【或请自行搜索上面的英文标题】;
本页中文版传送门【建设中】;
更新【new】:
- 8月23日
-
- 文首标注了“前言”与“正文”;
-
- 本系列暂告段落,升级了系列目录,放到了文尾;
- 后续更新备忘:文中“【建设中】”的内容;欢迎朋友们催更~
首先,国际通则:Just GET STARTED~ JUST DO IT~
然后,让我们行动起来~
注:
1、代码实践过程根据运行环境及笔记需要略有改动;
2、经过实践理解,加入了一些自己的注释;
3、常见问题及大概率解决方案:
- Python相关:注意缩进、冒号,中英文字符、大小写;
- Manim相关:安装与运行环境;
- Coding相关:检查拼写;
正文
The OpenGL renderer and You
- Different rendering backend( default: Cairo), can utilize GPU
- Activate using --renderer=opengl or by setting config.renderer=“openg”
- Warning: user experience can be somewhat rough
- OpenGL-Mobjects have a different interface( e.g., they inherit from OpenGLMobject instead of Mobject), but most users facing mobjects( Dot, Axes, …) can ben used without changes
- (minor) differences for 3D mobjects, camera control, CLI flags
%%manim -v WARNING -qm -p --renderer=opengl OpenGLIntro
from manim import *
from manim.opengl import *

class OpenGLIntro(Scene):
    def construct(self):
        hello_world=Tex("Hello world!").scale(3)
        self.play(Write(hello_world))
        self.play(
            self.camera.animate.set_euler_angles(
                theta=-10*DEGREES,
                phi=50*DEGREES
            )
        )
        self.play(FadeOut(hello_world))
%%manim -v WARNING -qm -p --renderer=opengl OpenGLIntro1
from manim import *
from manim.opengl import *

class OpenGLIntro1(Scene):
    def construct(self):
        hello_world=Tex("Hello world!").scale(3)
        self.play(Write(hello_world))
        self.play(
            self.camera.animate.set_euler_angles(
                theta=-10*DEGREES,
                phi=50*DEGREES
            )
        )
        self.play(FadeOut(hello_world))
        surface=OpenGLSurface(
            lambda u,v: (u,v,u*np.sin(v)+v*np.cos(u)),
            u_range=(-3,3),
            v_range=(-3,3)
        )
        surface_mesh=OpenGLSurfaceMesh(surface)
        self.play(Create(surface_mesh))
        self.play(FadeTransform(surface_mesh,surface))
        self.wait()
%%manim -v WARNING -qm -p --renderer=opengl OpenGLIntro2
from manim import *
from manim.opengl import *

class OpenGLIntro2(Scene):
    def construct(self):
        hello_world=Tex("Hello world!").scale(3)
        self.play(Write(hello_world))
        self.play(
            self.camera.animate.set_euler_angles(
                theta=-10*DEGREES,
                phi=50*DEGREES
            )
        )
        self.play(FadeOut(hello_world))
        surface=OpenGLSurface(
            lambda u,v: (u,v,u*np.sin(v)+v*np.cos(u)),
            u_range=(-3,3),
            v_range=(-3,3)
        )
        surface_mesh=OpenGLSurfaceMesh(surface)
        self.play(Create(surface_mesh))
        self.play(FadeTransform(surface_mesh,surface))
        self.wait()

        light=self.camera.light_source
        self.play(light.animate.shift([0,0,-20]))
        self.play(light.animate.shift([0,0,10]))
        self.play(self.camera.animate.set_euler_angles(theta=60*DEGREES))
        self.wait()
Live render preview
- CLI behavior is a bit different( subject to change):
-
- -p / --preview shows a live render preview
-
- –write_to_movie must be passed to obtain a file
- We can interact with the preview window: add
self.interactive_embed() to end of construct! - This halts the preview and spawns an IPython terminal in which further commands can be run -interactive construct
- Scene class is available as self; until #2669 is resolved use animation methods without self. -play, wait
%%manim -v WARNING -qm -p --renderer=opengl OpenGLIntro3
from manim import *
from manim.opengl import *

class OpenGLIntro3(Scene):
    def construct(self):
        hello_world=Tex("Hello world!").scale(3)
        self.play(Write(hello_world))
        self.play(
            self.camera.animate.set_euler_angles(
                theta=-10*DEGREES,
                phi=50*DEGREES
            )
        )
        self.play(FadeOut(hello_world))
        surface=OpenGLSurface(
            lambda u,v: (u,v,u*np.sin(v)+v*np.cos(u)),
            u_range=(-3,3),
            v_range=(-3,3)
        )
        surface_mesh=OpenGLSurfaceMesh(surface)
        self.play(Create(surface_mesh))
        self.play(FadeTransform(surface_mesh,surface))
        self.wait()

        light=self.camera.light_source
        self.play(light.animate.shift([0,0,-20]))
        self.play(light.animate.shift([0,0,10]))
        self.play(self.camera.animate.set_euler_angles(theta=60*DEGREES))
        #self.wait()
        self.interactive_embed()
得到如下提示后,可以在对话框内输入命令:

以下可以逐行测试,体验即时交互模式:
play(self.camera.animate.set_euler_angles(theta=0*DEGREES))
play(FadeOut(surface, shift-np.array([0,0,-2])))
red_sphere=Sphere(color=RED)
play(Create(red_sphere))
play(red_sphere.animate.scale(3))
sphere_mesh=OpenGLSurfaceMesh(red_sphere)
play(Transform(red_sphere, sphere_mesh))
(有可能会坏掉~)
Interacting with the render preview
- Preview window is a pyglet window, supports interaction- some defaults are implemented
- Mouse interaction
-
- shift+move mouse: move camera( in plane of frame)
-
- right mouse button drag: move camera( in XY plane)
-
- left mouse button drag: changing camera angles
-
- mouse scroll: zoom in and out
- Keyboard interaction
-
- r: reset camera position, q: quit interaction mode
上面代码在执行到最后,可以在窗口窗口中用鼠标和键盘做相应控制(不必多写其它代码)。
Custom interactions: relevant methods and mobjects
- Mouse:
-
- Methods: Scene.on_mouse_motion, Scene.on_mouse_scroll, Scene.on_mouse_drag
-
- Mobjects Scene.mouse_point, Scene.mouse_drag_point hold coordinates of mouse on preview window
-
- By default middle top of window is [0,4,0], regardless of camera orientation
- Keyboard methods: Scene.on_key_press, Scene.on_key_release
Custom interactions: Key press example
- For readability: use pyglet’s key constants
- Bitwise operations & | for modifier checks
class KeyboardInteract(Scene):
    def construct(self):
        ...
        self.interactive_embed()

    def on_key_press(self, symbol, modifiers):
        from pyglet.window import key as pyglet_key
        if symbol == pyglet_key.X:
            # X is pressed
            self.play(...)

        if symbol == pyglet_key.SPACE and modifiers & pyglet_key.MOD_CTRL:
            # CTRL is held down and spacebar is pressed
            self.play(...)

        super().on_key_press(symbol, modifiers)
以下案例需要在.py文件(比如05.py)执行,如果在.ipynb时用-qm,播放窗口分别率和比例都会有些问题(或者改为-qh):
from manim import *
from manim.opengl import *

class InteractiveRadius(Scene):
    def construct(self):
        plane=NumberPlane()
        cursor_dot=Dot().move_to(3*RIGHT+2*UP)
        red_circle=Circle(
            radius=np.linalg.norm(cursor_dot.get_center()),
            color=RED
        )
        red_circle.add_updater(
            lambda mob: mob.become(
                Circle(
                    raidus=np.linalg.norm(cursor_dot.get_center()),
                    color=RED
                )
            )
        )
        self.play(Create(plane),Create(red_circle),FadeIn(cursor_dot))
        self.cursor_dot=cursor_dot
        self.interactive_embed()

    def on_key_press(self, symbol, modifiers):
        from pyglet.window import key as pyglet_key
        if symbol == pyglet_key.G:
            self.play(
                self.cursor_dot.animate.move_to(self.mouse_point.get_center())
            )
        super().on_key_press(symbol, modifiers)
执行后输入以下命令行即可:
manim -qm -p --renderer=opengl 05.py InteractiveRadius
%%manim -v WARNING -qh -p --renderer=opengl  NewtonIteration
from manim import *
from manim.opengl import *

class NewtonIteration(Scene):
    def construct(self):
        self.axes=Axes()
        self.f=lambda x: (x+6)*(x+3)*x*(x-3)*(x-6)/300
        curve=self.axes.plot(self.f, color=RED)
        self.cursor_dot=Dot(color=YELLOW)
        self.play(Create(self.axes),Create(curve),FadeIn(self.cursor_dot))
        self.interactive_embed()

    def on_key_press(self, symbol, modifiers):
        from pyglet.window import key as pyglet_key
        from scipy.misc import derivative
        if symbol==pyglet_key.P:
            x,y=self.axes.point_to_coords(self.mouse_point.get_center())
            self.play(
                self.cursor_dot.animate.move_to(self.axes.c2p(x,self.f(x)))
            )


        super().on_key_press(symbol, modifiers)
%%manim -v WARNING -qh -p --renderer=opengl NewtonIteration1
from manim import *
from manim.opengl import *
class NewtonIteration1(Scene):
def construct(self):
self.axes=Axes()
self.f=lambda x: (x+6)*(x+3)*x*(x-3)*(x-6)/300
curve=self.axes.plot(self.f, color=RED)
self.cursor_dot=Dot(color=YELLOW)
self.play(Create(self.axes),Create(curve),FadeIn(self.cursor_dot))
self.interactive_embed()
def on_key_press(self, symbol, modifiers):
from pyglet.window import key as pyglet_key
from scipy.misc import derivative
if symbol==pyglet_key.P:
x,y=self.axes.point_to_coords(self.mouse_point.get_center())
self.play(
self.cursor_dot.animate.move_to(self.axes.c2p(x,self.f(x)))
)
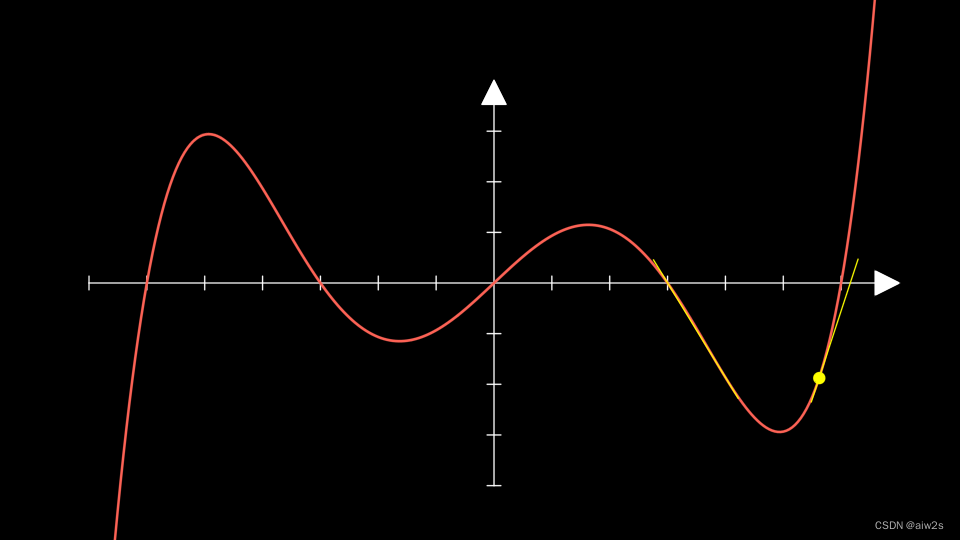
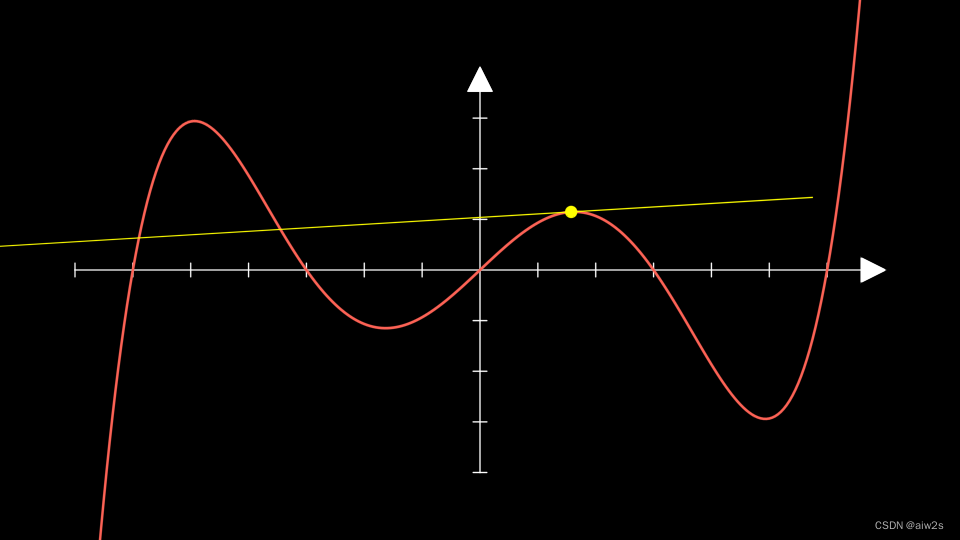
if symbol==pyglet_key.I:
x,y=self.axes.point_to_coords(self.cursor_dot.get_center())
# Newton iteration: x_new=x-f(x)/f'(x)
x_new=x-self.f(x)/derivative(self.f,x,dx=0.01)
curve_point=self.cursor_dot.get_center()
axes_point=self.axes.c2p(x_new,0)
tangent=Line(
curve_point+(curve_point-axes_point)*0.25,
axes_point+(axes_point-curve_point)*0.25,
color=YELLOW,
stroke_width=2,
)
self.play(Create(tangent))
self.paly(self.cursor_dot.animate.move_to(self.axes.c2p(x_new,0)))
self.play(
self.cursor_dot.animate.move_to(self.axes.c2p(x_new,self.f(x_new))),
FadeOut(tangent)
)
super().on_key_press(symbol, modifiers)
鼠标移动到窗口任意位置,按P键得到曲线上的点,然后按I键可以做其切线;
常见问题:
1、在视频播放窗口中,按r键可以复位;
2、关闭时,先按q键退出视频窗口,再按Esc键退出Jupyter交互模式;

本系列目录【new】
Manim文档及源码笔记-CE教程BE01英文笔记速览版
Manim文档及源码笔记-CE教程BE02英文笔记速览版
Manim文档及源码笔记-CE教程BE03英文笔记速览版
Manim文档及源码笔记-CE教程BE04英文笔记速览版
Manim文档及源码笔记-CE教程BE05英文笔记速览版【本文】